
User Guide
Page 6
... 60 Operating a PTZ Camera 60 5 System Administration and Troubleshooting 65 System Administration Using the Controller LCD 65 Logging in and Navigating to the System Configuration Menu 65 Setting the Screen Language 65 Restore Default 66 Updating the Touch Pad Firmware 66 Viewing the Firmware Version 66 Testing the Hardware 66 System Administration Using the Web Browser 67 Logging into the Web Browser 67 Upgrading the UltraKey Touch Firmware 67 Rebooting UltraKey Touch 68 Changing the UltraKey Touch Password 68 Appendix A DVR Operation...
... 60 Operating a PTZ Camera 60 5 System Administration and Troubleshooting 65 System Administration Using the Controller LCD 65 Logging in and Navigating to the System Configuration Menu 65 Setting the Screen Language 65 Restore Default 66 Updating the Touch Pad Firmware 66 Viewing the Firmware Version 66 Testing the Hardware 66 System Administration Using the Web Browser 67 Logging into the Web Browser 67 Upgrading the UltraKey Touch Firmware 67 Rebooting UltraKey Touch 68 Changing the UltraKey Touch Password 68 Appendix A DVR Operation...
User Guide
Page 9
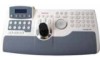
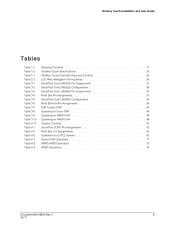
UltraKey Touch Installation and User Guide Tables Table 1-1 Table 1-2 Table 2-1 Table 2-2 Table 3-1 Table 3-2 Table 3-3 Table 3-4 Table 3-5 Table 3-6 Table 3-7 Table 3-8 Table 3-9 Table 3-10 Table 3-11 Table 4-1 Table 4-2 Table 4-3 Table A-1 Table A-2 Table A-3 Shipping Checklist 17 UltraKey Touch Specifications 20 UltraKey Touch Controller Keys and Controls 22 LCD Menu Navigation During Setup 24 Serial Port Com2 (RS232) Pin Assignments 27 Serial Port Com2 (RS232) Configurations 29...
UltraKey Touch Installation and User Guide Tables Table 1-1 Table 1-2 Table 2-1 Table 2-2 Table 3-1 Table 3-2 Table 3-3 Table 3-4 Table 3-5 Table 3-6 Table 3-7 Table 3-8 Table 3-9 Table 3-10 Table 3-11 Table 4-1 Table 4-2 Table 4-3 Table A-1 Table A-2 Table A-3 Shipping Checklist 17 UltraKey Touch Specifications 20 UltraKey Touch Controller Keys and Controls 22 LCD Menu Navigation During Setup 24 Serial Port Com2 (RS232) Pin Assignments 27 Serial Port Com2 (RS232) Configurations 29...
User Guide
Page 11
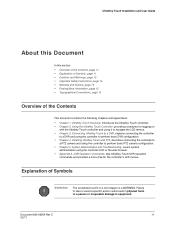
... harm to a person or irreparable damage to perform basic PTZ camera configuration. • Chapter 5, System Administration and Troubleshooting, covers system administration using the controller to equipment. Document 800-06554 Rev C 11 02/11 Failure to take or avoid a specific action could result in a red octagon is a WARNING. UltraKey Touch Installation and User Guide About this Document In this section: • Overview of...
... harm to a person or irreparable damage to perform basic PTZ camera configuration. • Chapter 5, System Administration and Troubleshooting, covers system administration using the controller to equipment. Document 800-06554 Rev C 11 02/11 Failure to take or avoid a specific action could result in a red octagon is a WARNING. UltraKey Touch Installation and User Guide About this Document In this section: • Overview of...

User Guide
Page 15
... period Honeywell will repair or replace, at 1.800.796.CCTV for assistance or to request a Return Merchandise Authorization (RMA) number. Be sure to have a problem with any defective products returned prepaid. Lucida Values of charge, any Honeywell product, please call Customer Service at its sole option, free of editable fields that are mentioned in PDF format including data sheets, quick references, installation and user guides, specifications, software...
... period Honeywell will repair or replace, at 1.800.796.CCTV for assistance or to request a Return Merchandise Authorization (RMA) number. Be sure to have a problem with any defective products returned prepaid. Lucida Values of charge, any Honeywell product, please call Customer Service at its sole option, free of editable fields that are mentioned in PDF format including data sheets, quick references, installation and user guides, specifications, software...
User Guide
Page 29
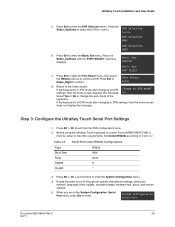
... using the UltraKey Touch keyboard to control Fusion/HRXD/HRDP DVRs, it must be setup to enter. Press Alt > Clr a second time to control. Press the Slider_Up/Down to select the DVR to enter the System Configuration menu. 4. If the keyboard is in DVR mode after changing to DVR Change to control a DVR. UltraKey Touch Installation and User Guide 5. Press Ent to enter the Port Select menu, then select the RS232 protocol to DVR mode? System Configuration...
... using the UltraKey Touch keyboard to control Fusion/HRXD/HRDP DVRs, it must be setup to enter. Press Alt > Clr a second time to control. Press the Slider_Up/Down to select the DVR to enter the System Configuration menu. 4. If the keyboard is in DVR mode after changing to DVR Change to control a DVR. UltraKey Touch Installation and User Guide 5. Press Ent to enter the Port Select menu, then select the RS232 protocol to DVR mode? System Configuration...

User Guide
Page 30
.... Press Data Bit Ent to save . Press Ent and use the Serial Settings: up /down arrow keys to select None. Press Slider_Left to return to the UltraKey Touch Using the Serial Port Table 3-3 Serial Port COM1 Serial Port Com1 (RS485) Pin Assignments Type Pin RS485 1 2 Signal T/R+ T/R - Connect to the UltraKey Touch Using the Serial Port (RS485) Step 1: Connect to the main menu...
.... Press Data Bit Ent to save . Press Ent and use the Serial Settings: up /down arrow keys to select None. Press Slider_Left to return to the UltraKey Touch Using the Serial Port Table 3-3 Serial Port COM1 Serial Port Com1 (RS485) Pin Assignments Type Pin RS485 1 2 Signal T/R+ T/R - Connect to the UltraKey Touch Using the Serial Port (RS485) Step 1: Connect to the main menu...
User Guide
Page 33
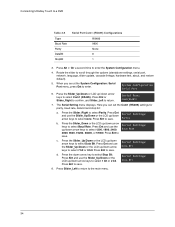
... keyboard is in PTZ mode after changing to DVR settings, then the home screen does not display that the keyboard is in PTZ mode. UltraKey Touch Installation and User Guide 2. From the home screen, press Alt > Clr to DVR mode? Basic Set: DVR/CAM Basic Set: PORT SELECT 7. Set Com1 (RS485) according to enter the Basic Set menu. CAM 001 DVR 1 ST User2 3. Press Ent to Table 3-5 on page 34. If the keyboard is in DVR mode. Before using the UltraKey Touch keyboard...
... keyboard is in PTZ mode after changing to DVR settings, then the home screen does not display that the keyboard is in PTZ mode. UltraKey Touch Installation and User Guide 2. From the home screen, press Alt > Clr to DVR mode? Basic Set: DVR/CAM Basic Set: PORT SELECT 7. Set Com1 (RS485) according to enter the Basic Set menu. CAM 001 DVR 1 ST User2 3. Press Ent to Table 3-5 on page 34. If the keyboard is in DVR mode. Before using the UltraKey Touch keyboard...
User Guide
Page 34
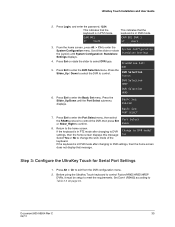
...key to save . Serial Settings: Data Bit d. Press Alt > Clr a second time to select Parity. Press the Slider_Right to enter the System Configuration menu. 4. Press Ent to select none. Press Ent to select Stop Bit. The Serial Setting menu displays. Press the Slider_Down or the LCD up /down Serial Settings: arrow keys to save...arrow keys to save . Connecting UltraKey Touch to scroll through the options (standalone settings, serial port, network, language, slider update, cascade linkage, hardware test, about, and restore default). 5. Rotate the slider to a DVR ...
...key to save . Serial Settings: Data Bit d. Press Alt > Clr a second time to select Parity. Press the Slider_Right to enter the System Configuration menu. 4. Press Ent to select none. Press Ent to select Stop Bit. The Serial Setting menu displays. Press the Slider_Down or the LCD up /down Serial Settings: arrow keys to save...arrow keys to save . Connecting UltraKey Touch to scroll through the options (standalone settings, serial port, network, language, slider update, cascade linkage, hardware test, about, and restore default). 5. Rotate the slider to a DVR ...

User Guide
Page 37
... save . Press Slider_Down, the menu displays (one of): Network: DHCP Network: Manual Setting Network: Show Net Infor 5. Press Ent. Press Ent. d. Keyboard Configuration for Cascade Linkage (Additional) Note No entry is complete. Press the Slider_Up/Down or the LCD up /down arrow keys to cancel. Press Ent. c. Using the numeric NetMask keypad, enter a NetMask value, as required. If other changes are required from this menu...
... save . Press Slider_Down, the menu displays (one of): Network: DHCP Network: Manual Setting Network: Show Net Infor 5. Press Ent. Press Ent. d. Keyboard Configuration for Cascade Linkage (Additional) Note No entry is complete. Press the Slider_Up/Down or the LCD up /down arrow keys to cancel. Press Ent. c. Using the numeric NetMask keypad, enter a NetMask value, as required. If other changes are required from this menu...
User Guide
Page 39
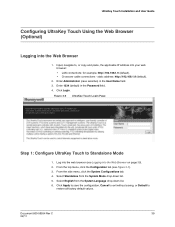
... address: http://192.168.1.9 (default). 2. From the top menu, click the Configuration tab (see Logging into your web browser: • LAN connections: for example, http://192.168.1.9 (default). • Crossover cable connections - From the side menu, click the System Configurations tab. 4. Select English from the System Mode drop-down list. 6. Select Standalone from the System Language drop-down list. 5. UltraKey Touch Installation and User Guide Configuring UltraKey Touch Using the Web...
... address: http://192.168.1.9 (default). 2. From the top menu, click the Configuration tab (see Logging into your web browser: • LAN connections: for example, http://192.168.1.9 (default). • Crossover cable connections - From the side menu, click the System Configurations tab. 4. Select English from the System Mode drop-down list. 6. Select Standalone from the System Language drop-down list. 5. UltraKey Touch Installation and User Guide Configuring UltraKey Touch Using the Web...
User Guide
Page 44
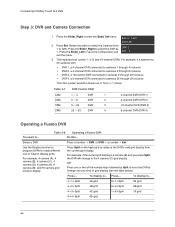
... • DVR 3, a 16-channel DVR connected to cameras 9 through 24 inclusive • DVR 4, a 9-channel DVR connected to cameras 25 through 33 inclusive Then this ... Table 3-8 Operating a Fusion DVR Do this system would be shown as CAM 1 1. Use the Display function to program DVRs to a DVR Step 3: DVR and Camera Connection 1. For example: if the current grid display is 4 camera (B) and you press Split, the DVR will change into any kind of the number keys followed...
... • DVR 3, a 16-channel DVR connected to cameras 9 through 24 inclusive • DVR 4, a 9-channel DVR connected to cameras 25 through 33 inclusive Then this ... Table 3-8 Operating a Fusion DVR Do this system would be shown as CAM 1 1. Use the Display function to program DVRs to a DVR Step 3: DVR and Camera Connection 1. For example: if the current grid display is 4 camera (B) and you press Split, the DVR will change into any kind of the number keys followed...

User Guide
Page 45
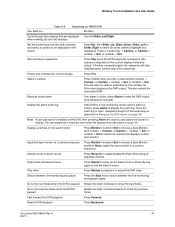
... Alarm. UltraKey Touch Installation and User Guide You want to Full Screen Display Press Ent. Stop Press Stop to make a DVR play forwards while searching. Adjust the forward or backward playback speed Rotate your finger on a DVR. Press... To... Press... Play Press Review to halt video playing on the touch pad slider. Document 800-06554 Rev C 45 02/11 Instant Record Press the number key, which represents a specific channel...
... Alarm. UltraKey Touch Installation and User Guide You want to Full Screen Display Press Ent. Stop Press Stop to make a DVR play forwards while searching. Adjust the forward or backward playback speed Rotate your finger on a DVR. Press... To... Press... Play Press Review to halt video playing on the touch pad slider. Document 800-06554 Rev C 45 02/11 Instant Record Press the number key, which represents a specific channel...
User Guide
Page 47
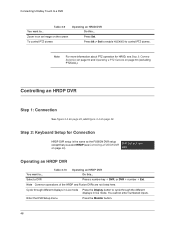
.... Select a camera Press number keys (to bring up the Search menu. Display the alarm event log If the DVR is active, press Alarm to enable/disable the Panic Recording on specified channel. Go to the previous frame when the DVR is active), press Alarm to show the next frame. Set the screen layout of the multi-cameras, and select a camera to be displayed in live monitoring mode (and no alarm is...
.... Select a camera Press number keys (to bring up the Search menu. Display the alarm event log If the DVR is active, press Alarm to enable/disable the Panic Recording on specified channel. Go to the previous frame when the DVR is active), press Alarm to show the next frame. Set the screen layout of the multi-cameras, and select a camera to be displayed in live monitoring mode (and no alarm is...
User Guide
Page 48
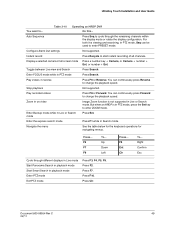
... image on page 43). Press Alt > Set to enable HJC4000 to ... Enter the DVR Setup menu Press the Monitor button. 48 Table 3-10 Operating an HRDP DVR Do this ... Note For more information about PTZ operation for Connection HRDP DVR setup is the same as the FUSION DVR setup except that you select HRDP (see Step 2: Camera Selection on page 60 and Operating a PTZ Camera on page 32. Select a DVR Press a number key + DVR, or DVR + number...
... image on page 43). Press Alt > Set to enable HJC4000 to ... Enter the DVR Setup menu Press the Monitor button. 48 Table 3-10 Operating an HRDP DVR Do this ... Note For more information about PTZ operation for Connection HRDP DVR setup is the same as the FUSION DVR setup except that you select HRDP (see Step 2: Camera Selection on page 60 and Operating a PTZ Camera on page 32. Select a DVR Press a number key + DVR, or DVR + number...
User Guide
Page 49
.... UltraKey Touch Installation and User Guide You want to start instant recording of all channels. Auto Sequence Press Seq to cycle through different displays in Live mode Start Panorama Search in playback mode Start Smart Search in full screen mode Press a number key + Camera, or Camera + number + Ent, or number + Ent. Toggle between Live view and Search Press Search. Enter FOCUS mode while in PTZ mode, Seq can be used to change the...
.... UltraKey Touch Installation and User Guide You want to start instant recording of all channels. Auto Sequence Press Seq to cycle through different displays in Live mode Start Panorama Search in playback mode Start Smart Search in full screen mode Press a number key + Camera, or Camera + number + Ent, or number + Ent. Toggle between Live view and Search Press Search. Enter FOCUS mode while in PTZ mode, Seq can be used to change the...
User Guide
Page 50
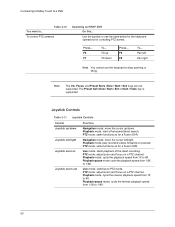
...+View) key is supported. F2 F7 To... Playback-pause mode: cycle the playback speed from 1X to 8X. Playback mode: start a Panorama/Smart search. Pan left Pan right Note You cannot use the keyboard to ... Table 3-10 To control PTZ cameras Operating an HRDP DVR Do this... Joystick Controls Table 3-11 Joystick Controls Control Joystick up/down Joystick left /right. Playback mode: cycle the reverse playback speed from 1/2X to PTZ mode...
...+View) key is supported. F2 F7 To... Playback-pause mode: cycle the playback speed from 1X to 8X. Playback mode: start a Panorama/Smart search. Pan left Pan right Note You cannot use the keyboard to ... Table 3-10 To control PTZ cameras Operating an HRDP DVR Do this... Joystick Controls Table 3-11 Joystick Controls Control Joystick up/down Joystick left /right. Playback mode: cycle the reverse playback speed from 1/2X to PTZ mode...

User Guide
Page 60
... OSD display. 1. Press View + number + Ent, or number + View. Auto Iris 60 Standalone Set: PTZ Note The UltraKey Touch supports five PTZ Protocols: Pelco P, Pelco D, Diamond, VCL, and Intellibus. Enter a camera number (1-128) + Camera, or Camera + number + Ent, or number + Ent to control (pan and tilt) the camera. Operations for a PTZ Camera Use the joystick to select a camera for pan functions. Auto Iris Press Ent to the main menu of the PTZ camera. Return to send auto iris command. Control a PTZ camera Zoom...
... OSD display. 1. Press View + number + Ent, or number + View. Auto Iris 60 Standalone Set: PTZ Note The UltraKey Touch supports five PTZ Protocols: Pelco P, Pelco D, Diamond, VCL, and Intellibus. Enter a camera number (1-128) + Camera, or Camera + number + Ent, or number + Ent to control (pan and tilt) the camera. Operations for a PTZ Camera Use the joystick to select a camera for pan functions. Auto Iris Press Ent to the main menu of the PTZ camera. Return to send auto iris command. Control a PTZ camera Zoom...
User Guide
Page 62
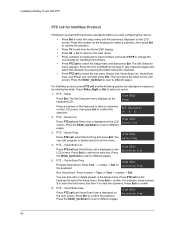
... List menus are displayed in the Setup menu. PTZ - Setup Press Ent. Sector Prog Press PTZ call and VectorScan List is displayed on VectorScan Prog the keyboard. Press the Slider_Up/Down to scan to select an option. 1. Sector List Press PTZ call and VectorScan View is displayed on the LCD screen. VectorScan Prog Program VectorScan: Press Tour + number + Set on the LCD screen. VectorScan View Press PTZ call and Sector List is displayed...
... List menus are displayed in the Setup menu. PTZ - Setup Press Ent. Sector Prog Press PTZ call and VectorScan List is displayed on VectorScan Prog the keyboard. Press the Slider_Up/Down to scan to select an option. 1. Sector List Press PTZ call and VectorScan View is displayed on the LCD screen. VectorScan Prog Program VectorScan: Press Tour + number + Set on the LCD screen. VectorScan View Press PTZ call and Sector List is displayed...
User Guide
Page 67
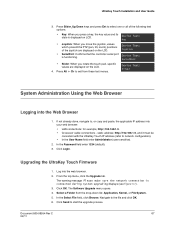
... network connection is displayed on the LCD. 4. UltraKey Touch Installation and User Guide 3. In the Password field enter 1234 (default). 3. Log into the Web Browser 1. Device Test: Joystick • SerialPort: Confirms that the controller serial port is functioning. In the Select File field, click Browse. Device Test: SerialPort • Slider: When you press a key, the key value and its state is connected during system upgrading displays (see Figure 5-1). 3. The Software Upgrade menu...
... network connection is displayed on the LCD. 4. UltraKey Touch Installation and User Guide 3. In the Password field enter 1234 (default). 3. Log into the Web Browser 1. Device Test: Joystick • SerialPort: Confirms that the controller serial port is functioning. In the Select File field, click Browse. Device Test: SerialPort • Slider: When you press a key, the key value and its state is connected during system upgrading displays (see Figure 5-1). 3. The Software Upgrade menu...
User Guide
Page 73
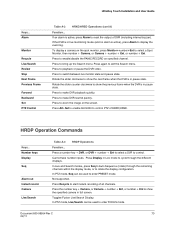
UltraKey Touch Installation and User Guide Keys... To display a camera on the screen. Press again to playback or pause the DVR video. HRDP Operation Commands Keys... Not supported. Press the number key + Camera, or Camera + number + Ent, or number + Ent to show the next frame when the DVR is in pause state. Press to exit the Search menu. Rotate the slider clockwise to show the previous frame when the DVR is in live monitor state and...
UltraKey Touch Installation and User Guide Keys... To display a camera on the screen. Press again to playback or pause the DVR video. HRDP Operation Commands Keys... Not supported. Press the number key + Camera, or Camera + number + Ent, or number + Ent to show the next frame when the DVR is in pause state. Press to exit the Search menu. Rotate the slider clockwise to show the previous frame when the DVR is in live monitor state and...


