Honeywell NX4S1 Support Question
Honeywell NX4S1 Support Question
Find answers below for this question about Honeywell NX4S1.Need a Honeywell NX4S1 manual? We have 2 online manuals for this item!
Question posted by Sthayer16624 on June 7th, 2017
Defaulting A Nx4s1
need to bring nx4s1 to factory defaul
Current Answers
Answer #1: Posted by freginold on July 25th, 2017 3:15 PM
freginold

Member since:
December 20th, 2011 Points: 23,253,885

Member since:
December 20th, 2011 Points: 23,253,885
Neither the installation guide nor the user guide include instructions for resetting the unit back to factory defaults. However, instructions are posted on Spiceworks for resetting the panel:
https://community.spiceworks.com/topic/1234576-honeywell-netaxs-door-access-login-disabled
If those instructions don't work, your best bet is probably to call tech support at (800) 323-4576.
https://community.spiceworks.com/topic/1234576-honeywell-netaxs-door-access-login-disabled
If those instructions don't work, your best bet is probably to call tech support at (800) 323-4576.
Related Honeywell NX4S1 Manual Pages
Installation Guide - Page 3
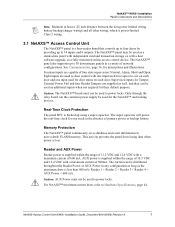
... Memory Protection ...7 Reader and AUX Power 7 3.2 Power Supply ...8 3.3 Battery...8 3.4 Enclosure ...8 3.5 Suppressors ...8
4.0 Installation...9 4.1 Cabinet Mounting ...10 4.2 Reader Wiring...14 4.3 Supervised Input Wiring 14 4.4 NX4S1 Control Output Wiring 16 4.5 Communications ...16 RS-232 Communications 16 RS-485 Communications 18 Ethernet TCP/IP Communications 19 4.6 DIP Switch Settings...
Installation Guide - Page 5
... Command 55 A.3.4 C (Card Add) Command 56 A.3.5 C (Card Delete) Command 56 A.3.6 W (Input) Command 57 A.3.7 P (Interlock) Command 57 A.3.8 Flow Control Disable/Enable 58
A.4 NetAXS™ Panel Defaults ...59 A.4.1 Reader Ports ...59 A.4.2 Reader LED Outputs 59 A.4.3 Reader Tamper Inputs 60 A.4.4 Door Egress Inputs...60 A.4.5 Door Status Inputs...61 A.4.6 ACFAIL and Panel Tamper Inputs ...
Installation Guide - Page 7
LIST OF FIGURES
Figure 1: NX4S1 Panel Components 6 Figure 2: NetAXS™ NX4S1 Panel Cabinet, Front View 10 Figure 3: NetAXS™ NX4S1 Panel Cabinet, Top View 11 Figure 4: NetAXS™ NX4S1 Panel Cabinet, Bottom View... Address Location 20 Figure 14: DIP Switch and Jumper Locations 21 Figure 15: Default Downstream I/O Configuration with Wiring 25 Figure 16: RS-485 Connection via PCI-2 ...
Installation Guide - Page 9
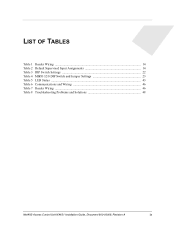
... 1 Reader Wiring ...14 Table 2 Default Supervised Input Assignments 14 Table 3 DIP Switch Settings ...22 Table 4 MIRO 32/0 DIP Switch and Jumper Settings 23 Table 5 LED Status ...43 Table 6 Communications and Wiring 46 Table 7 Reader Wiring ...46 Table 8 Troubleshooting Problems and Solutions 48
NetAXS Access Control Unit NX4S1 Installation Guide, Document 800-00008...
Installation Guide - Page 11
... without providing an alternative exit in accordance with the commercial carrier responsible. Primary warning or monitoring systems should always meet local fire and safety code requirements. To prevent damage always follow these procedures:
NetAXS Access Control Unit NX4S1 Installation Guide, Document 800-00008, Revision A
1
Failure to test a system regularly could be filed...
Installation Guide - Page 14
....com Notes:
• All field wiring, except the battery backup/charger wiring, is not intended as a stand alone system.
The input points only monitor the door position. NetAXS™ NX4S1 Installation Notices
1.6 Underwriters Laboratories Incorporated
The NetAXS™ panel was reviewed using the following Honeywell readers: OmniAssure (TM) OT30, OmniClass (TM) OM40...
Installation Guide - Page 15
...other and with a variety of the supported NetAXS™ system configurations. NetAXS Access Control Unit NX4S1 Installation Guide, Document 800-00008, Revision A
5 This document describes how to view illustrations ...strikes, and video and other devices, for example, are configured to control and monitor the access to specific areas and resources. See "System Configuration" on page 26 ...
Installation Guide - Page 17
... current draw, refer to 30 downstream panels in the absence of 600 mA.
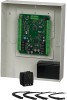
NetAXS™ NX4S1 Installation Panel Components and Descriptions
Note: Maintain at least a .25-inch distance between the non...fully monitored online access control device. Caution: AUX Power must not be used to exit on each door. Supervised inputs for their default purpose.
NetAXS Access Control Unit NX4S1 ...
Installation Guide - Page 19
... its use.
4. Leave enough shield drain length to secure to TB17-1 and TB17-2. Caution: Do not plug in...time. Review the panel layout, cable runs, and power needs.
2. The power-up sequence may take up resulting in ... NX4S1 Installation Guide, Document 800-00008, Revision A
9 NetAXS™ NX4S1 Installation Installation
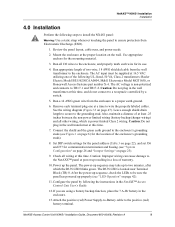
4.0 Installation
Perform the following steps to install the NX4S1 ...
Installation Guide - Page 20
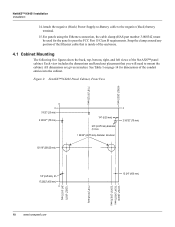
...back, top, bottom, right, and left views of the NetAXS™ panel cabinet. NetAXS™ NX4S1 Installation Installation
14.Attach the negative (black) Power Supply-to-Battery cable to the negative (black) ...HAS part number 3-000342) must be used for dimensions of the Ethernet cable that you will need to pass the FCC Part 15 Class B requirements. Snap the clamp around any portion of the...
Installation Guide - Page 24
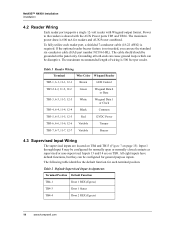
... Position Default Function
TB4-1
Door 1 REX (Egress)
TB4-3
Door 1 Status
TB4-4
Door 2 REX (Egress)
14
www.honeywell.com Power to the readers is not needed, you can use the standard six-conductor cable (HAS part number NC1861-BL). If the optional reader buzzer feature is shared with Wiegand output format. NetAXS™ NX4S1...
Installation Guide - Page 25
...of the cable. In addition, the Tamper and External Power Fail, as well as additional inputs if the default functionality is not needed.
NetAXS™ NX4S1 Installation Installation
Table 2 Default Supervised Input Assignments (continued)
Terminal Position Default Function
TB4-6
Door 2 Status
TB8-1
External Power Supply AC FAIL
TB8-3
Panel Tamper
TB13-1
Door 3 REX (Egress)
TB13...
Installation Guide - Page 26

...reader, or supervised input wiring. Connect the RJ45 end of the Door 2 lock, Relay 3 is defaulted for details on the NetAXS™ panel. Grounding at the panel only. Each relay also has a...wires with UL1076 Burglar Alarm units and systems.
4.4 NX4S1 Control Output Wiring
Relay 1 is defaulted for control of the Door 1 lock, Relay 2 is defaulted for the control of the cable to the NetAXS™...
Installation Guide - Page 32

... 3 DIP Switch Settings
S1
S2
S3
S4
S5
S6 Selection
on
off
off
off
off
Address 1 (default)
off
on
off
off
off
Address 2
on
on
off
off
off
Address 3
off
off
on
off
...Note: Address 0 is not a valid setting for standard operations.
22
www.honeywell.com
NetAXS™ NX4S1 Installation Installation
Use the following DIP switch configurations to set the panel address.
Installation Guide - Page 33
...has 32 supervised, four-state inputs that need to be added to the downstream bus. Each MIRO module needs to the MIRO modules using a polling... - 9 = OFF, 10 = OFF
NetAXS Access Control Unit NX4S1 Installation Guide, Document 800-00008, Revision A
23
NetAXS™ NX4S1 Installation Installation
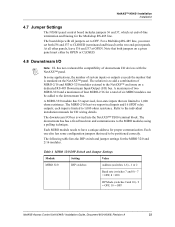
4.7 Jumper Settings
The NX4S1 panel control board includes jumpers 36 and 37, which set to OFF...
Installation Guide - Page 34
NetAXS™ NX4S1 Installation Installation
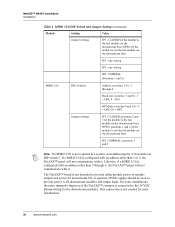
Table 4 MIRO 32/0 DIP Switch and Jumper Settings (continued)
Module
Setting
...and 10) - 9 = OFF, 10 = OFF
Jumper settings
JP1 - any setting
JP3 - OPEN, positions 1 and 2 (if the module is not needed for the downstream modules. This connection is not the last module on the downstream bus); If a MIRO 32/0 is not intended to the 24 VDC...
Installation Guide - Page 35
This configuration has not been reviewed by UL.
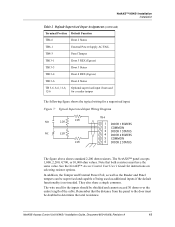
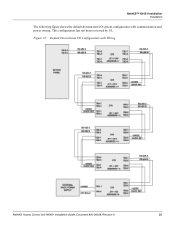
Figure 15: Default Downstream I /O system configuration with Wiring
NetAXS Access Control Unit NX4S1 Installation Guide, Document 800-00008, Revision A
25 NetAXS™ NX4S1 Installation Installation
The following figure shows the default downstream I /O Configuration with communication and power wiring.
Installation Guide - Page 58
...6 is incrementing every minute. The IP address is configured as a Gateway.
NetAXS™ NX4S1 Installation Maintenance
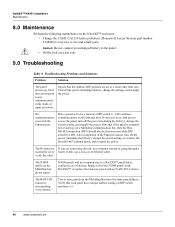
8.0 Maintenance
Perform the following maintenance on the NetAXS™ enclosure: • ... switch 6 = ON) will not communicate to a NetAXS™ panel that is If you need to access the panel, turn off the power (including battery), change the switch setting, re-...
Installation Guide - Page 59
... flow control)
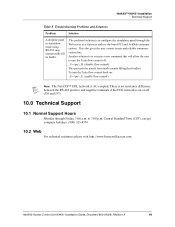
Note: The NetAXS™ EOL network is AC-coupled. NetAXS™ NX4S1 Installation Technical Support
Table 8 Troubleshooting Problems and Solutions
Problem
Solution
A dropline panel in standalone... using RS-232 may unexpectedly fill its buffer. This also gives the user a more secure and reliable communications line. to turn the Tesla flow control back on or off : ...
User Guide - Page 30
...
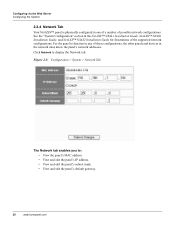
The Network tab enables you to function in the NetAXS™ NX4L1 Installation Guide, NetAXS™ NX4S1 Installation Guide, and NetAXS™ NX4S2 Installation Guide for illustrations of the supported network configurations. For ... • View and edit the panel's default gateway.
20
www.honeywell.com See the "System Configuration" section in any of possible network configurations.
Similar Questions

How To Default This Netaxs-4 Panel
how to default this netaxs-4 panel
how to default this netaxs-4 panel
(Posted by info69595 1 year ago)

I Need A User Manual For Honeywell Home Security 6149ex Keypad
(Posted by Willoughby 9 years ago)

I Need To Know How To Do The Preset On The Hjc 5000
The PTZ Need a preset setting.
The PTZ Need a preset setting.
(Posted by trevord 12 years ago)

Key Pad For Honeywell 6151.
Need A Manual As To How To Use The Key Pad To Proga
Honeywell’s 6151 Fixed-English keypad
Honeywell’s 6151 Fixed-English keypad
(Posted by chungmyy2 12 years ago)

Have A Old Honeywell/westinghouse Security System And It Keeps Beeping
HONEYWELL XL4600SM FLASHING AC/LB AND BEEPS EVERY 15 MINUTES OR SO, WHAT CAN I DO TO STOP IT?
HONEYWELL XL4600SM FLASHING AC/LB AND BEEPS EVERY 15 MINUTES OR SO, WHAT CAN I DO TO STOP IT?
(Posted by EMJWIN 12 years ago)