
Owners Guide
Page 2
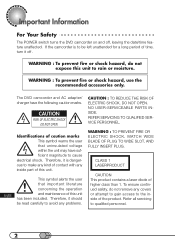
...date/time feature unaffected. Important Information F○o○r○ Y○o○u○r○ S○a○f○e○ty The POWER switch turns the DVD camcorder on and off . Therefore, it should be left unattended for a long period of higher class than 1. This symbol alerts the user that ... shock. WARNING : TO PREVENT FIRE OR ELECTRIC SHOCK, MATCH WIDE BLADE OF PLUG TO WIDE SLOT, AND FULLY INSERT PLUG. The DVD camcorder and AC adapter/ charger have sufficient magnitude to make any kind of contact with any inside of this unit. Therefore, it is to...
...date/time feature unaffected. Important Information F○o○r○ Y○o○u○r○ S○a○f○e○ty The POWER switch turns the DVD camcorder on and off . Therefore, it should be left unattended for a long period of higher class than 1. This symbol alerts the user that ... shock. WARNING : TO PREVENT FIRE OR ELECTRIC SHOCK, MATCH WIDE BLADE OF PLUG TO WIDE SLOT, AND FULLY INSERT PLUG. The DVD camcorder and AC adapter/ charger have sufficient magnitude to make any kind of contact with any inside of this unit. Therefore, it is to...
Owners Guide
Page 4
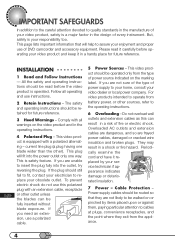
... your responsibility too. This video product is your service technician if appearance indicates damage or deteriorated insulation. 7 Power - If you need an extension, use of DVD camcorder and accessory equipment. Overloaded AC outlets and extension cables are dangerous, and so are not likely to be routed so that will fit into the...
... your responsibility too. This video product is your service technician if appearance indicates damage or deteriorated insulation. 7 Power - If you need an extension, use of DVD camcorder and accessory equipment. Overloaded AC outlets and extension cables are dangerous, and so are not likely to be routed so that will fit into the...
Owners Guide
Page 8
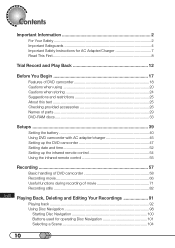
... movies, still pictures, etc. We want this page). • A detailed table of your DVD camcorder. • Chapter 2, "Set-up", explains how to set up your DVD camcorder for desired settings. • Chapter 6, "Connecting DVD camcorder to other devices", explains how to use the DVD camcorder with a TV, other AV devices or a personal computer. • Chapter 7, "Subsidiary Information...use most often (this manual to be as helpful as needed. Read thoroughly before starting to record. • Chapter 4, "Playback", explains how to know Hitachi. Refer to Your Personal Computer 148 8
... movies, still pictures, etc. We want this page). • A detailed table of your DVD camcorder. • Chapter 2, "Set-up", explains how to set up your DVD camcorder for desired settings. • Chapter 6, "Connecting DVD camcorder to other devices", explains how to use the DVD camcorder with a TV, other AV devices or a personal computer. • Chapter 7, "Subsidiary Information...use most often (this manual to be as helpful as needed. Read thoroughly before starting to record. • Chapter 4, "Playback", explains how to know Hitachi. Refer to Your Personal Computer 148 8
Owners Guide
Page 10
... Important Safety Instructions for AC Adapter/Charger 7 Read This First 8 Trial Record and Play Back 12 Before You Begin 17 Features of DVD camcorder 18 Cautions when using 20 Cautions when storing 24 Suggestions and restrictions 25 About this text 25 Checking provided accessories 26 Names of parts ...date and time 52 Setting up the infrared remote control 54 Using the infrared remote control 55 Recording 57 Basic handling of DVD camcorder 58 Recording movie 66 Useful functions during recording of movie 71 Recording stills 82 Playing Back, Deleting and Editing Your Recordings ...
... Important Safety Instructions for AC Adapter/Charger 7 Read This First 8 Trial Record and Play Back 12 Before You Begin 17 Features of DVD camcorder 18 Cautions when using 20 Cautions when storing 24 Suggestions and restrictions 25 About this text 25 Checking provided accessories 26 Names of parts ...date and time 52 Setting up the infrared remote control 54 Using the infrared remote control 55 Recording 57 Basic handling of DVD camcorder 58 Recording movie 66 Useful functions during recording of movie 71 Recording stills 82 Playing Back, Deleting and Editing Your Recordings ...
Owners Guide
Page 11
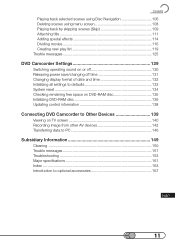
...skipping scenes (Skip 109 Attaching title 111 Adding special effects 114 Dividing movies 116 Creating new play list 119 Trouble messages 125 DVD Camcorder Settings 129 Switching operating sound on or off 130 Releasing power save/changing off time 131 Changing display format of date and ...time 132 Initializing all settings to defaults 133 System reset 134 Checking remaining free space on DVD-RAM disc 135 Initializing DVD-RAM disc 136 Updating control information 138 Connecting DVD Camcorder to Other Devices 139 Viewing on TV screen 140 Recording image from other AV devices 142...
...skipping scenes (Skip 109 Attaching title 111 Adding special effects 114 Dividing movies 116 Creating new play list 119 Trouble messages 125 DVD Camcorder Settings 129 Switching operating sound on or off 130 Releasing power save/changing off time 131 Changing display format of date and ...time 132 Initializing all settings to defaults 133 System reset 134 Checking remaining free space on DVD-RAM disc 135 Initializing DVD-RAM disc 136 Updating control information 138 Connecting DVD Camcorder to Other Devices 139 Viewing on TV screen 140 Recording image from other AV devices 142...
Owners Guide
Page 12
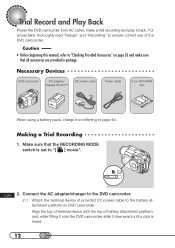
... actual take, thoroughly read "Setups" and "Recording" to ensure correct use of battery attachment platform, and, while fitting it onto the DVD camcorder, slide it or refferring to the battery attachment platform on page 26 and make a trial recording and play it back. Connect the AC... ○ec○ e○s○s○a○ry○ ○D○e○v○ic○e○s DVD camcorder AC adapter/ charger DZ-ACP1 DC power cable Power cable 8 cm DVD-RAM disc When using a battery pack, charge it downward until a click is set to "Checking Provided Accessories...
... actual take, thoroughly read "Setups" and "Recording" to ensure correct use of battery attachment platform, and, while fitting it onto the DVD camcorder, slide it or refferring to the battery attachment platform on page 26 and make a trial recording and play it back. Connect the AC... ○ec○ e○s○s○a○ry○ ○D○e○v○ic○e○s DVD camcorder AC adapter/ charger DZ-ACP1 DC power cable Power cable 8 cm DVD-RAM disc When using a battery pack, charge it downward until a click is set to "Checking Provided Accessories...

Owners Guide
Page 14
... date will enter the recording POWER pause mode. (The date is first turned on . Set the current date and time (see p.59). When the DVD camcorder is set to 1/1/2000 at the center of POWER switch, press the switch down: The red indicator of programs and scenes that are described in... the viewfinder, and the DVD camcorder will start to recognize the disc: After approximately 25 seconds, the DVD camcorder will be correctly recorded. Open the LCD monitor if you desire: Fit your eye into the Eye cup, and...
... date will enter the recording POWER pause mode. (The date is first turned on . Set the current date and time (see p.59). When the DVD camcorder is set to 1/1/2000 at the center of POWER switch, press the switch down: The red indicator of programs and scenes that are described in... the viewfinder, and the DVD camcorder will start to recognize the disc: After approximately 25 seconds, the DVD camcorder will be correctly recorded. Open the LCD monitor if you desire: Fit your eye into the Eye cup, and...
Owners Guide
Page 15
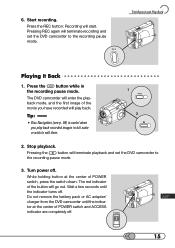
... off . tor at the center of POWER switch, press the switch down: The red indicator of the button will terminate playback and set the DVD camcorder to the recording pause mode. 3. Press the button while in ○ g○ ○It○ B○ a○ c○k 1.... Pressing the button will go out. 6. The DVD camcorder will terminate recording and set the DVD camcorder to the recording pause mode. While holding button at the center of the movie you play back. Pressing REC again will enter...
... off . tor at the center of POWER switch, press the switch down: The red indicator of the button will terminate playback and set the DVD camcorder to the recording pause mode. 3. Press the button while in ○ g○ ○It○ B○ a○ c○k 1.... Pressing the button will go out. 6. The DVD camcorder will terminate recording and set the DVD camcorder to the recording pause mode. While holding button at the center of the movie you play back. Pressing REC again will enter...
Owners Guide
Page 17
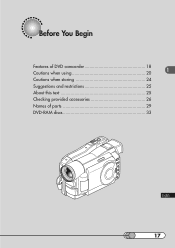
Before You Begin Features of DVD camcorder 18 Cautions when using 20 Cautions when storing 24 Suggestions and restrictions 25 About this text 25 Checking provided accessories 26 Names of parts 29 DVD-RAM discs 33 17
Before You Begin Features of DVD camcorder 18 Cautions when using 20 Cautions when storing 24 Suggestions and restrictions 25 About this text 25 Checking provided accessories 26 Names of parts 29 DVD-RAM discs 33 17
Owners Guide
Page 18
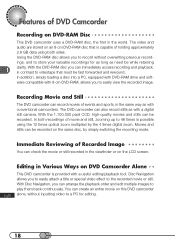
...c○o○rd○ i○n○g○ M○ ○o○v○ie○ ○a○n○d○S○t○ill The DVD camcorder can check the movie or still recorded in the world. In both sides. I○m○ m○ ○e○d○ia○te...a○ m○ ○co○ r○d○e○r○ A○ l○o○n○e○ ○ ○ This DVD camcorder is provided with 8 cm DVD-RAM, allows you to easily attach a title or special video effect to easily view the recorded image. With Disc Navigation, you can...
...c○o○rd○ i○n○g○ M○ ○o○v○ie○ ○a○n○d○S○t○ill The DVD camcorder can check the movie or still recorded in the world. In both sides. I○m○ m○ ○e○d○ia○te...a○ m○ ○co○ r○d○e○r○ A○ l○o○n○e○ ○ ○ This DVD camcorder is provided with 8 cm DVD-RAM, allows you to easily attach a title or special video effect to easily view the recorded image. With Disc Navigation, you can...

Owners Guide
Page 19
Features of DVD Camcorder U○ s○ i○n○g○w○ ○ith○ ○V○a○r○io○u○s○ D○ e○ v○ i○ce○ s Connect this DVD camcorder to your TV and you can also transfer the recorded movies and stills to print the recorded image. You can enjoy the playback picture with your family and friends on the large TV screen; or connect it to a video printer (generally available) to PC. 19
Features of DVD Camcorder U○ s○ i○n○g○w○ ○ith○ ○V○a○r○io○u○s○ D○ e○ v○ i○ce○ s Connect this DVD camcorder to your TV and you can also transfer the recorded movies and stills to print the recorded image. You can enjoy the playback picture with your family and friends on the large TV screen; or connect it to a video printer (generally available) to PC. 19

Owners Guide
Page 20
... DVD camcorder rises. Hold the DVD camcorder correctly: Do not hold the viewfinder or LCD monitor when lifting the DVD camcorder: The viewfinder or LCD monitor may become detached and the DVD camcorder could fall . • Do not use the DVD camcorder on again. • Do not place the DVD camcorder with...8226; Do not disassemble the LCD monitor as colored bright dots. Do not subject the DVD camcorder to impact: • This DVD camcorder is subject to fall . If unevenness does not disappear soon, turn the DVD camcorder off, wait for a while, and then turn it on a tripod in a ...
... DVD camcorder rises. Hold the DVD camcorder correctly: Do not hold the viewfinder or LCD monitor when lifting the DVD camcorder: The viewfinder or LCD monitor may become detached and the DVD camcorder could fall . • Do not use the DVD camcorder on again. • Do not place the DVD camcorder with...8226; Do not disassemble the LCD monitor as colored bright dots. Do not subject the DVD camcorder to impact: • This DVD camcorder is subject to fall . If unevenness does not disappear soon, turn the DVD camcorder off, wait for a while, and then turn it on a tripod in a ...

Owners Guide
Page 21
...could also enter the picture and sound. Do not point directly at the sun: • If direct sunlight strikes the lens or viewfinder, the DVD camcorder could malfunction or burn in a place where the temperature is used near strong radio waves or magnetism, such as near strong radio waves or magnetism... soot or steam: Heavy soot or steam could enter video and audio that are being recorded. No water or oil! Do not expose the DVD camcorder to direct sunlight: This could enter radio broadcasts. Cautions When Using No sand or dust! Heat on the TV screen, or interference could cause...
...could also enter the picture and sound. Do not point directly at the sun: • If direct sunlight strikes the lens or viewfinder, the DVD camcorder could malfunction or burn in a place where the temperature is used near strong radio waves or magnetism, such as near strong radio waves or magnetism... soot or steam: Heavy soot or steam could enter video and audio that are being recorded. No water or oil! Do not expose the DVD camcorder to direct sunlight: This could enter radio broadcasts. Cautions When Using No sand or dust! Heat on the TV screen, or interference could cause...
Owners Guide
Page 22
... it off and leave it in a dry place for at least 1-2 hours before using it again. 22 Turn the DVD camcorder off with vinyl sheet, etc. Do not use the DVD camcorder for home-use recording and playback. Do not use it for an extended time continuously, e.g., as hydrogen sulfide, could ...corrode the battery connecting terminals, which could cause it to operate abnormally. If you use the DVD camcorder near corrosive gas: Using it in a place where there is designed and produced for a long uninterrupted period of time: • This...
... it off and leave it in a dry place for at least 1-2 hours before using it again. 22 Turn the DVD camcorder off with vinyl sheet, etc. Do not use the DVD camcorder for home-use recording and playback. Do not use it for an extended time continuously, e.g., as hydrogen sulfide, could ...corrode the battery connecting terminals, which could cause it to operate abnormally. If you use the DVD camcorder near corrosive gas: Using it in a place where there is designed and produced for a long uninterrupted period of time: • This...
Owners Guide
Page 23
... For optional accessories, follow the instructions. ACCESS If the DVD camcorder is turned off while the ACCESS indicator is blinking, turn the DVD camcorder off or the case could cause fire, burns, electric shock or fault. 23 Do not wipe the DVD camcorder case with benzene or thinner: • The coating of...narrow space where flow of air is blocked, or where it is turned off. Cautions When Using Be careful when removing the DVD-RAM disc: When the DVD camcorder is used for a long period of time, the temperature of DVDRAM disc will increase heat inside the AC adapter/charger, which...
... For optional accessories, follow the instructions. ACCESS If the DVD camcorder is turned off while the ACCESS indicator is blinking, turn the DVD camcorder off or the case could cause fire, burns, electric shock or fault. 23 Do not wipe the DVD camcorder case with benzene or thinner: • The coating of...narrow space where flow of air is blocked, or where it is turned off. Cautions When Using Be careful when removing the DVD-RAM disc: When the DVD camcorder is used for a long period of time, the temperature of DVDRAM disc will increase heat inside the AC adapter/charger, which...
Owners Guide
Page 24
... attached or storing it in a box when storing it at high temperature could shorten its life. 24 Cautions When Storing Do not leave the DVD camcorder in a place where the temperature is very high for a long period of time: The temperature inside a closed vehicle or trunk becomes very ...high in such a place, it could malfunction or the case could cause malfunctions. Do not store the DVD camcorder in a dusty place: Dust entering the DVD camcorder could be unusable. If the humidity is high or in a place subject to direct sunlight or place near a heater. Also,...
... attached or storing it in a box when storing it at high temperature could shorten its life. 24 Cautions When Storing Do not leave the DVD camcorder in a place where the temperature is very high for a long period of time: The temperature inside a closed vehicle or trunk becomes very ...high in such a place, it could malfunction or the case could cause malfunctions. Do not store the DVD camcorder in a dusty place: Dust entering the DVD camcorder could be unusable. If the humidity is high or in a place subject to direct sunlight or place near a heater. Also,...
Owners Guide
Page 25
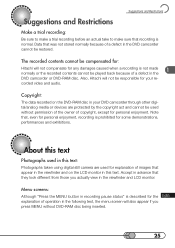
... text Photographs used in this text. Also, Hitachi will not compensate for personal enjoyment. Copyright: The data recorded on the LCD monitor in this text: Photographs taken using digital still camera are used for your DVD camcorder through other digital/analog media or devices are protected... by the copyright act and cannot be used without DVD-RAM disc being inserted. 25 The recorded contents cannot be compensated for: Hitachi will not be responsible for explanation of...
... text Photographs used in this text. Also, Hitachi will not compensate for personal enjoyment. Copyright: The data recorded on the LCD monitor in this text: Photographs taken using digital still camera are used for your DVD camcorder through other digital/analog media or devices are protected... by the copyright act and cannot be used without DVD-RAM disc being inserted. 25 The recorded contents cannot be compensated for: Hitachi will not be responsible for explanation of...
Owners Guide
Page 26
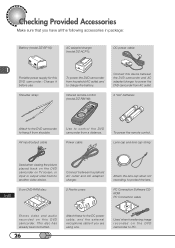
... cap string: Used when viewing the picture played back on the DVD camcorder on TV screen, or input or output video from household AC outlet, and to hang it before use. Infrared remote control (model DZ-RM1W): Connect this device between household AC outlet and AC adapter/...and the external microphone cable if you have all the following accessories in package: Battery (model DZ-BP16): AC adapter/charger (model DZ-ACP1): DC power cable: Portable power supply for this DVD camcorder. Power cable: To power the remote control. Checking Provided Accessories Make sure that you are...
... cap string: Used when viewing the picture played back on the DVD camcorder on TV screen, or input or output video from household AC outlet, and to hang it before use. Infrared remote control (model DZ-RM1W): Connect this device between household AC outlet and AC adapter/...and the external microphone cable if you have all the following accessories in package: Battery (model DZ-BP16): AC adapter/charger (model DZ-ACP1): DC power cable: Portable power supply for this DVD camcorder. Power cable: To power the remote control. Checking Provided Accessories Make sure that you are...

Owners Guide
Page 28
Caution: • Always keep the lens cap on when not using the DVD comcorder, to the DVD camcorder. 2. Use the string to attach the cap to protect the lens. Tip: • When recording, attach the lens cap to pass through the 2 slots. chapter ...;a○p Be sure to the hand strap by hooking the tab inside the cap onto strap for comfortable shooting. 28 Push the both sides of DVD camcorder. 1. A○ t○ta○ c○ h○ i○n○g○L○e○n○s ○C○a○p Pass the provided string through the 2 slots. Be sure to...
Caution: • Always keep the lens cap on when not using the DVD comcorder, to the DVD camcorder. 2. Use the string to attach the cap to protect the lens. Tip: • When recording, attach the lens cap to pass through the 2 slots. chapter ...;a○p Be sure to the hand strap by hooking the tab inside the cap onto strap for comfortable shooting. 28 Push the both sides of DVD camcorder. 1. A○ t○ta○ c○ h○ i○n○g○L○e○n○s ○C○a○p Pass the provided string through the 2 slots. Be sure to...
Owners Guide
Page 33
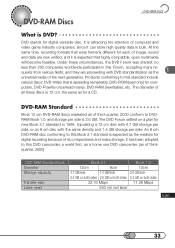
...in this standard include various discs: DVD-Video that is spreading remarkably, DVD-ROM (read many requests from various fields; It has been adopted to this DVD camcorder, a world first, as a home use DVD camcorder. (as the medium for a CD. An 8 cm DVD-RAM disc conforming to this Book ...2.1 standard is expected as of thirdquarter, 2000) DVD-RAM Standard Book Diameter Storage capacity Transfer rate Laser ...
...in this standard include various discs: DVD-Video that is spreading remarkably, DVD-ROM (read many requests from various fields; It has been adopted to this DVD camcorder, a world first, as a home use DVD camcorder. (as the medium for a CD. An 8 cm DVD-RAM disc conforming to this Book ...2.1 standard is expected as of thirdquarter, 2000) DVD-RAM Standard Book Diameter Storage capacity Transfer rate Laser ...


