Owners Guide
Page 1
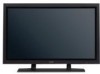
For future reference, record the serial number of the monitor. As an ENERGY STAR® Partner, Hitachi,Ltd. has determined that this product meets the ENERGY STAR® guidelines for energy efficiency. SERIAL NO. The serial number is ENERGY STAR® compliant ... EPA endorsement of any product or service. KEEP THIS USER'S MANUAL FOR FUTURE REFERENCE. This monitor is located on the rear of your monitor. Color Plasma Display Monitor Model PW1A CMP420V1 CMP420V2 USER'S MANUAL MANUEL UTILISATEUR MANUAL DE USUARIO READ THE INSTRUCTIONS INSIDE CAREFULLY.
For future reference, record the serial number of the monitor. As an ENERGY STAR® Partner, Hitachi,Ltd. has determined that this product meets the ENERGY STAR® guidelines for energy efficiency. SERIAL NO. The serial number is ENERGY STAR® compliant ... EPA endorsement of any product or service. KEEP THIS USER'S MANUAL FOR FUTURE REFERENCE. This monitor is located on the rear of your monitor. Color Plasma Display Monitor Model PW1A CMP420V1 CMP420V2 USER'S MANUAL MANUEL UTILISATEUR MANUAL DE USUARIO READ THE INSTRUCTIONS INSIDE CAREFULLY.
Owners Guide
Page 3
Always have an installation specialist or your monitor, please carefully read the "SAFETY INSTRUCTIONS" and this "USER'S MANUAL" so you very much for damage caused by qualifed personnel with enough skill and competence. Keep this manual to the ... You will know how to handle the product. Note for Dealers: After installation, be sure to deliver this manual in a safe place. HITACHI cannot assume liabilities for purchasing the HITACHI Plasma Display Monitor. Notes on lnstallation Work: This product is installed by mistake in the future. ENGLISH USER'S MANUAL Thank you will find...
Always have an installation specialist or your monitor, please carefully read the "SAFETY INSTRUCTIONS" and this "USER'S MANUAL" so you very much for damage caused by qualifed personnel with enough skill and competence. Keep this manual to the ... You will know how to handle the product. Note for Dealers: After installation, be sure to deliver this manual in a safe place. HITACHI cannot assume liabilities for purchasing the HITACHI Plasma Display Monitor. Notes on lnstallation Work: This product is installed by mistake in the future. ENGLISH USER'S MANUAL Thank you will find...
Owners Guide
Page 4
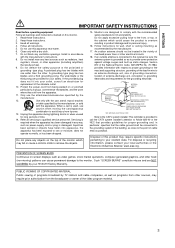
... TO OPERATE ON 120 VOLTS 60Hz, AC CURRENT. IMPORTANT SAFETY INSTRUCTIONS SAFETY POINTS YOU SHOULD KNOW ABOUT YOUR HITACHI PLASMA MONITOR Our reputation has been built on this section illustrates safety tips which will enable HITACHI to you obtain from it carefully and apply the knowledge you .... Safety is also foremost in our minds in the instructions, as this device that...
... TO OPERATE ON 120 VOLTS 60Hz, AC CURRENT. IMPORTANT SAFETY INSTRUCTIONS SAFETY POINTS YOU SHOULD KNOW ABOUT YOUR HITACHI PLASMA MONITOR Our reputation has been built on this section illustrates safety tips which will enable HITACHI to you obtain from it carefully and apply the knowledge you .... Safety is also foremost in our minds in the instructions, as this device that...
Owners Guide
Page 5
...to retrieve the objects. 15. Such "SCREEN BURNS" constitute misuse and are NOT COVERED by the manufacturer, or sold with the manufacturer's instructions. 8. Install in any ventilation openings. A polarized plug has two blades with the recommended safety standards for replacement of the obsolete outlet. ...in product damage and/or personal injury. 16. Servicing is damaged, liquid has been spilled or objects have fallen into your HITACHI Factory Warranty. PUBLIC VIEWING OF COPYRIGHTED MATERIAL Public viewing of programs broadcast by TV stations and cable companies, as well as ...
...to retrieve the objects. 15. Such "SCREEN BURNS" constitute misuse and are NOT COVERED by the manufacturer, or sold with the manufacturer's instructions. 8. Install in any ventilation openings. A polarized plug has two blades with the recommended safety standards for replacement of the obsolete outlet. ...in product damage and/or personal injury. 16. Servicing is damaged, liquid has been spilled or objects have fallen into your HITACHI Factory Warranty. PUBLIC VIEWING OF COPYRIGHTED MATERIAL Public viewing of programs broadcast by TV stations and cable companies, as well as ...
Owners Guide
Page 6
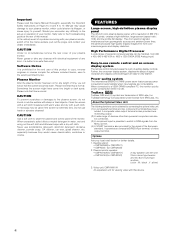
...etc. CAUTION Use a soft cloth to yourself. TruBass TruBass, SRS and (O) symbol are not available. Desktop stand: • CMPAD05B(for CMP420V1) • CMPAD05 (for further details. 1. Should you will notice that this device. Further, the on screen display system The remote control ...Please read this User's Manual thoroughly, especially the Important Safety Instructions on for any length of time, you encounter any kind - FEATURES Large-screen, high-definition plasma display panel The 42-inch color plasma display panel, with this is also provided for the signal of any ...
...etc. CAUTION Use a soft cloth to yourself. TruBass TruBass, SRS and (O) symbol are not available. Desktop stand: • CMPAD05B(for CMP420V1) • CMPAD05 (for further details. 1. Should you will notice that this device. Further, the on screen display system The remote control ...Please read this User's Manual thoroughly, especially the Important Safety Instructions on for any length of time, you encounter any kind - FEATURES Large-screen, high-definition plasma display panel The 42-inch color plasma display panel, with this is also provided for the signal of any ...
Owners Guide
Page 7
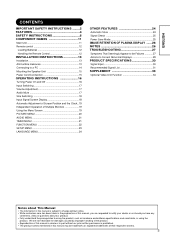
...FUNCTION MENU 22 SETUP MENU 23 LANGUAGE MENU 24 OTHER FEATURES 24 Automatic Store 24 Signal Check 25 Power Save Mode 25 IMAGE RETENTION OF PLASMA DISPLAY ......26 NOTES 26 TROUBLESHOOTING 27 Symptoms That Seemingly Appear to using the product, such as hardware and software specifications and constraints, in... Installation 13 Anti-tumble measures 13 Connecting to a PC 14 Mounting the Speaker Unit 15 Power Cord Connection 15 OPERATING INSTRUCTIONS 16 Turning Power On and Off 16 Input Switching 17 Volume Adjustment 17 Audio Mute 17 Size Switching 18 Input Signal Screen Display...
...FUNCTION MENU 22 SETUP MENU 23 LANGUAGE MENU 24 OTHER FEATURES 24 Automatic Store 24 Signal Check 25 Power Save Mode 25 IMAGE RETENTION OF PLASMA DISPLAY ......26 NOTES 26 TROUBLESHOOTING 27 Symptoms That Seemingly Appear to using the product, such as hardware and software specifications and constraints, in... Installation 13 Anti-tumble measures 13 Connecting to a PC 14 Mounting the Speaker Unit 15 Power Cord Connection 15 OPERATING INSTRUCTIONS 16 Turning Power On and Off 16 Input Switching 17 Volume Adjustment 17 Audio Mute 17 Size Switching 18 Input Signal Screen Display...
Owners Guide
Page 8
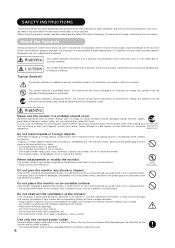
...instructions. If the monitor should enter the projector, immediately turn off the power switch, disconnect the power plug from the power outlet and contact your dealer. • Do not place the monitor in fire or electrical shock. Do not insert liquids or foreign objects. If the glass panel... sound, damaged casing, elements, cables, penetration of the monitor. This symbol indicates a compulsory action. SAFETY INSTRUCTIONS This Plasma monitor has been designed and manufactured to meet international safety standards, but like any electrical equipment, care must be used .
...instructions. If the monitor should enter the projector, immediately turn off the power switch, disconnect the power plug from the power outlet and contact your dealer. • Do not place the monitor in fire or electrical shock. Do not insert liquids or foreign objects. If the glass panel... sound, damaged casing, elements, cables, penetration of the monitor. This symbol indicates a compulsory action. SAFETY INSTRUCTIONS This Plasma monitor has been designed and manufactured to meet international safety standards, but like any electrical equipment, care must be used .
Owners Guide
Page 9
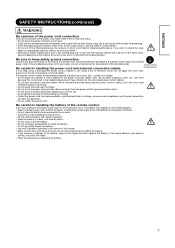
... exposed to extend the lead, obtain an appropriate extension lead or consult your outlet, consult an electrician for replacement of the power cord connection. SAFETY INSTRUCTIONS(continued) ENGLISH WARNING Be cautious of the obsolete outlet. Incorrect connection of this monitor with water. • Obey the local laws on the concealed power...
... exposed to extend the lead, obtain an appropriate extension lead or consult your outlet, consult an electrician for replacement of the power cord connection. SAFETY INSTRUCTIONS(continued) ENGLISH WARNING Be cautious of the obsolete outlet. Incorrect connection of this monitor with water. • Obey the local laws on the concealed power...
Owners Guide
Page 10
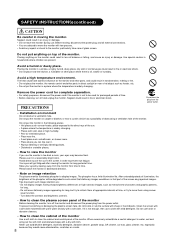
...the screen as monochrome characters and graphic patterns, for prolonged periods of the monitor. The phosphor has a finite illumination life. SAFETY INSTRUCTIONS(continued) CAUTION Be careful in moving , disconnect the power plug and all external connections. • You are advised to move... them at appropriate intervals of the monitor. PRECAUTIONS • Installation environment Do not obstruct a ventilation hole. Tips to clean the plasma screen panel of the monitor. Turn down the contrast and brightness controls. • How to prevent such image retention are present. If it...
...the screen as monochrome characters and graphic patterns, for prolonged periods of the monitor. The phosphor has a finite illumination life. SAFETY INSTRUCTIONS(continued) CAUTION Be careful in moving , disconnect the power plug and all external connections. • You are advised to move... them at appropriate intervals of the monitor. PRECAUTIONS • Installation environment Do not obstruct a ventilation hole. Tips to clean the plasma screen panel of the monitor. Turn down the contrast and brightness controls. • How to prevent such image retention are present. If it...
Owners Guide
Page 11
...confirm the screws on the remote control. Failure to transport the monitor in any carton except the original carton may require specific instructions pertaining to overturn resulting in any doubt about installation, operation or safety of your resident region. - Do not physically impact ... and make sure that it is used, use makeshift stands and NEVER fix legs with the apparatus. Avoid radio interference. Follow instructions for unattended operation or has a stand-by the manufacturer. - Furthermore, use the attachments/accessories specified by the manufacturer, or ...
...confirm the screws on the remote control. Failure to transport the monitor in any carton except the original carton may require specific instructions pertaining to overturn resulting in any doubt about installation, operation or safety of your resident region. - Do not physically impact ... and make sure that it is used, use makeshift stands and NEVER fix legs with the apparatus. Avoid radio interference. Follow instructions for unattended operation or has a stand-by the manufacturer. - Furthermore, use the attachments/accessories specified by the manufacturer, or ...
Owners Guide
Page 12
...technician for a Class B digital device, pursuant to Users : This equipment complies with the standards. Telephone: 1-800-HITACHI Declare under sole responsibility that interference will not occur in accordance with the standards of FCC (Federal Communication Commission) ...identical to the representative unit tested and found to comply with the limits for help. Trade name: Plasma Display Monitor Model Number: CMP420V PW1A ( = 0 9,A Z or Blank) SAFETY INSTRUCTIONS(continued) • FCC (Federal Communications Commission) STATEMENT WARNING For model CMP420V PW1A ( = 0 9,...
...technician for a Class B digital device, pursuant to Users : This equipment complies with the standards. Telephone: 1-800-HITACHI Declare under sole responsibility that interference will not occur in accordance with the standards of FCC (Federal Communication Commission) ...identical to the representative unit tested and found to comply with the limits for help. Trade name: Plasma Display Monitor Model Number: CMP420V PW1A ( = 0 9,A Z or Blank) SAFETY INSTRUCTIONS(continued) • FCC (Federal Communications Commission) STATEMENT WARNING For model CMP420V PW1A ( = 0 9,...

Owners Guide
Page 15
... design can be dangerous, so do not attempt this product. Take measures to prevent it from tumbling down to a firm wall or pillar. ENGLISH INSTALLATION INSTRUCTIONS Installation • If you have purchased the model without the stand attached: When installing the monitor, use of other objects such as shown. 2) Using commercially...
... design can be dangerous, so do not attempt this product. Take measures to prevent it from tumbling down to a firm wall or pillar. ENGLISH INSTALLATION INSTRUCTIONS Installation • If you have purchased the model without the stand attached: When installing the monitor, use of other objects such as shown. 2) Using commercially...
Owners Guide
Page 16
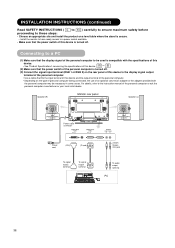
... to be necessary in some cases. For details, refer to the instruction manual of the personal computer or ask the personal computer manufacturer or your local retail dealer. Speaker (R) Monitor rear panel Speaker (L) Power cable connector Power cord (DVI) (D-sub) To ...signal output terminal To signal output terminal 3.5mm Stereo mini jack To audio output terminal PC INSTALLATION INSTRUCTIONS (continued) Read SAFETY INSTRUCTIONS ( to ) carefully to ensure maximum...
... to be necessary in some cases. For details, refer to the instruction manual of the personal computer or ask the personal computer manufacturer or your local retail dealer. Speaker (R) Monitor rear panel Speaker (L) Power cable connector Power cord (DVI) (D-sub) To ...signal output terminal To signal output terminal 3.5mm Stereo mini jack To audio output terminal PC INSTALLATION INSTRUCTIONS (continued) Read SAFETY INSTRUCTIONS ( to ) carefully to ensure maximum...
Owners Guide
Page 17
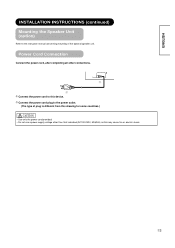
...power cord, after completing all other connections. ᶃ ᶄ x Connect the power cord to this device. ➁ Connect the power cord plug to the instruction manual concerning mounting of plug is different from this drawing for some countries.) CAUTION • Use only the power cord provided. • Do not use... a power supply voltage other than that indicated (AC100-240V, 50/60Hz) as this may cause fire or electric shock. ENGLISH INSTALLATION INSTRUCTIONS (continued) Mounting the Speaker Unit (option) Refer to the power outlet. (The type of the optional speaker unit.
...power cord, after completing all other connections. ᶃ ᶄ x Connect the power cord to this device. ➁ Connect the power cord plug to the instruction manual concerning mounting of plug is different from this drawing for some countries.) CAUTION • Use only the power cord provided. • Do not use... a power supply voltage other than that indicated (AC100-240V, 50/60Hz) as this may cause fire or electric shock. ENGLISH INSTALLATION INSTRUCTIONS (continued) Mounting the Speaker Unit (option) Refer to the power outlet. (The type of the optional speaker unit.
Owners Guide
Page 18
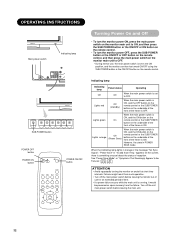
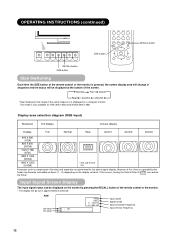
... on upon recovery from such operation. • Turn off the unit main power switch before leaving the monitor out of the frame is OFF. OPERATING INSTRUCTIONS Main power switch Indicating lamp Turning Power On and Off • To turn the monitor power ON, press the main power switch on the monitor...
... on upon recovery from such operation. • Turn off the unit main power switch before leaving the monitor out of the frame is OFF. OPERATING INSTRUCTIONS Main power switch Indicating lamp Turning Power On and Off • To turn the monitor power ON, press the main power switch on the monitor...
Owners Guide
Page 19
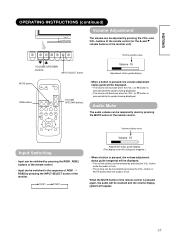
.... • The volume will be displayed. • The volume setting can be temporarily mute by pressing the MUTE button of the monitor unit). ENGLISH OPERATING INSTRUCTIONS (continued) Volume Adjustment The volume can be cancelled by pressing the VOL+ button or MUTE button while the audio is mute. button while the audio...
.... • The volume will be displayed. • The volume setting can be temporarily mute by pressing the MUTE button of the monitor unit). ENGLISH OPERATING INSTRUCTIONS (continued) Volume Adjustment The volume can be cancelled by pressing the VOL+ button or MUTE button while the audio is mute. button while the audio...
Owners Guide
Page 20
... displayed at the bottom of the screen. Min RGB2 RGB H : 48.4kHz V : 60.1 Hz Input mode Signal mode Input horizontal frequency Input vertical frequency OPERATING INSTRUCTIONS (continued) SIZE button RGB 1 RGB 2 MUTE VOL AV1 AV2 AV3 AV4 AUTO PinP SIZE RECALL MENU OK ID ID SET RECALL button RECALL button SIZE...
... displayed at the bottom of the screen. Min RGB2 RGB H : 48.4kHz V : 60.1 Hz Input mode Signal mode Input horizontal frequency Input vertical frequency OPERATING INSTRUCTIONS (continued) SIZE button RGB 1 RGB 2 MUTE VOL AV1 AV2 AV3 AV4 AUTO PinP SIZE RECALL MENU OK ID ID SET RECALL button RECALL button SIZE...
Owners Guide
Page 21
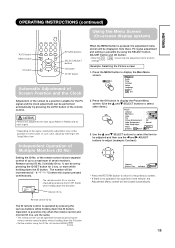
... closed automatically. concerning the adjustment items and the settings. Independent Operation of Function MENU. Picture MENU Audio Timer Function Setup Language Select OK Set 2. OPERATING INSTRUCTIONS (continued) ENGLISH AUTO button MENU button ID button VOL RGB 1 RGB 2 MUTE VOL AV1 AV2 AV3 AV4 AUTO PinP SIZE RECALL MENU OK ID ID...
... closed automatically. concerning the adjustment items and the settings. Independent Operation of Function MENU. Picture MENU Audio Timer Function Setup Language Select OK Set 2. OPERATING INSTRUCTIONS (continued) ENGLISH AUTO button MENU button ID button VOL RGB 1 RGB 2 MUTE VOL AV1 AV2 AV3 AV4 AUTO PinP SIZE RECALL MENU OK ID ID...
Owners Guide
Page 22
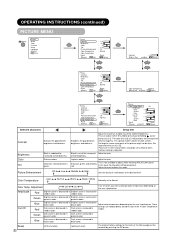
... increased overall brightness. Lightens colors. Enhances green and weakens red. Amplitude Red Brighter scene is decreased in reddish color. reddish color. OPERATING INSTRUCTIONS (continued) PICTURE MENU MENU Picture Audio Timer Function Setup Language Select OK Set Picture Contrast : + 31 OK Brightness : - 31 OK... the ambient brightness. The color for dark scenes. This special mode is adjusted. We recommend to set to taste. "Panel Life" in greenish color. Adjust to the desired level. Adjust to Normal. In this Menu page can adjust further till...
... increased overall brightness. Lightens colors. Enhances green and weakens red. Amplitude Red Brighter scene is decreased in reddish color. reddish color. OPERATING INSTRUCTIONS (continued) PICTURE MENU MENU Picture Audio Timer Function Setup Language Select OK Set Picture Contrast : + 31 OK Brightness : - 31 OK... the ambient brightness. The color for dark scenes. This special mode is adjusted. We recommend to set to taste. "Panel Life" in greenish color. Adjust to the desired level. Adjust to Normal. In this Menu page can adjust further till...
Owners Guide
Page 23
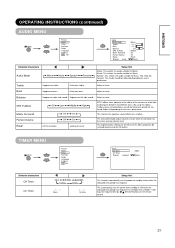
... not be adjusted depending on user's preference. TIMER MENU MENU Picture Audio Timer Function Setup Language Select OK Set Timer Off Timer : 30Min. ENGLISH OPERATING INSTRUCTIONS (continued) AUDIO MENU MENU Picture Audio Timer Function Setup Language Select OK Set Audio Audio Mode : Movie OK Treble : + 10 Bass : - 10 Balance : 0L R SRS...
... not be adjusted depending on user's preference. TIMER MENU MENU Picture Audio Timer Function Setup Language Select OK Set Timer Off Timer : 30Min. ENGLISH OPERATING INSTRUCTIONS (continued) AUDIO MENU MENU Picture Audio Timer Function Setup Language Select OK Set Audio Audio Mode : Movie OK Treble : + 10 Bass : - 10 Balance : 0L R SRS...


