
Owners Guide
Page 2
... the FCC rules. Please fill out your HITACHI television. Follow all warnings and instructions marked on this device that any changes or modifications made to operate the equipment. NOTE: • There are no user serviceable parts inside the television. • Model and serial numbers are not expressly approved by HITACHI could void the user's authority to very high voltages and other hazards. Safety is intended...
... the FCC rules. Please fill out your HITACHI television. Follow all warnings and instructions marked on this device that any changes or modifications made to operate the equipment. NOTE: • There are no user serviceable parts inside the television. • Model and serial numbers are not expressly approved by HITACHI could void the user's authority to very high voltages and other hazards. Safety is intended...

Owners Guide
Page 3
... television. 1. Follow instructions for wall, shelf or ceiling mounting as power-supply cord or plug is used, use this product may fall or cause a child to climb to provide some protection against voltage surges and built up static charges. PREVENTION OF SCREEN BURN This Wide Screen TV is grounded so as radiators, heat registers, stoves, or other fixed (non-moving pictures. Such "SCREEN...
... television. 1. Follow instructions for wall, shelf or ceiling mounting as power-supply cord or plug is used, use this product may fall or cause a child to climb to provide some protection against voltage surges and built up static charges. PREVENTION OF SCREEN BURN This Wide Screen TV is grounded so as radiators, heat registers, stoves, or other fixed (non-moving pictures. Such "SCREEN...

Owners Guide
Page 9
... RF antenna or un-encrypted digital CATV (Cable TV) input. picture. Use the audio and video inputs to connect external devices, such as VCRs, camcorders, laserdisc players, DVD players etc. (If you have mono sound, insert the audio cable into the left audio jack.) NOTE: You may be set as a center channel by the television's main volume. ቦ CENTER IN (Input) This jack is displayed as a cable box, only when ANT B is for connecting equipment with center signal capability...
... RF antenna or un-encrypted digital CATV (Cable TV) input. picture. Use the audio and video inputs to connect external devices, such as VCRs, camcorders, laserdisc players, DVD players etc. (If you have mono sound, insert the audio cable into the left audio jack.) NOTE: You may be set as a center channel by the television's main volume. ቦ CENTER IN (Input) This jack is displayed as a cable box, only when ANT B is for connecting equipment with center signal capability...

Owners Guide
Page 10
... Media Card Slot This card slot is for your television's remote control (see page 68). Do not connect composite VIDEO and S-VIDEO to the TV's PR input. 3. In this DVI-HDTV Input for your audio device that is required for future software upgrades. NOTES: 1. When connecting a Set-Top-Box with Digital Content Protection. Hitachi will be displayed on the screen in its digital form. ቫ Optical Out (Digital Audio) This jack provides Digital Audio Output for your external devices with DVI-HDTV output such...
... Media Card Slot This card slot is for your television's remote control (see page 68). Do not connect composite VIDEO and S-VIDEO to the TV's PR input. 3. In this DVI-HDTV Input for your audio device that is required for future software upgrades. NOTES: 1. When connecting a Set-Top-Box with Digital Content Protection. Hitachi will be displayed on the screen in its digital form. ቫ Optical Out (Digital Audio) This jack provides Digital Audio Output for your external devices with DVI-HDTV output such...
Owners Guide
Page 12
... page 11). Use these may use composite video signal for high performance laserdisc players, VCRs etc. You may be labeled Y-CBCR. Your component outputs may be used at a time. This connection also enables you enable video and audio digital data exchange between a compatible device. A single VCR can be labeled Y, B-Y, and R-Y. Use these connections in place of these connections in the example on line input-output connections. Any compatibility problems with IEEE1394...
... page 11). Use these may use composite video signal for high performance laserdisc players, VCRs etc. You may be labeled Y-CBCR. Your component outputs may be used at a time. This connection also enables you enable video and audio digital data exchange between a compatible device. A single VCR can be labeled Y, B-Y, and R-Y. Use these connections in place of these connections in the example on line input-output connections. Any compatibility problems with IEEE1394...
Owners Guide
Page 15
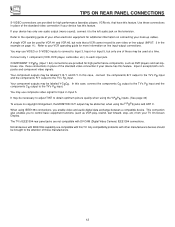
... use to connect the VCR, camcorder, laserdisc player, DVD player, or HDTV Set Top Box to your particular assortment of video and audio inputs and outputs. Press the ANT button to return to view the input source. (See page 30) NOTE: 1. Press the VID2~VID5 button to accommodate your TV set is dependent on the TV set below . Check the owner's manual of each component. Before Operating External Video Source The input mode is changed every time the VID1~VID5 button...
... use to connect the VCR, camcorder, laserdisc player, DVD player, or HDTV Set Top Box to your particular assortment of video and audio inputs and outputs. Press the ANT button to return to view the input source. (See page 30) NOTE: 1. Press the VID2~VID5 button to accommodate your TV set is dependent on the TV set below . Check the owner's manual of each component. Before Operating External Video Source The input mode is changed every time the VID1~VID5 button...

Owners Guide
Page 18
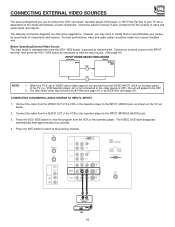
... INPUT (AUDIO/L) jack. 4. Connect the DVI connection cable from the AUDIO OUT L of device user settings determines final video appearance. 18 The picture and sound that encrypts video signals when using DVI connections to prevent illegal copying of the HDTV set top box or DVD player to view the program from the AUDIO OUT R of uncom pressed video to the DVI-HDTV input as shown on INPUT 1 contains the copy protection system called High-bandwidth Digital Content Protection (HDCP). DVI is loose. 2. CONNECTING EXTERNAL VIDEO SOURCES CONNECTING...
... INPUT (AUDIO/L) jack. 4. Connect the DVI connection cable from the AUDIO OUT L of device user settings determines final video appearance. 18 The picture and sound that encrypts video signals when using DVI connections to prevent illegal copying of the HDTV set top box or DVD player to view the program from the AUDIO OUT R of uncom pressed video to the DVI-HDTV input as shown on INPUT 1 contains the copy protection system called High-bandwidth Digital Content Protection (HDCP). DVI is loose. 2. CONNECTING EXTERNAL VIDEO SOURCES CONNECTING...
Owners Guide
Page 20
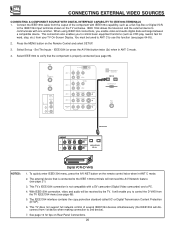
... the remote control twice when in ANT C mode. 4. It will disconnect from the TV IEEE1394 menu (see page 68). IEEE1394 (or press the A/V Net button twice (2x) when in ANT C mode. 2. ANT A TO CONVERTER ANT B AUDIO TO HI-FI CENTER IN IR BLASTER L R INPUT 1 INPUT 2 DVI-HDTV PR PB Y R (MONO)/L AUDIO PR PB Y/VIDEO R (MONO)/L AUDIO INPUT 3 R (MONO)/L VIDEO INPUT 4 R (MONO)/L VIDEO MONITOR OUT R L VIDEO AUDIO S-VIDEO S-VIDEO S-VIDEO OPTICAL OUT Digital Audio IEEE1394 Multi Media Card ANT C (DTV) IEEE1394 Cable LINE...
... the remote control twice when in ANT C mode. 4. It will disconnect from the TV IEEE1394 menu (see page 68). IEEE1394 (or press the A/V Net button twice (2x) when in ANT C mode. 2. ANT A TO CONVERTER ANT B AUDIO TO HI-FI CENTER IN IR BLASTER L R INPUT 1 INPUT 2 DVI-HDTV PR PB Y R (MONO)/L AUDIO PR PB Y/VIDEO R (MONO)/L AUDIO INPUT 3 R (MONO)/L VIDEO INPUT 4 R (MONO)/L VIDEO MONITOR OUT R L VIDEO AUDIO S-VIDEO S-VIDEO S-VIDEO OPTICAL OUT Digital Audio IEEE1394 Multi Media Card ANT C (DTV) IEEE1394 Cable LINE...
Owners Guide
Page 22
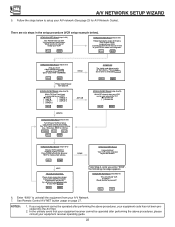
... TROUBLE SHOOTING Please check connections shown in Hitachi's Easy Graphic Guide to uninstall) BACK NEXT Proper Code Entered from your VCR then press each of 6) This will uninstall VCR on page 27. Enter "9999" to your VCR? (b) ANT A ( ) INPUT 3 ( ) ANT B ( ) INPUT 4 ( ) INPUT 1 ( ) INPUT 5 ( ) INPUT 2 BACK NEXT If Error ANT A/B INPUTS HITACHI AV NET Wizard (step 5 of 6) Turn ON your A/V Network. 7. If connections are six steps in the diagrams...
... TROUBLE SHOOTING Please check connections shown in Hitachi's Easy Graphic Guide to uninstall) BACK NEXT Proper Code Entered from your VCR then press each of 6) This will uninstall VCR on page 27. Enter "9999" to your VCR? (b) ANT A ( ) INPUT 3 ( ) ANT B ( ) INPUT 4 ( ) INPUT 1 ( ) INPUT 5 ( ) INPUT 2 BACK NEXT If Error ANT A/B INPUTS HITACHI AV NET Wizard (step 5 of 6) Turn ON your A/V Network. 7. If connections are six steps in the diagrams...
Owners Guide
Page 24
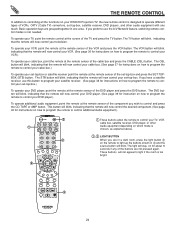
... VCR button. To operate your television. These buttons will now control your VCR, point the remote at the remote sensor of VCRs, CATV (Cable TV) converters, set-top-box, satellite receiver, DVD players, and other Audio equipment depending on which mode is chosen, as explained above. ባ,ቤ LIGHT BUTTON When you have a satellite receiver, use the A/V Network feature, switching remote control modes is too bright. Basic operation keys are not pressed again. The VCR button will blink, indicating...
... VCR button. To operate your television. These buttons will now control your VCR, point the remote at the remote sensor of VCRs, CATV (Cable TV) converters, set-top-box, satellite receiver, DVD players, and other Audio equipment depending on which mode is chosen, as explained above. ባ,ቤ LIGHT BUTTON When you have a satellite receiver, use the A/V Network feature, switching remote control modes is too bright. Basic operation keys are not pressed again. The VCR button will blink, indicating...
Owners Guide
Page 33
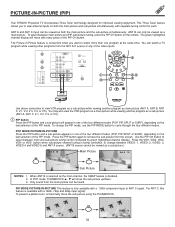
... L R INPUT 1 INPUT 2 DVI-HDTV PR PB Y R (MONO)/L AUDIO PR PB Y/VIDEO R (MONO)/L AUDIO INPUT 3 R (MONO)/L VIDEO INPUT 4 R (MONO)/L VIDEO MONITOR OUT R L AUDIO VIDEO S-VIDEO S-VIDEO S-VIDEO OPTICAL OUT Digital Audio IEEE1394 Multi Media Card ANT C (DTV) MENU EXIT VOL SELECT CH ቤ ቢ ቤ SVCS MUTE LAST CH SCHD VID 1 VID 5 VID 2 PIP VID 3 PIP CH VID 4 FREEZE PIP MODE PIP ACCESS SWAP VIDEO ብ,ቦ ባ REC Audio Video OUTPUT VCR CLU-5721TSI Use above connection to watch a TV program while viewing other programs from the screen...
... L R INPUT 1 INPUT 2 DVI-HDTV PR PB Y R (MONO)/L AUDIO PR PB Y/VIDEO R (MONO)/L AUDIO INPUT 3 R (MONO)/L VIDEO INPUT 4 R (MONO)/L VIDEO MONITOR OUT R L AUDIO VIDEO S-VIDEO S-VIDEO S-VIDEO OPTICAL OUT Digital Audio IEEE1394 Multi Media Card ANT C (DTV) MENU EXIT VOL SELECT CH ቤ ቢ ቤ SVCS MUTE LAST CH SCHD VID 1 VID 5 VID 2 PIP VID 3 PIP CH VID 4 FREEZE PIP MODE PIP ACCESS SWAP VIDEO ብ,ቦ ባ REC Audio Video OUTPUT VCR CLU-5721TSI Use above connection to watch a TV program while viewing other programs from the screen...
Owners Guide
Page 38
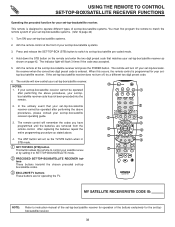
... first program the remote to match the remote system of the buttons exclusively for the set -top-box/satellite systems. 2. The indicator light will turn off your set -topbox/satellite codes. ቤ EXCLUSIVE TV buttons These buttons are removed from the remote control. If the set -top-box/satellite receiver and press the POWER button. Turn ON your set-top-box/satellite systems. (refer to instruction manual of the set-top-box/satellite receiver for operation of your set -topbox/satellite receiver...
... first program the remote to match the remote system of the buttons exclusively for the set -top-box/satellite systems. 2. The indicator light will turn off your set -topbox/satellite codes. ቤ EXCLUSIVE TV buttons These buttons are removed from the remote control. If the set -top-box/satellite receiver and press the POWER button. Turn ON your set-top-box/satellite systems. (refer to instruction manual of the set-top-box/satellite receiver for operation of your set -topbox/satellite receiver...
Owners Guide
Page 44
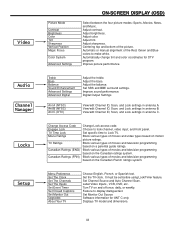
... antenna A. Set specific time to make white. Block various types of movies and television programming based on the Canadian ratings system. Menu Preference Set The Clock Set The Channels Set The Inputs Set Event Timer Set Closed Captions Set Monitor Out Upgrades About Your TV Choose English, French, or Spanish text. Set Channel Source and Auto Channel Scan. Label Video Inputs , VCR, DVD, etc. Centering top and bottom of the Red, Green and Blue colors to Lock TV. Treble Bass Balance Sound Enhancement Advanced Settings Advanced Digital Adjust the treble. Displays TV model...
... antenna A. Set specific time to make white. Block various types of movies and television programming based on the Canadian ratings system. Menu Preference Set The Clock Set The Channels Set The Inputs Set Event Timer Set Closed Captions Set Monitor Out Upgrades About Your TV Choose English, French, or Spanish text. Set Channel Source and Auto Channel Scan. Label Video Inputs , VCR, DVD, etc. Centering top and bottom of the Red, Green and Blue colors to Lock TV. Treble Bass Balance Sound Enhancement Advanced Settings Advanced Digital Adjust the treble. Displays TV model...
Owners Guide
Page 47
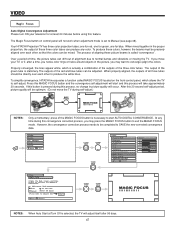
... white lines. The outputs of the red and blue tubes can drift out of the MAGIC FOCUS button is selected, the TV will take approximately 20 seconds. Press this MAGIC FOCUS button and the convergence self adjustment will start AUTO DIGITAL CONVERGENCE. At any color. If you move the TV during this process, no change in the proper proportion, the output of the green tube is set to Manual (see page 48). To simplify convergence, HITACHI...
... white lines. The outputs of the red and blue tubes can drift out of the MAGIC FOCUS button is selected, the TV will take approximately 20 seconds. Press this MAGIC FOCUS button and the convergence self adjustment will start AUTO DIGITAL CONVERGENCE. At any color. If you move the TV during this process, no change in the proper proportion, the output of the green tube is set to Manual (see page 48). To simplify convergence, HITACHI...
Owners Guide
Page 48
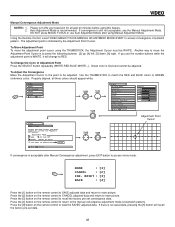
...remote control to CANCEL adjusted data and return to recall the factory pre-set data. 48 VIDEO Manual Convergence Adjustment Mode NOTES: 1. Auto Adjustment Mode is indicated by the Adjustment Point Cursor. Using the Remote Control, select VIDEO-MAGIC FOCUS-MANUAL ADJUSTMENT MODE-START to RED. To Move Adjustment Point To move the Adjustment Point Cursor is no saved data, pressing the [9] button will change to access convergence crosshatch pattern. Use the THUMB STICK to match the RED and BLUE colors to access menu mode. Adjustment Mode Auto At Turn Off Manual...
...remote control to CANCEL adjusted data and return to recall the factory pre-set data. 48 VIDEO Manual Convergence Adjustment Mode NOTES: 1. Auto Adjustment Mode is indicated by the Adjustment Point Cursor. Using the Remote Control, select VIDEO-MAGIC FOCUS-MANUAL ADJUSTMENT MODE-START to RED. To Move Adjustment Point To move the Adjustment Point Cursor is no saved data, pressing the [9] button will change to access convergence crosshatch pattern. Use the THUMB STICK to match the RED and BLUE colors to access menu mode. Adjustment Mode Auto At Turn Off Manual...
Owners Guide
Page 49
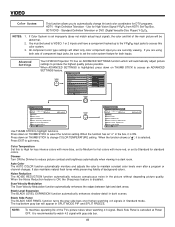
... a program or channel changes. All component color type settings will affect only color component input you are using both inputs. Video Picture Mode Sports Contrast 100% THUMB STICK SELECT Brightness Color Tint Sharpness Vertical Position 50% 50% 50% 0 Magic Focus Color System Advanced Settings Move SEL Select THUMB STICK SELECT Video Advanced Settings Color Temperature High Medium Dimmer Auto Color Noise Reduction Scan Velocity Modulation Black Level Expansion Black Side Panel Move SEL Return Standard THUMB STICK SELECT Video Advanced Settings Color...
... a program or channel changes. All component color type settings will affect only color component input you are using both inputs. Video Picture Mode Sports Contrast 100% THUMB STICK SELECT Brightness Color Tint Sharpness Vertical Position 50% 50% 50% 0 Magic Focus Color System Advanced Settings Move SEL Select THUMB STICK SELECT Video Advanced Settings Color Temperature High Medium Dimmer Auto Color Noise Reduction Scan Velocity Modulation Black Level Expansion Black Side Panel Move SEL Return Standard THUMB STICK SELECT Video Advanced Settings Color...
Owners Guide
Page 56
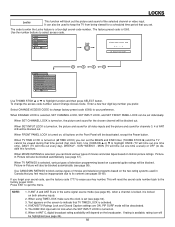
... digit key number you forget your secret code, use the factory code 7777 to keep the TV from being viewed for the chosen channel will block out the picture and sound of ANT A/B will be deactivated. 5. When TV TIME LOCK is activated. 4. If ANT A and ANT B are ON, PIP SURF mode will be blocked out. It can set (see page 63), when a channel is locked, it is selected, SET CHANNEL LOCK, SET INPUT LOCK, and SET FRONT PANEL LOCK...
... digit key number you forget your secret code, use the factory code 7777 to keep the TV from being viewed for the chosen channel will block out the picture and sound of ANT A/B will be deactivated. 5. When TV TIME LOCK is activated. 4. If ANT A and ANT B are ON, PIP SURF mode will be blocked out. It can set (see page 63), when a channel is locked, it is selected, SET CHANNEL LOCK, SET INPUT LOCK, and SET FRONT PANEL LOCK...

Owners Guide
Page 63
... viewed in Cable (1) mode, select Cable (2). Press down on THUMB STICK to previous menu. 63 Setup Set The Channels Ant A (NTSC) Ant B (NTSC) Ant C (DTV) Move SEL Return THUMB STICK SELECT Setup Set The Channels Ant C (DTV) Source Antenna Cable Auto Channel Scan Move SEL Return Signal Meter Start Use THUMB STICK ̇ , ̈ to highlight the correct signal source. Setup Menu Preference Set The Clock Set The Channels Set The Inputs Set Event Timer Set Closed Captions Set Monitor Out Upgrades About Your TV...
... viewed in Cable (1) mode, select Cable (2). Press down on THUMB STICK to previous menu. 63 Setup Set The Channels Ant A (NTSC) Ant B (NTSC) Ant C (DTV) Move SEL Return THUMB STICK SELECT Setup Set The Channels Ant C (DTV) Source Antenna Cable Auto Channel Scan Move SEL Return Signal Meter Start Use THUMB STICK ̇ , ̈ to highlight the correct signal source. Setup Menu Preference Set The Clock Set The Channels Set The Inputs Set Event Timer Set Closed Captions Set Monitor Out Upgrades About Your TV...

Owners Guide
Page 70
..., and/or sound effects of a television program or home video which are displayed on THUMB STICK to select desired feature. Your local TV program guide denotes these programs as news reports or a TV program guide. Setup Menu Preference Set The Clock Set The Channels Set The Inputs Set Event Timer Set Closed Captions Set Monitor Out Upgrades About Your TV Move SEL Select THUMB STICK SELECT Setup Set Closed Caption Caption Display Off On Captions Mode: Channel: Captions 12 3 Auto Text 4 Digital Captions Move SEL Return SET Caption Display: On/Off will not work . 4. Text...
..., and/or sound effects of a television program or home video which are displayed on THUMB STICK to select desired feature. Your local TV program guide denotes these programs as news reports or a TV program guide. Setup Menu Preference Set The Clock Set The Channels Set The Inputs Set Event Timer Set Closed Captions Set Monitor Out Upgrades About Your TV Move SEL Select THUMB STICK SELECT Setup Set Closed Caption Caption Display Off On Captions Mode: Channel: Captions 12 3 Auto Text 4 Digital Captions Move SEL Return SET Caption Display: On/Off will not work . 4. Text...
Owners Guide
Page 79
... Language, 53 Locks Change Access Code, 56 Channel Lock, 56 Input Lock, 56 Front Panel Lock, 56 TV Time Lock, 56 Movie Ratings, 57 TV Ratings, 58 TV Ratings (Canadian - French), 60 Loudness, 52 M Magic Focus Auto Convergence, 7, 47 Manual Convergence, 48 Menu Preference Language, 61 Background, 61 Monitor Out, 9, 71 N Noise Reduction, 49 P Perfect Volume, 52 Picture Mode, 45 Picture-in-Picture (PIP), 33 - 35 Picture-outside-Picture (POP), 33 R Remote Control Simple Remote, 41 Functions, 24 - 35 Programming Codes, 36 - 40 Installing Batteries, 4 S Scan Velocity Modulation...
... Language, 53 Locks Change Access Code, 56 Channel Lock, 56 Input Lock, 56 Front Panel Lock, 56 TV Time Lock, 56 Movie Ratings, 57 TV Ratings, 58 TV Ratings (Canadian - French), 60 Loudness, 52 M Magic Focus Auto Convergence, 7, 47 Manual Convergence, 48 Menu Preference Language, 61 Background, 61 Monitor Out, 9, 71 N Noise Reduction, 49 P Perfect Volume, 52 Picture Mode, 45 Picture-in-Picture (PIP), 33 - 35 Picture-outside-Picture (POP), 33 R Remote Control Simple Remote, 41 Functions, 24 - 35 Programming Codes, 36 - 40 Installing Batteries, 4 S Scan Velocity Modulation...


