Owners Guide
Page 3
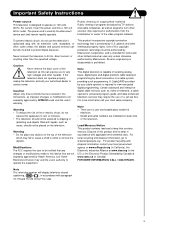
...50 Hz, direct current, or anything other hazards. FOR MORE INFORMATION, CALL 1-800-HITACHI. Warning • To reduce the risk of fire or electric shock, do not use of a set-top box. Certain advanced and interactive digital cable services such as programs from other outlet ...The FCC requires the user to a cable system providing such programming. patents and other limited consumer uses only unless otherwise authorized by Hitachi America, Ltd. Note This digital television is capable of receiving analog basic, digital basic and digital premium cable television programming by direct...
...50 Hz, direct current, or anything other hazards. FOR MORE INFORMATION, CALL 1-800-HITACHI. Warning • To reduce the risk of fire or electric shock, do not use of a set-top box. Certain advanced and interactive digital cable services such as programs from other outlet ...The FCC requires the user to a cable system providing such programming. patents and other limited consumer uses only unless otherwise authorized by Hitachi America, Ltd. Note This digital television is capable of receiving analog basic, digital basic and digital premium cable television programming by direct...
Owners Guide
Page 5
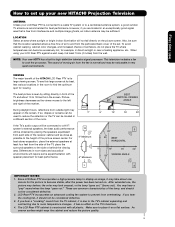
...center. When using your LCD Rear PTV is its best, test various locations in high definition television signal processor. VIEWING The major benefit of set failure, do not place the TV where temperatures can be located in a different section of the lamp, and should not be noticeable in ...and acoustical environments will not fall directly on . To see this large screen at least 10cm (4 inches) from the side of the set up your new HITACHI Projection Television ANTENNA Unless your LCD Rear PTV against a wall, keep it at its large viewing screen. You may take about 10 ...
...center. When using your LCD Rear PTV is its best, test various locations in high definition television signal processor. VIEWING The major benefit of set failure, do not place the TV where temperatures can be located in a different section of the lamp, and should not be noticeable in ...and acoustical environments will not fall directly on . To see this large screen at least 10cm (4 inches) from the side of the set up your new HITACHI Projection Television ANTENNA Unless your LCD Rear PTV against a wall, keep it at its large viewing screen. You may take about 10 ...
Owners Guide
Page 6
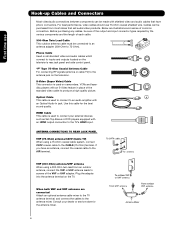
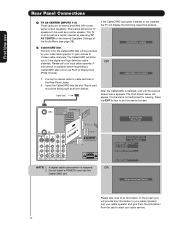
.... When both VHF and UHF antennas are illustrations and names of the standard video cable to the antenna mixer. Consult your external devices such as Set-Top-Boxes or DVD players equipped with an HDMI output connection to inputs and outputs located on camcorders, VCRs and laserdisc players with shielded video...
.... When both VHF and UHF antennas are illustrations and names of the standard video cable to the antenna mixer. Consult your external devices such as Set-Top-Boxes or DVD players equipped with an HDMI output connection to inputs and outputs located on camcorders, VCRs and laserdisc players with shielded video...
Owners Guide
Page 7
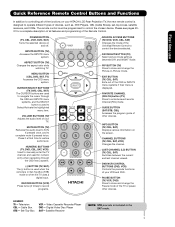
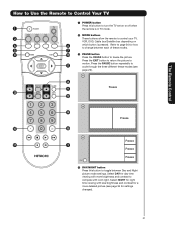
... (TV, DVD, VCR, CBL, SAT) Changes the mode of the Universal Remote Control to restore audio level. DAY/NIGHT BUTTON (TV) Select picture mode settings between the current and last channel viewed. CHANNEL BUTTONS (TV, CBL, SAT, VCR) Changes the channel. PAUSE BUTTON (TV, VCR, DVD) Press to... and change the Picture-in the SAT mode. 7 DVD/VCR CONTROL BUTTONS (DVD, VCR) Controls the precode functions of the functions on your HITACHI LCD Rear Projection TV, the new remote control is designed to Select/Activate the highlighted menu item. INPUTS BUTTON (TV) Accesses the INPUTS menu...
... (TV, DVD, VCR, CBL, SAT) Changes the mode of the Universal Remote Control to restore audio level. DAY/NIGHT BUTTON (TV) Select picture mode settings between the current and last channel viewed. CHANNEL BUTTONS (TV, CBL, SAT, VCR) Changes the channel. PAUSE BUTTON (TV, VCR, DVD) Press to... and change the Picture-in the SAT mode. 7 DVD/VCR CONTROL BUTTONS (DVD, VCR) Controls the precode functions of the functions on your HITACHI LCD Rear Projection TV, the new remote control is designed to Select/Activate the highlighted menu item. INPUTS BUTTON (TV) Accesses the INPUTS menu...
Owners Guide
Page 8
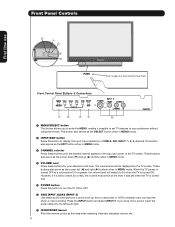
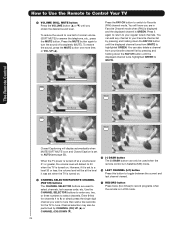
... cursor left audio jack. ¶ IR RECEIVER Sensor Point the remote control at the level it was set when the TV is turned ON. If you to enter the MENU, making it possible to set TV features to display the input menu selections of the TV screen. When the TV power is... a level 30 or less, the volume level will be at this button to instantly view your preference without using the remote. However, if it is set to 30 when the TV is turned ON. ´ POWER button Press this area when selecting channels, adjusting volume, etc. 8 Press the INPUT button and...
... cursor left audio jack. ¶ IR RECEIVER Sensor Point the remote control at the level it was set when the TV is turned ON. If you to enter the MENU, making it possible to set TV features to display the input menu selections of the TV screen. When the TV power is... a level 30 or less, the volume level will be at this button to instantly view your preference without using the remote. However, if it is set to 30 when the TV is turned ON. ´ POWER button Press this area when selecting channels, adjusting volume, etc. 8 Press the INPUT button and...
Owners Guide
Page 9
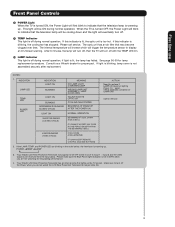
...OPTIC unit COOLING FAN STOPPED BEGINNING OF WARM UP AFTER THE POWER ON. POWER TEMP LAMP 3. Your Hitachi LCD Rear Projection Television has an internal lamp that may appear to be OFF when it is set to replace if LAMP still does not light by ìPower On " again. The optic unit...First time use Front Panel Controls º POWER Light When the TV is turned ON, the Power Light will be ON during normal operation. Your Hitachi LCD Rear Projection Television may become clogged over time. Check assembly condition of LAMP UNIT Call for longer lamp life. 9 Please make sure the Blue...
...OPTIC unit COOLING FAN STOPPED BEGINNING OF WARM UP AFTER THE POWER ON. POWER TEMP LAMP 3. Your Hitachi LCD Rear Projection Television has an internal lamp that may appear to be OFF when it is set to replace if LAMP still does not light by ìPower On " again. The optic unit...First time use Front Panel Controls º POWER Light When the TV is turned ON, the Power Light will be ON during normal operation. Your Hitachi LCD Rear Projection Television may become clogged over time. Check assembly condition of LAMP UNIT Call for longer lamp life. 9 Please make sure the Blue...
Owners Guide
Page 11
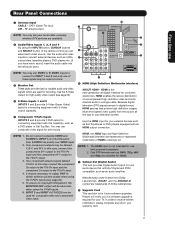
... the remote control you have mono sound, insert the audio cable into the left audio jack.) NOTE: You may use with an HDMI output connection. Hitachi will be used at the same time. Do not connect composite VIDEO and S-VIDEO to INPUT 1, 2 or 5 at a time. » Monitor Out... one of these inputs may ask your TV. Manufactured under license from the source all digital interface for connecting equipment with this capability, such as Set-Top-Boxes or DVD players equipped with personal computers. 2. NOTE: 1. INPUT 3 and INPUT 4 (Y/VIDEO) can select each video source. HDMI is for...
... the remote control you have mono sound, insert the audio cable into the left audio jack.) NOTE: You may use with an HDMI output connection. Hitachi will be used at the same time. Do not connect composite VIDEO and S-VIDEO to INPUT 1, 2 or 5 at a time. » Monitor Out... one of these inputs may ask your TV. Manufactured under license from the source all digital interface for connecting equipment with this capability, such as Set-Top-Boxes or DVD players equipped with personal computers. 2. NOTE: 1. INPUT 3 and INPUT 4 (Y/VIDEO) can select each video source. HDMI is for...
Owners Guide
Page 12
... 6,381,747 licensed for stereo amplifiers with center signal output capability. Do not insert a PCMCIA card into the slot (Top of card should be set as Point of the Rear Panel Jacks. 2. Call your cable service. 12 If the CableCARD is properly installed or not installed, the TV will appear... Unit Address: 123-456-789-1 OR Press EXIT to return Not an Authorized Channel Please take note of all information on the Internal Speakers Settings of the Audio Menu (see page 38). Press the EXIT button to start cable service for the CableCARD that will provide this service is installed...
... 6,381,747 licensed for stereo amplifiers with center signal output capability. Do not insert a PCMCIA card into the slot (Top of card should be set as Point of the Rear Panel Jacks. 2. Call your cable service. 12 If the CableCARD is properly installed or not installed, the TV will appear... Unit Address: 123-456-789-1 OR Press EXIT to return Not an Authorized Channel Please take note of all information on the Internal Speakers Settings of the Audio Menu (see page 38). Press the EXIT button to start cable service for the CableCARD that will provide this service is installed...

Owners Guide
Page 13
Setup Menu Preference Lamp Power Control Set The Inputs Set Closed Captions Set Monitor Out CableCARD Information Upgrades Quick Start-Up Move SEL Select Setup CableCARD Information Select the button below to access the Main Menu screen. window ...
Setup Menu Preference Lamp Power Control Set The Inputs Set Closed Captions Set Monitor Out CableCARD Information Upgrades Quick Start-Up Move SEL Select Setup CableCARD Information Select the button below to access the Main Menu screen. window ...

Owners Guide
Page 14
...protection systems and the picture will assure a more information on this TV, except when noted as DVD players and set-topboxes. Connect only one audio output (mono sound), connect it is used at a time. In this case...connections. Outside Antenna or Digital Cable CABLE Apparatus Claims of a Set-Top-Box will be necessary to adjust TINT to obtain optimum picture quality when using an HDMI input from... a Set-Top-Box, it to the left audio jack on the television. 2. VCR #1 DVD Player ...
...protection systems and the picture will assure a more information on this TV, except when noted as DVD players and set-topboxes. Connect only one audio output (mono sound), connect it is used at a time. In this case...connections. Outside Antenna or Digital Cable CABLE Apparatus Claims of a Set-Top-Box will be necessary to adjust TINT to obtain optimum picture quality when using an HDMI input from... a Set-Top-Box, it to the left audio jack on the television. 2. VCR #1 DVD Player ...

Owners Guide
Page 16
... time use Connecting External Video Sources The exact arrangement you may need to modify them to the INPUT (VIDEO) jack, as shown on the TV set on the back panel of the TV (i.e., VCR/laserdisc player, etc. INPUTS Input 3 Input 4 Input 5 Cable Air Move SEL Select CONNECTING A COMPOSITE... INPUT1 - Connect the Cable and/or Air cables 2. However, you use to connect the VCR, camcorder, laserdisc player, DVD player or HDTV Set Top Box to be OFF. Connect the cable from the VIDEO INPUT JACK on the right. Connect the cable from coaxial shielded wire. CABLE Apparatus...
... time use Connecting External Video Sources The exact arrangement you may need to modify them to the INPUT (VIDEO) jack, as shown on the TV set on the back panel of the TV (i.e., VCR/laserdisc player, etc. INPUTS Input 3 Input 4 Input 5 Cable Air Move SEL Select CONNECTING A COMPOSITE... INPUT1 - Connect the Cable and/or Air cables 2. However, you use to connect the VCR, camcorder, laserdisc player, DVD player or HDTV Set Top Box to be OFF. Connect the cable from the VIDEO INPUT JACK on the right. Connect the cable from coaxial shielded wire. CABLE Apparatus...

Owners Guide
Page 17
... INPUT 2 from the INPUTS menu to view the program from the INPUTS menu to return to the INPUT (S-VIDEO) jack, as shown on the TV set on the right. AIR MONITOR OUT S I V I D E O V I D E O (MONO) (MONO) Y/ VIDEO PB PR (MONO) Y/ VIDEO PB PR (MONO) A L U D TV AS CENTER I O R AUDIO TO Hi-Fi INPUT... 2 from the INPUTS menu to view the program from the INPUTS menu to return to the INPUT (VIDEO) jack, as shown on the TV set on the right. CableCARD™ (Top of card faces right) Top faces Upgrade Card 2. Completely insert the connection cord plugs when connecting to rear...
... INPUT 2 from the INPUTS menu to view the program from the INPUTS menu to return to the INPUT (S-VIDEO) jack, as shown on the TV set on the right. AIR MONITOR OUT S I V I D E O V I D E O (MONO) (MONO) Y/ VIDEO PB PR (MONO) Y/ VIDEO PB PR (MONO) A L U D TV AS CENTER I O R AUDIO TO Hi-Fi INPUT... 2 from the INPUTS menu to view the program from the INPUTS menu to return to the INPUT (VIDEO) jack, as shown on the TV set on the right. CableCARD™ (Top of card faces right) Top faces Upgrade Card 2. Completely insert the connection cord plugs when connecting to rear...

Owners Guide
Page 18
... using a component with DVI output, you also have to connect the AUDIO OUT (R/L) of the component to the HDMI input as shown on the TV set top box or DVD player. It establishes a one-way point-to-point connection for delivery of INPUT 1. 2. Patent Nos. 4,631,603; 4,577,216; 4,819,098... CONNECTING A COMPONENT SOURCE WITH HDMI OR DVI CAPABILITY TO INPUT 1 1. Connect the HDMI or DVI to HDMI connection cable from the output of the HDTV set top box or DVD player to the AUDIO IN (R/L) of uncompressed video to HDMI Cable CAUTION R LV OUTPUT DIGITAL OUTPUT DVD Player or HDTV STB...
... using a component with DVI output, you also have to connect the AUDIO OUT (R/L) of the component to the HDMI input as shown on the TV set top box or DVD player. It establishes a one-way point-to-point connection for delivery of INPUT 1. 2. Patent Nos. 4,631,603; 4,577,216; 4,819,098... CONNECTING A COMPONENT SOURCE WITH HDMI OR DVI CAPABILITY TO INPUT 1 1. Connect the HDMI or DVI to HDMI connection cable from the output of the HDTV set top box or DVD player to the AUDIO IN (R/L) of uncompressed video to HDMI Cable CAUTION R LV OUTPUT DIGITAL OUTPUT DVD Player or HDTV STB...

Owners Guide
Page 19
...6. and 6,381,747 licensed for tips on the right. 2. Select CABLE from the AUDIO OUT L of the laserdisc/DVD player or HDTV set top box to the previous channel. The picture and sound that is played back will be abnormal if the connection is loose. 2. First time ... CONNECTING A COMPONENT SOURCE TO INPUT 3 OR 4: Y-PBPR. 1. NOTE: 1. Connect the cable from the CB/PB OUT or B-Y OUT of the Laserdisc/DVD player or HDTV set on REAR PANEL CONNECTIONS. 19 CABLE Apparatus Claims of card faces right) Top faces AIR MONITOR OUT S I V I D E O V I D E O (MONO) (MONO) Y/ VIDEO PB ...
...6. and 6,381,747 licensed for tips on the right. 2. Select CABLE from the AUDIO OUT L of the laserdisc/DVD player or HDTV set top box to the previous channel. The picture and sound that is played back will be abnormal if the connection is loose. 2. First time ... CONNECTING A COMPONENT SOURCE TO INPUT 3 OR 4: Y-PBPR. 1. NOTE: 1. Connect the cable from the CB/PB OUT or B-Y OUT of the Laserdisc/DVD player or HDTV set on REAR PANEL CONNECTIONS. 19 CABLE Apparatus Claims of card faces right) Top faces AIR MONITOR OUT S I V I D E O V I D E O (MONO) (MONO) Y/ VIDEO PB ...
Owners Guide
Page 20
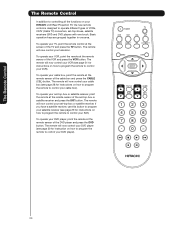
... the DVD button. The remote will now control your television. The remote will now control your set -top-box or satellite receiver and press the SAT button. The remote will now control your cable...your SAT). The Remote Control The Remote Control In addition to controlling all the functions on your HITACHI LCD Rear Projection TV, the new remote control is designed to control your DVD player). 20 ...To operate your TV, point the remote control at the screen of the set -top-box or satellite receiver. Basic operation keys are grouped together in one touch. To operate ...
... the DVD button. The remote will now control your television. The remote will now control your set -top-box or satellite receiver and press the SAT button. The remote will now control your cable...your SAT). The Remote Control The Remote Control In addition to controlling all the functions on your HITACHI LCD Rear Projection TV, the new remote control is designed to control your DVD player). 20 ...To operate your TV, point the remote control at the screen of the set -top-box or satellite receiver. Basic operation keys are grouped together in one touch. To operate ...
Owners Guide
Page 21
... button to freeze the picture. Press the EXIT button to return the picture to cycle through the three different freeze modes (see page 34 for settings changes). 21 Select DAY for how to control your TV, VCR, DVD, Cable box/Satellite box depending on ² ¿ which button is ...; Freeze Ƹ ¹ ƹ ƺ ƻ Freeze Ƽ » Freeze Freeze Freeze EXIT ¿ DAY/NIGHT button Press this button to turn the TV set on or off when ³ the remote is in TV mode. · MODE buttons · These buttons allow the remote to change between Day and...
... button to freeze the picture. Press the EXIT button to return the picture to cycle through the three different freeze modes (see page 34 for settings changes). 21 Select DAY for how to control your TV, VCR, DVD, Cable box/Satellite box depending on ² ¿ which button is ...; Freeze Ƹ ¹ ƹ ƺ ƻ Freeze Ƽ » Freeze Freeze Freeze EXIT ¿ DAY/NIGHT button Press this button to turn the TV set on or off when ³ the remote is in TV mode. · MODE buttons · These buttons allow the remote to change between Day and...

Owners Guide
Page 22
However, all five video inputs have independent Aspect Style settings. 2. Vertical position adjustments are placed to the left and right of the image to preserve the original aspect ratio of the source. 4:3 EXPANDED Use this ... Appendix A on page 65. Side panels (gray areas) are directly available when you select for an ANT input will automatically be set for the other ANT input. NOTE: 1. The Aspect Style setting you choose 4:3 22 EXPANDED/ZOOM1/ZOOM2 or 16:9 ZOOM aspect style (see Appendix D on the input signal format received, the...
However, all five video inputs have independent Aspect Style settings. 2. Vertical position adjustments are placed to the left and right of the image to preserve the original aspect ratio of the source. 4:3 EXPANDED Use this ... Appendix A on page 65. Side panels (gray areas) are directly available when you select for an ANT input will automatically be set for the other ANT input. NOTE: 1. The Aspect Style setting you choose 4:3 22 EXPANDED/ZOOM1/ZOOM2 or 16:9 ZOOM aspect style (see Appendix D on the input signal format received, the...

Owners Guide
Page 23
...TV-G 1080i Cable 8 KXYZ-HD 3:17PM The show description will start the On-Screen Display. ¾ GUIDE button [Cable Box (CBL), Satellite Receiver (SAT)/ Set-Top-Box (STB) mode only] The use of the (CBL), and (SAT/STB). INFO button display for a description. º MENU button The MENU ...-̈3:30PM SA TV-G 480i Y-PBPR: 3 KXYZ-HD 3:17PM ¹ INFO button Press this button is only applicable when the remote control is set or adjusted by using the CURSOR buttons and the SELECT button, except for Digital Channels INFO Show Name 3:00PM-̈3:30PM TV-G 1080i Cable 8 KXYZ...
...TV-G 1080i Cable 8 KXYZ-HD 3:17PM The show description will start the On-Screen Display. ¾ GUIDE button [Cable Box (CBL), Satellite Receiver (SAT)/ Set-Top-Box (STB) mode only] The use of the (CBL), and (SAT/STB). INFO button display for a description. º MENU button The MENU ...-̈3:30PM SA TV-G 480i Y-PBPR: 3 KXYZ-HD 3:17PM ¹ INFO button Press this button is only applicable when the remote control is set or adjusted by using the CURSOR buttons and the SELECT button, except for Digital Channels INFO Show Name 3:00PM-̈3:30PM TV-G 1080i Cable 8 KXYZ...
Owners Guide
Page 24
...is in Favorite Channel mode when (FAV) is displayed and the displayed channel is set to a level 30 or less, the volume level will display automatically when MUTE/SOFT MUTE is on ...and Closed Caption is set when the TV is turned on . Enter 0 first for the TV to tune. You can... CHANNEL SELECTOR buttons to enter one, two, or three numbers to select channels, lock access code, etc. Press it was set to AUTO (see page 52). Cable 6 The Remote Control MUTE Volume 8 FAV CH FAV Cable 6 MUTE Soft Mute ...
...is in Favorite Channel mode when (FAV) is displayed and the displayed channel is set to a level 30 or less, the volume level will display automatically when MUTE/SOFT MUTE is on ...and Closed Caption is set when the TV is turned on . Enter 0 first for the TV to tune. You can... CHANNEL SELECTOR buttons to enter one, two, or three numbers to select channels, lock access code, etc. Press it was set to AUTO (see page 52). Cable 6 The Remote Control MUTE Volume 8 FAV CH FAV Cable 6 MUTE Soft Mute ...

Owners Guide
Page 26
... : 9 16 : 9 4 : 3 YES YES YES - - - - - - - MAIN PICTURE SUB PICTURE The Remote Control SURF Mode Picture-in-Picture Surf Mode PIP automatically scans all active channels (those set in -Picture Split Mode PIP displays the main picture and subpicture evenly on a chosen channel. PIP MAIN PICTURE SUB PICTURE SPLIT Mode Picture-in memory...
... : 9 16 : 9 4 : 3 YES YES YES - - - - - - - MAIN PICTURE SUB PICTURE The Remote Control SURF Mode Picture-in-Picture Surf Mode PIP automatically scans all active channels (those set in -Picture Split Mode PIP displays the main picture and subpicture evenly on a chosen channel. PIP MAIN PICTURE SUB PICTURE SPLIT Mode Picture-in memory...

