Owners Guide
Page 6
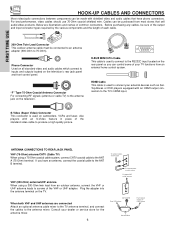
...Ohm coaxial cable system, connect CATV coaxial cable to the TV's HDMI input. Below are connected Attach an optional antenna cable mixer to the TV antenna terminal, and connect the ...your TV functions from most stores that have an antenna, connect the coaxial cable to the RS232C input located on the television's rear jack panel and front control panel. "F" Type 75-Ohm Coaxial Antenna...terminal on camcorders, VCRs and laser- Before purchasing any cables, be sure of the output and input connector types required by the various components and the length of your dealer or service store for ...
...Ohm coaxial cable system, connect CATV coaxial cable to the TV's HDMI input. Below are connected Attach an optional antenna cable mixer to the TV antenna terminal, and connect the ...your TV functions from most stores that have an antenna, connect the coaxial cable to the RS232C input located on the television's rear jack panel and front control panel. "F" Type 75-Ohm Coaxial Antenna...terminal on camcorders, VCRs and laser- Before purchasing any cables, be sure of the output and input connector types required by the various components and the length of your dealer or service store for ...
Owners Guide
Page 9
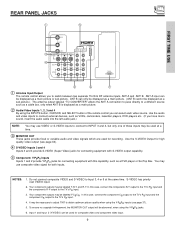
... labeled Y, B-Y, and R-Y. Your component outputs may be labeled Y-CBCR. Input 1 and Input 2 (Y/VIDEO) can be used for composite video and component video input. 9 FIRST TIME USE REAR PANEL JACKS ቢ ቦ ANT A To Converter ቤ ብ ANT B MONITOR OUT S-VIDEO INPUT 4 INPUT 3 INPUT 2 Y/ VIDEO PB INPUT 1 Y/ VIDEO PB HDMI 1 VIDEO L AUDIO R AUDIO TO HI-FI PR PR (MONO...
... labeled Y, B-Y, and R-Y. Your component outputs may be labeled Y-CBCR. Input 1 and Input 2 (Y/VIDEO) can be used for composite video and component video input. 9 FIRST TIME USE REAR PANEL JACKS ቢ ቦ ANT A To Converter ቤ ብ ANT B MONITOR OUT S-VIDEO INPUT 4 INPUT 3 INPUT 2 Y/ VIDEO PB INPUT 1 Y/ VIDEO PB HDMI 1 VIDEO L AUDIO R AUDIO TO HI-FI PR PR (MONO...
Owners Guide
Page 10
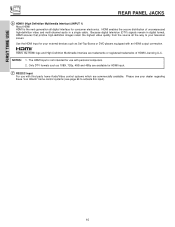
Because digital television (DTV) signals remain in a single cable. The HDMI input is the next-generation all the way to activate this input). 10 Please see page 64 to your dealer regarding these "non Hitachi" home control systems (see your television screen. HDMI, the HDMI logo and High-Definition Multimedia Interface are trademarks or registered trademarks of...
Because digital television (DTV) signals remain in a single cable. The HDMI input is the next-generation all the way to activate this input). 10 Please see page 64 to your dealer regarding these "non Hitachi" home control systems (see your television screen. HDMI, the HDMI logo and High-Definition Multimedia Interface are trademarks or registered trademarks of...
Owners Guide
Page 11
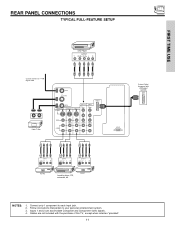
... FULL-FEATURE SETUP FIRST TIME USE DVD Player OUTPUT Y PB/CB PR/CR L R Outside antenna or digital cable INPUT OUTPUT Cable TV Box ANT A To Converter ANT B MONITOR OUT S-VIDEO INPUT 4 INPUT 3 INPUT 2 Y/ VIDEO PB INPUT 1 Y/ VIDEO PB HDMI 1 VIDEO L AUDIO R PR PR (MONO) (MONO) (MONO) (MONO) RS232C 1 2 345 6 789 External Digital Component with the purchase...
... FULL-FEATURE SETUP FIRST TIME USE DVD Player OUTPUT Y PB/CB PR/CR L R Outside antenna or digital cable INPUT OUTPUT Cable TV Box ANT A To Converter ANT B MONITOR OUT S-VIDEO INPUT 4 INPUT 3 INPUT 2 Y/ VIDEO PB INPUT 1 Y/ VIDEO PB HDMI 1 VIDEO L AUDIO R PR PR (MONO) (MONO) (MONO) (MONO) RS232C 1 2 345 6 789 External Digital Component with the purchase...

Owners Guide
Page 12
... USE TIPS ON REAR PANEL CONNECTIONS • S-VIDEO, Y-PbPr and HDMI connections are provided for high performance laserdisc players, VCRs etc. Use these may be abnormal, when using the Y-PBPR jacks. • When using the Y-PBPR inputs (see page 37). • To ensure no copyright infringement, the MONITOR... OUT output may be necessary to adjust TINT to obtain optimum picture quality when using an HDMI input from a Set-Top-Box, it to the left audio jack on the television. • Refer to the operating guide of the standard ...
... USE TIPS ON REAR PANEL CONNECTIONS • S-VIDEO, Y-PbPr and HDMI connections are provided for high performance laserdisc players, VCRs etc. Use these may be abnormal, when using the Y-PBPR jacks. • When using the Y-PBPR inputs (see page 37). • To ensure no copyright infringement, the MONITOR... OUT output may be necessary to adjust TINT to obtain optimum picture quality when using an HDMI input from a Set-Top-Box, it to the left audio jack on the television. • Refer to the operating guide of the standard ...

Owners Guide
Page 13
FIRST TIME USE CONNECTING EXTERNAL AUDIO SOURCES To control the audio level of an external audio amplifier with the remote control, connect the system as shown below. REAR PANEL OF TELEVISION ANT A To Converter ANT B MONITOR OUT S-VIDEO INPUT 4 INPUT 3 INPUT 2 Y/ VIDEO PB INPUT 1 Y/ VIDEO PB HDMI 1 VIDEO L AUDIO R AUDIO TO HI-FI PR PR (MONO) (MONO) (MONO) (MONO) RS232C 1 2 345 6 789 LR INPUT Stereo System Amplifier or DVD Player 13
FIRST TIME USE CONNECTING EXTERNAL AUDIO SOURCES To control the audio level of an external audio amplifier with the remote control, connect the system as shown below. REAR PANEL OF TELEVISION ANT A To Converter ANT B MONITOR OUT S-VIDEO INPUT 4 INPUT 3 INPUT 2 Y/ VIDEO PB INPUT 1 Y/ VIDEO PB HDMI 1 VIDEO L AUDIO R AUDIO TO HI-FI PR PR (MONO) (MONO) (MONO) (MONO) RS232C 1 2 345 6 789 LR INPUT Stereo System Amplifier or DVD Player 13

Owners Guide
Page 14
...CURSOR buttons to accommodate your particular assortment of components and features. Connect the cable from the VIDEO INPUT JACK on the TV set below. 2. Input 5 Ant B Ant A Input 1 Input 2 Move SEL Select NOTE: When the TV is dependent on the model and features of each...the VCR or the laserdisc player to view the program from the INPUTS menu to the INPUT (MONO)/L(AUDIO) jack. 3. Select Antenna from coaxial shielded wire. ANT A To Converter ANT B MONITOR OUT S-VIDEO INPUT 4 INPUT 3 INPUT 2 Y/ VIDEO PB INPUT 1 Y/ VIDEO PB HDMI 1 VIDEO L AUDIO R AUDIO TO HI-FI PR PR (...
...CURSOR buttons to accommodate your particular assortment of components and features. Connect the cable from the VIDEO INPUT JACK on the TV set below. 2. Input 5 Ant B Ant A Input 1 Input 2 Move SEL Select NOTE: When the TV is dependent on the model and features of each...the VCR or the laserdisc player to view the program from the INPUTS menu to the INPUT (MONO)/L(AUDIO) jack. 3. Select Antenna from coaxial shielded wire. ANT A To Converter ANT B MONITOR OUT S-VIDEO INPUT 4 INPUT 3 INPUT 2 Y/ VIDEO PB INPUT 1 Y/ VIDEO PB HDMI 1 VIDEO L AUDIO R AUDIO TO HI-FI PR PR (...

Owners Guide
Page 15
.../R) jack. 3. The VIDEO OSD label disappears automatically after approximately four seconds. 5. ANT A To Converter ANT B MONITOR OUT S-VIDEO INPUT 4 INPUT 3 INPUT 2 Y/ VIDEO PB INPUT 1 Y/ VIDEO PB HDMI 1 VIDEO L AUDIO R AUDIO TO HI-FI PR PR (MONO) (MONO) (MONO) (MONO) RS232C 1 2 345 6 789 OUTPUT RL V VCR NOTES: 1. ...for more information on the TV set below. 2. Connect the cable from the VIDEO OUT of the VCR or the laserdisc player to the INPUT (AUDIO/L) jack. 4. Connect the cable from the AUDIO OUT R of the VCR or the laserdisc player to your VCR operating guide ...
.../R) jack. 3. The VIDEO OSD label disappears automatically after approximately four seconds. 5. ANT A To Converter ANT B MONITOR OUT S-VIDEO INPUT 4 INPUT 3 INPUT 2 Y/ VIDEO PB INPUT 1 Y/ VIDEO PB HDMI 1 VIDEO L AUDIO R AUDIO TO HI-FI PR PR (MONO) (MONO) (MONO) (MONO) RS232C 1 2 345 6 789 OUTPUT RL V VCR NOTES: 1. ...for more information on the TV set below. 2. Connect the cable from the VIDEO OUT of the VCR or the laserdisc player to the INPUT (AUDIO/L) jack. 4. Connect the cable from the AUDIO OUT R of the VCR or the laserdisc player to your VCR operating guide ...

Owners Guide
Page 16
... be abnormal if the connection is loose. 2. FIRST TIME USE CONNECTING EXTERNAL VIDEO SOURCES CONNECTING AN S-VIDEO SOURCE TO INPUT 3, 4 AND 5 1. ANT A To Converter ANT B MONITOR OUT S-VIDEO INPUT 4 INPUT 3 INPUT 2 Y/ VIDEO PB INPUT 1 Y/ VIDEO PB HDMI 1 VIDEO L AUDIO R AUDIO TO HI-FI PR PR (MONO) (MONO) (MONO) (MONO) RS232C 1 ... be used for more information on the TV set below. 2. Connect the cable from the INPUTS menu to the INPUT (AUDIO/R) jack. 3. Connect the cable from the INPUTS menu to return to the previous channel. Select Antenna from the AUDIO OUT L of the ...
... be abnormal if the connection is loose. 2. FIRST TIME USE CONNECTING EXTERNAL VIDEO SOURCES CONNECTING AN S-VIDEO SOURCE TO INPUT 3, 4 AND 5 1. ANT A To Converter ANT B MONITOR OUT S-VIDEO INPUT 4 INPUT 3 INPUT 2 Y/ VIDEO PB INPUT 1 Y/ VIDEO PB HDMI 1 VIDEO L AUDIO R AUDIO TO HI-FI PR PR (MONO) (MONO) (MONO) (MONO) RS232C 1 ... be used for more information on the TV set below. 2. Connect the cable from the INPUTS menu to the INPUT (AUDIO/R) jack. 3. Connect the cable from the INPUTS menu to return to the previous channel. Select Antenna from the AUDIO OUT L of the ...

Owners Guide
Page 17
... INPUT 1. 2. When using HDMI connections to the HDMI input as shown on INPUT 1 contains the copy protection system called High-bandwidth Digital Content Protection (HDCP). Press the INPUTS button, then select INPUT 1 from the INPUTS menu to view the program from the output of the HDTV set below. HDMI-HDMI DVI-HDMI ANT A To Converter ANT B MONITOR OUT S-VIDEO INPUT 4 INPUT 3 INPUT 2 Y/ VIDEO PB INPUT...
... INPUT 1. 2. When using HDMI connections to the HDMI input as shown on INPUT 1 contains the copy protection system called High-bandwidth Digital Content Protection (HDCP). Press the INPUTS button, then select INPUT 1 from the INPUTS menu to view the program from the output of the HDTV set below. HDMI-HDMI DVI-HDMI ANT A To Converter ANT B MONITOR OUT S-VIDEO INPUT 4 INPUT 3 INPUT 2 Y/ VIDEO PB INPUT...

Owners Guide
Page 18
... seconds. 7. Connect the cable from the Y OUT of the Laserdisc/DVD player or HDTV set top box to the INPUT (AUDIO/R) jack. 5. ANT A To Converter ANT B MONITOR OUT S-VIDEO INPUT 4 INPUT 3 INPUT 2 Y/ VIDEO INPUT 1 Y/ VIDEO PB PB HDMI 1 VIDEO L AUDIO R AUDIO TO HI-FI PR PR (MONO) (MONO) (MONO) (MONO) RS232C 1 2 345 6 789 OUTPUT R L PR PB...
... seconds. 7. Connect the cable from the Y OUT of the Laserdisc/DVD player or HDTV set top box to the INPUT (AUDIO/R) jack. 5. ANT A To Converter ANT B MONITOR OUT S-VIDEO INPUT 4 INPUT 3 INPUT 2 Y/ VIDEO INPUT 1 Y/ VIDEO PB PB HDMI 1 VIDEO L AUDIO R AUDIO TO HI-FI PR PR (MONO) (MONO) (MONO) (MONO) RS232C 1 2 345 6 789 OUTPUT R L PR PB...

Owners Guide
Page 25
... Picture Sub Picture NOTES: 1. Sub-picture channel availability depends on the remote. ANT A To Converter ANT B MONITOR OUT S-VIDEO INPUT 4 INPUT 3 INPUT 2 Y/ VIDEO PB INPUT 1 Y/ VIDEO PB HDMI 1 VIDEO L AUDIO R AUDIO TO HI-FI PR PR (MONO) (MONO) (MONO) (MONO) RS232C 1 2 345 6 789 ቢ THE ... INPUT:5). ቢ PIP button Press the PIP button and a sub-picture will move the sub-picture. Use the CURSOR buttons (̆, ̄) to enable the sub-picture sound. 3. PICTURE-IN-PICTURE (PIP) Your HITACHI Projection TV incorporates Two Tuner technology designed for each....
... Picture Sub Picture NOTES: 1. Sub-picture channel availability depends on the remote. ANT A To Converter ANT B MONITOR OUT S-VIDEO INPUT 4 INPUT 3 INPUT 2 Y/ VIDEO PB INPUT 1 Y/ VIDEO PB HDMI 1 VIDEO L AUDIO R AUDIO TO HI-FI PR PR (MONO) (MONO) (MONO) (MONO) RS232C 1 2 345 6 789 ቢ THE ... INPUT:5). ቢ PIP button Press the PIP button and a sub-picture will move the sub-picture. Use the CURSOR buttons (̆, ̄) to enable the sub-picture sound. 3. PICTURE-IN-PICTURE (PIP) Your HITACHI Projection TV incorporates Two Tuner technology designed for each....

Owners Guide
Page 39
... to maintain natural flesh tones while preserving fidelity of the 4 Color Temperature settings. Theatrical movies are shot on it's input (ANT A/B, Input 1~5). When using Component, HDMI or DVI input, Auto Color will not be available (grayed out). 2. When Noise Reduction is ON, Sharpness function is turned ON ...to adjust and balance the percentage of the four color temperature settings. Press down to select from the VIDEO menu, your Hitachi Projection Television will activate the circuitry for television viewing, the disparity between the two frame rates must be reconciled. When film...
... to maintain natural flesh tones while preserving fidelity of the 4 Color Temperature settings. Theatrical movies are shot on it's input (ANT A/B, Input 1~5). When using Component, HDMI or DVI input, Auto Color will not be available (grayed out). 2. When Noise Reduction is ON, Sharpness function is turned ON ...to adjust and balance the percentage of the four color temperature settings. Press down to select from the VIDEO menu, your Hitachi Projection Television will activate the circuitry for television viewing, the disparity between the two frame rates must be reconciled. When film...

Owners Guide
Page 69
... 47k Ohm • Average input level 470mVrms • HDMI HDMI 19 PIN Outputs: • Video 1.0Vp-p. 75 Ohm • Audio (Fixed 470mVrms, 1k Ohm • S-Video Luminance (Y 1.0Vp-p, 75 Ohm Chrominance (C 0.286Vp-p, 75 Ohm Dimensions: 51F510 57F510 • Height (in.) (mm) • ...Picture • Magic Focus (Auto Digital Convergence and 9-point/117-point Manual Adjustment) • Dual Antenna Inputs • Video Input Sensor • HDMI (High Definition Multimedia Interface) (High Bandwidth Digital Content Protection V1.1 compatible). • 3 Dimensional Y/C Comb...
... 47k Ohm • Average input level 470mVrms • HDMI HDMI 19 PIN Outputs: • Video 1.0Vp-p. 75 Ohm • Audio (Fixed 470mVrms, 1k Ohm • S-Video Luminance (Y 1.0Vp-p, 75 Ohm Chrominance (C 0.286Vp-p, 75 Ohm Dimensions: 51F510 57F510 • Height (in.) (mm) • ...Picture • Magic Focus (Auto Digital Convergence and 9-point/117-point Manual Adjustment) • Dual Antenna Inputs • Video Input Sensor • HDMI (High Definition Multimedia Interface) (High Bandwidth Digital Content Protection V1.1 compatible). • 3 Dimensional Y/C Comb...

Owners Guide
Page 72
... (see Magic Focus) D Date 52 E Event Timer 54 F Freeze Button 20 G Guide Button on Remote 23 H HDMI 10, 11, 17 I Inputs Button 22 L Language Menu Language 59 Locks Change Access Code 47 Channel Lock 47 Input Lock 47 Front Panel Lock 47 TV Time Lock 47 Movie Ratings 48 TV Ratings 49 TV...
... (see Magic Focus) D Date 52 E Event Timer 54 F Freeze Button 20 G Guide Button on Remote 23 H HDMI 10, 11, 17 I Inputs Button 22 L Language Menu Language 59 Locks Change Access Code 47 Channel Lock 47 Input Lock 47 Front Panel Lock 47 TV Time Lock 47 Movie Ratings 48 TV Ratings 49 TV...


