Owners Guide
Page 1
has determined that this product meets the Energy Star® guidelines for 42HDT79, 55HDT79 42HDX99 and 55HDX99 IMPORTANT SAFETY INSTRUCTIONS 2-3 FIRST TIME USE ...4-24 THE REMOTE CONTROL...25-44 ON-SCREEN DISPLAY ...45-80 USEFUL INFORMATION...81-88 END USER LICENSE AGREEMENT FOR HITACHI DTV SOFTWARE 89-97 APPENDIXES...98-99 INDEX...100 As an Energy Star® Partner, Hitachi, Ltd. PLASMA TELEVISION Operating Guide for energy efficiency.
has determined that this product meets the Energy Star® guidelines for 42HDT79, 55HDT79 42HDX99 and 55HDX99 IMPORTANT SAFETY INSTRUCTIONS 2-3 FIRST TIME USE ...4-24 THE REMOTE CONTROL...25-44 ON-SCREEN DISPLAY ...45-80 USEFUL INFORMATION...81-88 END USER LICENSE AGREEMENT FOR HITACHI DTV SOFTWARE 89-97 APPENDIXES...98-99 INDEX...100 As an Energy Star® Partner, Hitachi, Ltd. PLASMA TELEVISION Operating Guide for energy efficiency.
Owners Guide
Page 3
...digital television is capable of this apparatus to rain or moisture. • The plasma television should not be placed on -screen displays such as this product in Canada). Prevention of the plasma television as video games, stock market quotations, computer generated graphics, and... product recycling and disposal information, contact your cable operator is required to view encrypted digital programming. FOR MORE INFORMATION, CALL 1-800-HITACHI. 3 Caution Never remove the back cover of screen damages Continuous on the television. • This apparatus shall be fully inserted to...
...digital television is capable of this apparatus to rain or moisture. • The plasma television should not be placed on -screen displays such as this product in Canada). Prevention of the plasma television as video games, stock market quotations, computer generated graphics, and... product recycling and disposal information, contact your cable operator is required to view encrypted digital programming. FOR MORE INFORMATION, CALL 1-800-HITACHI. 3 Caution Never remove the back cover of screen damages Continuous on the television. • This apparatus shall be fully inserted to...

Owners Guide
Page 9
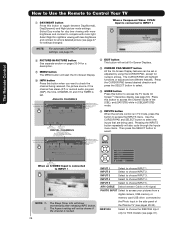
...(TV) Changes the aspect ratio of the OSD, INPUTS or AV NET menu systems if their menu is displayed. BUTTON (TV, CBL, STB, VCR) The CH+ or CH- The Cursor UP or DOWN to ...navigate through the OSD and INPUT menu systems. INFO BUTTON (TV, STB, CBL, PVR) Displays various information on the wheel to access (FAV) Favorite Channel mode. (Favorite channel is in Set-Top-...to manually enter the TV channel, and used for a complete description of all of the functions on your HITACHI Plasma TV, the new remote control is in -Picture mode. Audio Amplifier NOTES: 1. To control TV ...
...(TV) Changes the aspect ratio of the OSD, INPUTS or AV NET menu systems if their menu is displayed. BUTTON (TV, CBL, STB, VCR) The CH+ or CH- The Cursor UP or DOWN to ...navigate through the OSD and INPUT menu systems. INFO BUTTON (TV, STB, CBL, PVR) Displays various information on the wheel to access (FAV) Favorite Channel mode. (Favorite channel is in Set-Top-...to manually enter the TV channel, and used for a complete description of all of the functions on your HITACHI Plasma TV, the new remote control is in -Picture mode. Audio Amplifier NOTES: 1. To control TV ...

Owners Guide
Page 10
... the TV screen. NOTE: When the "MAIN POWER" button is unplugged, the clock will be turned ON/OFF manually. The "MAIN POWER" button must be displayed on the broadside bottom, under the label "MAIN POWER". ቦ CHANNEL selector Press these buttons to adjust the sound level. It is slightly different from...
... the TV screen. NOTE: When the "MAIN POWER" button is unplugged, the clock will be turned ON/OFF manually. The "MAIN POWER" button must be displayed on the broadside bottom, under the label "MAIN POWER". ቦ CHANNEL selector Press these buttons to adjust the sound level. It is slightly different from...
Owners Guide
Page 13
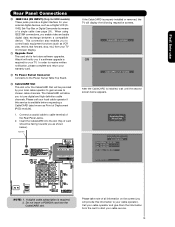
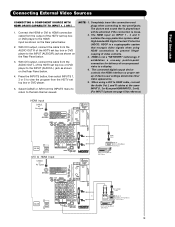
...digital cable subscription is properly installed or removed, the TV will be facing towards you will provide this service is for the CableCARD that will display the following respective screens. In order to receive written notification, please complete and return your warranty card. ቮ To Power Swivel Connector Connects...such as a Digital VCR (DVHS), Set-Top-Box or Digital Camcorder by your local cable operator to gain access to chosen cable channels. Hitachi will allow you to return NOTE: 1. Do not insert a PCMCIA card into the slot (Top of card should be provided by means of...
...digital cable subscription is properly installed or removed, the TV will be facing towards you will provide this service is for the CableCARD that will display the following respective screens. In order to receive written notification, please complete and return your warranty card. ቮ To Power Swivel Connector Connects...such as a Digital VCR (DVHS), Set-Top-Box or Digital Camcorder by your local cable operator to gain access to chosen cable channels. Hitachi will allow you to return NOTE: 1. Do not insert a PCMCIA card into the slot (Top of card should be provided by means of...
Owners Guide
Page 19
... HDMI cable, connect the Audio Out L and R cables at the same INPUT (1 , 2 or 5) as shown on the Rear Panel below . 2. When using HDMI connections to a display. 4.
... HDMI cable, connect the Audio Out L and R cables at the same INPUT (1 , 2 or 5) as shown on the Rear Panel below . 2. When using HDMI connections to a display. 4.

Owners Guide
Page 24
...). 2. NOTE: 1. When using IEEE1394 connections, you to communicate with IEEE1394 capability, such as VCR play, rewind, fast forward, stop, etc.) from your TV On-Screen Display. Press the INPUTS button on the Remote Control. 3. Select the IEEE1394 option (see page 31). 2. With IEEE1394 connection, video and audio will enable you enable...
...). 2. NOTE: 1. When using IEEE1394 connections, you to communicate with IEEE1394 capability, such as VCR play, rewind, fast forward, stop, etc.) from your TV On-Screen Display. Press the INPUTS button on the Remote Control. 3. Select the IEEE1394 option (see page 31). 2. With IEEE1394 connection, video and audio will enable you enable...

Owners Guide
Page 27
...time to quickly change the picture format ASPECT ratio. Depending on conventional (4:3) sources. 16:9 STANDARD 1 Use this aspect mode to display 16:9 sources like HDTV and DVD's preserving the original 16:9 aspect ratio showing 95% of the size. 16:9 STANDARD 2 Use ... Use this is normal operation of the source. NOTE: 1. Vertical position adjustments are placed to the left and right of the image to display conventional (4:3) images. When displaying 16:9 STANDARD 2 it . • Antenna-Analog Channel • S-Video/Video Input (Auto Aspect: Off) • HDMI-480i/480p...
...time to quickly change the picture format ASPECT ratio. Depending on conventional (4:3) sources. 16:9 STANDARD 1 Use this aspect mode to display 16:9 sources like HDTV and DVD's preserving the original 16:9 aspect ratio showing 95% of the size. 16:9 STANDARD 2 Use ... Use this is normal operation of the source. NOTE: 1. Vertical position adjustments are placed to the left and right of the image to display conventional (4:3) images. When displaying 16:9 STANDARD 2 it . • Antenna-Analog Channel • S-Video/Video Input (Auto Aspect: Off) • HDMI-480i/480p...
Owners Guide
Page 28
... Broadcast Rating Picture Format ተ INPUTS button When the remote control is connected to access the TV Guide On ScreenTM interactive display (see pages 29-30). DTvCC 1080i Air 15-1 KPBS-HD 3:17PM Main Picture Source and channel indication Broadcast channel identification Clock...INPUT 3 INPUT 4 Photo Input IEEE 1394 Air / Cable Input 1 Input 2 Move SEL Sel. The Sleep Timer info will start the On-Screen Display. Select Night for numeric entries. Program Information Program Run Time INFO Show Name 3:00PM- 3:30PM ST TV-G ALT U.S. PHOTO INPUT Select to select...
... Broadcast Rating Picture Format ተ INPUTS button When the remote control is connected to access the TV Guide On ScreenTM interactive display (see pages 29-30). DTvCC 1080i Air 15-1 KPBS-HD 3:17PM Main Picture Source and channel indication Broadcast channel identification Clock...INPUT 3 INPUT 4 Photo Input IEEE 1394 Air / Cable Input 1 Input 2 Move SEL Sel. The Sleep Timer info will start the On-Screen Display. Select Night for numeric entries. Program Information Program Run Time INFO Show Name 3:00PM- 3:30PM ST TV-G ALT U.S. PHOTO INPUT Select to select...

Owners Guide
Page 29
...the CURSOR PAD ̆ or ̄ and the SELECT button to view THUMBNAIL. 4. The maximum number of digital Photos that can be displayed is fully loaded, or because of slow access time on the screen for viewing digital still pictures from picture to picture. Digital photos recorded ...on a DVD-RAM disc may not properly display your photos in individual photos. 4. Picture No. Press INFO button to show "Input device not detected" if the digital camera's large ...
...the CURSOR PAD ̆ or ̄ and the SELECT button to view THUMBNAIL. 4. The maximum number of digital Photos that can be displayed is fully loaded, or because of slow access time on the screen for viewing digital still pictures from picture to picture. Digital photos recorded ...on a DVD-RAM disc may not properly display your photos in individual photos. 4. Picture No. Press INFO button to show "Input device not detected" if the digital camera's large ...

Owners Guide
Page 30
... rule for Camera File System). 4. Photo file names modified on a computer should be placed on a sub directory name with the slideshow. Photo files should be displayed on a chosen picture of the digital photos. This TV set . 30 The Remote Control How to Use the Remote to Control Your TV ROTATE Select... PAD ̇ or ̈ to choose the device to start a slideshow of the slideshow. Supported image types are up to stop on the TV set displays only digital pictures from 5, 10 and 30 seconds. Press the SELECT button to 3072 x 2304;
... rule for Camera File System). 4. Photo file names modified on a computer should be placed on a sub directory name with the slideshow. Photo files should be displayed on a chosen picture of the digital photos. This TV set . 30 The Remote Control How to Use the Remote to Control Your TV ROTATE Select... PAD ̇ or ̈ to choose the device to start a slideshow of the slideshow. Supported image types are up to stop on the TV set displays only digital pictures from 5, 10 and 30 seconds. Press the SELECT button to 3072 x 2304;

Owners Guide
Page 31
... is DVHS TV OUT is connected, it will be automatically recognized if properly connected. 2. Use CURSOR PAD ̈ to select IEEE 1394. 2. The On-Screen display will not disappear until the EXIT button is connected INPUTS Input 5 Photo Input IEEE 1394 Air / Cable Input 1 Move SEL Sel. Device not detected The...
... is DVHS TV OUT is connected, it will be automatically recognized if properly connected. 2. Use CURSOR PAD ̈ to select IEEE 1394. 2. The On-Screen display will not disappear until the EXIT button is connected INPUTS Input 5 Photo Input IEEE 1394 Air / Cable Input 1 Move SEL Sel. Device not detected The...

Owners Guide
Page 32
... the current and last channel viewed. ቲ VOLUME (VOL) WHEEL, MUTE button Use the VOL WHEEL (̆ or ̄) until the displayed channel turns from WHITE to highlighted GREEN. Channel selection may also be at a volume level 31 or greater, the volume level will be performed ... will know you obtain the desired sound level. The CHANNEL wheel or the CHANNEL SELECTOR buttons are in Favorite Channel mode when (FAV) is displayed and the displayed channel is turned ON. ቴ (-) DASH button Use the (-) DASH button with the (-) DASH button. For Digital Channels, use the...
... the current and last channel viewed. ቲ VOLUME (VOL) WHEEL, MUTE button Use the VOL WHEEL (̆ or ̄) until the displayed channel turns from WHITE to highlighted GREEN. Channel selection may also be at a volume level 31 or greater, the volume level will be performed ... will know you obtain the desired sound level. The CHANNEL wheel or the CHANNEL SELECTOR buttons are in Favorite Channel mode when (FAV) is displayed and the displayed channel is turned ON. ቴ (-) DASH button Use the (-) DASH button with the (-) DASH button. For Digital Channels, use the...

Owners Guide
Page 33
... main picture, the Digital or Analog channel can watch more than one program at right to move with separate control. The Green highlighted channel display will appear in one Tuner technology designed for PIP availability. Use the CURSOR PAD (̆ or ̄) to view VCR program as a.... This feature allows you want to the PICTURE-IN-PICTURE MODES Table (see table for improved viewing enjoyment. Picture-in-Picture (PIP) Your HITACHI Plasma TV incorporates one of the four different modes (POP, PIP, or SPLIT), depending on the INPUT signal. Main Picture SWAP Sub Picture...
... main picture, the Digital or Analog channel can watch more than one program at right to move with separate control. The Green highlighted channel display will appear in one Tuner technology designed for PIP availability. Use the CURSOR PAD (̆ or ̄) to view VCR program as a.... This feature allows you want to the PICTURE-IN-PICTURE MODES Table (see table for improved viewing enjoyment. Picture-in-Picture (PIP) Your HITACHI Plasma TV incorporates one of the four different modes (POP, PIP, or SPLIT), depending on the INPUT signal. Main Picture SWAP Sub Picture...

Owners Guide
Page 38
... the remote control to position the LED light to pages 42-43 for operation of your DVD player. The remote will need to set the display type of DVD players. Aim the remote control at the DVD player and press the POWER button. When this occurs, the remote control is entered...
... the remote control to position the LED light to pages 42-43 for operation of your DVD player. The remote will need to set the display type of DVD players. Aim the remote control at the DVD player and press the POWER button. When this occurs, the remote control is entered...
Owners Guide
Page 44
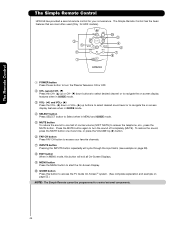
...HITACHI has provided a second remote control for HDX models). ባ ቦ ቪ ቢ CH + GUIDE VOL - The Simple Remote Control has the basic features that are most often used (Only for your favorite channels. ቨ INPUTS button Pressing the INPUTS button repeatedly will exit all On-Screen Displays... (̈) Press the VOL- (̇) down or VOL+ (̈) up buttons to select desired sound level or to navigate the on screen display features when in GUIDE mode. ብ SELECT button Press SELECT button to Select when in MENU mode, this button will cycle through the input ...
...HITACHI has provided a second remote control for HDX models). ባ ቦ ቪ ቢ CH + GUIDE VOL - The Simple Remote Control has the basic features that are most often used (Only for your favorite channels. ቨ INPUTS button Pressing the INPUTS button repeatedly will exit all On-Screen Displays... (̈) Press the VOL- (̇) down or VOL+ (̈) up buttons to select desired sound level or to navigate the on screen display features when in GUIDE mode. ብ SELECT button Press SELECT button to Select when in MENU mode, this button will cycle through the input ...

Owners Guide
Page 45
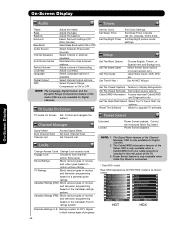
... Reset Video Settings Adjust and balance individual colors to quickly exit from a menu. Press MENU on the remote control to display the different features on the remote control to make either deeper or more reddish color. Choose the picture format aspect ratio.... Settings to preference. Color Tint Sharpness Color Temperature Black Enhancement Contrast Mode Noise Reduction Auto Movie Mode Adjust color. On-Screen Display 1. On-Screen Display Vide o Picture Mode White Level* Black Level** Select between 2 Contrast Mode settings. Set this function to adjust the dark...
... Reset Video Settings Adjust and balance individual colors to quickly exit from a menu. Press MENU on the remote control to display the different features on the remote control to make either deeper or more reddish color. Choose the picture format aspect ratio.... Settings to preference. Color Tint Sharpness Color Temperature Black Enhancement Contrast Mode Noise Reduction Auto Movie Mode Adjust color. On-Screen Display 1. On-Screen Display Vide o Picture Mode White Level* Black Level** Select between 2 Contrast Mode settings. Set this function to adjust the dark...
Owners Guide
Page 46
Adjust volume in the rear panel of the TV. 3. Select Dynamic Range Compression to display dialogue/text. intervals, 00:30-3:00). Label Video Inputs, VCR, DVD, etc. TV Ratings Block various types of movies and television programming based on... picture mode settings. Set The Output Terminals Set Output source options. Control the motorized Table Top Stand Power Swivel disabled. On-Screen Display On-Screen Display Audio Timers Treble Bass Balance Surround Bass Boost Audio Source Internal Speakers Auto Noise Cancel Perfect Volume Loudness Language Digital Output DRC Adjust the...
Adjust volume in the rear panel of the TV. 3. Select Dynamic Range Compression to display dialogue/text. intervals, 00:30-3:00). Label Video Inputs, VCR, DVD, etc. TV Ratings Block various types of movies and television programming based on... picture mode settings. Set The Output Terminals Set Output source options. Control the motorized Table Top Stand Power Swivel disabled. On-Screen Display On-Screen Display Audio Timers Treble Bass Balance Surround Bass Boost Audio Source Internal Speakers Auto Noise Cancel Perfect Volume Loudness Language Digital Output DRC Adjust the...

Owners Guide
Page 47
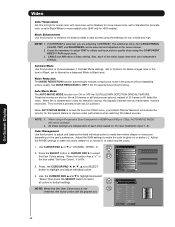
... Level 100% Black Level 50% Color 62% Tint Sharpness 50% Color Temperature High Black Enhancement Off Contrast Mode Dynamic Move SEL Select OR On-Screen Display OR Picture Mode Day(Dynamic) Next/Prev Select SEL Return 1. Brightness* Use this function to quit menu. Video Video Select VIDEO to initial conditions. If...
... Level 100% Black Level 50% Color 62% Tint Sharpness 50% Color Temperature High Black Enhancement Off Contrast Mode Dynamic Move SEL Select OR On-Screen Display OR Picture Mode Day(Dynamic) Next/Prev Select SEL Return 1. Brightness* Use this function to quit menu. Video Video Select VIDEO to initial conditions. If...
Owners Guide
Page 48
...±0 ±0 ±0 ±0 ±0 ±0 ±0 ±0 ±0 ±0 ±0 ±0 Move Reset SEL Return Gain Phase On-Screen Display 48 Use CURSOR PAD ̆ or ̄ or CHANNEL WHEEL to default settings. Video Color Temperature Set this special feature to improve video performance when... the picture without degrading picture quality. NOTE: 1. When AUTO MOVIE MODE is turned ON from the VIDEO menu, your Hitachi Plasma Television will be available 2. Press the CURSOR PAD and SELECT button to make the color brighter (+) or darker (-).
...±0 ±0 ±0 ±0 ±0 ±0 ±0 ±0 ±0 ±0 ±0 ±0 Move Reset SEL Return Gain Phase On-Screen Display 48 Use CURSOR PAD ̆ or ̄ or CHANNEL WHEEL to default settings. Video Color Temperature Set this special feature to improve video performance when... the picture without degrading picture quality. NOTE: 1. When AUTO MOVIE MODE is turned ON from the VIDEO menu, your Hitachi Plasma Television will be available 2. Press the CURSOR PAD and SELECT button to make the color brighter (+) or darker (-).

