Owners Guide
Page 2
... of these products properly, this section illustrates safety tips which could cause the product to the presence of HITACHI plasma televisions. Protect the power cord from being walked on this apparatus during lightning storms or when unused for wall, shelf or ceiling...should not be discovered in the literature accompanying the appliance. caution when moving the cart/apparatus combination to avoid injury from it to HITACHI. Section 810 of your product model. Follow all warnings. 4. built up static charges. Heed all instructions. 5. Only use Please...
... of these products properly, this section illustrates safety tips which could cause the product to the presence of HITACHI plasma televisions. Protect the power cord from being walked on this apparatus during lightning storms or when unused for wall, shelf or ceiling...should not be discovered in the literature accompanying the appliance. caution when moving the cart/apparatus combination to avoid injury from it to HITACHI. Section 810 of your product model. Follow all warnings. 4. built up static charges. Heed all instructions. 5. Only use Please...
Owners Guide
Page 3
Insert the power cord into a 120 volt 60 Hz outlet. Never connect the plasma television to 50 Hz, direct current, or anything other intellectual property rights. Use of the plasma television as improper changes or modifications not expressly approved by HITACHI could void the user's ...or electric shock, do not use of the plasma television. Dispose of this apparatus to prevent blade exposure. Important Safety Instructions Power source This plasma television is protected by U.S. For more information call your TV screen. For product recycling and disposal information, ...
Insert the power cord into a 120 volt 60 Hz outlet. Never connect the plasma television to 50 Hz, direct current, or anything other intellectual property rights. Use of the plasma television as improper changes or modifications not expressly approved by HITACHI could void the user's ...or electric shock, do not use of the plasma television. Dispose of this apparatus to prevent blade exposure. Important Safety Instructions Power source This plasma television is protected by U.S. For more information call your TV screen. For product recycling and disposal information, ...
Owners Guide
Page 4
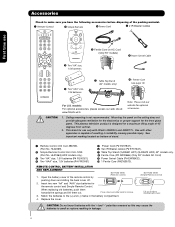
... Top Stand (QJ02681 HDT) (QJ02673 HDX) 42" models only. º Ferrite Core (P# GX00666) (Only 55" models AC Cord) ¾ Power Swivel Cable (P# EW08432). µ 1 Ferrite Core (P#2169513). First time use only with Hitachi 42HDX99 and 42HDT79. Mounting the panel on bottom of the remote control by BOTTOM VIEW (Remote Control) pushing down...
... Top Stand (QJ02681 HDT) (QJ02673 HDX) 42" models only. º Ferrite Core (P# GX00666) (Only 55" models AC Cord) ¾ Power Swivel Cable (P# EW08432). µ 1 Ferrite Core (P#2169513). First time use only with Hitachi 42HDX99 and 42HDT79. Mounting the panel on bottom of the remote control by BOTTOM VIEW (Remote Control) pushing down...

Owners Guide
Page 5
...two people are located in a stable and flat surface. CONNECT POWER SWIVEL CABLE Connect one end of the monitor when using the power swivel feature. However, if you purchased the wall mount bracket option, please ask for model 55HDT79 & 55HDX99 is important to mount the unit in an exceptionally...fall directly on the rear of set to the clamping screw holes on the picture screen. First time use How To Set Up Your New Hitachi Plasma Television To take measures to prevent the Plasma Television from tipping over and prevent possible injury it is not included (Optional). 42" 55"...
...two people are located in a stable and flat surface. CONNECT POWER SWIVEL CABLE Connect one end of the monitor when using the power swivel feature. However, if you purchased the wall mount bracket option, please ask for model 55HDT79 & 55HDX99 is important to mount the unit in an exceptionally...fall directly on the rear of set to the clamping screw holes on the picture screen. First time use How To Set Up Your New Hitachi Plasma Television To take measures to prevent the Plasma Television from tipping over and prevent possible injury it is not included (Optional). 42" 55"...
Owners Guide
Page 8
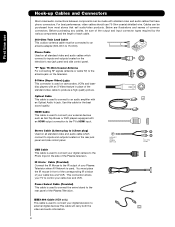
... quality. HDMI Cable This cable is used to connect your digital television to the rear panel of your Plasma Television when AV Network is used . Power Swivel Cable (Provided) This cable is used to connect the swivel stand to external digital devices.This cable will carry both the video and audio...
... quality. HDMI Cable This cable is used to connect your digital television to the rear panel of your Plasma Television when AV Network is used . Power Swivel Cable (Provided) This cable is used to connect the swivel stand to external digital devices.This cable will carry both the video and audio...

Owners Guide
Page 9
...25-43 for numeric entry when navigating through the OSD and INPUT menu systems. INFO BUTTON (TV, STB, CBL, PVR) Displays various information on your HITACHI Plasma TV, the new remote control is in -Picture mode. INPUTS BUTTON (TV, AMP) Accesses the INPUTS menu system. Can also be programmed to...channel. LEGEND TV - Television CBL - Video Recorder/Player DVD - The remote control must be used for a complete description of all of the TV screen. POWER BUTTON (TV, DVD, CBL, STB, PVR/VCR, AMP/CD) Turns the selected device on the right bottom portion of the functions on the screen, ...
...25-43 for numeric entry when navigating through the OSD and INPUT menu systems. INFO BUTTON (TV, STB, CBL, PVR) Displays various information on your HITACHI Plasma TV, the new remote control is in -Picture mode. INPUTS BUTTON (TV, AMP) Accesses the INPUTS menu system. Can also be programmed to...channel. LEGEND TV - Television CBL - Video Recorder/Player DVD - The remote control must be used for a complete description of all of the TV screen. POWER BUTTON (TV, DVD, CBL, STB, PVR/VCR, AMP/CD) Turns the selected device on the right bottom portion of the functions on the screen, ...

Owners Guide
Page 10
...located on the TV screen. One of the differences are the handles that are only present on the 42" models. ቨ POWER button Television MAIN POWER button This power button is slightly different from the 42" models. This button also serves as the SELECT button when in the top right corner of...possible to set to OFF or the TV is set TV features to adjust the sound level. The "MAIN POWER" button must be displayed on the broadside bottom, under the label "MAIN POWER". ቦ CHANNEL selector Press these buttons to your preference without using the remote. Hook the band to exit...
...located on the TV screen. One of the differences are the handles that are only present on the 42" models. ቨ POWER button Television MAIN POWER button This power button is slightly different from the 42" models. This button also serves as the SELECT button when in the top right corner of...possible to set to OFF or the TV is set TV features to adjust the sound level. The "MAIN POWER" button must be displayed on the broadside bottom, under the label "MAIN POWER". ቦ CHANNEL selector Press these buttons to your preference without using the remote. Hook the band to exit...

Owners Guide
Page 11
... 2, 3, 4 and 5. NOTES: 1. TV MAIN POWER is shown. Your component outputs may be necessary to ...Power Light to the TV's PR input. 2. Lamp 1 Lamp 2 Indicating Lamp Power Status Lamp 1 Lamp 2 Off Off OFF. TV MAIN POWER...Front/Side Panel Controls ቩ POWER light indicator To turn ON/OFF the "MAIN POWER" of the TV. 11 A ...red stand-by ) OFF. (Turning ON ) Off Lights Blue O n Lights Orange Off Off (Power Saving) When the main power...operation. Operating When the main power switch is now ready for.... TV MAIN POWER is ON. picture is no sync. INPUT 3,...
... 2, 3, 4 and 5. NOTES: 1. TV MAIN POWER is shown. Your component outputs may be necessary to ...Power Light to the TV's PR input. 2. Lamp 1 Lamp 2 Indicating Lamp Power Status Lamp 1 Lamp 2 Off Off OFF. TV MAIN POWER...Front/Side Panel Controls ቩ POWER light indicator To turn ON/OFF the "MAIN POWER" of the TV. 11 A ...red stand-by ) OFF. (Turning ON ) Off Lights Blue O n Lights Orange Off Off (Power Saving) When the main power...operation. Operating When the main power switch is now ready for.... TV MAIN POWER is ON. picture is no sync. INPUT 3,...
Owners Guide
Page 13
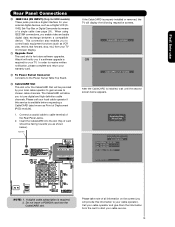
... as shown below appears. In order to receive written notification, please complete and return your warranty card. ቮ To Power Swivel Connector Connects to the Power Swivel Table Top Stand. ቯ CableCARD Slot This slot is for the CableCARD that will notify you if a software ... for HDX models) These jacks provide a digital interface for your local cable operator if this device, please contact your cable service. 13 Hitachi will be facing towards you enable video and audio digital data exchange between a compatible device. Please call your external digital devices, such as...
... as shown below appears. In order to receive written notification, please complete and return your warranty card. ቮ To Power Swivel Connector Connects to the Power Swivel Table Top Stand. ቯ CableCARD Slot This slot is for the CableCARD that will notify you if a software ... for HDX models) These jacks provide a digital interface for your local cable operator if this device, please contact your cable service. 13 Hitachi will be facing towards you enable video and audio digital data exchange between a compatible device. Please call your external digital devices, such as...

Owners Guide
Page 22
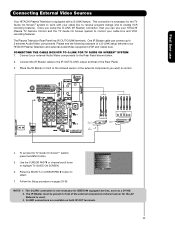
...IR Blaster cable to control your equipment using your HITACHI Plasma TV Remote Control. Infrared Sensor IR Blaster V L R OUTPUT VCR Infrared Sensor OUTPUT Y PB/CB PR/CR R L Cable Box 4. Video Audio TV Guide On Screen Channel Manager Locks Timers Setup Power Swivel Move SEL Select 6. Press the SELECT ...or CURSOR PAD ̈ button to work. The IR Blaster must be placed in front of the infrared sensor of an AV Network setup between your HITACHI remote control to function properly. 22...
...IR Blaster cable to control your equipment using your HITACHI Plasma TV Remote Control. Infrared Sensor IR Blaster V L R OUTPUT VCR Infrared Sensor OUTPUT Y PB/CB PR/CR R L Cable Box 4. Video Audio TV Guide On Screen Channel Manager Locks Timers Setup Power Swivel Move SEL Select 6. Press the SELECT ...or CURSOR PAD ̈ button to work. The IR Blaster must be placed in front of the infrared sensor of an AV Network setup between your HITACHI remote control to function properly. 22...
Owners Guide
Page 23
...Once you setup the G-LINK (IR Blaster) connector, then you want to control. One IR Blaster cable can use Connecting External Video Sources Your HITACHI Plasma Television is not necessary for the TV Guide On ScreenTM system to work . 3. Please see the following example of the Rear Panel. ... 1. Press the SELECT or CURSOR PAD ̈ button to highlight TV GUIDE ON SCREEN. 6. Video Audio TV Guide On Screen Channel Manager Locks Timers Setup Power Swivel Move SEL Select NOTE: 1. Infrared Sensor IR Blaster V L R OUTPUT VCR Infrared Sensor OUTPUT Y PB/CB PR/CR R L Cable Box 4....
...Once you setup the G-LINK (IR Blaster) connector, then you want to control. One IR Blaster cable can use Connecting External Video Sources Your HITACHI Plasma Television is not necessary for the TV Guide On ScreenTM system to work . 3. Please see the following example of the Rear Panel. ... 1. Press the SELECT or CURSOR PAD ̈ button to highlight TV GUIDE ON SCREEN. 6. Video Audio TV Guide On Screen Channel Manager Locks Timers Setup Power Swivel Move SEL Select NOTE: 1. Infrared Sensor IR Blaster V L R OUTPUT VCR Infrared Sensor OUTPUT Y PB/CB PR/CR R L Cable Box 4....

Owners Guide
Page 26
The Remote Control How to Use the Remote to Control Your TV ቢ POWER button Press this button to turn the TV set on or off when the remote is in TV mode. (See page 25 for ቢ instructions ...
The Remote Control How to Use the Remote to Control Your TV ቢ POWER button Press this button to turn the TV set on or off when the remote is in TV mode. (See page 25 for ቢ instructions ...

Owners Guide
Page 29
... Control 5. Contrast will decrease automatically if stationary images such as digital still photos are left side panel of the TV. 1. Digital cameras with low battery power may show Picture Numbers in Thumbnail view, plus other information in individual photos. 4. Photo Input IEEE 1394 Air / Cable Input 1 Input 2 Move SEL Sel. 2. Use...
... Control 5. Contrast will decrease automatically if stationary images such as digital still photos are left side panel of the TV. 1. Digital cameras with low battery power may show Picture Numbers in Thumbnail view, plus other information in individual photos. 4. Photo Input IEEE 1394 Air / Cable Input 1 Input 2 Move SEL Sel. 2. Use...

Owners Guide
Page 31
... IEEE1394 device is connected INPUTS Input 5 Photo Input IEEE 1394 Air / Cable Input 1 Move SEL Sel. IEEE1394 DVHS1 DEVICE NAME, BRAND NAME POWER TV TV RESET Move STD SEL Select 00:00:00 Counter:-00:03:31 1. Use CURSOR PAD ̈ to highlight the TV IN/OUT ... recording of those manufacturers. 5. When using a CableCARD, this CCI data will be used. Press INPUT button, CURSOR PAD and SELECT button to highlight POWER. 4. Digital channels may contain Copy Control Information (CCI). Use CURSOR PAD cursors to select IEEE 1394. 2. The On-Screen display will replace the ...
... IEEE1394 device is connected INPUTS Input 5 Photo Input IEEE 1394 Air / Cable Input 1 Move SEL Sel. IEEE1394 DVHS1 DEVICE NAME, BRAND NAME POWER TV TV RESET Move STD SEL Select 00:00:00 Counter:-00:03:31 1. Use CURSOR PAD ̈ to highlight the TV IN/OUT ... recording of those manufacturers. 5. When using a CableCARD, this CCI data will be used. Press INPUT button, CURSOR PAD and SELECT button to highlight POWER. 4. Digital channels may contain Copy Control Information (CCI). Use CURSOR PAD cursors to select IEEE 1394. 2. The On-Screen display will replace the ...

Owners Guide
Page 32
... channel turns highlighted GREEN to select channels, lock access code, etc. but to activate the (FAV) channels it has to change channels ; When the TV power is turned off completely (MUTE). Use the CHANNEL ት BACKLIGHT button Press this button to toggle between the current and last channel viewed. ቲ VOLUME...
... channel turns highlighted GREEN to select channels, lock access code, etc. but to activate the (FAV) channels it has to change channels ; When the TV power is turned off completely (MUTE). Use the CHANNEL ት BACKLIGHT button Press this button to toggle between the current and last channel viewed. ቲ VOLUME...

Owners Guide
Page 36
... above . ቢ PRECODED CABLE BOX buttons These buttons transmit the chosen precoded cable codes. Aim the remote control at the cable box and press the POWER button. The remote will flash 3 times if the ቢ code was accepted. ባ 5. When this occurs, the remote control is ባ programmed for operating the...
... above . ቢ PRECODED CABLE BOX buttons These buttons transmit the chosen precoded cable codes. Aim the remote control at the cable box and press the POWER button. The remote will flash 3 times if the ቢ code was accepted. ባ 5. When this occurs, the remote control is ባ programmed for operating the...

Owners Guide
Page 37
.../satellite receiver as stated above procedures, please consult your set -top- Aim the remote control at the set-top-box/satellite receiver and press the POWER button. When this occurs, the remote control is programmed for your set-top- ባ box/satellite systems. 3. The Remote Control The Remote Control for Set...
.../satellite receiver as stated above procedures, please consult your set -top- Aim the remote control at the set-top-box/satellite receiver and press the POWER button. When this occurs, the remote control is programmed for your set-top- ባ box/satellite systems. 3. The Remote Control The Remote Control for Set...

Owners Guide
Page 38
... player to 16:9 widescreen. Turn ON your DVD player. Release the ENT button. NOTE: 1. Aim the remote control at the DVD player and press the POWER button. The remote will remember the codes you have programmed until the batteries are for operating the TV. 38 The remote will flash 3 times if...
... player to 16:9 widescreen. Turn ON your DVD player. Release the ENT button. NOTE: 1. Aim the remote control at the DVD player and press the POWER button. The remote will remember the codes you have programmed until the batteries are for operating the TV. 38 The remote will flash 3 times if...

Owners Guide
Page 39
... of the VCR/PVR for operation of your VCR/PVR operating guide. 3. NOTE: 1. Aim the remote control at the VCR/PVR and press the ባ POWER button. After replacing the batteries repeat the entire programming procedure as shown on the remote and enter the four digit preset code that your VCR...
... of the VCR/PVR for operation of your VCR/PVR operating guide. 3. NOTE: 1. Aim the remote control at the VCR/PVR and press the ባ POWER button. After replacing the batteries repeat the entire programming procedure as shown on the remote and enter the four digit preset code that your VCR...

Owners Guide
Page 40
... AUDIO COMPONENT CODE IS: NOTE: Refer to operate different types of your Audio component. Aim the remote control at the Audio component and press the POWER button. When this occurs, the remote control is programmed for your Audio ባ component. 3.
... AUDIO COMPONENT CODE IS: NOTE: Refer to operate different types of your Audio component. Aim the remote control at the Audio component and press the POWER button. When this occurs, the remote control is programmed for your Audio ባ component. 3.


