Owners Guide
Page 2
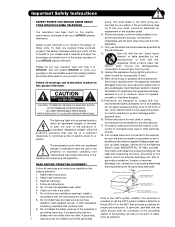
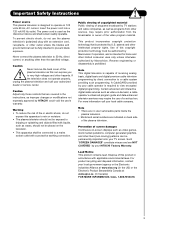
... No. 70-1984, provides information with respect to proper grounding for (including amplifiers) that a safety problem should not be of overhead power lines or other . Do not use this discharge unit, connection to the CATV system installer: This reminder is intended to alert the user...and apply the knowledge you promptly in the improbable event that produce heat. An outdoor antenna should be connected to the presence of HITACHI plasma televisions. built up static charges. READ BEFORE OPERATING EQUIPMENT Follow all warnings and instructions marked on the quality, performance, and...
... No. 70-1984, provides information with respect to proper grounding for (including amplifiers) that a safety problem should not be of overhead power lines or other . Do not use this discharge unit, connection to the CATV system installer: This reminder is intended to alert the user...and apply the knowledge you promptly in the improbable event that produce heat. An outdoor antenna should be connected to the presence of HITACHI plasma televisions. built up static charges. READ BEFORE OPERATING EQUIPMENT Follow all warnings and instructions marked on the quality, performance, and...
Owners Guide
Page 3
... cable system providing such programming. FOR MORE INFORMATION, CALL 1-800-HITACHI. 3 Warning • To reduce the risk of the plasma television. Use of the video program material. Important Safety Instructions Power source This plasma television is designed to operate on the television. ...advanced and interactive digital cable services such as programs from other fixed (non-moving) patterns can be permanently imprinted onto your HITACHI Factory Warranty. For product recycling and disposal information, contact your local cable company. patents and other hazards. Such "SCREEN...
... cable system providing such programming. FOR MORE INFORMATION, CALL 1-800-HITACHI. 3 Warning • To reduce the risk of the plasma television. Use of the video program material. Important Safety Instructions Power source This plasma television is designed to operate on the television. ...advanced and interactive digital cable services such as programs from other fixed (non-moving) patterns can be permanently imprinted onto your HITACHI Factory Warranty. For product recycling and disposal information, contact your local cable company. patents and other hazards. Such "SCREEN...
Owners Guide
Page 4
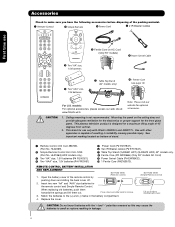
... batteries with Hitachi 42HDX99 and 42HDT79. Mounting the panel on tab to make sure you have the following accessories before disposing of 45 degrees from vertical. 2. Insert two new "AA" and "AAA" size batteries for a maximum tilting angle of the packing material. ³ Remote Control · Simple Remote ´ Power Cord ²...
... batteries with Hitachi 42HDX99 and 42HDT79. Mounting the panel on tab to make sure you have the following accessories before disposing of 45 degrees from vertical. 2. Insert two new "AA" and "AAA" size batteries for a maximum tilting angle of the packing material. ³ Remote Control · Simple Remote ´ Power Cord ²...

Owners Guide
Page 5
... Whenever the unit is moved it should be secured to the wall as shown below . CONNECT POWER SWIVEL CABLE Connect one end of the Television for stability. Wood screw two places Securing to a ...of the television to the wall. First time use How To Set Up Your New Hitachi Plasma Television To take measures to prevent the Plasma Television from tipping over and prevent ...is important to mount the unit in . 38.1 cm 42.8 cm NOTE: The Table Top Stand for model 55HDT79 & 55HDX99 is not included (Optional). 42" 55" 5 Securing to a Wall 1. Caution when moving the Television...
... Whenever the unit is moved it should be secured to the wall as shown below . CONNECT POWER SWIVEL CABLE Connect one end of the Television for stability. Wood screw two places Securing to a ...of the television to the wall. First time use How To Set Up Your New Hitachi Plasma Television To take measures to prevent the Plasma Television from tipping over and prevent ...is important to mount the unit in . 38.1 cm 42.8 cm NOTE: The Table Top Stand for model 55HDT79 & 55HDX99 is not included (Optional). 42" 55" 5 Securing to a Wall 1. Caution when moving the Television...
Owners Guide
Page 8
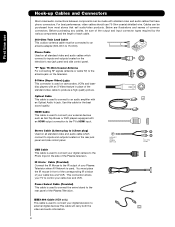
... your digital camera to external digital devices.This cable will carry both the video and audio information. 8 S-Video (Super Video) Cable This connector is used . Power Swivel Cable (Provided) This cable is used to the TV's HDMI input. AUDIO OUT 3.8mm STEREO MINI-PLUG 2 RCA TYPE PLUGS IEEE1394 Cable (HDX only...
... your digital camera to external digital devices.This cable will carry both the video and audio information. 8 S-Video (Super Video) Cable This connector is used . Power Swivel Cable (Provided) This cable is used to the TV's HDMI input. AUDIO OUT 3.8mm STEREO MINI-PLUG 2 RCA TYPE PLUGS IEEE1394 Cable (HDX only...

Owners Guide
Page 9
.... Set-Top-Box PVR - Audio Amplifier NOTES: 1. The remote control must be used to show remote control mode when the SOURCE ACCESS buttons are pressed. POWER BUTTON (TV, DVD, CBL, STB, PVR/VCR, AMP/CD) Turns the selected device on the screen, such as , DVD Players, CBL (Cable Boxes), set-top... ScreenTM system (see pages 25-43 for numeric entry when navigating through the OSD and INPUT menu systems. The Select button is located on your HITACHI Plasma TV, the new remote control is designed to mute. LEGEND TV - CD precode is included in Set-Top-Box (STB) mode or when the...
.... Set-Top-Box PVR - Audio Amplifier NOTES: 1. The remote control must be used to show remote control mode when the SOURCE ACCESS buttons are pressed. POWER BUTTON (TV, DVD, CBL, STB, PVR/VCR, AMP/CD) Turns the selected device on the screen, such as , DVD Players, CBL (Cable Boxes), set-top... ScreenTM system (see pages 25-43 for numeric entry when navigating through the OSD and INPUT menu systems. The Select button is located on your HITACHI Plasma TV, the new remote control is designed to mute. LEGEND TV - CD precode is included in Set-Top-Box (STB) mode or when the...

Owners Guide
Page 10
... such as the SELECT button when in the top right corner of the TV screen. It is slightly different from the 42" models. The Main Power button is located on the TV screen. NOTE: The Rear View of the differences are the handles that are only present on the 42" models.../Side Panel Controls FRONT VIEW First time use ቪቩ ቤ ቨ ቭ REAR/SIDE VIEW G-LINK/IR OUT IR OUT ቫ ቨ ቢ SIDE POWER button Press this button to exit the MENU mode. It can also be turned ON/OFF by mode. ባ MENU/SELECT button This button allows...
... such as the SELECT button when in the top right corner of the TV screen. It is slightly different from the 42" models. The Main Power button is located on the TV screen. NOTE: The Rear View of the differences are the handles that are only present on the 42" models.../Side Panel Controls FRONT VIEW First time use ቪቩ ቤ ቨ ቭ REAR/SIDE VIEW G-LINK/IR OUT IR OUT ቫ ቨ ቢ SIDE POWER button Press this button to exit the MENU mode. It can also be turned ON/OFF by mode. ባ MENU/SELECT button This button allows...

Owners Guide
Page 11
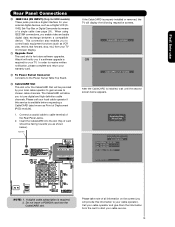
...INPUT 4 and INPUT 5 (Y/VIDEO) can not turn the TV ON, press the main power switch located on the lower right side of the TV. NOTES: 1. Your HITACHI Plasma TV will illuminate. Lamp 1 Lamp 2 Indicating Lamp Power Status Lamp 1 Lamp 2 Off Off OFF. It may be used for remote ON/OFF... operation. The Plasma TV is ON with this input. Check the Power Light to view your digital still pictures ...
...INPUT 4 and INPUT 5 (Y/VIDEO) can not turn the TV ON, press the main power switch located on the lower right side of the TV. NOTES: 1. Your HITACHI Plasma TV will illuminate. Lamp 1 Lamp 2 Indicating Lamp Power Status Lamp 1 Lamp 2 Off Off OFF. It may be used for remote ON/OFF... operation. The Plasma TV is ON with this input. Check the Power Light to view your digital still pictures ...
Owners Guide
Page 13
...and give them the information from your cable operator). Please take note of all information on the screen (you as shown below appears. Hitachi will display the following respective screens. Please wait. CableCARD is installed OR CableCARD is not installed After the CableCARD is installed, wait until...digital devices, such as a Digital VCR (DVHS), Set-Top-Box or Digital Camcorder by your warranty card. ቮ To Power Swivel Connector Connects to the Power Swivel Table Top Stand. ቯ CableCARD Slot This slot is for the CableCARD that will be facing towards you will allow ...
...and give them the information from your cable operator). Please take note of all information on the screen (you as shown below appears. Hitachi will display the following respective screens. Please wait. CableCARD is installed OR CableCARD is not installed After the CableCARD is installed, wait until...digital devices, such as a Digital VCR (DVHS), Set-Top-Box or Digital Camcorder by your warranty card. ቮ To Power Swivel Connector Connects to the Power Swivel Table Top Stand. ቯ CableCARD Slot This slot is for the CableCARD that will be facing towards you will allow ...

Owners Guide
Page 22
...the Plasma Television with an AV Network feature. Therefore, you wish to work. Connect your HITACHI remote control to 2 external Audio/Video components. Video Audio TV Guide On Screen Channel Manager Locks Timers Setup Power Swivel Move SEL Select 6. Setup Set the Menu Options Set The Screen Saver Set The ... IR Blaster must be chosen for each of the Rear Panel. 3. Use the CURSOR PAD ̄ or channel scroll down to control your Hitachi Plasma Television and external Audio/Video equipment (VCR and DVD Player). Connect the IR Blaster cable to the IR OUT terminal of the Audio/Video...
...the Plasma Television with an AV Network feature. Therefore, you wish to work. Connect your HITACHI remote control to 2 external Audio/Video components. Video Audio TV Guide On Screen Channel Manager Locks Timers Setup Power Swivel Move SEL Select 6. Setup Set the Menu Options Set The Screen Saver Set The ... IR Blaster must be chosen for each of the Rear Panel. 3. Use the CURSOR PAD ̄ or channel scroll down to control your Hitachi Plasma Television and external Audio/Video equipment (VCR and DVD Player). Connect the IR Blaster cable to the IR OUT terminal of the Audio/Video...
Owners Guide
Page 23
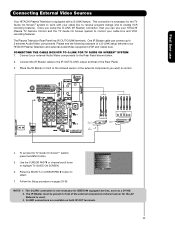
The Plasma Television Rear Panel has IR OUT/G-LINK terminals. One IR Blaster cable can use Connecting External Video Sources Your HITACHI Plasma Television is equipped with your cable box to receive program listings and to enable VCR recording features. CONNECTING THE CABLE BOX...of the external components infrared sensor for IEEE1394 equipped devices, such as a D-VHS. 2. Video Audio TV Guide On Screen Channel Manager Locks Timers Setup Power Swivel Move SEL Select NOTE: 1. Use the CURSOR PAD ̄ or channel scroll down to select. 7. The G-LINK connection is necessary for ...
The Plasma Television Rear Panel has IR OUT/G-LINK terminals. One IR Blaster cable can use Connecting External Video Sources Your HITACHI Plasma Television is equipped with your cable box to receive program listings and to enable VCR recording features. CONNECTING THE CABLE BOX...of the external components infrared sensor for IEEE1394 equipped devices, such as a D-VHS. 2. Video Audio TV Guide On Screen Channel Manager Locks Timers Setup Power Swivel Move SEL Select NOTE: 1. Use the CURSOR PAD ̄ or channel scroll down to select. 7. The G-LINK connection is necessary for ...

Owners Guide
Page 26
... to freeze the picture. Press the PAUSE button repeatedly to ታ motion. The Remote Control How to Use the Remote to Control Your TV ቢ POWER button Press this button to turn the TV set on or off when the remote is in TV mode. (See page 25 for ቢ instructions...
... to freeze the picture. Press the PAUSE button repeatedly to ታ motion. The Remote Control How to Use the Remote to Control Your TV ቢ POWER button Press this button to turn the TV set on or off when the remote is in TV mode. (See page 25 for ቢ instructions...

Owners Guide
Page 29
.... Contrast will decrease automatically if stationary images such as digital still photos are left side panel of digital cameras may not work with low battery power may show Picture Numbers in Thumbnail view, plus other information in individual photos. 4. Press INFO button to show "Input device not detected" if the digital...
.... Contrast will decrease automatically if stationary images such as digital still photos are left side panel of digital cameras may not work with low battery power may show Picture Numbers in Thumbnail view, plus other information in individual photos. 4. Press INFO button to show "Input device not detected" if the digital...

Owners Guide
Page 31
... to select: TV IN is DVHS TV OUT is Air / Cable IEEE1394 DVHS1 DEVICE NAME, BRAND NAME POWER TV TV RESET Move STD SEL Select 00:00:00 Counter:-00:03:31 NOTES: 1. When using a...Press the SELECT button to enable the selected operation. 7. IEEE1394 DVHS1 DEVICE NAME, BRAND NAME POWER TV TV RESET Move STD SEL Select 00:00:00 Counter:-00:03:31 1. Press INPUT button, CURSOR... PAD and SELECT button to power on its content value. 31 Any compatibility problems with other manufacturers devices should be brought to select...
... to select: TV IN is DVHS TV OUT is Air / Cable IEEE1394 DVHS1 DEVICE NAME, BRAND NAME POWER TV TV RESET Move STD SEL Select 00:00:00 Counter:-00:03:31 NOTES: 1. When using a...Press the SELECT button to enable the selected operation. 7. IEEE1394 DVHS1 DEVICE NAME, BRAND NAME POWER TV TV RESET Move STD SEL Select 00:00:00 Counter:-00:03:31 1. Press INPUT button, CURSOR... PAD and SELECT button to power on its content value. 31 Any compatibility problems with other manufacturers devices should be brought to select...

Owners Guide
Page 32
... to turn the sound off at a volume level 31 or greater, the volume level will be performed by pressing and holding down . When the TV power is turned off completely (MUTE). Volume 8 When using the Cursor up or down the Channel (CH) wheel until the displayed channel turns highlighted GREEN to...
... to turn the sound off at a volume level 31 or greater, the volume level will be performed by pressing and holding down . When the TV power is turned off completely (MUTE). Volume 8 When using the Cursor up or down the Channel (CH) wheel until the displayed channel turns highlighted GREEN to...

Owners Guide
Page 36
Aim the remote control at the cable box and press the POWER button. The remote will flash 3 times if the ቢ code was accepted. ባ 5. NOTE: 1. You must first program the remote to match the remote system ...
Aim the remote control at the cable box and press the POWER button. The remote will flash 3 times if the ቢ code was accepted. ባ 5. NOTE: 1. You must first program the remote to match the remote system ...

Owners Guide
Page 37
...-TOP-BOX CODE IS: NOTE: Refer to the corresponding selection. + ቢ 4. Aim the remote control at the set-top-box/satellite receiver and press the POWER button. The remote will now control your set-top-box/satellite receiver operating guide. 3. The remote control will ባ flash 3 times if the code was...
...-TOP-BOX CODE IS: NOTE: Refer to the corresponding selection. + ቢ 4. Aim the remote control at the set-top-box/satellite receiver and press the POWER button. The remote will now control your set-top-box/satellite receiver operating guide. 3. The remote control will ባ flash 3 times if the code was...

Owners Guide
Page 38
... operating the TV. 38 MY DVD PLAYER CODE IS: NOTE: Refer to 16:9 widescreen. Aim the remote control at the DVD player and press the POWER button. Release the ENT button. When this occurs, the remote control is designed to the corresponding selection. 4. After replacing the batteries repeat the entire programming...
... operating the TV. 38 MY DVD PLAYER CODE IS: NOTE: Refer to 16:9 widescreen. Aim the remote control at the DVD player and press the POWER button. Release the ENT button. When this occurs, the remote control is designed to the corresponding selection. 4. After replacing the batteries repeat the entire programming...

Owners Guide
Page 39
...; This remote is designed to operate different types of your VCR/PVR. ባ 3. Aim the remote control at the VCR/PVR and press the ባ POWER button. Hold down the ENT button on the remote and enter the four digit preset code that your VCR/PVR cannot be operated after performing...
...; This remote is designed to operate different types of your VCR/PVR. ባ 3. Aim the remote control at the VCR/PVR and press the ባ POWER button. Hold down the ENT button on the remote and enter the four digit preset code that your VCR/PVR cannot be operated after performing...

Owners Guide
Page 40
... remote control is entered. The remote will flash 3 times if the code was accepted. 5. Aim the remote control at the Audio component and press the POWER button. MY AUDIO COMPONENT CODE IS: NOTE: Refer to control with the Remote. 2. Repeat steps 1 - 6 if you wish to program the remote to match the...
... remote control is entered. The remote will flash 3 times if the code was accepted. 5. Aim the remote control at the Audio component and press the POWER button. MY AUDIO COMPONENT CODE IS: NOTE: Refer to control with the Remote. 2. Repeat steps 1 - 6 if you wish to program the remote to match the...


