
Owners Guide
Page 2
... ...9 REMOTE CONTROL BATTERY INSTALLATION AND REPLACEMENT 10 PICTURE CAUTIONS ...11 HOW TO SET UP YOUR NEW HITACHI PROJECTION TV 12 ANTENNA...12 LOCATION ...12 VIEWING...12 HOOK-UP CABLES AND CONNECTORS 13 ANTENNA CONNECTIONS 14 FRONT PANEL CONTROLS 15 AVX (Audio/Video) selector 15 VOLUME level...15 CHANNEL selector 15 POWER button ...15 POWER light ...15 AI (Artificial Intelligence) sensor 15 REMOTE CONTROL sensor 15 AUDIO SYSTEM SET-UP 16 REAR PANEL JACKS ...17 Antenna Input...17 Audio/Video Inputs 1, 2 17 Output...17 Audio to Hi-Fi ...17 S-Video ...17 Rear Speaker...
... ...9 REMOTE CONTROL BATTERY INSTALLATION AND REPLACEMENT 10 PICTURE CAUTIONS ...11 HOW TO SET UP YOUR NEW HITACHI PROJECTION TV 12 ANTENNA...12 LOCATION ...12 VIEWING...12 HOOK-UP CABLES AND CONNECTORS 13 ANTENNA CONNECTIONS 14 FRONT PANEL CONTROLS 15 AVX (Audio/Video) selector 15 VOLUME level...15 CHANNEL selector 15 POWER button ...15 POWER light ...15 AI (Artificial Intelligence) sensor 15 REMOTE CONTROL sensor 15 AUDIO SYSTEM SET-UP 16 REAR PANEL JACKS ...17 Antenna Input...17 Audio/Video Inputs 1, 2 17 Output...17 Audio to Hi-Fi ...17 S-Video ...17 Rear Speaker...
Owners Guide
Page 3
...; PICTURE PROGRAM 35 • PICTURE SETTINGS 35 • AI...35 • AUTOCOLOR ...36 • NOTCH FILTER ...36 • NOISE REDUCER 36 • CONVERGENCE ...36 -SOUND- SPEAKERS ...39 CARE OF YOUR PROJECTION TV AND REMOTE CONTROLS 40 TROUBLESHOOTING ...41 RECEPTION PROBLEMS (EXTERNAL TO THE TV 41 CHECK HERE BEFORE CALLING FOR SERVICE 41 SPECIFICATIONS ...43 3 TABLE OF CONTENTS • AUTOMATIC MESSAGE 30 • FAVORITE CHANNELS 31 • VOLUME CORRECTION 32 PICTURE-IN-PICTURE (P-IN...
...; PICTURE PROGRAM 35 • PICTURE SETTINGS 35 • AI...35 • AUTOCOLOR ...36 • NOTCH FILTER ...36 • NOISE REDUCER 36 • CONVERGENCE ...36 -SOUND- SPEAKERS ...39 CARE OF YOUR PROJECTION TV AND REMOTE CONTROLS 40 TROUBLESHOOTING ...41 RECEPTION PROBLEMS (EXTERNAL TO THE TV 41 CHECK HERE BEFORE CALLING FOR SERVICE 41 SPECIFICATIONS ...43 3 TABLE OF CONTENTS • AUTOMATIC MESSAGE 30 • FAVORITE CHANNELS 31 • VOLUME CORRECTION 32 PICTURE-IN-PICTURE (P-IN...
Owners Guide
Page 4
... PROJECTION COLOR TV USES A SPECIAL POLARIZED POWER SUPPLY CORD. CAUTION: TO REDUCE THE RISK OF ELECTRIC SHOCK, DO NOT REMOVE COVER (OR BACK). REFER SERVICING TO QUALIFIED SERVICE PERSONNEL. NOTE: • There are no user serviceable parts inside the receiver. • Model number and serial number are indicated on the back side of important operating and maintenance (servicing) instructions in the literature accompanying the appliance. HITACHI SAFETY POINTS YOU SHOULD KNOW ABOUT YOUR HITACHI TELEVISION RECEIVER...
... PROJECTION COLOR TV USES A SPECIAL POLARIZED POWER SUPPLY CORD. CAUTION: TO REDUCE THE RISK OF ELECTRIC SHOCK, DO NOT REMOVE COVER (OR BACK). REFER SERVICING TO QUALIFIED SERVICE PERSONNEL. NOTE: • There are no user serviceable parts inside the receiver. • Model number and serial number are indicated on the back side of important operating and maintenance (servicing) instructions in the literature accompanying the appliance. HITACHI SAFETY POINTS YOU SHOULD KNOW ABOUT YOUR HITACHI TELEVISION RECEIVER...
Owners Guide
Page 5
... voltage points or short out parts that a safety problem should still fail to fit, contact your electrician to the proper operation of your HITACHI television receiver. To help you to qualified service personnel. 5 Please fill out your warranty card at once and mail it to replace your model of any kind on the television set. 7 If the television set has been dropped or the...
... voltage points or short out parts that a safety problem should still fail to fit, contact your electrician to the proper operation of your HITACHI television receiver. To help you to qualified service personnel. 5 Please fill out your warranty card at once and mail it to replace your model of any kind on the television set. 7 If the television set has been dropped or the...

Owners Guide
Page 6
... expose the set to damage the picture tube surface. 10 Unplug this television set on the screen. 14 Avoid dusty places, since accumulated dust inside the chassis may cause failure of the set when high humidity persists. 15 The set has slots, or openings in the cabinet for cleaning. 11-1 Do not place this television set has been exposed to provide reliable operation of...
... expose the set to damage the picture tube surface. 10 Unplug this television set on the screen. 14 Avoid dusty places, since accumulated dust inside the chassis may cause failure of the set when high humidity persists. 15 The set has slots, or openings in the cabinet for cleaning. 11-1 Do not place this television set has been exposed to provide reliable operation of...
Owners Guide
Page 7
... to qualified service personnel. PROTECTION AND LOCATION OF YOUR SET 16-1 If an outside antenna system should be sure the antenna system is provided to call the CATV system installer's attention to grounding electrode, and requirements for the grounding electrode. Adjust only those controls that the cable ground shall be connected to the grounding system of the building, as close to...
... to qualified service personnel. PROTECTION AND LOCATION OF YOUR SET 16-1 If an outside antenna system should be sure the antenna system is provided to call the CATV system installer's attention to grounding electrode, and requirements for the grounding electrode. Adjust only those controls that the cable ground shall be connected to the grounding system of the building, as close to...
Owners Guide
Page 8
... your television set is to remain unused for some TV sets to determine that have it from the wall outlet. IMPORTANT SAFEGUARDS covered in the operating instructions as improper adjustment of other hazards. 27 Upon completion of time, turn the television set "off . IF THIS SET DOES NOT OPERATE PROPERLY 22 If you are required, be sure the service technician has used replacement parts specified by a professional service technician...
... your television set is to remain unused for some TV sets to determine that have it from the wall outlet. IMPORTANT SAFEGUARDS covered in the operating instructions as improper adjustment of other hazards. 27 Upon completion of time, turn the television set "off . IF THIS SET DOES NOT OPERATE PROPERLY 22 If you are required, be sure the service technician has used replacement parts specified by a professional service technician...
Owners Guide
Page 12
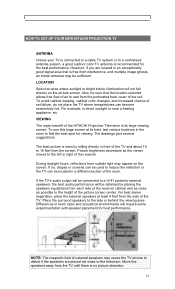
... television. For best stereo separation, place the external speakers at its large viewing screen. During daylight hours, reflections from interference, and multiple image ghosts, an indoor antenna may appear on the picture screen. Differences in front of the TV and about 10 to 18 feet from each side of the receiver. HOW TO SET UP YOUR NEW HITACHI PROJECTION TV HOW TO SET UP YOUR NEW HITACHI PROJECTION TV ANTENNA Unless your TV...
... television. For best stereo separation, place the external speakers at its large viewing screen. During daylight hours, reflections from interference, and multiple image ghosts, an indoor antenna may appear on the picture screen. Differences in front of the TV and about 10 to 18 feet from each side of the receiver. HOW TO SET UP YOUR NEW HITACHI PROJECTION TV HOW TO SET UP YOUR NEW HITACHI PROJECTION TV ANTENNA Unless your TV...
Owners Guide
Page 15
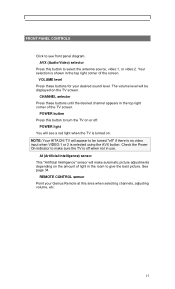
... channels, adjusting volume, etc. 15 POWER light You will appear to turn the TV on the TV screen. Your selection is selected using the AVX button. VOLUME level Press these buttons until the desired channel appears in use. NOTE: Your HITACHI TV will see front panel diagram. REMOTE CONTROL sensor Point your desired sound level. CHANNEL selector Press these buttons for your Genius Remote at this button to be displayed on or off " if there is no video input...
... channels, adjusting volume, etc. 15 POWER light You will appear to turn the TV on the TV screen. Your selection is selected using the AVX button. VOLUME level Press these buttons until the desired channel appears in use. NOTE: Your HITACHI TV will see front panel diagram. REMOTE CONTROL sensor Point your desired sound level. CHANNEL selector Press these buttons for your Genius Remote at this button to be displayed on or off " if there is no video input...

Owners Guide
Page 16
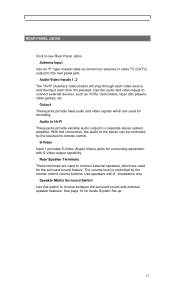
AUDIO SYSTEM SET-UP AUDIO SYSTEM SET-UP • Match the numbers below to the diagram for speaker placement and refer to the Rear Speaker 8 output on the TV. These speakers are connected to the table for the surround sound requirements. Click to a separate audio amplifier. These speakers are used as "fill-in the system. This is needed to Hi-Fi" output on the TV. The television's internal speakers. Use the "Audio to create the...
AUDIO SYSTEM SET-UP AUDIO SYSTEM SET-UP • Match the numbers below to the diagram for speaker placement and refer to the Rear Speaker 8 output on the TV. These speakers are connected to the table for the surround sound requirements. Click to a separate audio amplifier. These speakers are used as "fill-in the system. This is needed to Hi-Fi" output on the TV. The television's internal speakers. Use the "Audio to create the...
Owners Guide
Page 17
... volume level is pressed. REAR PANEL JACKS REAR PANEL JACKS Click to a separate stereo system amplifier. Speaker Matrix Surround Switch Use this rear panel jack. Output These jacks provide fixed audio and video signals which are used for Audio System Set-up. 17 Antenna Input Use an "F" type coaxial cable to connect an antenna or cable TV (CATV) output to this switch to the stereo can be controlled by the remote control volume buttons. Audio to Hi-Fi These jacks provide variable audio output to see Rear Panel...
... volume level is pressed. REAR PANEL JACKS REAR PANEL JACKS Click to a separate stereo system amplifier. Speaker Matrix Surround Switch Use this rear panel jack. Output These jacks provide fixed audio and video signals which are used for Audio System Set-up. 17 Antenna Input Use an "F" type coaxial cable to connect an antenna or cable TV (CATV) output to this switch to the stereo can be controlled by the remote control volume buttons. Audio to Hi-Fi These jacks provide variable audio output to see Rear Panel...
Owners Guide
Page 18
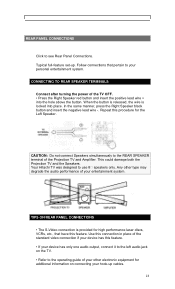
... on the TV. • Refer to the REAR SPEAKER terminal of the TV OFF. • Press the Right Speaker red button and insert the positive lead wire + into place. TIPS ON REAR PANEL CONNECTIONS • The S-Video connection is locked into the hole above the button. CONNECTING TO REAR SPEAKER TERMINALS Connect after turning the power of the Projection TV and Amplifier. This could damage both the Projection TV and the Speakers. Use this connection in place...
... on the TV. • Refer to the REAR SPEAKER terminal of the TV OFF. • Press the Right Speaker red button and insert the positive lead wire + into place. TIPS ON REAR PANEL CONNECTIONS • The S-Video connection is locked into the hole above the button. CONNECTING TO REAR SPEAKER TERMINALS Connect after turning the power of the Projection TV and Amplifier. This could damage both the Projection TV and the Speakers. Use this connection in place...
Owners Guide
Page 20
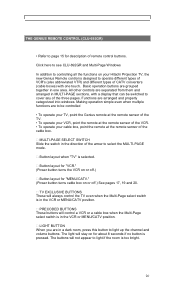
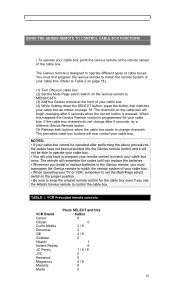
... of the arrow to light if the room is selected. The buttons will stay on for "MENU/CATV." (Power button turns cable box on or off.) Button layout for about 8 seconds if no button is in MULTI-PAGE sections, with one area. THE GENIUS REMOTE CONTROL (CLU-692GR) THE GENIUS REMOTE CONTROL (CLU-692GR) • Refer to be switched to light up the channel and volume buttons. Basic operation buttons are arranged and...
... of the arrow to light if the room is selected. The buttons will stay on for "MENU/CATV." (Power button turns cable box on or off.) Button layout for about 8 seconds if no button is in MULTI-PAGE sections, with one area. THE GENIUS REMOTE CONTROL (CLU-692GR) THE GENIUS REMOTE CONTROL (CLU-692GR) • Refer to be switched to light up the channel and volume buttons. Basic operation buttons are arranged and...
Owners Guide
Page 21
... operating your TV or a cable box, remember to set the Multi-Page select switch to the proper position. • Refer to the instruction manual for the VCR to operate buttons exclusively for the VCR. • Be sure to keep the original remote control for your VCR. The remote will begin changing after 5 seconds when the correct button is designed to change after performing the above procedures, the codes...
... operating your TV or a cable box, remember to set the Multi-Page select switch to the proper position. • Refer to the instruction manual for the VCR to operate buttons exclusively for the VCR. • Be sure to keep the original remote control for your VCR. The remote will begin changing after 5 seconds when the correct button is designed to change after performing the above procedures, the codes...
Owners Guide
Page 22
... cable box. • When operating your TV or VCR, remember to set the Multi-Page select switch to the proper position. • Be sure to keep the original remote control for your cable box. If the cable box channels do not change after 5 seconds, try a different Genius Remote button. (5) Release both buttons when the cable box starts to MENU/CATV. (3) AIM the Genius remote at the remote sensor of the cable box. The remote will begin changing...
... cable box. • When operating your TV or VCR, remember to set the Multi-Page select switch to the proper position. • Be sure to keep the original remote control for your cable box. If the cable box channels do not change after 5 seconds, try a different Genius Remote button. (5) Release both buttons when the cable box starts to MENU/CATV. (3) AIM the Genius remote at the remote sensor of the cable box. The remote will begin changing...
Owners Guide
Page 26
... sound off . LAST CHANNEL (LST-CH) button Use this button to answer the telephone, etc., press the "MUTE" button. SEE PAGE 23. The word "MUTE" will select between the last two channels viewed. (Good for a description. 26 AVX button The AVX (Auxiliary Video) button will not be displayed if the CLOSED CAPTION feature is turned off instantly to select between the antenna signal and the two sets of video input...
... sound off . LAST CHANNEL (LST-CH) button Use this button to answer the telephone, etc., press the "MUTE" button. SEE PAGE 23. The word "MUTE" will select between the last two channels viewed. (Good for a description. 26 AVX button The AVX (Auxiliary Video) button will not be displayed if the CLOSED CAPTION feature is turned off instantly to select between the antenna signal and the two sets of video input...
Owners Guide
Page 27
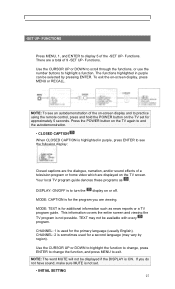
... not possible. This information covers the entire screen and viewing the TV program is to turn the display on or off. CHANNEL: 2 is for the primary language (usually English). NOTE: To see the following display: Closed captions are the dialogue, narration, and/or sound effects of a television program or home video which are a total of the -SET UP- MODE: TEXT is sometimes used for additional information such as...
... not possible. This information covers the entire screen and viewing the TV program is to turn the display on or off. CHANNEL: 2 is for the primary language (usually English). NOTE: To see the following display: Closed captions are the dialogue, narration, and/or sound effects of a television program or home video which are a total of the -SET UP- MODE: TEXT is sometimes used for additional information such as...
Owners Guide
Page 35
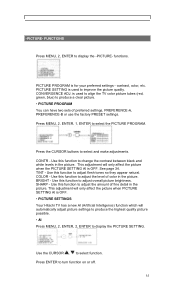
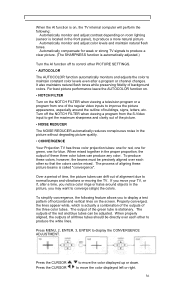
... the TV color picture tubes (red, green, blue) to produce a clear picture. • PICTURE PROGRAM You can have two sets of fine detail in the picture. Use this function to improve the picture quality. SHARP - -PICTURE- functions. CONVERGENCE ADJ. Press MENU, 2, ENTER, 1, ENTER to select and make adjustments. Press the CURSOR buttons to select the PICTURE PROGRAM. TINT - FUNCTIONS Press MENU, 2, ENTER to select function. PICTURE SETTING is for your preferred settings - is used to adjust overall picture brightness...
... the TV color picture tubes (red, green, blue) to produce a clear picture. • PICTURE PROGRAM You can have two sets of fine detail in the picture. Use this function to improve the picture quality. SHARP - -PICTURE- functions. CONVERGENCE ADJ. Press MENU, 2, ENTER, 1, ENTER to select and make adjustments. Press the CURSOR buttons to select the PICTURE PROGRAM. TINT - FUNCTIONS Press MENU, 2, ENTER to select function. PICTURE SETTING is for your preferred settings - is used to adjust overall picture brightness...
Owners Guide
Page 36
... Projection TV has three color projection tubes: one for red, one for blue. To produce these picture beams is called "convergence". Press MENU, 2, ENTER, 3, ENTER to move the color displayed left or right. 36 To simplify convergence, the following : Automatically monitor and adjust contrast depending on room lighting (sensor is automatically adjusted.) Turn the AI function off the NOTCH FILTER when viewing a program from one for green, one of the regular video inputs...
... Projection TV has three color projection tubes: one for red, one for blue. To produce these picture beams is called "convergence". Press MENU, 2, ENTER, 3, ENTER to move the color displayed left or right. 36 To simplify convergence, the following : Automatically monitor and adjust contrast depending on room lighting (sensor is automatically adjusted.) Turn the AI function off the NOTCH FILTER when viewing a program from one for green, one of the regular video inputs...
Owners Guide
Page 38
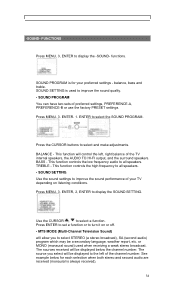
... display the SOUND SETTING. The sources received will control the left of preferred settings, PREFERENCE-A, PREFERENCE-B or use the factory PRESET settings. BASS - FUNCTIONS Press MENU, 3, ENTER to all speakers. This function controls the low frequency audio to all speakers. • SOUND SETTING Use the sound settings to improve the sound quality. • SOUND PROGRAM You can have two sets of the channel number. or MONO (monaural sound) used to improve the sound performance of the TV internal speakers, the AUDIO...
... display the SOUND SETTING. The sources received will control the left of preferred settings, PREFERENCE-A, PREFERENCE-B or use the factory PRESET settings. BASS - FUNCTIONS Press MENU, 3, ENTER to all speakers. This function controls the low frequency audio to all speakers. • SOUND SETTING Use the sound settings to improve the sound quality. • SOUND PROGRAM You can have two sets of the channel number. or MONO (monaural sound) used to improve the sound performance of the TV internal speakers, the AUDIO...


