Owners Guide
Page 2
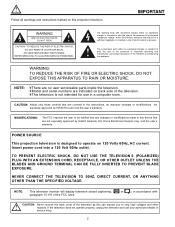
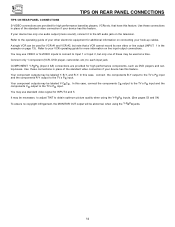
... your authorized dealer or service shop. 2 CAUTION: Adjust only those controls that are not expressly approved by HITACHI could void the user s warranty. POWER SOURCE This projection television is not intended for use in the instructions, as this projection television. NOTE: This television receiver will display television closed captioning, ( or ), in the literature accompanying the appliance. NOTE: ¥There are no user serviceable parts inside the television. ¥Model and serial numbers are indicated on...
... your authorized dealer or service shop. 2 CAUTION: Adjust only those controls that are not expressly approved by HITACHI could void the user s warranty. POWER SOURCE This projection television is not intended for use in the instructions, as this projection television. NOTE: This television receiver will display television closed captioning, ( or ), in the literature accompanying the appliance. NOTE: ¥There are no user serviceable parts inside the television. ¥Model and serial numbers are indicated on...
Owners Guide
Page 3
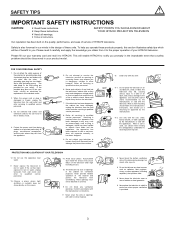
... these instructions. ¥ Keep these instructions. ¥ Heed all warnings. ¥ Follow all servicing to damage the picture tube surface. To help you to rain or water. Please fill out your HITACHI television. A polarized plug has two blades with one wider than the other hazards. The wide blade or the third prong are provided for your product model. Servicing is...
... these instructions. ¥ Keep these instructions. ¥ Heed all warnings. ¥ Follow all servicing to damage the picture tube surface. To help you to rain or water. Please fill out your HITACHI television. A polarized plug has two blades with one wider than the other hazards. The wide blade or the third prong are provided for your product model. Servicing is...
Owners Guide
Page 4
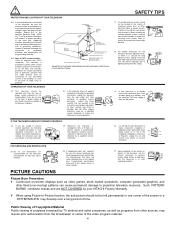
... such power lines or circuits. If replacement parts are covered in the instructions as practical. Picture Burn Prevention ¥ Continuous on a holiday), turn ? Public Viewing of Copyrighted Material Public viewing of the video program material. 4 This reminder is continuous Pop Snap or frequent, unplug the set and consult your operating instructions, do not attempt any service or repairs to the television, ask the ask service technician to normal operation. 21. OPERATION...
... such power lines or circuits. If replacement parts are covered in the instructions as practical. Picture Burn Prevention ¥ Continuous on a holiday), turn ? Public Viewing of Copyrighted Material Public viewing of the video program material. 4 This reminder is continuous Pop Snap or frequent, unplug the set and consult your operating instructions, do not attempt any service or repairs to the television, ask the ask service technician to normal operation. 21. OPERATION...
Owners Guide
Page 14
... input. COMPONENT: Y-PBPR (Input 4 &5) connections are provided for high performance components, such as DVD players and settop-boxes. In this feature. You may be abnormal, when using the Y-PBPR inputs. (See pages 53 and 54) To ensure no copyright infringement, the MONITOR OUT output will be necessary to adjust TINT to Input 1 or Input 2, but only one audio output (mono sound), connect it to the operating guide of the standard video connection...
... input. COMPONENT: Y-PBPR (Input 4 &5) connections are provided for high performance components, such as DVD players and settop-boxes. In this feature. You may be abnormal, when using the Y-PBPR inputs. (See pages 53 and 54) To ensure no copyright infringement, the MONITOR OUT output will be necessary to adjust TINT to Input 1 or Input 2, but only one audio output (mono sound), connect it to the operating guide of the standard video connection...

Owners Guide
Page 16
... seconds. 4. Before Operating External Video Source The input mode is changed every time the VID1~VID5 button is pressed as necessary to view the input source. (See page 27) INPUT MODE SELECTION ORDER (ANTENNA) (INPUT) Ant A VID1 Video:1 VID1 ANT NOTE: When the TV is set is dependent on the back panel of the TV (i.e., VCR/laserdisc player, etc. However, you use to connect the VCR, camcorder, laserdisc player, DVD player, or HDTV Set Top Box to your...
... seconds. 4. Before Operating External Video Source The input mode is changed every time the VID1~VID5 button is pressed as necessary to view the input source. (See page 27) INPUT MODE SELECTION ORDER (ANTENNA) (INPUT) Ant A VID1 Video:1 VID1 ANT NOTE: When the TV is set is dependent on the back panel of the TV (i.e., VCR/laserdisc player, etc. However, you use to connect the VCR, camcorder, laserdisc player, DVD player, or HDTV Set Top Box to your...
Owners Guide
Page 19
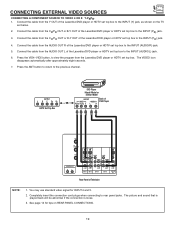
... connection cord plugs when connecting to the previous channel. Connect the cable from the CR/PR OUT or R-Y OUT of the Laserdisc/DVD player or HDTV set top box to the INPUT (PR) jack. 4. Connect the cable from the AUDIO OUT R of the Laserdisc/DVD player or HDTV set below. 2. Press the ANT button to return to rear panel jacks. You may use standard video signal for tips on the TV set top box to the INPUT (AUDIO/L) jack. 6. CONNECTING EXTERNAL VIDEO SOURCES CONNECTING...
... connection cord plugs when connecting to the previous channel. Connect the cable from the CR/PR OUT or R-Y OUT of the Laserdisc/DVD player or HDTV set top box to the INPUT (PR) jack. 4. Connect the cable from the AUDIO OUT R of the Laserdisc/DVD player or HDTV set below. 2. Press the ANT button to return to rear panel jacks. You may use standard video signal for tips on the TV set top box to the INPUT (AUDIO/L) jack. 6. CONNECTING EXTERNAL VIDEO SOURCES CONNECTING...
Owners Guide
Page 20
... (Cable TV) converters, set-top-box, satellite receiver, DVD players, and other Audio/Video equipment depending on which mode is chosen, as follow for best performance. The CBL button will blink, indicating that the remote will blink. NOTE: 1. Use AV1 to light if the room is too bright. The TV button will blink, indicating that the remote will now control your cable box. (See page 28 for instructions on how to program the remote to control your television. Use AV2 to program your...
... (Cable TV) converters, set-top-box, satellite receiver, DVD players, and other Audio/Video equipment depending on which mode is chosen, as follow for best performance. The CBL button will blink, indicating that the remote will blink. NOTE: 1. Use AV1 to light if the room is too bright. The TV button will blink, indicating that the remote will now control your cable box. (See page 28 for instructions on how to program the remote to control your television. Use AV2 to program your...

Owners Guide
Page 22
... time a MENU is displayed, until two dashes appear next to the channel display on , off and auto (see page 52 for more information) ቱ PIX or MODE button Press this button repeatedly to direct access THEATER MODE between Antenna A and Antenna B each of these buttons will blink to program your AMPLIFIER/RECEIVER brand. button Press this button to quickly turn the Closed Caption feature on your TV, then enter the remaining two numbers using the number buttons. Use...
... time a MENU is displayed, until two dashes appear next to the channel display on , off and auto (see page 52 for more information) ቱ PIX or MODE button Press this button repeatedly to direct access THEATER MODE between Antenna A and Antenna B each of these buttons will blink to program your AMPLIFIER/RECEIVER brand. button Press this button to quickly turn the Closed Caption feature on your TV, then enter the remaining two numbers using the number buttons. Use...

Owners Guide
Page 23
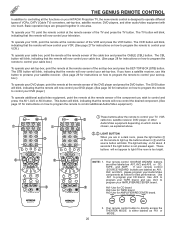
... REMOTE TO CONTROL YOUR TV ቴ THUMB STICK/SELECT button All the On-Screen Display features can be set different features. Volume 8 MUTE Soft Mute 8 MUTE Mute 8 ▲ ▲ ▲ ▲ ▲ ▲ Closed Captioning will control the Set-Top-Box. Audio Selected Main Picture Source S - The channel number which is highlighted indicates what channel is being received, the picture source, if the channel has stereo (ST) or second audio program (SAP), the time, CHANNEL...
... REMOTE TO CONTROL YOUR TV ቴ THUMB STICK/SELECT button All the On-Screen Display features can be set different features. Volume 8 MUTE Soft Mute 8 MUTE Mute 8 ▲ ▲ ▲ ▲ ▲ ▲ Closed Captioning will control the Set-Top-Box. Audio Selected Main Picture Source S - The channel number which is highlighted indicates what channel is being received, the picture source, if the channel has stereo (ST) or second audio program (SAP), the time, CHANNEL...
Owners Guide
Page 24
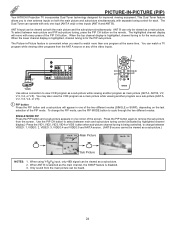
...with separate tuning control for improved viewing enjoyment. Use the PIP CH button to view VCR program as a sub-picture while viewing another program as main picture (ANT A, ANT B, V:2, V:3, V:4, or V:5). When using Y-PBPR input, only 480i signal can watch more than one corner of VCR V L R OUTPUT ANT A TO CONVERTER S-VIDEO S-VIDEO S-VIDEO ANT B AUDIO TO HI-FI R L VIDEO VIDEO Y/VIDEO Y/VIDEO VIDEO (MONO) (MONO) L L R R AUDIO AUDIO INPUT 1 INPUT 2 PB (MONO) L PR R AUDIO INPUT 4 PB (MONO) L L PR R AUDIO R AUDIO INPUT 5 MONITOR OUT MENU EXIT VOL SELECT...
...with separate tuning control for improved viewing enjoyment. Use the PIP CH button to view VCR program as a sub-picture while viewing another program as main picture (ANT A, ANT B, V:2, V:3, V:4, or V:5). When using Y-PBPR input, only 480i signal can watch more than one corner of VCR V L R OUTPUT ANT A TO CONVERTER S-VIDEO S-VIDEO S-VIDEO ANT B AUDIO TO HI-FI R L VIDEO VIDEO Y/VIDEO Y/VIDEO VIDEO (MONO) (MONO) L L R R AUDIO AUDIO INPUT 1 INPUT 2 PB (MONO) L PR R AUDIO INPUT 4 PB (MONO) L L PR R AUDIO R AUDIO INPUT 5 MONITOR OUT MENU EXIT VOL SELECT...
Owners Guide
Page 28
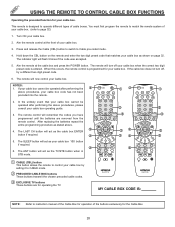
... release the Cable (CBL) button to switch to instruction manual of the Cable Box for operation of your cable box. 2. The indicator light will turn off your cable box by setting it to page 32) 1. The remote will flash 3 times if the code was accepted. 5. If your cable box cannot be operated after performing the above procedures, please consult your cable box operating guide. 3. After replacing the batteries repeat the entire programming procedure as the cable box ENTER button if required...
... release the Cable (CBL) button to switch to instruction manual of the Cable Box for operation of your cable box. 2. The indicator light will turn off your cable box by setting it to page 32) 1. The remote will flash 3 times if the code was accepted. 5. If your cable box cannot be operated after performing the above procedures, please consult your cable box operating guide. 3. After replacing the batteries repeat the entire programming procedure as the cable box ENTER button if required...
Owners Guide
Page 29
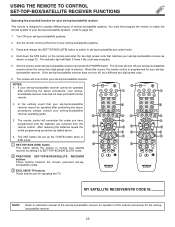
... GUIDE/TV SCHD VID 5 VID 2 VID 4 VID 3 PIP PIP CH FREEZE PIP MODE PIP ACCESS SWAP PROG TV/VCR SLOW ባ ቤ ባ REC CLU-5713TSI MY SATELLITE RECEIVER/STB CODE IS: NOTE: Refer to instruction manual of the set-top-box/satellite receiver for operation of your set -top-box/satellite receiver when the correct two digit preset code is programmed for your set -topbox/satellite receiver code has not been precoded into the remote. 2. The indicator light...
... GUIDE/TV SCHD VID 5 VID 2 VID 4 VID 3 PIP PIP CH FREEZE PIP MODE PIP ACCESS SWAP PROG TV/VCR SLOW ባ ቤ ባ REC CLU-5713TSI MY SATELLITE RECEIVER/STB CODE IS: NOTE: Refer to instruction manual of the set-top-box/satellite receiver for operation of your set -top-box/satellite receiver when the correct two digit preset code is programmed for your set -topbox/satellite receiver code has not been precoded into the remote. 2. The indicator light...
Owners Guide
Page 34
...Adjust tint. Improve picture performance. Set Antenna/Cable Select Antenna or Cable TV. Adjust brightness. Set Parental Locks Set Program Timer Video Input Sensor Closed Caption Menu Background Label channels PAY1, ABC, etc. Adjust color. Magic Focus Automatically match red, green, and blue colors to make white. (53UDX10B/61UDX10B) Digital Array Adjust red and blue to display dialogue/text. Turn TV on to set . View Channel List Check channel name, scan, and child lock. Allows you to VIDEO:4 input. Set Channel Memory First time set up for channel buttons...
...Adjust tint. Improve picture performance. Set Antenna/Cable Select Antenna or Cable TV. Adjust brightness. Set Parental Locks Set Program Timer Video Input Sensor Closed Caption Menu Background Label channels PAY1, ABC, etc. Adjust color. Magic Focus Automatically match red, green, and blue colors to make white. (53UDX10B/61UDX10B) Digital Array Adjust red and blue to display dialogue/text. Turn TV on to set . View Channel List Check channel name, scan, and child lock. Allows you to VIDEO:4 input. Set Channel Memory First time set up for channel buttons...
Owners Guide
Page 36
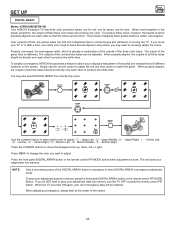
... three questions and a graphic will help you the optimum setup for your TV or Home Theater System. SETUP CUSTOMIZE VIDEO SEL AUDIO THEATER Set Menu Language Plug & Play Set Antenna/Cable Set Channel Memory Edit Channel Memory View Channel List Set The Clock Magic Focus Picture Formats M e n u To M e n u B a r To E x i t Q u i t THUMB STICK Welcome To Your Plug & Play On Screen Set Up Guide. I Want To Connect A Set Top Box To My System A) Yes B) No P r e s s ̆ , ̄ To...
... three questions and a graphic will help you the optimum setup for your TV or Home Theater System. SETUP CUSTOMIZE VIDEO SEL AUDIO THEATER Set Menu Language Plug & Play Set Antenna/Cable Set Channel Memory Edit Channel Memory View Channel List Set The Clock Magic Focus Picture Formats M e n u To M e n u B a r To E x i t Q u i t THUMB STICK Welcome To Your Plug & Play On Screen Set Up Guide. I Want To Connect A Set Top Box To My System A) Yes B) No P r e s s ̆ , ̄ To...
Owners Guide
Page 43
.... SETUP SET UP DIGITAL ARRAY Model: 43FDX10B/43FDX11B Your HITACHI Projection TV has three color projection tubes: one for red, one for green, one for blue. Over a period of time, the picture tubes can be restored. If you move the displayed color up, down, left, or right. The output of alignment due to save your adjustment into memory, press the front panel DIGITAL ARRAY button or the remote control PIP MODE Button. The outputs of the screen. 43 To simplify convergence, HITACHI...
.... SETUP SET UP DIGITAL ARRAY Model: 43FDX10B/43FDX11B Your HITACHI Projection TV has three color projection tubes: one for red, one for green, one for blue. Over a period of time, the picture tubes can be restored. If you move the displayed color up, down, left, or right. The output of alignment due to save your adjustment into memory, press the front panel DIGITAL ARRAY button or the remote control PIP MODE Button. The outputs of the screen. 43 To simplify convergence, HITACHI...
Owners Guide
Page 44
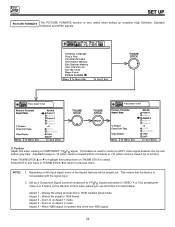
.... Aspect 4 - Position Adjust this is the true 1080i signal. 44 Set up reception High Definition, Standard Definition and NTSC signals. Stretch the signal to center an HDTV video signal between the top and bottom gray bars. Zoom in on Aspect 1 mode. Aspect 5 - SETUP CUSTOMIZE VIDEO SEL AUDIO THEATER Set Menu Language Plug & Play Set Antenna/Cable Set Channel Memory Edit Channel Memory View Channel List Set The Clock Magic Focus Picture Formats M e n u To M e n u B a r To Q u i t E x i t THUMB STICK SETUP Press Select To Set SEL Picture...
.... Aspect 4 - Position Adjust this is the true 1080i signal. 44 Set up reception High Definition, Standard Definition and NTSC signals. Stretch the signal to center an HDTV video signal between the top and bottom gray bars. Zoom in on Aspect 1 mode. Aspect 5 - SETUP CUSTOMIZE VIDEO SEL AUDIO THEATER Set Menu Language Plug & Play Set Antenna/Cable Set Channel Memory Edit Channel Memory View Channel List Set The Clock Magic Focus Picture Formats M e n u To M e n u B a r To Q u i t E x i t THUMB STICK SETUP Press Select To Set SEL Picture...

Owners Guide
Page 46
... DTV Programs. HDTV - The aspect button on the TV screen as DVD (Digital Video Disc Player). Input 4/5 (Component) - 4x3 Format Input 4x3 480p Aspect 1 (4x3 mode) Aspect 1 540p/1080i Aspect key Aspect 4 (Zoom 2 mode) Aspect 4 540p/1080i Normal Aspect key Aspect key Aspect key Aspect key Aspect 2 (16x9 mode) Aspect 2 405p/810i Aspect key Aspect 3 (Zoom 1 Mode) Aspect 3 540p/1080i SETUP Press Select To Set SEL Picture Formats Aspect Style V. High Definition Television - You must be sure to display 1080i or 540P signal mode. Position Comp Color Type Video Display M e n u To...
... DTV Programs. HDTV - The aspect button on the TV screen as DVD (Digital Video Disc Player). Input 4/5 (Component) - 4x3 Format Input 4x3 480p Aspect 1 (4x3 mode) Aspect 1 540p/1080i Aspect key Aspect 4 (Zoom 2 mode) Aspect 4 540p/1080i Normal Aspect key Aspect key Aspect key Aspect key Aspect 2 (16x9 mode) Aspect 2 405p/810i Aspect key Aspect 3 (Zoom 1 Mode) Aspect 3 540p/1080i SETUP Press Select To Set SEL Picture Formats Aspect Style V. High Definition Television - You must be sure to display 1080i or 540P signal mode. Position Comp Color Type Video Display M e n u To...

Owners Guide
Page 51
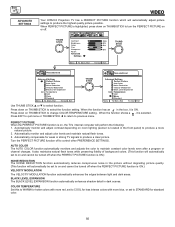
Use the number buttons to previous menu. When VIDEO LOCK is turned on, all buttons on both antenna inputs. 2. When FRONT PANEL LOCK is turned on, the picture and sound for channels 3, 4 on the Front Panel will be deactivated, except the POWER button. MOVIE RATINGS LOCK, TV RATINGS LOCK, and CANADIAN RATINGS are in the Parental Control Movie/TV Ratings Reference Guide. Change Secret Code? 0 0 0 0 Channel 3 Video Lock Quick Lock Front Panel Lock Set Time Lock Movie Ratings Lock TV Ratings Lock Canadian Ratings (ENG) Canadian Ratings (FRN) Menu To Menu Bar...
Use the number buttons to previous menu. When VIDEO LOCK is turned on, all buttons on both antenna inputs. 2. When FRONT PANEL LOCK is turned on, the picture and sound for channels 3, 4 on the Front Panel will be deactivated, except the POWER button. MOVIE RATINGS LOCK, TV RATINGS LOCK, and CANADIAN RATINGS are in the Parental Control Movie/TV Ratings Reference Guide. Change Secret Code? 0 0 0 0 Channel 3 Video Lock Quick Lock Front Panel Lock Set Time Lock Movie Ratings Lock TV Ratings Lock Canadian Ratings (ENG) Canadian Ratings (FRN) Menu To Menu Bar...
Owners Guide
Page 53
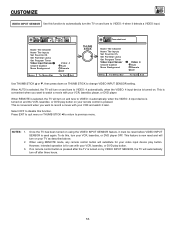
... to automatically turn the TV on your TV as described above. 2. If no remote control button is pressed after three hours. 53 SETUP CUSTOMIZE VIDEO SEL AUDIO THEATER Name The Channel Name The Inputs Set Favorite Ch. Set Parental Locks Set Program Timer Video Input Sensor Closed Caption Menu Background Menu To Menu Bar Video: 4 Auto Remote Off To Quit Exit Use THUMB STICK ̆ or ̄, then press down on using REMOTE mode, any remote control button will turn on and tune to change VIDEO INPUT SENSOR setting. Press...
... to automatically turn the TV on your TV as described above. 2. If no remote control button is pressed after three hours. 53 SETUP CUSTOMIZE VIDEO SEL AUDIO THEATER Name The Channel Name The Inputs Set Favorite Ch. Set Parental Locks Set Program Timer Video Input Sensor Closed Caption Menu Background Menu To Menu Bar Video: 4 Auto Remote Off To Quit Exit Use THUMB STICK ̆ or ̄, then press down on using REMOTE mode, any remote control button will turn on and tune to change VIDEO INPUT SENSOR setting. Press...
Owners Guide
Page 56
... noise in dark scenes. COLOR TEMPERATURE Set this to WARM for hotter colors with more red, set to COOL for weak or strong TV signals to maintain constant color levels even after a program or channel changes. PERFECT PICTURE When the PERFECT PICTURE function is selected. Automatically monitor and adjust color levels and maintain natural flesh tones. 3. Automatically compensate for less intense colors with more natural picture. 2. AUTO COLOR The AUTO COLOR function automatically monitors and adjusts the color...
... noise in dark scenes. COLOR TEMPERATURE Set this to WARM for hotter colors with more red, set to COOL for weak or strong TV signals to maintain constant color levels even after a program or channel changes. PERFECT PICTURE When the PERFECT PICTURE function is selected. Automatically monitor and adjust color levels and maintain natural flesh tones. 3. Automatically compensate for less intense colors with more natural picture. 2. AUTO COLOR The AUTO COLOR function automatically monitors and adjusts the color...


