Owners Guide
Page 7
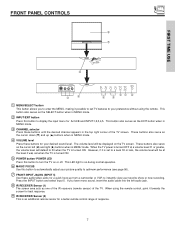
... and up from a camcorder or VCR to instantly view your preference without using the remote control, point it possible to set when the TV is set to display the input menu for a better remote control range of the TV. These buttons also serve as the SELECT ... A/B and INPUT:1,2,3,4,5. The volume level will default to your favorite show or new recording. FRONT PANEL CONTROLS ቩ ቪ FIRST TIME USE ቦ INPUT 5 AUDIO S-VIDEO VIDEO L/MONO R ቨ ቦ VOL- CH+ INPUT MENU MAGIC FOCUS ̇ ̈ ̄ ̆ EXIT SELECT CURSOR ባቢ ቧ ብ...
... and up from a camcorder or VCR to instantly view your preference without using the remote control, point it possible to set when the TV is set to display the input menu for a better remote control range of the TV. These buttons also serve as the SELECT ... A/B and INPUT:1,2,3,4,5. The volume level will default to your favorite show or new recording. FRONT PANEL CONTROLS ቩ ቪ FIRST TIME USE ቦ INPUT 5 AUDIO S-VIDEO VIDEO L/MONO R ቨ ቦ VOL- CH+ INPUT MENU MAGIC FOCUS ̇ ̈ ̄ ̆ EXIT SELECT CURSOR ባቢ ቧ ብ...
Owners Guide
Page 9
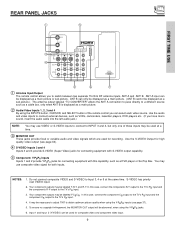
...video output (see page 37). 5. S-VIDEO has priority over VIDEO input. 2. In this capability, such as a DVD player or Set Top Box. It may be labeled Y-CBCR. Do not connect composite VIDEO and S-VIDEO to Input 3, 4 or 5 at a time. ቤ MONITOR OUT These jacks provide fixed or variable audio and video...inputs. FIRST TIME USE REAR PANEL JACKS ቢ ቦ ANT A To Converter ቤ ብ ANT B MONITOR OUT S-VIDEO INPUT 4 INPUT 3 INPUT 2 Y/ VIDEO PB INPUT 1 Y/ VIDEO PB HDMI 1 VIDEO L AUDIO R AUDIO TO HI-FI PR PR (MONO) (MONO) (MONO) (MONO) RS232C 1 2 345 6 789 &#...
...video output (see page 37). 5. S-VIDEO has priority over VIDEO input. 2. In this capability, such as a DVD player or Set Top Box. It may be labeled Y-CBCR. Do not connect composite VIDEO and S-VIDEO to Input 3, 4 or 5 at a time. ቤ MONITOR OUT These jacks provide fixed or variable audio and video...inputs. FIRST TIME USE REAR PANEL JACKS ቢ ቦ ANT A To Converter ቤ ብ ANT B MONITOR OUT S-VIDEO INPUT 4 INPUT 3 INPUT 2 Y/ VIDEO PB INPUT 1 Y/ VIDEO PB HDMI 1 VIDEO L AUDIO R AUDIO TO HI-FI PR PR (MONO) (MONO) (MONO) (MONO) RS232C 1 2 345 6 789 &#...
Owners Guide
Page 10
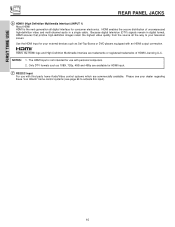
...JACKS ቧ HDMI1 (High Definition Multimedia Interface) (INPUT 1) About HDMI HDMI is not intended for use with third party home Audio/Video control systems which are commercially available. Use the HDMI input for consumer electronics. Because digital television (DTV) signals remain in a single ...cable. Please see your dealer regarding these "non Hitachi" home control systems (see page 64 to your external devices such as Set-Top-Boxes or DVD players equipped with personal computers. 2. HDMI enables the secure distribution of HDMI...
...JACKS ቧ HDMI1 (High Definition Multimedia Interface) (INPUT 1) About HDMI HDMI is not intended for use with third party home Audio/Video control systems which are commercially available. Use the HDMI input for consumer electronics. Because digital television (DTV) signals remain in a single ...cable. Please see your dealer regarding these "non Hitachi" home control systems (see page 64 to your external devices such as Set-Top-Boxes or DVD players equipped with personal computers. 2. HDMI enables the secure distribution of HDMI...

Owners Guide
Page 12
... sound), connect it is used. 12 FIRST TIME USE TIPS ON REAR PANEL CONNECTIONS • S-VIDEO, Y-PbPr and HDMI connections are provided for high performance components, such as DVD players and set- Input 2 accepts both composite and component video signals. • Your component outputs may be used at a time. • Connect only 1 component...
... sound), connect it is used. 12 FIRST TIME USE TIPS ON REAR PANEL CONNECTIONS • S-VIDEO, Y-PbPr and HDMI connections are provided for high performance components, such as DVD players and set- Input 2 accepts both composite and component video signals. • Your component outputs may be used at a time. • Connect only 1 component...

Owners Guide
Page 14
... Ant A Input 1 Input 2 Move SEL Select NOTE: When the TV is set will appear to be made from the VIDEO OUT of components and features. ANT A To Converter ANT B MONITOR OUT S-VIDEO INPUT 4 INPUT 3 INPUT 2 Y/ VIDEO PB INPUT 1 Y/ VIDEO PB HDMI 1 VIDEO L AUDIO R AUDIO TO HI-FI PR PR (MONO) (MONO) (MONO)...Input of your particular assortment of the VCR or the laserdisc player to the INPUT (VIDEO) jack, as suggestions. is not connected or the video device is OFF), the set to VIDEO and a video signal is dependent on the model and features of each component for the location of ...
... Ant A Input 1 Input 2 Move SEL Select NOTE: When the TV is set will appear to be made from the VIDEO OUT of components and features. ANT A To Converter ANT B MONITOR OUT S-VIDEO INPUT 4 INPUT 3 INPUT 2 Y/ VIDEO PB INPUT 1 Y/ VIDEO PB HDMI 1 VIDEO L AUDIO R AUDIO TO HI-FI PR PR (MONO) (MONO) (MONO)...Input of your particular assortment of the VCR or the laserdisc player to the INPUT (VIDEO) jack, as suggestions. is not connected or the video device is OFF), the set to VIDEO and a video signal is dependent on the model and features of each component for the location of ...

Owners Guide
Page 15
... to the INPUT (AUDIO/L) jack. 4. Connect the cable from the INPUTS menu to rear panel jacks. ANT A To Converter ANT B MONITOR OUT S-VIDEO INPUT 4 INPUT 3 INPUT 2 Y/ VIDEO PB INPUT 1 Y/ VIDEO PB HDMI 1 VIDEO L AUDIO R AUDIO TO HI-FI PR PR (MONO) (MONO) (MONO) (MONO) RS232C 1 2 345 6 789 OUTPUT RL V VCR NOTES... (see page 11), but note that is played back will be used for more information on the TV set below. 2. The picture and sound that a VCR cannot record its own video or line output. Select Antenna from the VCR or laserdisc player. A single VCR can be abnormal if ...
... to the INPUT (AUDIO/L) jack. 4. Connect the cable from the INPUTS menu to rear panel jacks. ANT A To Converter ANT B MONITOR OUT S-VIDEO INPUT 4 INPUT 3 INPUT 2 Y/ VIDEO PB INPUT 1 Y/ VIDEO PB HDMI 1 VIDEO L AUDIO R AUDIO TO HI-FI PR PR (MONO) (MONO) (MONO) (MONO) RS232C 1 2 345 6 789 OUTPUT RL V VCR NOTES... (see page 11), but note that is played back will be used for more information on the TV set below. 2. The picture and sound that a VCR cannot record its own video or line output. Select Antenna from the VCR or laserdisc player. A single VCR can be abnormal if ...

Owners Guide
Page 16
...or laserdisc player. ANT A To Converter ANT B MONITOR OUT S-VIDEO INPUT 4 INPUT 3 INPUT 2 Y/ VIDEO PB INPUT 1 Y/ VIDEO PB HDMI 1 VIDEO L AUDIO R AUDIO TO HI-FI PR PR (MONO) (MONO) (MONO) (MONO) RS232C 1 2 345 6 789 RL V S-VIDEO VCR NOTES: 1. A single VCR can be abnormal if the ...VIDEO SOURCE TO INPUT 3, 4 AND 5 1. Refer to the INPUT (AUDIO/L) jack. 4. Connect the cable from the S-VIDEO OUT of the VCR or the laserdisc player to your VCR operating guide for VCR #1 and VCR #2 (see page 11), but note that is played back will be used for more information on the TV set...
...or laserdisc player. ANT A To Converter ANT B MONITOR OUT S-VIDEO INPUT 4 INPUT 3 INPUT 2 Y/ VIDEO PB INPUT 1 Y/ VIDEO PB HDMI 1 VIDEO L AUDIO R AUDIO TO HI-FI PR PR (MONO) (MONO) (MONO) (MONO) RS232C 1 2 345 6 789 RL V S-VIDEO VCR NOTES: 1. A single VCR can be abnormal if the ...VIDEO SOURCE TO INPUT 3, 4 AND 5 1. Refer to the INPUT (AUDIO/L) jack. 4. Connect the cable from the S-VIDEO OUT of the VCR or the laserdisc player to your VCR operating guide for VCR #1 and VCR #2 (see page 11), but note that is played back will be used for more information on the TV set...

Owners Guide
Page 17
... cable from the output of INPUT 1. 2. Connect the HDMI or DVI to -point connection for delivery of device user settings determines final video appearance. 17 Press the INPUTS button, then select INPUT 1 from the INPUTS menu to view the program from the INPUTS... NOTES: 1. HDMI is loose. 2. FIRST TIME USE CONNECTING EXTERNAL VIDEO SOURCES CONNECTING A COMPONENT SOURCE WITH HDMI or DVI CAPABILITY TO INPUT 1 1. The VIDEO OSD label disappears automatically after approximately four seconds. 3. Select Antenna from the HDTV set -up of uncompressed video to the previous channel.
... cable from the output of INPUT 1. 2. Connect the HDMI or DVI to -point connection for delivery of device user settings determines final video appearance. 17 Press the INPUTS button, then select INPUT 1 from the INPUTS menu to view the program from the INPUTS... NOTES: 1. HDMI is loose. 2. FIRST TIME USE CONNECTING EXTERNAL VIDEO SOURCES CONNECTING A COMPONENT SOURCE WITH HDMI or DVI CAPABILITY TO INPUT 1 1. The VIDEO OSD label disappears automatically after approximately four seconds. 3. Select Antenna from the HDTV set -up of uncompressed video to the previous channel.

Owners Guide
Page 18
Select Antenna from the Laserdisc/DVD player or HDTV set top box. ANT A To Converter ANT B MONITOR OUT S-VIDEO INPUT 4 INPUT 3 INPUT 2 Y/ VIDEO INPUT 1 Y/ VIDEO PB PB HDMI 1 VIDEO L AUDIO R AUDIO TO HI-FI PR PR (MONO) (MONO) (MONO) (MONO) RS232C 1 2 345 6 789 OUTPUT R L PR PB...INPUT (AUDIO/L) jack. 6. See page 12 for tips on the TV set top box to the INPUT (PB) jack. 3. CONNECTING EXTERNAL VIDEO SOURCES CONNECTING A COMPONENT SOURCE TO INPUT 1 OR 2: Y-PBPR. 1. The VIDEO OSD label disappears automatically after approximately four seconds. 7. Connect the cable ...
Select Antenna from the Laserdisc/DVD player or HDTV set top box. ANT A To Converter ANT B MONITOR OUT S-VIDEO INPUT 4 INPUT 3 INPUT 2 Y/ VIDEO INPUT 1 Y/ VIDEO PB PB HDMI 1 VIDEO L AUDIO R AUDIO TO HI-FI PR PR (MONO) (MONO) (MONO) (MONO) RS232C 1 2 345 6 789 OUTPUT R L PR PB...INPUT (AUDIO/L) jack. 6. See page 12 for tips on the TV set top box to the INPUT (PB) jack. 3. CONNECTING EXTERNAL VIDEO SOURCES CONNECTING A COMPONENT SOURCE TO INPUT 1 OR 2: Y-PBPR. 1. The VIDEO OSD label disappears automatically after approximately four seconds. 7. Connect the cable ...
Owners Guide
Page 21
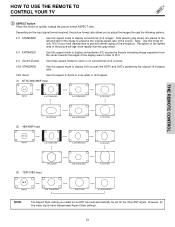
...received, the picture format ratio allows you select for an ANT input will automatically be set for only 15% of your total viewing time to display conventional (4:3) images. However, all five video inputs have independent Aspect Style settings. 21 Phosphors in 16:9 aspect. (1) NTSC/480i/480P Input 4:3 INPUT 4:3 ...4:3 ZOOM2 4:3 ZOOM1 16:9 ZOOM (3) 720P/1080i Input 16:9 INPUT 16:9 STANDARD 16:9 STANDARD 16:9 ZOOM 4:3 ZOOM2 4:3 EXPANDED NOTE: The Aspect Style setting you to adjust the images through the following options. 4:3 STANDARD Use this mode for the other ANT inputs.
...received, the picture format ratio allows you select for an ANT input will automatically be set for only 15% of your total viewing time to display conventional (4:3) images. However, all five video inputs have independent Aspect Style settings. 21 Phosphors in 16:9 aspect. (1) NTSC/480i/480P Input 4:3 INPUT 4:3 ...4:3 ZOOM2 4:3 ZOOM1 16:9 ZOOM (3) 720P/1080i Input 16:9 INPUT 16:9 STANDARD 16:9 STANDARD 16:9 ZOOM 4:3 ZOOM2 4:3 EXPANDED NOTE: The Aspect Style setting you to adjust the images through the following options. 4:3 STANDARD Use this mode for the other ANT inputs.

Owners Guide
Page 23
... (CBL) and (SAT/STB) mode. PM 4:3 Expanded Event Timer Time Main Picture Source Audio Broadcast Broadcast Rating Aspect Mode 3:32 PM When an S-VIDEO S-IN: 3 Input is connected to check the channel being received, the picture source, if the channel has stereo (ST) or second audio program (SAP...for a description. ቩ MENU button The MENU button will start the On-Screen Display. ቪ GUIDE button [Cable Box (CBL), Satellite Receiver (SAT)/Set-Top-Box (STB) mode only] The use of the (CBL), and (SAT/STB). ቫ EXIT button This button will show momentarily after releasing INFO ...
... (CBL) and (SAT/STB) mode. PM 4:3 Expanded Event Timer Time Main Picture Source Audio Broadcast Broadcast Rating Aspect Mode 3:32 PM When an S-VIDEO S-IN: 3 Input is connected to check the channel being received, the picture source, if the channel has stereo (ST) or second audio program (SAP...for a description. ቩ MENU button The MENU button will start the On-Screen Display. ቪ GUIDE button [Cable Box (CBL), Satellite Receiver (SAT)/Set-Top-Box (STB) mode only] The use of the (CBL), and (SAT/STB). ቫ EXIT button This button will show momentarily after releasing INFO ...
Owners Guide
Page 32
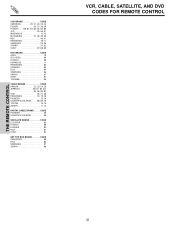
VCR BRAND CODE EMERSON 20, 21, 22, 23 ,24 FISHER 34, 37, 38, 39 HITACHI . . . . 00, 01, 02, 03, 04, 05, 06 JVC 49, 50, 51 MAGNAVOX 12, 13...10, 11 SAMSUNG 25, 26 SHARP 31, 32 SONY 07, 08, 09 DVD BRAND CODE APEX 10 GO VIDEO 09 HITACHI 00 KENWOOD 11 PANASONIC 02 PIONEER 03 RCA 04 SAMSUNG 06 SANYO 07 SONY 01 TOSHIBA 05 CABLE BRAND CODE ...DIGITAL CABLE BRAND . . . . . CODE PIONEER 29 SCIENTIFIC ATLANTA 30 SATELLITE BRAND CODE ECOSTAR 03 HITACHI 00 HUGHES 04 RCA 01 SONY 02 SET TOP BOX BRAND CODE PANASONIC 05 RCA 06 SAMSUNG 07 ZENITH 08 VCR, CABLE, SATELLITE, AND DVD ...
VCR BRAND CODE EMERSON 20, 21, 22, 23 ,24 FISHER 34, 37, 38, 39 HITACHI . . . . 00, 01, 02, 03, 04, 05, 06 JVC 49, 50, 51 MAGNAVOX 12, 13...10, 11 SAMSUNG 25, 26 SHARP 31, 32 SONY 07, 08, 09 DVD BRAND CODE APEX 10 GO VIDEO 09 HITACHI 00 KENWOOD 11 PANASONIC 02 PIONEER 03 RCA 04 SAMSUNG 06 SANYO 07 SONY 01 TOSHIBA 05 CABLE BRAND CODE ...DIGITAL CABLE BRAND . . . . . CODE PIONEER 29 SCIENTIFIC ATLANTA 30 SATELLITE BRAND CODE ECOSTAR 03 HITACHI 00 HUGHES 04 RCA 01 SONY 02 SET TOP BOX BRAND CODE PANASONIC 05 RCA 06 SAMSUNG 07 ZENITH 08 VCR, CABLE, SATELLITE, AND DVD ...
Owners Guide
Page 34
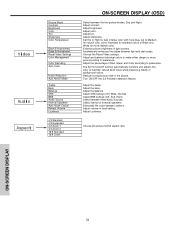
... Picture Mode Contrast Brightness Color Tint Sharpness Color Temperature Black Enhancement Edge Enhancement Reset Video Settings Color Management Color Decoding Auto Color Noise Reduction Auto Movie Mode Treble Bass Balance SRS BBE Audio Source ...Standard 4:3 Expanded 4:3 Zoom 1 4:3 Zoom 2 16:9 Standard 16:9 Zoom ON-SCREEN DISPLAY (OSD) Select between stations. Enhance picture brightness in fixed setting. Choose the Reset Video settings. Adjust and balance individual colors to make either deeper or more reddish color. Adjust the balance. Choose the picture format aspect ratio...
... Picture Mode Contrast Brightness Color Tint Sharpness Color Temperature Black Enhancement Edge Enhancement Reset Video Settings Color Management Color Decoding Auto Color Noise Reduction Auto Movie Mode Treble Bass Balance SRS BBE Audio Source ...Standard 4:3 Expanded 4:3 Zoom 1 4:3 Zoom 2 16:9 Standard 16:9 Zoom ON-SCREEN DISPLAY (OSD) Select between stations. Enhance picture brightness in fixed setting. Choose the Reset Video settings. Adjust and balance individual colors to make either deeper or more reddish color. Adjust the balance. Choose the picture format aspect ratio...
Owners Guide
Page 35
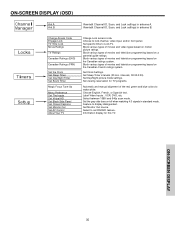
...programming based on /off when watching 4:3 signals in standard mode. Set Day/Night picture mode settings. Choose English, French, or Spanish text. Label Video Inputs , VCR, DVD, etc. Feature to Lock TV. Set Monitor Out source. Set specific time to display dialogue/text. intervals, 00:30-3:00). Select... between 1080i and 540p scan mode. Set the gray side bars on a parental guide ratings. Select to lock channel, video input, and/or front panel. ON-SCREEN DISPLAY 35 ON-SCREEN DISPLAY (OSD) Channel Ant A ...
...programming based on /off when watching 4:3 signals in standard mode. Set Day/Night picture mode settings. Choose English, French, or Spanish text. Label Video Inputs , VCR, DVD, etc. Feature to Lock TV. Set Monitor Out source. Set specific time to display dialogue/text. intervals, 00:30-3:00). Select... between 1080i and 540p scan mode. Set the gray side bars on a parental guide ratings. Select to lock channel, video input, and/or front panel. ON-SCREEN DISPLAY 35 ON-SCREEN DISPLAY (OSD) Channel Ant A ...

Owners Guide
Page 36
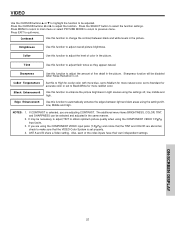
.... ON-SCREEN DISPLAY 36 VIDEO Video Select VIDEO to optimize your preference to highlight and select Picture Mode settings. Video Audio Aspect Chan. Picture Mode Use this function to choose from automatic picture settings to adjust picture settings and improve picture quality. ...You can independently customize each of the Video Inputs to your TV's performance. Manager Locks Timers Setup Move SEL Sel Video Picture Mode Contrast Brightness Color Tint Sharpness Color Temperature Black Enhancement Edge Enhancement Reset Video Settings Move SEL Select ANT A/B Day 100...
.... ON-SCREEN DISPLAY 36 VIDEO Video Select VIDEO to optimize your preference to highlight and select Picture Mode settings. Video Audio Aspect Chan. Picture Mode Use this function to choose from automatic picture settings to adjust picture settings and improve picture quality. ...You can independently customize each of the Video Inputs to your TV's performance. Manager Locks Timers Setup Move SEL Sel Video Picture Mode Contrast Brightness Color Tint Sharpness Color Temperature Black Enhancement Edge Enhancement Reset Video Settings Move SEL Select ANT A/B Day 100...
Owners Guide
Page 37
... to change the contrast between light and dark areas using the COMPONENT VIDEO Y-PBPR input jacks. 3. Sharpness function will be necessary to adjust TINT to obtain optimum picture quality when using the settings Off, Low, Middle and High. ANT A and B share a Video setting. Sharpness Use this function to enhance the picture brightness in the...
... to change the contrast between light and dark areas using the COMPONENT VIDEO Y-PBPR input jacks. 3. Sharpness function will be necessary to adjust TINT to obtain optimum picture quality when using the settings Off, Low, Middle and High. ANT A and B share a Video setting. Sharpness Use this function to enhance the picture brightness in the...

Owners Guide
Page 38
... function. Use the CURSOR button ̄ to the Day VIDEO mode. VIDEO Reset Video Settings This function allows you to Reset the Video Menu Settings of the Video Inputs to your preference to select Reset Video Settings. Video Picture Mode Contrast Brightness Color Tint Sharpness Color Temperature Black Enhancement Edge Enhancement Reset Video Settings Move SEL Select ANT A/B Day 100% 50% 50...
... function. Use the CURSOR button ̄ to the Day VIDEO mode. VIDEO Reset Video Settings This function allows you to Reset the Video Menu Settings of the Video Inputs to your preference to select Reset Video Settings. Video Picture Mode Contrast Brightness Color Tint Sharpness Color Temperature Black Enhancement Edge Enhancement Reset Video Settings Move SEL Select ANT A/B Day 100% 50% 50...

Owners Guide
Page 39
... still pictures per second, instead of the 4 Color Temperature settings. All Video settings are independent of each of 30 frames or 60 fields like video. Use the CURSOR buttons to highlight and select "Reset" to return all settings to highlight and adjust Red, Green, Color and Tint. NOTE...: Color Decoding settings are shot on it's input (ANT A/B, Input 1~5). When Auto Movie Mode is turned ON from 4 menu items. Press the CURSOR buttons to default. Press down to select from the VIDEO menu, your Hitachi Projection Television will not be available (grayed ...
... still pictures per second, instead of the 4 Color Temperature settings. All Video settings are independent of each of 30 frames or 60 fields like video. Use the CURSOR buttons to highlight and select "Reset" to return all settings to highlight and adjust Red, Green, Color and Tint. NOTE...: Color Decoding settings are shot on it's input (ANT A/B, Input 1~5). When Auto Movie Mode is turned ON from 4 menu items. Press the CURSOR buttons to default. Press down to select from the VIDEO menu, your Hitachi Projection Television will not be available (grayed ...

Owners Guide
Page 47
...10004; TIME LOCK) you can block various types of movies and video tapes based on the two rating systems used to indicate that TV TIME LOCK is selected, SET CHANNEL LOCK, SET INPUT LOCK, and SET FRONT PANEL LOCK can be set the BEGIN and END times (CURSOR button ̈) and the ... four digit access code number. When MOVIE RATINGS is 0000. Use CANADIAN RATINGS to block various types of the selected channel or video input. If you can set individually. Use the number buttons to erase your preference. The factory preset code is selected, you forget your access code, use ...
...10004; TIME LOCK) you can block various types of movies and video tapes based on the two rating systems used to indicate that TV TIME LOCK is selected, SET CHANNEL LOCK, SET INPUT LOCK, and SET FRONT PANEL LOCK can be set the BEGIN and END times (CURSOR button ̈) and the ... four digit access code number. When MOVIE RATINGS is 0000. Use CANADIAN RATINGS to block various types of the selected channel or video input. If you can set individually. Use the number buttons to erase your preference. The factory preset code is selected, you forget your access code, use ...

Owners Guide
Page 72
English 50 TV Ratings (Canadian - INDEX A Accessories 4 Antennas (Connecting 5,6 Aspect Ratio 21, 42 Audio SRS 40 BBE 40 Audio Settings 40-41 Audio Source 41 Auto Noise Cancel 41 B Balance 40 Bass 40 Black Enhancement 37 Brightness 39 C Channel Manager 43-46 Auto Channel Scan ... 28-32 Installing Batteries 4 S Sharpness 36-37 Speakers 41 Connecting External Speakers 5, 13 T Timers 52-54 Time 52 Tint 37 Treble 40 V Vertical Position 42 Video Settings 36-39 Volume 24 72
English 50 TV Ratings (Canadian - INDEX A Accessories 4 Antennas (Connecting 5,6 Aspect Ratio 21, 42 Audio SRS 40 BBE 40 Audio Settings 40-41 Audio Source 41 Auto Noise Cancel 41 B Balance 40 Bass 40 Black Enhancement 37 Brightness 39 C Channel Manager 43-46 Auto Channel Scan ... 28-32 Installing Batteries 4 S Sharpness 36-37 Speakers 41 Connecting External Speakers 5, 13 T Timers 52-54 Time 52 Tint 37 Treble 40 V Vertical Position 42 Video Settings 36-39 Volume 24 72


