
Owners Guide
Page 1
... AND REPLACEMENT 7 HOW TO SET UP YOUR NEW HITACHI PROJECTION TV 8 HOOK-UP CABLES AND CONNECTORS 8 ANTENNA CONNECTIONS TO REAR JACK PANEL 9 FRONT PANEL CONTROLS...10 FRONT VIEW ...10 FRONT PANEL JACKS AND CONNECTIONS 11 REAR PANEL JACKS ...11 REAR PANEL CONNECTIONS 12 TIPS ON REAR PANEL CONNECTIONS 12 EXTERNAL CONNECTIONS 12 CONNECTING EXTERNAL AUDIO AMPLIFIER 12 CONNECTING EXTERNAL VIDEO SOURCES 13 CONNECTING A STEREO VCR OR STEREO LASERDISC PLAYER 14 CONNECTING A STEREO LASERDISC PLAYER OR DVD PLAYER TO INPUT 2............14 AUDIO SYSTEM SETUP ...15 THE GENIUS REMOTE CONTROL (CLU...
... AND REPLACEMENT 7 HOW TO SET UP YOUR NEW HITACHI PROJECTION TV 8 HOOK-UP CABLES AND CONNECTORS 8 ANTENNA CONNECTIONS TO REAR JACK PANEL 9 FRONT PANEL CONTROLS...10 FRONT VIEW ...10 FRONT PANEL JACKS AND CONNECTIONS 11 REAR PANEL JACKS ...11 REAR PANEL CONNECTIONS 12 TIPS ON REAR PANEL CONNECTIONS 12 EXTERNAL CONNECTIONS 12 CONNECTING EXTERNAL AUDIO AMPLIFIER 12 CONNECTING EXTERNAL VIDEO SOURCES 13 CONNECTING A STEREO VCR OR STEREO LASERDISC PLAYER 14 CONNECTING A STEREO LASERDISC PLAYER OR DVD PLAYER TO INPUT 2............14 AUDIO SYSTEM SETUP ...15 THE GENIUS REMOTE CONTROL (CLU...
Owners Guide
Page 2
... remove the back cover of the television. • This television is intended to alert the user to very high voltages and other hazards. NOTE: • There are no user serviceable parts inside the television. • Model number and serial number are covered in the instructions, as this projection television. NEVER CONNECT THE TV TO 50 Hz, DIRECT CURRENT, OR ANYTHING OTHER THAN THE SPECIFIED VOLTAGE. RECEPTION PROBLEMS...42 USEFUL INFO...43 Back Cover...
... remove the back cover of the television. • This television is intended to alert the user to very high voltages and other hazards. NOTE: • There are no user serviceable parts inside the television. • Model number and serial number are covered in the instructions, as this projection television. NEVER CONNECT THE TV TO 50 Hz, DIRECT CURRENT, OR ANYTHING OTHER THAN THE SPECIFIED VOLTAGE. RECEPTION PROBLEMS...42 USEFUL INFO...43 Back Cover...
Owners Guide
Page 3
... or fire hazard. 5 Do not attempt to service this television set yourself as opening or removing covers may touch dangerous voltage points or short out parts that a safety problem should still fail to fit, contact your electrician to the proper operation of these instructions for later use. • Follow all warnings and instructions marked on the quality, performance, and ease of...
... or fire hazard. 5 Do not attempt to service this television set yourself as opening or removing covers may touch dangerous voltage points or short out parts that a safety problem should still fail to fit, contact your electrician to the proper operation of these instructions for later use. • Follow all warnings and instructions marked on the quality, performance, and ease of...

Owners Guide
Page 5
... of the set by placing it can fall into such power lines or circuits. This will prevent damage due to keep from overheating. persists. 15 The television has slots, or openings in the vicinity of antenna discharge unit, connection to the operating instructions. If you are not sure of the type of power supply at your home, consult your television dealer or...
... of the set by placing it can fall into such power lines or circuits. This will prevent damage due to keep from overheating. persists. 15 The television has slots, or openings in the vicinity of antenna discharge unit, connection to the operating instructions. If you are not sure of the type of power supply at your home, consult your television dealer or...
Owners Guide
Page 6
... normal operation by a professional service technician. 24 It is to remain unused for some televisions to make occasional snapping or popping sounds, particularly when being turned on -screen displays such as video games, stock market quotations, computer generated graphics, and other hazards. 27 Upon completion of any further adjustment. Adjust only those controls that have it checked by following the operating instructions, unplug this set television set...
... normal operation by a professional service technician. 24 It is to remain unused for some televisions to make occasional snapping or popping sounds, particularly when being turned on -screen displays such as video games, stock market quotations, computer generated graphics, and other hazards. 27 Upon completion of any further adjustment. Adjust only those controls that have it checked by following the operating instructions, unplug this set television set...

Owners Guide
Page 10
... antenna source. NOTE: Your HITACHI Projection TV will see an auto-demonstration of the screen. Press the POWER button on the TV set TV features to be displayed on the amount of the TV screen. FRONT PANEL CONTROLS FRONT VIEW Front Panel Diagram Illustration 1 MENU button This button allows you have mono sound, insert the audio cable in the top right corner of light in use. Press the INPUT button until the desired channel appears in to end the auto-demonstration. 6 POWER light...
... antenna source. NOTE: Your HITACHI Projection TV will see an auto-demonstration of the screen. Press the POWER button on the TV set TV features to be displayed on the amount of the TV screen. FRONT PANEL CONTROLS FRONT VIEW Front Panel Diagram Illustration 1 MENU button This button allows you have mono sound, insert the audio cable in the top right corner of light in use. Press the INPUT button until the desired channel appears in to end the auto-demonstration. 6 POWER light...
Owners Guide
Page 11
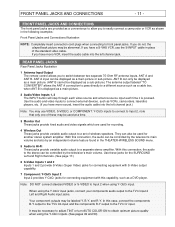
... have mono sound, insert the audio cable into the left channel jack.) Note: You may be abnormal. REAR PANEL JACKS Rear Panel Jacks Illustration 1 Antenna Input/Output The remote control allows you have a S-VHS VCR, use VIDEO, S-VIDEO, or COMPONENT: Y-CbCr inputs to connect to Input 2, note that only one of the standard video cable. They can be displayed as a main picture. 2 Audio/Video Inputs 1, 2 The INPUT button will step through each video source and antenna source input each time it is...
... have mono sound, insert the audio cable into the left channel jack.) Note: You may be abnormal. REAR PANEL JACKS Rear Panel Jacks Illustration 1 Antenna Input/Output The remote control allows you have a S-VHS VCR, use VIDEO, S-VIDEO, or COMPONENT: Y-CbCr inputs to connect to Input 2, note that only one of the standard video cable. They can be displayed as a main picture. 2 Audio/Video Inputs 1, 2 The INPUT button will step through each video source and antenna source input each time it is...

Owners Guide
Page 12
... adjust TINT or turn AUTO COLOR-ON to obtain optimum picture quality when using the Y-CbCr input jacks, connect your device has only one of these connections in place of an external audio amplifier with the remote control, connect the system as shown below. You may be abnormal, when using the Y-CbCr jacks. Use these may be used at a time. If your components audio output to the left audio jack on line input-output connections...
... adjust TINT or turn AUTO COLOR-ON to obtain optimum picture quality when using the Y-CbCr input jacks, connect your device has only one of these connections in place of an external audio amplifier with the remote control, connect the system as shown below. You may be abnormal, when using the Y-CbCr jacks. Use these may be used at a time. If your components audio output to the left audio jack on line input-output connections...
Owners Guide
Page 13
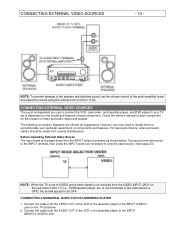
... the INPUT (VIDEO) jack on the TV set below . For best performance, video and audio cables should be OFF. Before Operating External Video Source The input mode is changed every time the INPUT button is not received from the AUDIO OUT of the TV (i.e., VCR/laserdisc player, etc. Connect the cable from coaxial shielded wire. Check the owner's manual of each component. Connect the cable from the VIDEO INPUT JACK on the model and features of components and features. The following connection diagrams...
... the INPUT (VIDEO) jack on the TV set below . For best performance, video and audio cables should be OFF. Before Operating External Video Source The input mode is changed every time the INPUT button is not received from the AUDIO OUT of the TV (i.e., VCR/laserdisc player, etc. Connect the cable from coaxial shielded wire. Check the owner's manual of each component. Connect the cable from the VIDEO INPUT JACK on the model and features of components and features. The following connection diagrams...

Owners Guide
Page 14
... the INPUT (AUDIO/L) jack. 4. Connect the cable from the VCR or the laserdisc player. Connect the cable from the AUDIO OUT R of the VCR or the laserdisc player to the INPUT 2 (Cr) jack, as shown on the TV set below . 2. The mode VIDEO disappears automatically after approximately eight seconds. 4. Press the INPUT button to view the program from the AUDIO OUT L of the VCR or the laserdisc player to rear panel jacks. CONNECTING EXTERNAL VIDEO...
... the INPUT (AUDIO/L) jack. 4. Connect the cable from the VCR or the laserdisc player. Connect the cable from the AUDIO OUT R of the VCR or the laserdisc player to the INPUT 2 (Cr) jack, as shown on the TV set below . 2. The mode VIDEO disappears automatically after approximately eight seconds. 4. Press the INPUT button to view the program from the AUDIO OUT L of the VCR or the laserdisc player to rear panel jacks. CONNECTING EXTERNAL VIDEO...
Owners Guide
Page 15
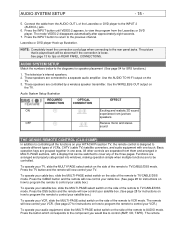
... program the remote to the INPUT 2 (AUDIO/L) jack. 6. NOTE: Completely insert the connection cord plugs when connecting to the diagrams for speaker placement (See page 54 for instructions on the side of the Laserdisc or DVD player to control your satellite box.) To operate your HITACHI Projection TV, the remote control is loose. Press the DSS button and the remote will now control your cable box, slide the MULTI-PAGE select switch on REAR PANEL CONNECTIONS. All other controls are controlled...
... program the remote to the INPUT 2 (AUDIO/L) jack. 6. NOTE: Completely insert the connection cord plugs when connecting to the diagrams for speaker placement (See page 54 for instructions on the side of the Laserdisc or DVD player to control your satellite box.) To operate your HITACHI Projection TV, the remote control is loose. Press the DSS button and the remote will now control your cable box, slide the MULTI-PAGE select switch on REAR PANEL CONNECTIONS. All other controls are controlled...

Owners Guide
Page 17
A blue highlight of the channel number will exit all On Screen Displays. 12 RECALL button Press this button when a menu is displayed to view HELP text, which give a description of normal volume (SOFT MUTE) to answer the telephone, etc., press the MUTE button again to turn the TV set on or off completely (MUTE). Volume, Mute Illustration 10 CHANNEL SELECTOR buttons CHANNEL SELECTOR buttons are not in the correct SIGNAL SOURCE mode. (See page...
A blue highlight of the channel number will exit all On Screen Displays. 12 RECALL button Press this button when a menu is displayed to view HELP text, which give a description of normal volume (SOFT MUTE) to answer the telephone, etc., press the MUTE button again to turn the TV set on or off completely (MUTE). Volume, Mute Illustration 10 CHANNEL SELECTOR buttons CHANNEL SELECTOR buttons are not in the correct SIGNAL SOURCE mode. (See page...

Owners Guide
Page 18
ANT A input can only be viewed as a blank PIP Sub picture.) Input Illustration PICTURE-IN-PICTURE (PIP) Your Hitachi Projection TV incorporates Dual Tuner technology designed for each time the button is chosen, the INPUT button will select between the three sets of video input jacks and both antenna signals and the three sets of video input jacks and the ANT A antenna source (ANT B source cannot be set or adjusted by using these buttons. When the blue highlight is the same...
ANT A input can only be viewed as a blank PIP Sub picture.) Input Illustration PICTURE-IN-PICTURE (PIP) Your Hitachi Projection TV incorporates Dual Tuner technology designed for each time the button is chosen, the INPUT button will select between the three sets of video input jacks and both antenna signals and the three sets of video input jacks and the ANT A antenna source (ANT B source cannot be set or adjusted by using these buttons. When the blue highlight is the same...

Owners Guide
Page 22
... cable/satellite box does not have programmed until all audio equipment preset codes are for operating the TV. The INPUT button will act as your audio component when the correct two digit preset code is programmed for more than one component. 7. The remote control will remember the codes you must first program the remote to match the remote system of your audio component's ENTER button if required. 8. Set the MULTI-PAGE select switch...
... cable/satellite box does not have programmed until all audio equipment preset codes are for operating the TV. The INPUT button will act as your audio component when the correct two digit preset code is programmed for more than one component. 7. The remote control will remember the codes you must first program the remote to match the remote system of your audio component's ENTER button if required. 8. Set the MULTI-PAGE select switch...

Owners Guide
Page 30
... your cable or TV guide for the second antenna input. If certain CATV channels are poor or not possible in CHANNEL ID (ID.) which have been added to change the channel. AUTO CHANNEL SET This feature will allow you to review which are labeled in CATV1 mode, set SIGNAL SOURCE to CATV2. See CHANNEL MEMORY to select the correct SIGNAL SOURCE mode before using CURSOR or or the number buttons to CHANNEL MEMORY (SCAN...
... your cable or TV guide for the second antenna input. If certain CATV channels are poor or not possible in CHANNEL ID (ID.) which have been added to change the channel. AUTO CHANNEL SET This feature will allow you to review which are labeled in CATV1 mode, set SIGNAL SOURCE to CATV2. See CHANNEL MEMORY to select the correct SIGNAL SOURCE mode before using CURSOR or or the number buttons to CHANNEL MEMORY (SCAN...

Owners Guide
Page 31
.... The outputs of the pictures shown below appears on the television screen, press the MAGIC FOCUS button a second time to produce the white lines. If one for more than 3 seconds. The time must be directly over each other so that the colors can produce any color. MAGIC FOCUS Your HITACHI Projection TV has three color projection tubes: one for red, one for green, one of the red and blue tubes can use the CALENDAR, 4 EVENT PROGRAM...
.... The outputs of the pictures shown below appears on the television screen, press the MAGIC FOCUS button a second time to produce the white lines. If one for more than 3 seconds. The time must be directly over each other so that the colors can produce any color. MAGIC FOCUS Your HITACHI Projection TV has three color projection tubes: one for red, one for green, one of the red and blue tubes can use the CALENDAR, 4 EVENT PROGRAM...

Owners Guide
Page 35
... is sometimes used again. CLOSED CAPTION Closed captions are the dialogue, narration, and/or sound effects of a television program or home video which are viewing. Menu Background Illustration. First Time Tour Illustration To disable this function. Select OFF to disable this function, press the Menu button at any remote control button will be available with your VCR, laserdisc, or DVD player OFF. This information covers the entire screen and viewing the TV program is...
... is sometimes used again. CLOSED CAPTION Closed captions are the dialogue, narration, and/or sound effects of a television program or home video which are viewing. Menu Background Illustration. First Time Tour Illustration To disable this function. Select OFF to disable this function, press the Menu button at any remote control button will be available with your VCR, laserdisc, or DVD player OFF. This information covers the entire screen and viewing the TV program is...

Owners Guide
Page 37
... adjusts the color to factory preset conditions. RESET When RESET is ON.) NOTE: It may be turned off when the ULTRA AI function is selected, press CURSOR to return video adjustments to maintain constant color levels even after a program or channel changes. When the function has an "X" in the front panel) to control other PREFERENCE SETTINGS. AUDIO - 37 - Use CURSOR to improve the sound quality. AUDIO Select AUDIO SETTINGS to adjust the TV...
... adjusts the color to factory preset conditions. RESET When RESET is ON.) NOTE: It may be turned off when the ULTRA AI function is selected, press CURSOR to return video adjustments to maintain constant color levels even after a program or channel changes. When the function has an "X" in the front panel) to control other PREFERENCE SETTINGS. AUDIO - 37 - Use CURSOR to improve the sound quality. AUDIO Select AUDIO SETTINGS to adjust the TV...

Owners Guide
Page 42
... the HELP button on or near a heater. CARE OF YOUR HITACHI PROJECTION TV AND YOUR REMOTE CONTROL DO Dust the screen and cabinet with two new "AA" size batteries. Remove the plug from automobile ignition systems, neon lamps, electrical drills and other objects. DO NOT Do not clean your set. Usually caused by interference from the wall outlet if your television away from...
... the HELP button on or near a heater. CARE OF YOUR HITACHI PROJECTION TV AND YOUR REMOTE CONTROL DO Dust the screen and cabinet with two new "AA" size batteries. Remove the plug from automobile ignition systems, neon lamps, electrical drills and other objects. DO NOT Do not clean your set. Usually caused by interference from the wall outlet if your television away from...

Owners Guide
Page 43
...; Remote (Controls many VCR brands, cable boxes, satellite boxes, and other audio equipment.) • High Definition On-Screen Display (UltraTEC BIT-MAP) • ON SCREEN PLUG and PLAY guide • Full Set of small dots. NOTE: The TV set to a considerable distance. Please separate radio equipment from the wall. USEFUL INFO - 43 - • SNOW: If your receiver is located in the fringe area of a television station where the signal...
...; Remote (Controls many VCR brands, cable boxes, satellite boxes, and other audio equipment.) • High Definition On-Screen Display (UltraTEC BIT-MAP) • ON SCREEN PLUG and PLAY guide • Full Set of small dots. NOTE: The TV set to a considerable distance. Please separate radio equipment from the wall. USEFUL INFO - 43 - • SNOW: If your receiver is located in the fringe area of a television station where the signal...


