Owners Guide
Page 1
HITACHI PROJECTION COLOR TV 50GX49B OPERATING GUIDE TABLE OF CONTENTS IMPORTANT ...2 SAFETY TIPS...3 PICTURE CAUTIONS ...7 ACCESSORIES...8 REMOTE CONTROL BATTERY INSTALLATION AND REPLACEMENT 8 HOW TO SET UP YOUR NEW HITACHI PROJECTION TV 8 HOOK-UP CABLES AND CONNECTORS ...9 FRONT PANEL CONTROLS ...10 FIRST TIME USE ...12 REAR SPEAKER TERMINAL CONNECTIONS...AUDIO SYSTEM SET-UP ...18 THE GENIUS REMOTE CONTROL (CLU-435UI 19 HOW TO USE THE GENIUS REMOTE TO CONTROL YOUR TV 20 PICTURE-IN-PICTURE (PIP)...23 USING THE REMOTE TO CONTROL VCR FUNCTIONS 26 USING THE REMOTE TO CONTROL CABLE BOX/SATELLITE...
HITACHI PROJECTION COLOR TV 50GX49B OPERATING GUIDE TABLE OF CONTENTS IMPORTANT ...2 SAFETY TIPS...3 PICTURE CAUTIONS ...7 ACCESSORIES...8 REMOTE CONTROL BATTERY INSTALLATION AND REPLACEMENT 8 HOW TO SET UP YOUR NEW HITACHI PROJECTION TV 8 HOOK-UP CABLES AND CONNECTORS ...9 FRONT PANEL CONTROLS ...10 FIRST TIME USE ...12 REAR SPEAKER TERMINAL CONNECTIONS...AUDIO SYSTEM SET-UP ...18 THE GENIUS REMOTE CONTROL (CLU-435UI 19 HOW TO USE THE GENIUS REMOTE TO CONTROL YOUR TV 20 PICTURE-IN-PICTURE (PIP)...23 USING THE REMOTE TO CONTROL VCR FUNCTIONS 26 USING THE REMOTE TO CONTROL CABLE BOX/SATELLITE...
Owners Guide
Page 2
... THEATER MODES ...52 INFO ...53 SPECIAL EVENT REMINDER...53 CALENDAR...54 CARE OF YOUR HITACHI PROJECTION TV AND YOUR REMOTE CONTROL 54 RECEPTION PROBLEMS...55 USEFUL INFO ...56 Features ...56 HITACHI SERVICE HOTLINE...57 IMPORTANT Follow all warnings and instructions marked on this device that may void... the user's authority to operate the TV. WARNING: TO PREVENT FIRE OR SHOCK HAZARD, DO NOT EXPOSE ...
... THEATER MODES ...52 INFO ...53 SPECIAL EVENT REMINDER...53 CALENDAR...54 CARE OF YOUR HITACHI PROJECTION TV AND YOUR REMOTE CONTROL 54 RECEPTION PROBLEMS...55 USEFUL INFO ...56 Features ...56 HITACHI SERVICE HOTLINE...57 IMPORTANT Follow all warnings and instructions marked on this device that may void... the user's authority to operate the TV. WARNING: TO PREVENT FIRE OR SHOCK HAZARD, DO NOT EXPOSE ...
Owners Guide
Page 3
NEVER CONNECT THE TV TO 50Hz, DIRECT CURRENT, OR ANYTHING OTHER THAN THE SPECIFIED VOLTAGE. SAFETY TIPS IMPORTANT SAFEGUARDS SAFETY POINTS YOU SHOULD KNOW ABOUT YOUR HITACHI PROJECTION TELEVISION CAUTION: * Read all of these products properly, this can result in accordance with a polarized alternating-current line.... 3 Do not overload wall outlets and extension cords as this television yourself as this section illustrates safety tips which will enable HITACHI to notify you to traffic or abuse. Do not defeat the safety purpose of the FCC rules. This plug will display television...
NEVER CONNECT THE TV TO 50Hz, DIRECT CURRENT, OR ANYTHING OTHER THAN THE SPECIFIED VOLTAGE. SAFETY TIPS IMPORTANT SAFEGUARDS SAFETY POINTS YOU SHOULD KNOW ABOUT YOUR HITACHI PROJECTION TELEVISION CAUTION: * Read all of these products properly, this can result in accordance with a polarized alternating-current line.... 3 Do not overload wall outlets and extension cords as this television yourself as this section illustrates safety tips which will enable HITACHI to notify you to traffic or abuse. Do not defeat the safety purpose of the FCC rules. This plug will display television...

Owners Guide
Page 7
..., or if there is a distinct change in performance that indicates a need for some televisions to determine that have it checked by your HITACHI Factory Warranty. • When using Picture-in-Picture function, the sub-picture should not be sure the service technician has used replacement parts... specified by TV stations and cable companies, as well as programs from the broadcaster or owner of programs broadcast by the manufacturer that the television is...
..., or if there is a distinct change in performance that indicates a need for some televisions to determine that have it checked by your HITACHI Factory Warranty. • When using Picture-in-Picture function, the sub-picture should not be sure the service technician has used replacement parts... specified by TV stations and cable companies, as well as programs from the broadcaster or owner of programs broadcast by the manufacturer that the television is...
Owners Guide
Page 8
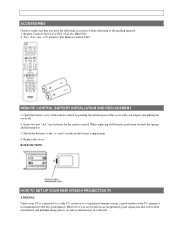
... and lift them out. 3. However, if you have the following accessories before disposing of the cover with your TV is connected to a cable TV system or to a centralized antenna system, a good outdoor color TV antenna is free from interference and multiple image ghosts, an indoor antenna may be sufficient. ACCESSORIES Check to the... Remote Control Unit). Remote Control Unit CLU-435UI ( Part No. HL00726) 2. REMOTE CONTROL BATTERY INSTALLATION AND REPLACEMENT 1. BOTTOM VIEW HOW TO SET UP YOUR NEW HITACHI PROJECTION TV ANTENNA Unless your fingers and pulling the cover off. 2.
... and lift them out. 3. However, if you have the following accessories before disposing of the cover with your TV is connected to a cable TV system or to a centralized antenna system, a good outdoor color TV antenna is free from interference and multiple image ghosts, an indoor antenna may be sufficient. ACCESSORIES Check to the... Remote Control Unit). Remote Control Unit CLU-435UI ( Part No. HL00726) 2. REMOTE CONTROL BATTERY INSTALLATION AND REPLACEMENT 1. BOTTOM VIEW HOW TO SET UP YOUR NEW HITACHI PROJECTION TV ANTENNA Unless your fingers and pulling the cover off. 2.

Owners Guide
Page 9
VIEWING The major benefit of the HITACHI Projection Television is its best, test various locations in front of the TV and about 10 to the television. During daylight hours, reflections from most stores that sell audio/video products. LOCATION Select an area where sunlight or ... or behind the viewing area. To see this large screen at least four feet from the side of the set failure, do not place the TV where temperatures can be made with speaker placement for example, in room sizes and acoustical environments will require some experimentation with shielded video and audio...
VIEWING The major benefit of the HITACHI Projection Television is its best, test various locations in front of the TV and about 10 to the television. During daylight hours, reflections from most stores that sell audio/video products. LOCATION Select an area where sunlight or ... or behind the viewing area. To see this large screen at least four feet from the side of the set failure, do not place the TV where temperatures can be made with speaker placement for example, in room sizes and acoustical environments will require some experimentation with shielded video and audio...

Owners Guide
Page 10
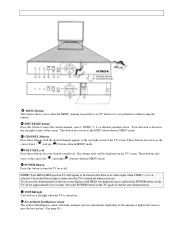
... outdoor antenna or CATV cable 2. connect the (VHF or UHF) antenna leads to the ANT A (75-Ohm) terminal. VHF (75-Ohm) antenna/CATV (Cable TV) When using a 300-Ohm twin lead from an outdoor antenna. Consult your dealer or service store for the antenna mixer. standard video cable to the...and audio cables which This connector is used on camcorders, VCRs, and connect to the antenna mixer. If you have a second antenna or cable TV system, connect the coaxial cable to produce a high-quality picture. When both VHF and UHF antennas are connected Attach an optional antenna cable mixer to...
... outdoor antenna or CATV cable 2. connect the (VHF or UHF) antenna leads to the ANT A (75-Ohm) terminal. VHF (75-Ohm) antenna/CATV (Cable TV) When using a 300-Ohm twin lead from an outdoor antenna. Consult your dealer or service store for the antenna mixer. standard video cable to the...and audio cables which This connector is used on camcorders, VCRs, and connect to the antenna mixer. If you have a second antenna or cable TV system, connect the coaxial cable to produce a high-quality picture. When both VHF and UHF antennas are connected Attach an optional antenna cable mixer to...
Owners Guide
Page 11
...will appear to your desired sound level. Check the Power Light to select the current antenna source, VIDEO: 1, 2, or alternate antenna source. NOTE: Your HITACHI Projection TV will be turned off if there is no video input when VIDEO: 1 or 2 is shown in MENU mode. V POWER light You will make sure ... will see an auto-demonstration of the on-screen displays with HELP text displayed, press and hod the POWER button on the amount of the TV screen. FRONT PANEL CONTROLS - 11 - .Q MENU Button This button allows you to enter the MENU, making it possible to set for your preference ...
...will appear to your desired sound level. Check the Power Light to select the current antenna source, VIDEO: 1, 2, or alternate antenna source. NOTE: Your HITACHI Projection TV will be turned off if there is no video input when VIDEO: 1 or 2 is shown in MENU mode. V POWER light You will make sure ... will see an auto-demonstration of the on-screen displays with HELP text displayed, press and hod the POWER button on the amount of the TV screen. FRONT PANEL CONTROLS - 11 - .Q MENU Button This button allows you to enter the MENU, making it possible to set for your preference ...

Owners Guide
Page 12
FIRST TIME USE - 12 - ] REMOTE CONTROL Sensor Point your components audio output to the TV's input 2 Left and Right Audio input jacks. ANT B can only be displayed as a main picture. (ANT B cannot be input to enter Digital Array mode. S Monitor ...: 2 (36UX59B and 32UX59B models) This input provides Y-CB-CR jacks for connecting equipment with S-Video output capability. Use the audio and video inputs to the TV's CB
FIRST TIME USE - 12 - ] REMOTE CONTROL Sensor Point your components audio output to the TV's input 2 Left and Right Audio input jacks. ANT B can only be displayed as a main picture. (ANT B cannot be input to enter Digital Array mode. S Monitor ...: 2 (36UX59B and 32UX59B models) This input provides Y-CB-CR jacks for connecting equipment with S-Video output capability. Use the audio and video inputs to the TV's CB
Owners Guide
Page 13
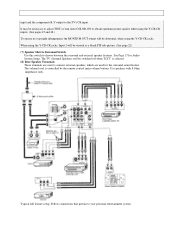
Use speakers with 8 Ohm impedance only. Typical full feature setup. Follow connections that pertain to the TV's CR input. It may be necessary to adjust TINT or turn Auto COLOR-ON to obtain optimum picture quality when using the Y-CB-CR inputs. (... Y-CB-CR jacks. The volume level is selected. (8) Rear Speaker Terminals These terminals are used to choose between the surround and external speaker features. The TV's Internal Speakers will be abnormal, when using the Y-CB-CR jacks, Input 2 will be switched off when "EXT" is controlled by the remote control main...
Use speakers with 8 Ohm impedance only. Typical full feature setup. Follow connections that pertain to the TV's CR input. It may be necessary to adjust TINT or turn Auto COLOR-ON to obtain optimum picture quality when using the Y-CB-CR inputs. (... Y-CB-CR jacks. The volume level is selected. (8) Rear Speaker Terminals These terminals are used to choose between the surround and external speaker features. The TV's Internal Speakers will be abnormal, when using the Y-CB-CR jacks, Input 2 will be switched off when "EXT" is controlled by the remote control main...

Owners Guide
Page 14
...Refer to your audio outputs or other type may be used at a time. Connect only 1 component to the REAR SPEAKER terminal of your TV. CAUTION: Do not short speaker terminal, (do not connect a wire directly across any two terminals). A single VCR can be used for...of the standard video connections if your hook-up cables. TIPS ON REAR PANEL CONNECTIONS S-Video connections are provided for additional information on the TV. Repeat this feature. COMPONENT: Y-CBCR connections are provided for high performance laserdisc players, VCRs etc., that have this procedure for VCR ...
...Refer to your audio outputs or other type may be used at a time. Connect only 1 component to the REAR SPEAKER terminal of your TV. CAUTION: Do not short speaker terminal, (do not connect a wire directly across any two terminals). A single VCR can be used for...of the standard video connections if your hook-up cables. TIPS ON REAR PANEL CONNECTIONS S-Video connections are provided for additional information on the TV. Repeat this feature. COMPONENT: Y-CBCR connections are provided for high performance laserdisc players, VCRs etc., that have this procedure for VCR ...

Owners Guide
Page 15
...EXTERNAL VIDEO SOURCES The exact arrangement you may be labeled Y, B-Y, and R-Y. However, you use to connect the VCR, camcorder, laserdisc player to accommodate your TV set . When using the Y-CB-CR jacks, Input 2 will be viewed as a blank PIP sub-picture. (See page 22) EXTERNAL CONNECTIONS CONNECTING ..., when using the remote control of video and audio inputs and outputs. The following connection diagrams are offered as necessary to the TV's CR input. Before Operating External Video Source The input mode is changed every time the INPUT button is dependent on the model ...
...EXTERNAL VIDEO SOURCES The exact arrangement you may be labeled Y, B-Y, and R-Y. However, you use to connect the VCR, camcorder, laserdisc player to accommodate your TV set . When using the Y-CB-CR jacks, Input 2 will be viewed as a blank PIP sub-picture. (See page 22) EXTERNAL CONNECTIONS CONNECTING ..., when using the remote control of video and audio inputs and outputs. The following connection diagrams are offered as necessary to the TV's CR input. Before Operating External Video Source The input mode is changed every time the INPUT button is dependent on the model ...

Owners Guide
Page 16
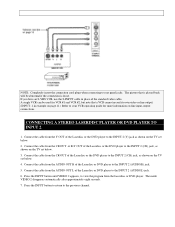
... INPUT (AUDIO/L) jack. 4. Connect the cable from the AUDIO OUT of the VCR or the laserdisc player to the INPUT (VIDEO) jack on the TV set below . 2. CONNECTING A MONAURAL AUDIO VCR OR LASERDISC PLAYER 1. The VIDEO mode disappears automatically after approximately eight seconds. 5. Press the INPUT button... or the laserdisc player to be OFF. CONNECTING EXTERNAL VIDEO SOURCES - 16 - Press the INPUT button to the previous channel . NOTE: When TV is not received from the VCR or laserdisc player. is not connected or the video device is OFF), the set to VIDEO and a video...
... INPUT (AUDIO/L) jack. 4. Connect the cable from the AUDIO OUT of the VCR or the laserdisc player to the INPUT (VIDEO) jack on the TV set below . 2. CONNECTING A MONAURAL AUDIO VCR OR LASERDISC PLAYER 1. The VIDEO mode disappears automatically after approximately eight seconds. 5. Press the INPUT button... or the laserdisc player to be OFF. CONNECTING EXTERNAL VIDEO SOURCES - 16 - Press the INPUT button to the previous channel . NOTE: When TV is not received from the VCR or laserdisc player. is not connected or the video device is OFF), the set to VIDEO and a video...
Owners Guide
Page 17
... the Laserdisc or DVD player. If you have an S-VHS VCR, use the S-INPUT cable in example on the TV set below . 3. Connect the cable from the CR OUT of the Laserdisc or the DVD player to the INPUT ...of the Laserdisc or DVD player to the INPUT 2 (CR) jack, as shown on the TV set below . 2. A single VCR can be abnormal if the connection is played back will be used for more ...information on the TV set below. 4. Connect the cable from the Y OUT of the standard video cable. Connect the ...
... the Laserdisc or DVD player. If you have an S-VHS VCR, use the S-INPUT cable in example on the TV set below . 3. Connect the cable from the CR OUT of the Laserdisc or the DVD player to the INPUT ...of the Laserdisc or DVD player to the INPUT 2 (CR) jack, as shown on the TV set below . 2. A single VCR can be abnormal if the connection is played back will be used for more ...information on the TV set below. 4. Connect the cable from the Y OUT of the standard video cable. Connect the ...
Owners Guide
Page 18
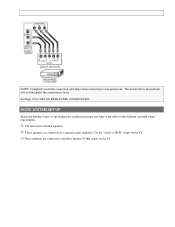
... diagram for speaker placement and refer to rear panel jacks. Use the "Audio to Hi-Fi" output on the TV. (3) These speakers are connected to the Rear Speaker 8 Ohm output on the TV. NOTE: Completely insert the connection cord plugs when connecting to the table for TIPS ON REAR PANEL CONNECTIONS. The...
... diagram for speaker placement and refer to rear panel jacks. Use the "Audio to Hi-Fi" output on the TV. (3) These speakers are connected to the Rear Speaker 8 Ohm output on the TV. NOTE: Completely insert the connection cord plugs when connecting to the table for TIPS ON REAR PANEL CONNECTIONS. The...

Owners Guide
Page 19
...how to program the remote to operate different types of the cable/satellite box and press the CABLE The remote will now control your HITACHI Color TV, the new remote is designed to control your VCR.) To operate your television. SURROUND SURROUND REQUIRED OPTIONAL FEATURE SWITCH CONNECTION CONNECTION EFFECT...mono and stereo sound. The remote will now control your cable/satellite box, point the remote at the remote sensor of VCRs, CATV (Cable TV), and satellite converters with one area. MATRIX Sp. To operate your VCR, point the remote at the remote sensor of the VCR and press...
...how to program the remote to operate different types of the cable/satellite box and press the CABLE The remote will now control your HITACHI Color TV, the new remote is designed to control your VCR.) To operate your television. SURROUND SURROUND REQUIRED OPTIONAL FEATURE SWITCH CONNECTION CONNECTION EFFECT...mono and stereo sound. The remote will now control your cable/satellite box, point the remote at the remote sensor of VCRs, CATV (Cable TV), and satellite converters with one area. MATRIX Sp. To operate your VCR, point the remote at the remote sensor of the VCR and press...

Owners Guide
Page 20
... chosen, as explained above. (2), (3) LIGHT BUTTON When you are in a dark room, press the light button (2) on the side of VCR mode, this is the TV/VCR button. These buttons will not appear to light up the buttons shown in (3) . HOW TO USE THE GENIUS REMOTE TO CONTROL YOUR... the remote to light if the room is too bright. (4) PRECODED VCR BUTTONS These buttons always transmit the chosen precoded VCR codes. (5) TV/VCR BUTTON When the remote is in the CABLE mode, this is the A/B button. button. The remote will stay on for instructions on how to ...
... chosen, as explained above. (2), (3) LIGHT BUTTON When you are in a dark room, press the light button (2) on the side of VCR mode, this is the TV/VCR button. These buttons will not appear to light up the buttons shown in (3) . HOW TO USE THE GENIUS REMOTE TO CONTROL YOUR... the remote to light if the room is too bright. (4) PRECODED VCR BUTTONS These buttons always transmit the chosen precoded VCR codes. (5) TV/VCR BUTTON When the remote is in the CABLE mode, this is the A/B button. button. The remote will stay on for instructions on how to ...
Owners Guide
Page 21
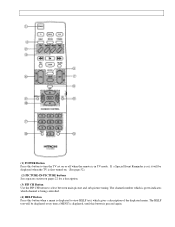
... text, which gives a description of the displayed menu. HOW TO USE THE GENIUS REMOTE TO CONTROL YOUR TV - 21 - (1) POWER Button Press this button to turn the TV set , it will be displayed when the TV is first turned on. (See page 52). (2) PICTURE-IN-PICTURE buttons See separate section on or off... when the remote is in TV mode. The HELP text will be displayed every time a MENU is displayed, until...
... text, which gives a description of the displayed menu. HOW TO USE THE GENIUS REMOTE TO CONTROL YOUR TV - 21 - (1) POWER Button Press this button to turn the TV set , it will be displayed when the TV is first turned on. (See page 52). (2) PICTURE-IN-PICTURE buttons See separate section on or off... when the remote is in TV mode. The HELP text will be displayed every time a MENU is displayed, until...

Owners Guide
Page 22
...restore the sound, press the MUTE button one half of normal volume (SOFT MUTE) to answer the telephone, etc., press the MUTE button. NOTE: The TV may also be performed by pressing CH up ( ) or down ( ) button until another dash appears next to turn the sound off completely (MUTE). Enter ...Family Favorites, Channel Memory, etc .Enter two or three numbers to select channels. Press the MUTE button again to the channel display on your TV, then enter the remaining two numbers using the number buttons. Channel selection may not receive some channels if you are used to one more ...
...restore the sound, press the MUTE button one half of normal volume (SOFT MUTE) to answer the telephone, etc., press the MUTE button. NOTE: The TV may also be performed by pressing CH up ( ) or down ( ) button until another dash appears next to turn the sound off completely (MUTE). Enter ...Family Favorites, Channel Memory, etc .Enter two or three numbers to select channels. Press the MUTE button again to the channel display on your TV, then enter the remaining two numbers using the number buttons. Channel selection may not receive some channels if you are used to one more ...

Owners Guide
Page 23
... be set different features. (11) CHANNEL SKIP button Press this button when no menu is displayed and the TV will select between the three sets of the screen. PICTURE-IN-PICTURE (PIP) Your HITACHI Projection TV incorporates Dual Tuner technology designed for each time the button is pressed. Once set , it will select...
... be set different features. (11) CHANNEL SKIP button Press this button when no menu is displayed and the TV will select between the three sets of the screen. PICTURE-IN-PICTURE (PIP) Your HITACHI Projection TV incorporates Dual Tuner technology designed for each time the button is pressed. Once set , it will select...


