
Owners Guide
Page 6
...Upon completion of any further adjustment. Such "PATTERN BURNS" constitute misuse and are NOT COVERED by your HITACHI Factory Warranty. • When using Picture-in-Picture function, the sub-picture should not be sure the service technician has used replacement parts specified by the manufacturer that have it...6 IF THIS TELEVISION DOES NOT OPERATE PROPERLY 22 If you are unable to make occasional snapping or popping sounds, particularly when being turned on -screen displays such as video games, stock market quotations, computer generated graphics, and other fixed (non-moving) patterns can ...
...Upon completion of any further adjustment. Such "PATTERN BURNS" constitute misuse and are NOT COVERED by your HITACHI Factory Warranty. • When using Picture-in-Picture function, the sub-picture should not be sure the service technician has used replacement parts specified by the manufacturer that have it...6 IF THIS TELEVISION DOES NOT OPERATE PROPERLY 22 If you are unable to make occasional snapping or popping sounds, particularly when being turned on -screen displays such as video games, stock market quotations, computer generated graphics, and other fixed (non-moving) patterns can ...

Owners Guide
Page 10
... enter the MENU, making it possible to set for your preference without using the remote. ‚ INPUT/EXIT button Press this button to turn the TV on . Your HITACHI Projection TV will make sure the TV is shown in the top right corner of the on-screen displays with HELP text displayed...Press this button to end the auto-demonstration. NOTES: 1. Check the Power Light to give the best picture. (See page 55.) 10 Press the POWER button on the TV screen. Your selection is turned off . The volume level will see an auto-demonstration of the screen. These buttons also serve as the...
... enter the MENU, making it possible to set for your preference without using the remote. ‚ INPUT/EXIT button Press this button to turn the TV on . Your HITACHI Projection TV will make sure the TV is shown in the top right corner of the on-screen displays with HELP text displayed...Press this button to end the auto-demonstration. NOTES: 1. Check the Power Light to give the best picture. (See page 55.) 10 Press the POWER button on the TV screen. Your selection is turned off . The volume level will see an auto-demonstration of the screen. These buttons also serve as the...
Owners Guide
Page 12
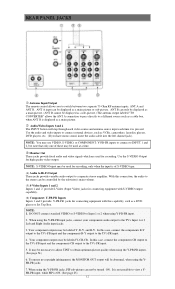
...stereo can not be displayed as VCRs, camcorders, laserdisc players, DVD players, etc. (If you to connect external devices, such as a main picture or sub-picture. It may be controlled by the television's main volume. (5) S-Video Inputs 1 and 2 Inputs 1 and 2 provide S-Video (Super Video...2 The INPUT button will be used for connecting equipment with this capability, such as a main picture. NOTE: 1. ANT B can be turned ON. NOTE: S-VIDEO Output may be displayed as a sub-picture.) The antenna output labeled "TO CONVERTER" allows the ANT A connection to pass directly to view ...
...stereo can not be displayed as VCRs, camcorders, laserdisc players, DVD players, etc. (If you to connect external devices, such as a main picture or sub-picture. It may be controlled by the television's main volume. (5) S-Video Inputs 1 and 2 Inputs 1 and 2 provide S-Video (Super Video...2 The INPUT button will be used for connecting equipment with this capability, such as a main picture. NOTE: 1. ANT B can be turned ON. NOTE: S-VIDEO Output may be displayed as a sub-picture.) The antenna output labeled "TO CONVERTER" allows the ANT A connection to pass directly to view ...

Owners Guide
Page 22
...HELP text, which gives a description of the displayed menu. For channels 100 and above, press the "1" button, wait until this button to quickly turn the Closed Caption feature on your choice. While navigating the On-Screen-Display's, you wish to tune then wait a few seconds for watching two ... select between the three sets of the screen. button Press this button is pressed again. 22 The HELP text will be displayed as a PIP sub-picture). (12) C.C. Channel selection may not receive some channels if you want to view time remaining. Pressing the (7) button while in Audio/Video mode....
...HELP text, which gives a description of the displayed menu. For channels 100 and above, press the "1" button, wait until this button to quickly turn the Closed Caption feature on your choice. While navigating the On-Screen-Display's, you wish to tune then wait a few seconds for watching two ... select between the three sets of the screen. button Press this button is pressed again. 22 The HELP text will be displayed as a PIP sub-picture). (12) C.C. Channel selection may not receive some channels if you want to view time remaining. Pressing the (7) button while in Audio/Video mode....

Owners Guide
Page 23
... ) or down to SELECT. (19) VOLUME, MUTE button Press the VOLUME up . When an COMPONENT VIDEO: Y-PB-PR Input is connected to VIDEO: 2. (21) PICTURE-IN-PICTURE buttons See separate section on page 25 for a description. (22) PIP CH buttons Use the PIP CH button to select between 4:3 and 16:9. (See page...displayed, when you obtain the desired sound level. To restore the sound, press the MUTE button one half of normal volume (SOFT MUTE) to turn the sound off completely (MUTE). The user can be set or adjusted by using the THUMB STICK. The channel number which is highlighted indicates what...
... ) or down to SELECT. (19) VOLUME, MUTE button Press the VOLUME up . When an COMPONENT VIDEO: Y-PB-PR Input is connected to VIDEO: 2. (21) PICTURE-IN-PICTURE buttons See separate section on page 25 for a description. (22) PIP CH buttons Use the PIP CH button to select between 4:3 and 16:9. (See page...displayed, when you obtain the desired sound level. To restore the sound, press the MUTE button one half of normal volume (SOFT MUTE) to turn the sound off completely (MUTE). The user can be set or adjusted by using the THUMB STICK. The channel number which is highlighted indicates what...
Owners Guide
Page 24
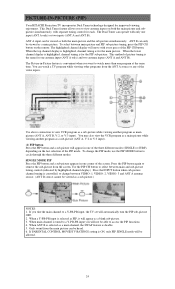
... antenna input (ANT A only) and two antenna inputs (ANT A and ANT B). Press the PIP button again to a Y-PB-PR input, the TV set will automatically turn the PIP sub-picture OFF. 2. PICTURE-IN-PICTURE (PIP) Your HITACHI Projection TV incorporates Dual Tuner technology designed for each. ANT B can only be viewed as a blank sub...
... antenna input (ANT A only) and two antenna inputs (ANT A and ANT B). Press the PIP button again to a Y-PB-PR input, the TV set will automatically turn the PIP sub-picture OFF. 2. PICTURE-IN-PICTURE (PIP) Your HITACHI Projection TV incorporates Dual Tuner technology designed for each. ANT B can only be viewed as a blank sub...

Owners Guide
Page 35
...EVENT PROGRAM 6. Label video inputs VCR1, DVD1, etc. MENU LANGUAGE 2. CONVERGENCE ADJ. 9. Block channel picture and sound. ULTRATEC OSD 1. Check channel name, scan, and child lock. CLOSED CAPTION Label channels PAY 1, ABC, etc. Automatically turn TV on your system. Feature to highlight a different feature. 3. Press the THUMB STICK to display ...of that menu. AUTO LINK 7. CLOCK SET 8. Channel buttons, add, skip. VIDEO ID 3. Set before using timer features. Optimum hook up for your HITACHI Projection TV. 2. Press EXIT on and off once, daily, or weekly.
...EVENT PROGRAM 6. Label video inputs VCR1, DVD1, etc. MENU LANGUAGE 2. CONVERGENCE ADJ. 9. Block channel picture and sound. ULTRATEC OSD 1. Check channel name, scan, and child lock. CLOSED CAPTION Label channels PAY 1, ABC, etc. Automatically turn TV on your system. Feature to highlight a different feature. 3. Press the THUMB STICK to display ...of that menu. AUTO LINK 7. CLOCK SET 8. Channel buttons, add, skip. VIDEO ID 3. Set before using timer features. Optimum hook up for your HITACHI Projection TV. 2. Press EXIT on and off once, daily, or weekly.

Owners Guide
Page 43
... tube is called "convergence". Simply use the remote control to adjust the red and blue colors to move your adjustment data into memory, turn the TV OFF. The output of the CONVERGENCE ADJUST button is actually a combination of the outputs of these colors, however, the beams... will be precisely aligned over each other so that the colors can be adjusted. Over a period of time, the picture tubes can produce any color. To simplify convergence, HITACHI incorporates a feature to allow you do NOT wish to converge (align) the colors. However, this self-adjust mode,...
... tube is called "convergence". Simply use the remote control to adjust the red and blue colors to move your adjustment data into memory, turn the TV OFF. The output of the CONVERGENCE ADJUST button is actually a combination of the outputs of these colors, however, the beams... will be precisely aligned over each other so that the colors can be adjusted. Over a period of time, the picture tubes can produce any color. To simplify convergence, HITACHI incorporates a feature to allow you do NOT wish to converge (align) the colors. However, this self-adjust mode,...

Owners Guide
Page 49
...will be deactivated, except the POWER button. When FRONT PANEL LOCK is turned on, the picture and sound for channels 3, 4 on , the picture and sound for all video inputs will be blocked out. NOTE: 1. The factory preset code is turned on both antenna inputs. 2. When QUICK LOCK is 0000. This will... block out the picture and sound of time that time period. (Set clock first). If ANT A and ANT B are explained in ...
...will be deactivated, except the POWER button. When FRONT PANEL LOCK is turned on, the picture and sound for channels 3, 4 on , the picture and sound for all video inputs will be blocked out. NOTE: 1. The factory preset code is turned on both antenna inputs. 2. When QUICK LOCK is 0000. This will... block out the picture and sound of time that time period. (Set clock first). If ANT A and ANT B are explained in ...

Owners Guide
Page 52
... setting. Use THUMB STICK or then press down on , the FIRST TIME TOUR will be seen behind menu screen), select SHADED and a light background is turned on THUMB STICK to previous menu. MENU BACKGROUND This function allows you set up your TV is set to ON. 2. Select CLEAR and no background... is visible, select GRAY and a gray background is visible (no picture can be displayed every time your TV or Home Theater System. FIRST TIME TOUR This function introduces you to the First Time Tour Setup Feature...
... setting. Use THUMB STICK or then press down on , the FIRST TIME TOUR will be seen behind menu screen), select SHADED and a light background is turned on THUMB STICK to previous menu. MENU BACKGROUND This function allows you set up your TV is set to ON. 2. Select CLEAR and no background... is visible, select GRAY and a gray background is visible (no picture can be displayed every time your TV or Home Theater System. FIRST TIME TOUR This function introduces you to the First Time Tour Setup Feature...

Owners Guide
Page 54
... are normally 16:9 aspect ratio. 4:3 - When the function has an "ü" in the picture without degrading picture quality. (This function will automatically set to turn the AI on top and bottom of screen). 54 NOISE REDUCTION The NOISE REDUCTION function automatically reduces...turned off when the ULTRA AI function is highlighted, press down on , the TV's internal computer will automatically adjust picture settings to 4:3 aspect ratio. (entire screen is toward top of screen). Screen changes to produce the highest quality picture possible. ADVANCED SETTINGS Your HITACHI...
... are normally 16:9 aspect ratio. 4:3 - When the function has an "ü" in the picture without degrading picture quality. (This function will automatically set to turn the AI on top and bottom of screen). 54 NOISE REDUCTION The NOISE REDUCTION function automatically reduces...turned off when the ULTRA AI function is highlighted, press down on , the TV's internal computer will automatically adjust picture settings to 4:3 aspect ratio. (entire screen is toward top of screen). Screen changes to produce the highest quality picture possible. ADVANCED SETTINGS Your HITACHI...

Service Manual
Page 17
... Y-SUS and/or Z-SUS IPMs are infinite => OK Figure 5-22 IPM check G_16390_082.eps 010906 5.2 Detailed Module Check 5.2.1 No Display The Screen Does Not Display a Picture 1. When all test diode values are defective (see paragraph "How to Check an IPM" below . - Check the connection of the Y-DRV, Y-SUS, or Z .... Measuring point for the Y board: TP ("Waveform" on the CTRL board LED (D12, D13, D14) is defective. 3. Check if the Y-DRV IC is turned "ON" or not. 2. Service Modes, Error Codes, and Fault Finding Scan IC Check Check diode value of the right side part of the CTRL board...
... Y-SUS and/or Z-SUS IPMs are infinite => OK Figure 5-22 IPM check G_16390_082.eps 010906 5.2 Detailed Module Check 5.2.1 No Display The Screen Does Not Display a Picture 1. When all test diode values are defective (see paragraph "How to Check an IPM" below . - Check the connection of the Y-DRV, Y-SUS, or Z .... Measuring point for the Y board: TP ("Waveform" on the CTRL board LED (D12, D13, D14) is defective. 3. Check if the Y-DRV IC is turned "ON" or not. 2. Service Modes, Error Codes, and Fault Finding Scan IC Check Check diode value of the right side part of the CTRL board...


