

Owners Guide
Page 1
... Setup Move SEL Sel IMPORTANT SAFETY INSTRUCTIONS 2-3 FIRST TIME USE 4-23 THE REMOTE CONTROL 24-41 ON-SCREEN DISPLAY USING THE RGB INPUT OF THE PLASMA TV 42-65 66-75 USEFUL INFORMATION INDEX 76-84 Manager Locks Setup Move SEL Sel STB POWER TV CBL VCR SOURCE WIZARDTAPE CD 2 AMP... 5 VOL MUTE SVCS VCR PLUS+ VID 2 VID 1 PIP FREEZE VID 3 PIP CH PIP ACCESS VIDEO SWAP PIP MODE REC CLU-5723TSI Video Audio Aspect Chan. PLASMA TELEVISION AVC (Audio Video Control Center) & Plasma Display Monitor 32HDT55 42HDT55 50HDT55 OPERATING GUIDE Video Audio Ch.
... Setup Move SEL Sel IMPORTANT SAFETY INSTRUCTIONS 2-3 FIRST TIME USE 4-23 THE REMOTE CONTROL 24-41 ON-SCREEN DISPLAY USING THE RGB INPUT OF THE PLASMA TV 42-65 66-75 USEFUL INFORMATION INDEX 76-84 Manager Locks Setup Move SEL Sel STB POWER TV CBL VCR SOURCE WIZARDTAPE CD 2 AMP... 5 VOL MUTE SVCS VCR PLUS+ VID 2 VID 1 PIP FREEZE VID 3 PIP CH PIP ACCESS VIDEO SWAP PIP MODE REC CLU-5723TSI Video Audio Aspect Chan. PLASMA TELEVISION AVC (Audio Video Control Center) & Plasma Display Monitor 32HDT55 42HDT55 50HDT55 OPERATING GUIDE Video Audio Ch.

Owners Guide
Page 2
... our minds in the design of benefit to operate the equipment. Please read it carefully and apply the knowledge you promptly in your HITACHI Plasma Television. This will display television closed captioning, ( or ), in accordance with arrowhead symbol, within the product's enclosure that a safety...RECEPTACLE, OR OTHER OUTLET UNLESS THE BLADES AND GROUND TERMINAL CAN BE FULLY INSERTED TO PREVENT BLADE EXPOSURE. NOTE: This Plasma Television will enable HITACHI to notify you obtain from it to persons. Follow all warnings and instructions marked on the quality, performance, and ease...
... our minds in the design of benefit to operate the equipment. Please read it carefully and apply the knowledge you promptly in your HITACHI Plasma Television. This will display television closed captioning, ( or ), in accordance with arrowhead symbol, within the product's enclosure that a safety...RECEPTACLE, OR OTHER OUTLET UNLESS THE BLADES AND GROUND TERMINAL CAN BE FULLY INSERTED TO PREVENT BLADE EXPOSURE. NOTE: This Plasma Television will enable HITACHI to notify you obtain from it to persons. Follow all warnings and instructions marked on the quality, performance, and ease...
Owners Guide
Page 4
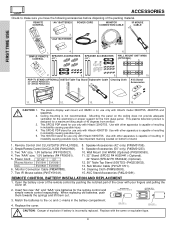
.... Two "AA" size, 1.5V batteries (P# FQ00021). 4. Monitor Connection Cable (P#EW07883). 7. Speaker Accessories (50" only) (P#GM01233). 10. AVC Stand Accessories (P#QJ01081). Replace with Hitachi model 32HDT55, 42HDT55 and 50HDT55. The plasma display wall mount unit WM50 is capable of resulting in instability causing possible injury. Ceiling mounting is incorrectly replaced. This SPD42 PDP stand...
.... Two "AA" size, 1.5V batteries (P# FQ00021). 4. Monitor Connection Cable (P#EW07883). 7. Speaker Accessories (50" only) (P#GM01233). 10. AVC Stand Accessories (P#QJ01081). Replace with Hitachi model 32HDT55, 42HDT55 and 50HDT55. The plasma display wall mount unit WM50 is capable of resulting in instability causing possible injury. Ceiling mounting is incorrectly replaced. This SPD42 PDP stand...

Owners Guide
Page 5
...shown below . (Make sure the core is toward the display monitor side.) Core Screw in screws (D) 6. Screw in screws (C) Bottom View of the Plasma TV and an external amplifier. 5 Speaker Holder Screw x2 (R) (L) (R) SPEAKER INSTALLATION 50" 1. Screw the speaker holders to the loosened screws (A). 5....below . Loosen 4 screws (A) (two on the left and two on the right). 3. FIRST TIME USE HOW TO SETUP YOUR NEW HITACHI PLASMA TELEVISION SPEAKER INSTALLATION 42" 1. Screw the speaker holder to the speaker terminal of Speaker Holder Insert horizontally from the side Screw in the ...
...shown below . (Make sure the core is toward the display monitor side.) Core Screw in screws (D) 6. Screw in screws (C) Bottom View of the Plasma TV and an external amplifier. 5 Speaker Holder Screw x2 (R) (L) (R) SPEAKER INSTALLATION 50" 1. Screw the speaker holders to the loosened screws (A). 5....below . Loosen 4 screws (A) (two on the left and two on the right). 3. FIRST TIME USE HOW TO SETUP YOUR NEW HITACHI PLASMA TELEVISION SPEAKER INSTALLATION 42" 1. Screw the speaker holder to the speaker terminal of Speaker Holder Insert horizontally from the side Screw in the ...
Owners Guide
Page 6
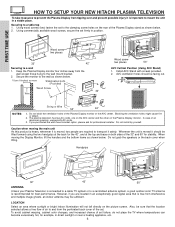
... an area where sunlight or bright indoor illumination will not fall directly on the Plasma Display monitor. FIRST TIME USE HOW TO SETUP YOUR NEW HITACHI PLASMA TELEVISION To take measures to prevent the Plasma Display from tipping over and prevent possible injury it is important to the wall mount... bracket. 2. Keep the Plasma Display monitor four inches away from the wall except those hung ...
... an area where sunlight or bright indoor illumination will not fall directly on the Plasma Display monitor. FIRST TIME USE HOW TO SETUP YOUR NEW HITACHI PLASMA TELEVISION To take measures to prevent the Plasma Display from tipping over and prevent possible injury it is important to the wall mount... bracket. 2. Keep the Plasma Display monitor four inches away from the wall except those hung ...
Owners Guide
Page 7
... room sizes and acoustical environments will decrease automatically during still and slightly moving pictures. HOW TO SET UP YOUR NEW HITACHI PLASMA TELEVISION FIRST TIME USE VIEWING The major benefit of the HITACHI Plasma Television is its best, test various locations in front of the TV and about 8 to 18 feet from the screen...
... room sizes and acoustical environments will decrease automatically during still and slightly moving pictures. HOW TO SET UP YOUR NEW HITACHI PLASMA TELEVISION FIRST TIME USE VIEWING The major benefit of the HITACHI Plasma Television is its best, test various locations in front of the TV and about 8 to 18 feet from the screen...
Owners Guide
Page 8
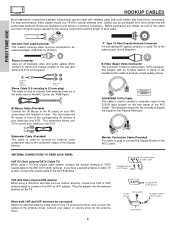
... jack panel and front control panel. The resolution should use 75-Ohm coaxial shielded wire. Monitor Connection Cable (Provided) This cable is used on the Plasma Television. Cables can be made with an S-Video feature in front of the corresponding IR window of common connectors. If you have phono connectors. When...
... jack panel and front control panel. The resolution should use 75-Ohm coaxial shielded wire. Monitor Connection Cable (Provided) This cable is used on the Plasma Television. Cables can be made with an S-Video feature in front of the corresponding IR window of common connectors. If you have phono connectors. When...
Owners Guide
Page 10
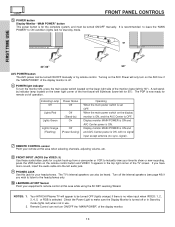
... control at this jack for 50"). signal). ቨ REMOTE CONTROL sensor Point your remote at this area while using the AV NET Learning Wizard. Your HITACHI Plasma TV will illuminate (lower left audio jack. ቪ PHONES JACK Use this area when selecting channels, adjusting volume, etc. ቩ FRONT INPUT JACKS (for VIDEO...
... control at this jack for 50"). signal). ቨ REMOTE CONTROL sensor Point your remote at this area while using the AV NET Learning Wizard. Your HITACHI Plasma TV will illuminate (lower left audio jack. ቪ PHONES JACK Use this area when selecting channels, adjusting volume, etc. ቩ FRONT INPUT JACKS (for VIDEO...
Owners Guide
Page 12
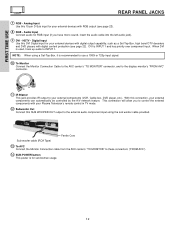
... MONITOR" connector, and to the display monitor's "FROM AVC" connector. ቭ IR Blaster This jack provides IR output to control the external components with your Plasma Television's remote control in TV mode. ቮ Subwoofer Out Connect this 15-pin D-Sub input for serviceman usage. 12 Analog Input Use this SUB WOOFER...
... MONITOR" connector, and to the display monitor's "FROM AVC" connector. ቭ IR Blaster This jack provides IR output to control the external components with your Plasma Television's remote control in TV mode. ቮ Subwoofer Out Connect this 15-pin D-Sub input for serviceman usage. 12 Analog Input Use this SUB WOOFER...
Owners Guide
Page 13
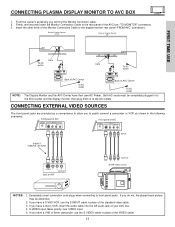
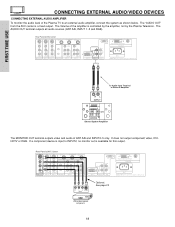
...panel of AVC PHONES S-VIDEO INPUT 5 AUDIO VIDEO L/(MONO) R PHONES S-VIDEO INPUT 5 AUDIO VIDEO L/(MONO) R NOTES: 1. FIRST TIME USE CONNECTING PLASMA DISPLAY MONITOR TO AVC BOX 1. CONNECTING EXTERNAL VIDEO SOURCES The front panel jacks are provided as a convenience to allow you do not, the played back... picture may be completely plugged in to the display monitor rear panel "FROM AVC" connectors. If you have a S-VHS VCR, use HITACHI specified cable. To AC outlet Please use the S-VIDEO cable in the following examples: Front panel of AVC Front panel of the AVC ...
...panel of AVC PHONES S-VIDEO INPUT 5 AUDIO VIDEO L/(MONO) R PHONES S-VIDEO INPUT 5 AUDIO VIDEO L/(MONO) R NOTES: 1. FIRST TIME USE CONNECTING PLASMA DISPLAY MONITOR TO AVC BOX 1. CONNECTING EXTERNAL VIDEO SOURCES The front panel jacks are provided as a convenience to allow you do not, the played back... picture may be completely plugged in to the display monitor rear panel "FROM AVC" connectors. If you have a S-VHS VCR, use HITACHI specified cable. To AC outlet Please use the S-VIDEO cable in the following examples: Front panel of AVC Front panel of the AVC ...
Owners Guide
Page 14
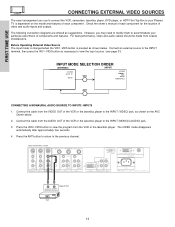
...of each component for the location of the VCR or the laserdisc player to the INPUT (MONO)/L(AUDIO) jack. 3. However, you use HITACHI specified cable. Connect the cable from coaxial shielded wire. The VIDEO mode disappears automatically after approximately four seconds. 4. Connect the cable from the... VCR or the laserdisc player. FIRST TIME USE CONNECTING EXTERNAL VIDEO SOURCES The exact arrangement you may need to modify them to accommodate your Plasma TV is pressed as shown below . 2. Check the owner's manual of the VCR or the laserdisc player to the INPUT (VIDEO) ...
...of each component for the location of the VCR or the laserdisc player to the INPUT (MONO)/L(AUDIO) jack. 3. However, you use HITACHI specified cable. Connect the cable from coaxial shielded wire. The VIDEO mode disappears automatically after approximately four seconds. 4. Connect the cable from the... VCR or the laserdisc player. FIRST TIME USE CONNECTING EXTERNAL VIDEO SOURCES The exact arrangement you may need to modify them to accommodate your Plasma TV is pressed as shown below . 2. Check the owner's manual of the VCR or the laserdisc player to the INPUT (VIDEO) ...
Owners Guide
Page 18
...) PB L/(MONO) R AUDIO INPUT 3 IR BLASTER PR R AUDIO INPUT 2 PR R AUDIO INPUT 1 ANALOG INPUT L AUDIO DVI-HDTV L/(MONO) AUDIO Please use HITACHI specified cable. R L V S-VIDEO INPUT Optional, See page 23 VCR or other external components 18 The AUDIO OUT terminal outputs all audio sources (ANT A/B, INPUT 1~5... EXTERNAL AUDIO AMPLIFIER To monitor the audio level of the amplifier is controlled by the amplifier, not by the Plasma Television. The Volume of the Plasma TV to INPUT2, no monitor out is available for this output. It does not output component video, DVIHDTV or...
...) PB L/(MONO) R AUDIO INPUT 3 IR BLASTER PR R AUDIO INPUT 2 PR R AUDIO INPUT 1 ANALOG INPUT L AUDIO DVI-HDTV L/(MONO) AUDIO Please use HITACHI specified cable. R L V S-VIDEO INPUT Optional, See page 23 VCR or other external components 18 The AUDIO OUT terminal outputs all audio sources (ANT A/B, INPUT 1~5... EXTERNAL AUDIO AMPLIFIER To monitor the audio level of the amplifier is controlled by the amplifier, not by the Plasma Television. The Volume of the Plasma TV to INPUT2, no monitor out is available for this output. It does not output component video, DVIHDTV or...
Owners Guide
Page 19
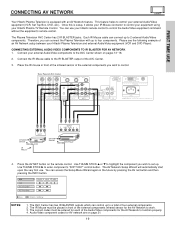
...STICK ̈ to function properly. 4. FIRST TIME USE CONNECTING AV NETWORK Your Hitachi Plasma Television is setup, it allows your IR Mouse connector to control your equipment using your Hitachi Plasma TV Remote Control. Connect your Hitachi Plasma Television and external Audio/Video equipment (VCR and DVD Player). Rear Panel of ... the AV net button and then pressing the INFO button. This feature helps to control your Hitachi remote control to the AVC Center shown on the remote control. The Plasma Television AVC Center has 2 IR BLASTER jacks. Connect the IR Mouse cable to the IR ...
...STICK ̈ to function properly. 4. FIRST TIME USE CONNECTING AV NETWORK Your Hitachi Plasma Television is setup, it allows your IR Mouse connector to control your equipment using your Hitachi Plasma TV Remote Control. Connect your Hitachi Plasma Television and external Audio/Video equipment (VCR and DVD Player). Rear Panel of ... the AV net button and then pressing the INFO button. This feature helps to control your Hitachi remote control to the AVC Center shown on the remote control. The Plasma Television AVC Center has 2 IR BLASTER jacks. Connect the IR Mouse cable to the IR ...

Owners Guide
Page 24
... 2 VID 1 PIP FREEZE VID 3 PIP CH PIP ACCESS VIDEO SWAP PIP MODE REC CLU-5723TSI REMOTE In addition to controlling all the functions on your HITACHI Plasma TV, the new remote control is designed to operate different types of the set-top-box and press the SET-TOPBOX (STB) button. The STB... receiver (see page 35 for instructions on how to program the remote to control and press the CD, PVR or AMP button. To operate your Plasma TV, point the remote control at the remote sensor of the cable box and press the CABLE (CBL) button. To operate your VCR, point the...
... 2 VID 1 PIP FREEZE VID 3 PIP CH PIP ACCESS VIDEO SWAP PIP MODE REC CLU-5723TSI REMOTE In addition to controlling all the functions on your HITACHI Plasma TV, the new remote control is designed to operate different types of the set-top-box and press the SET-TOPBOX (STB) button. The STB... receiver (see page 35 for instructions on how to program the remote to control and press the CD, PVR or AMP button. To operate your Plasma TV, point the remote control at the remote sensor of the cable box and press the CABLE (CBL) button. To operate your VCR, point the...
Owners Guide
Page 25
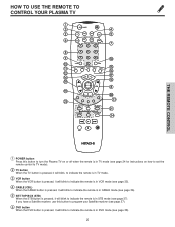
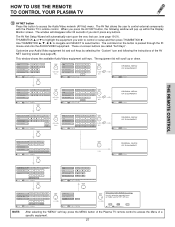
HOW TO USE THE REMOTE TO CONTROL YOUR PLASMA TV ት POWER TV DVD VCR CBL SOURCE WIZARD CD PVR STB AMP 1 2 3 4 5 6 7 8 9 SLEEP 0 INFO ANT TV/RGB A/V NET ASPECT VIDEO MENU EXIT VOL SELECT ... will blink to indicate the remote is in STB mode (see page 38). 25 If you have a Satellite receiver, use this button to turn the Plasma TV on or off when the remote is in TV mode (see page 24 for instructions on how to set the remote control to TV...
HOW TO USE THE REMOTE TO CONTROL YOUR PLASMA TV ት POWER TV DVD VCR CBL SOURCE WIZARD CD PVR STB AMP 1 2 3 4 5 6 7 8 9 SLEEP 0 INFO ANT TV/RGB A/V NET ASPECT VIDEO MENU EXIT VOL SELECT ... will blink to indicate the remote is in STB mode (see page 38). 25 If you have a Satellite receiver, use this button to turn the Plasma TV on or off when the remote is in TV mode (see page 24 for instructions on how to set the remote control to TV...
Owners Guide
Page 26
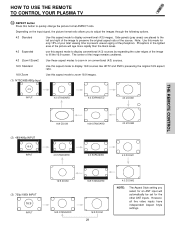
... 3 When an S-VIDEO Input is connected to VIDEO: 3. Day/Night Closed Mode Captioning Day CC Off 4:3 Expanded View 0:00 AM Off Timer Zzzz -:-- NOTE: The Plasma TV may also be performed by pressing CH up to a maximum of the screen. Enter one, two, or three numbers to the channel display on... PLUS+ VID 1 VID 2 PIP FREEZE VID 3 PIP CH PIP ACCESS VIDEO SWAP PIP MODE REC CLU-5723TSI HOW TO USE THE REMOTE TO CONTROL YOUR PLASMA TV ቨ CD, PVR, AMP buttons When pressed, each time the button is pressed. 3:32 PM Ant A 15 Stereo G ANT 3:32 PM Ant B 22 Stereo...
... 3 When an S-VIDEO Input is connected to VIDEO: 3. Day/Night Closed Mode Captioning Day CC Off 4:3 Expanded View 0:00 AM Off Timer Zzzz -:-- NOTE: The Plasma TV may also be performed by pressing CH up to a maximum of the screen. Enter one, two, or three numbers to the channel display on... PLUS+ VID 1 VID 2 PIP FREEZE VID 3 PIP CH PIP ACCESS VIDEO SWAP PIP MODE REC CLU-5723TSI HOW TO USE THE REMOTE TO CONTROL YOUR PLASMA TV ቨ CD, PVR, AMP buttons When pressed, each time the button is pressed. 3:32 PM Ant A 15 Stereo G ANT 3:32 PM Ant B 22 Stereo...
Owners Guide
Page 27
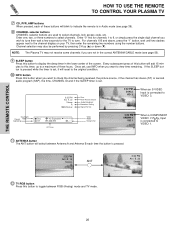
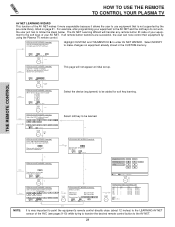
... 8 LAST CH 0 6 INFO 9 GUIDE MENU MENU - THE REMOTE CONTROL MODE EXIT MUTE VCR PLUS+ SVCS VID 2 VID 1 HOW TO USE THE REMOTE TO CONTROL YOUR PLASMA TV VOL TV POWER SLEEP ANT TV/RGB MENU DVD 1 VCR CDSOURCE WIZARDCBL TAPE STB 4 7 2 5 AMP 3 8 6 0 9 A/V NET ASPECT INFO SELECT CH PIP ... Device Setting CH ̆ 3 6 9 MENU INFO GUIDE THUMB STICK Cable Box Set Top Box Custom SETUP Move INFO Device Setting THUMB STICK HITACHI AV NET WIZARD (Learning) Use this button to control or setup and then press THUMBSTICK ̈. The command on -screen buttons are called "...
... 8 LAST CH 0 6 INFO 9 GUIDE MENU MENU - THE REMOTE CONTROL MODE EXIT MUTE VCR PLUS+ SVCS VID 2 VID 1 HOW TO USE THE REMOTE TO CONTROL YOUR PLASMA TV VOL TV POWER SLEEP ANT TV/RGB MENU DVD 1 VCR CDSOURCE WIZARDCBL TAPE STB 4 7 2 5 AMP 3 8 6 0 9 A/V NET ASPECT INFO SELECT CH PIP ... Device Setting CH ̆ 3 6 9 MENU INFO GUIDE THUMB STICK Cable Box Set Top Box Custom SETUP Move INFO Device Setting THUMB STICK HITACHI AV NET WIZARD (Learning) Use this button to control or setup and then press THUMBSTICK ̈. The command on -screen buttons are called "...
Owners Guide
Page 28
...NET WIZARD (Learning) Which device do not work, the user just has to use equipment that is not supported by using the Plasma TV remote control. Yes HITACHI AV NET WIZARD (Learning) Press and hold desired button to transfer the command to be learned. NO Move YES SEL Select Cable...WIZARD (Learning) No Transfer not completed! Try again? TV Softkeys POWER MENU Done Move Continue SEL Select SELECT EXIT No Done THUMB STICK SELECT HITACHI AV NET WIZARD (Learning) DVD2 (Custom) Video Input Audio Input No Connection No Connection Transmission Test POWER PLAY CH UP BACK Move OK ...
...NET WIZARD (Learning) Which device do not work, the user just has to use equipment that is not supported by using the Plasma TV remote control. Yes HITACHI AV NET WIZARD (Learning) Press and hold desired button to transfer the command to be learned. NO Move YES SEL Select Cable...WIZARD (Learning) No Transfer not completed! Try again? TV Softkeys POWER MENU Done Move Continue SEL Select SELECT EXIT No Done THUMB STICK SELECT HITACHI AV NET WIZARD (Learning) DVD2 (Custom) Video Input Audio Input No Connection No Connection Transmission Test POWER PLAY CH UP BACK Move OK ...
Owners Guide
Page 29
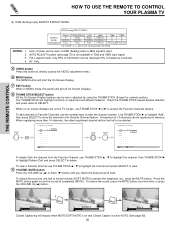
... mode for the other ANT inputs. THE REMOTE CONTROL MODE EXIT MUTE VCR PLUS+ SVCS VID 2 VID 1 HOW TO USE THE REMOTE TO CONTROL YOUR PLASMA TV VOL TV POWER SLEEP ANT TV/RGB MENU DVD 1 VCR CDSOURCE WIZARDCBL TAPE STB 4 7 2 5 AMP 3 8 6 0 9 A/V NET ASPECT INFO SELECT CH PIP PIP MODE PIP...
... mode for the other ANT inputs. THE REMOTE CONTROL MODE EXIT MUTE VCR PLUS+ SVCS VID 2 VID 1 HOW TO USE THE REMOTE TO CONTROL YOUR PLASMA TV VOL TV POWER SLEEP ANT TV/RGB MENU DVD 1 VCR CDSOURCE WIZARDCBL TAPE STB 4 7 2 5 AMP 3 8 6 0 9 A/V NET ASPECT INFO SELECT CH PIP PIP MODE PIP...
Owners Guide
Page 30
... PLUS+ VID 1 VID 2 PIP FREEZE VID 3 PIP CH PIP ACCESS VIDEO SWAP PIP MODE REC CLU-5723TSI HOW TO USE THE REMOTE TO CONTROL YOUR PLASMA TV (4) RGB (Analog Input) ASPECT DISPLAY MODE. NOTES: 1. FULL aspect mode, only 95% of 14 channels can be registered to turn the sound off completely...
... PLUS+ VID 1 VID 2 PIP FREEZE VID 3 PIP CH PIP ACCESS VIDEO SWAP PIP MODE REC CLU-5723TSI HOW TO USE THE REMOTE TO CONTROL YOUR PLASMA TV (4) RGB (Analog Input) ASPECT DISPLAY MODE. NOTES: 1. FULL aspect mode, only 95% of 14 channels can be registered to turn the sound off completely...


