

Owners Guide
Page 1
... Setup Move SEL Sel IMPORTANT SAFETY INSTRUCTIONS 2-3 FIRST TIME USE 4-23 THE REMOTE CONTROL 24-41 ON-SCREEN DISPLAY USING THE RGB INPUT OF THE PLASMA TV 42-65 66-75 USEFUL INFORMATION INDEX 76-84 PLASMA TELEVISION AVC (Audio Video Control Center) & Plasma Display Monitor 32HDT55 42HDT55 50HDT55 OPERATING GUIDE Video Audio Ch.
... Setup Move SEL Sel IMPORTANT SAFETY INSTRUCTIONS 2-3 FIRST TIME USE 4-23 THE REMOTE CONTROL 24-41 ON-SCREEN DISPLAY USING THE RGB INPUT OF THE PLASMA TV 42-65 66-75 USEFUL INFORMATION INDEX 76-84 PLASMA TELEVISION AVC (Audio Video Control Center) & Plasma Display Monitor 32HDT55 42HDT55 50HDT55 OPERATING GUIDE Video Audio Ch.

Owners Guide
Page 2
...THAN THE SPECIFIED VOLTAGE. If the television does not operate properly, unplug the Plasma Television and call your HITACHI Plasma Television. WARNING: TO PREVENT FIRE OR SHOCK HAZARD, DO NOT EXPOSE THIS PLASMA TELEVISION TO RAIN OR MOISTURE. Please read it carefully and apply the knowledge ... on back side of your authorized dealer or service center. 2 Safety is intended to alert the user to the presence of HITACHI Plasma Televisions. Follow all warnings and instructions marked on the quality, performance, and ease of service of important operating and maintenance (servicing...
...THAN THE SPECIFIED VOLTAGE. If the television does not operate properly, unplug the Plasma Television and call your HITACHI Plasma Television. WARNING: TO PREVENT FIRE OR SHOCK HAZARD, DO NOT EXPOSE THIS PLASMA TELEVISION TO RAIN OR MOISTURE. Please read it carefully and apply the knowledge ... on back side of your authorized dealer or service center. 2 Safety is intended to alert the user to the presence of HITACHI Plasma Televisions. Follow all warnings and instructions marked on the quality, performance, and ease of service of important operating and maintenance (servicing...
Owners Guide
Page 4
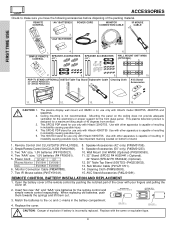
...OPTIONAL) A/V NET CH + SELECT VOL - MUTE MENU VOL + FAV CH ANT EXIT POWER 2. 8. 9. 10. Use with Hitachi model 32HDT55, 42HDT55 and 50HDT55. See important marking located on the ceiling does not provide adequate ventilation for the electronics or proper support for a maximum ... 1.5V batteries (P# FQ00021). 4. Power Cord: 32"/42" 50" Plasma Monitor EV01841 EV01861 AVC EV01841 EV01841 6. AVC Stand Accessories (P#QJ01081). Insert two new "AA" and "AAA" size batteries for use only with Hitachi 42HDT55 Use with other apparatus is capable of stand. 1. Replace the cover. ...
...OPTIONAL) A/V NET CH + SELECT VOL - MUTE MENU VOL + FAV CH ANT EXIT POWER 2. 8. 9. 10. Use with Hitachi model 32HDT55, 42HDT55 and 50HDT55. See important marking located on the ceiling does not provide adequate ventilation for the electronics or proper support for a maximum ... 1.5V batteries (P# FQ00021). 4. Power Cord: 32"/42" 50" Plasma Monitor EV01841 EV01861 AVC EV01841 EV01841 6. AVC Stand Accessories (P#QJ01081). Insert two new "AA" and "AAA" size batteries for use only with Hitachi 42HDT55 Use with other apparatus is capable of stand. 1. Replace the cover. ...

Owners Guide
Page 5
... screws (D) 6. Hook the upper speaker holder to the speaker terminal of Speaker Holder Insert horizontally from the side Screw in screws (C) Bottom View of the Plasma TV and an external amplifier. 5 Loosen 4 screws (A) (two on the left and two on the right). 3. Tighten screws (A). (R) Speaker Unscrew (B) Completely Loosen Screw (A) Screw x2...
... screws (D) 6. Hook the upper speaker holder to the speaker terminal of Speaker Holder Insert horizontally from the side Screw in screws (C) Bottom View of the Plasma TV and an external amplifier. 5 Loosen 4 screws (A) (two on the left and two on the right). 3. Tighten screws (A). (R) Speaker Unscrew (B) Completely Loosen Screw (A) Screw x2...
Owners Guide
Page 6
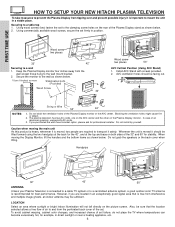
... Whenever the unit is moved it safely. LOCATION Select an area where sunlight or bright indoor illumination will not fall directly on the Plasma Display monitor. CH+ INPUT/EXIT AUDIO VIDEO CONTROL CENTER PULL AUDIO VIDEO CONTROL CENTER CH+ INPUT/EXIT CH- POWER NOTES: String .... Handgrips 3322" " 4422"" 50" ANTENNA Unless your Plasma Television is connected to a cable TV system or to a table-top 1. FIRST TIME USE HOW TO SETUP YOUR NEW HITACHI PLASMA TELEVISION To take measures to prevent the Plasma Display from tipping over and prevent possible injury it is ...
... Whenever the unit is moved it safely. LOCATION Select an area where sunlight or bright indoor illumination will not fall directly on the Plasma Display monitor. CH+ INPUT/EXIT AUDIO VIDEO CONTROL CENTER PULL AUDIO VIDEO CONTROL CENTER CH+ INPUT/EXIT CH- POWER NOTES: String .... Handgrips 3322" " 4422"" 50" ANTENNA Unless your Plasma Television is connected to a cable TV system or to a table-top 1. FIRST TIME USE HOW TO SETUP YOUR NEW HITACHI PLASMA TELEVISION To take measures to prevent the Plasma Display from tipping over and prevent possible injury it is ...
Owners Guide
Page 7
... cases, this is used to refresh them using screen saver function. - HOW TO SET UP YOUR NEW HITACHI PLASMA TELEVISION FIRST TIME USE VIEWING The major benefit of the HITACHI Plasma Television is functioning. To see image-like when the picture varied. If so, drapes or screens can be... used to prevent such image retention are minor defects in a very quiet plasma display monitor's room. For best stereo separation,...
... cases, this is used to refresh them using screen saver function. - HOW TO SET UP YOUR NEW HITACHI PLASMA TELEVISION FIRST TIME USE VIEWING The major benefit of the HITACHI Plasma Television is functioning. To see image-like when the picture varied. If so, drapes or screens can be... used to prevent such image retention are minor defects in a very quiet plasma display monitor's room. For best stereo separation,...
Owners Guide
Page 8
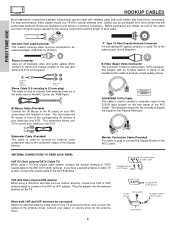
... lead from external audio out to the subwoofer output of the AVC Center (ex. This connection allows your TV to the IR output on the Plasma Television. "F" Type 75-Ohm Coaxial Antenna Connector For connecting RF signals (antenna or cable TV) to the D-SUB input located on the rear panel of...
... lead from external audio out to the subwoofer output of the AVC Center (ex. This connection allows your TV to the IR output on the Plasma Television. "F" Type 75-Ohm Coaxial Antenna Connector For connecting RF signals (antenna or cable TV) to the D-SUB input located on the rear panel of...
Owners Guide
Page 10
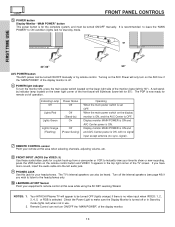
.... signal). ቨ REMOTE CONTROL sensor Point your equipment's remote control at this jack for a quick hook-up from a camcorder or VCR to be heard. Your HITACHI Plasma TV will only turn ON/OFF the "MAIN POWER" of the display monitor is for the complete system, and must be turned ON/OFF manually...
.... signal). ቨ REMOTE CONTROL sensor Point your equipment's remote control at this jack for a quick hook-up from a camcorder or VCR to be heard. Your HITACHI Plasma TV will only turn ON/OFF the "MAIN POWER" of the display monitor is for the complete system, and must be turned ON/OFF manually...
Owners Guide
Page 12
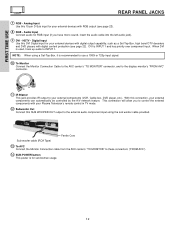
... Input Connect audio for your external devices with digital output capability, such as a Set-Top-Box, high band DTV decoders and DVD players with your Plasma Television's remote control in TV mode. ቮ Subwoofer Out Connect this connection, your external components (VCR, Cable box, DVD player, etc.). HDTV - DVI is used...
... Input Connect audio for your external devices with digital output capability, such as a Set-Top-Box, high band DTV decoders and DVD players with your Plasma Television's remote control in TV mode. ቮ Subwoofer Out Connect this connection, your external components (VCR, Cable box, DVD player, etc.). HDTV - DVI is used...
Owners Guide
Page 13
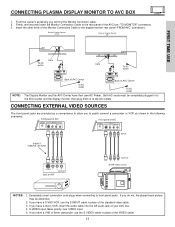
... monitor rear panel "FROM AVC" connectors. To AC outlet The Display Monitor and the AVC Center have a S-VHS VCR, use HITACHI specified cable. If you have a VHS or 8mm camcorder, use HITACHI specified cable. TO MONITOR AC IN Back of AVC Center TruBass SRS and symbol are trademarks of your AVC box..., and securely insert the Monitor Connection Cable to front panel jacks. From the owner's accessory you have their own AC Power. FIRST TIME USE CONNECTING PLASMA DISPLAY MONITOR TO AVC BOX 1.
... monitor rear panel "FROM AVC" connectors. To AC outlet The Display Monitor and the AVC Center have a S-VHS VCR, use HITACHI specified cable. If you have a VHS or 8mm camcorder, use HITACHI specified cable. TO MONITOR AC IN Back of AVC Center TruBass SRS and symbol are trademarks of your AVC box..., and securely insert the Monitor Connection Cable to front panel jacks. From the owner's accessory you have their own AC Power. FIRST TIME USE CONNECTING PLASMA DISPLAY MONITOR TO AVC BOX 1.
Owners Guide
Page 14
However, you use HITACHI specified cable. Connect the cable from the VIDEO OUT of video and audio inputs and outputs. FIRST TIME USE CONNECTING EXTERNAL VIDEO SOURCES The exact arrangement you may need to modify them to accommodate your Plasma TV is pressed as shown below . 2. Rear Panel of AVC Center ANT B TO...
However, you use HITACHI specified cable. Connect the cable from the VIDEO OUT of video and audio inputs and outputs. FIRST TIME USE CONNECTING EXTERNAL VIDEO SOURCES The exact arrangement you may need to modify them to accommodate your Plasma TV is pressed as shown below . 2. Rear Panel of AVC Center ANT B TO...
Owners Guide
Page 18
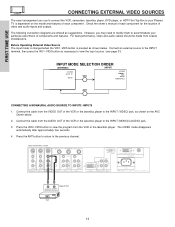
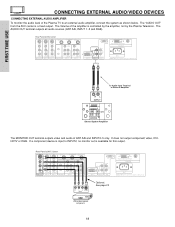
... 3 IR BLASTER PR R AUDIO INPUT 2 PR R AUDIO INPUT 1 ANALOG INPUT L AUDIO DVI-HDTV L/(MONO) AUDIO Please use HITACHI specified cable. The "AUDIO OUT" from the AVC center is controlled by the amplifier, not by the Plasma Television. The Volume of AVC Center ANT B TO CONVERTER ANT A S-VIDEO S-VIDEO VIDEO VIDEO L L/(MONO) R AUDIO...
... 3 IR BLASTER PR R AUDIO INPUT 2 PR R AUDIO INPUT 1 ANALOG INPUT L AUDIO DVI-HDTV L/(MONO) AUDIO Please use HITACHI specified cable. The "AUDIO OUT" from the AVC center is controlled by the amplifier, not by the Plasma Television. The Volume of AVC Center ANT B TO CONVERTER ANT A S-VIDEO S-VIDEO VIDEO VIDEO L L/(MONO) R AUDIO...
Owners Guide
Page 19
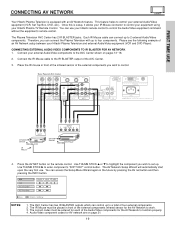
...four external components. 2. Audio/Video component codes for the AV Network to control your equipment using your Hitachi Plasma TV Remote Control. FIRST TIME USE CONNECTING AV NETWORK Your Hitachi Plasma Television is setup, it allows your IR Mouse connector to work. 3. The correct codes must be ...Connect your external Audio/Video components to the IR BLASTER output of the Audio/Video components for the AV Network to control your Hitachi Plasma Television and external Audio/Video equipment (VCR and DVD Player). Connect the IR Mouse cable to the AVC Center shown on pages ...
...four external components. 2. Audio/Video component codes for the AV Network to control your equipment using your Hitachi Plasma TV Remote Control. FIRST TIME USE CONNECTING AV NETWORK Your Hitachi Plasma Television is setup, it allows your IR Mouse connector to work. 3. The correct codes must be ...Connect your external Audio/Video components to the IR BLASTER output of the Audio/Video components for the AV Network to control your Hitachi Plasma Television and external Audio/Video equipment (VCR and DVD Player). Connect the IR Mouse cable to the AVC Center shown on pages ...

Owners Guide
Page 24
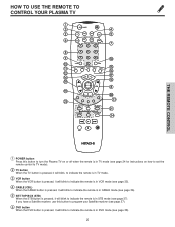
... 2 VID 1 PIP FREEZE VID 3 PIP CH PIP ACCESS VIDEO SWAP PIP MODE REC CLU-5723TSI REMOTE In addition to controlling all the functions on your HITACHI Plasma TV, the new remote control is designed to operate different types of VCRs, CATV (Cable TV) converters, set-top-box, satellite receiver, DVD players,... remote to illuminate if the room is not pressed again. This button will blink, indicating that the remote will not appear to control your Plasma TV, point the remote control at the remote sensor of the AVC box/Display Monitor and press the TV button. Basic operation keys are ...
... 2 VID 1 PIP FREEZE VID 3 PIP CH PIP ACCESS VIDEO SWAP PIP MODE REC CLU-5723TSI REMOTE In addition to controlling all the functions on your HITACHI Plasma TV, the new remote control is designed to operate different types of VCRs, CATV (Cable TV) converters, set-top-box, satellite receiver, DVD players,... remote to illuminate if the room is not pressed again. This button will blink, indicating that the remote will not appear to control your Plasma TV, point the remote control at the remote sensor of the AVC box/Display Monitor and press the TV button. Basic operation keys are ...
Owners Guide
Page 25
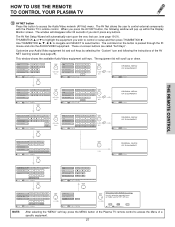
HOW TO USE THE REMOTE TO CONTROL YOUR PLASMA TV ት POWER TV DVD VCR CBL SOURCE WIZARD CD PVR STB AMP 1 2 3 4 5 6 7 8 9 SLEEP 0 INFO ANT TV/RGB A/V NET ASPECT VIDEO MENU EXIT VOL SELECT ... will blink to indicate the remote is in STB mode (see page 38). 25 If you have a Satellite receiver, use this button to turn the Plasma TV on or off when the remote is in TV mode (see page 24 for instructions on how to set the remote control to TV...
HOW TO USE THE REMOTE TO CONTROL YOUR PLASMA TV ት POWER TV DVD VCR CBL SOURCE WIZARD CD PVR STB AMP 1 2 3 4 5 6 7 8 9 SLEEP 0 INFO ANT TV/RGB A/V NET ASPECT VIDEO MENU EXIT VOL SELECT ... will blink to indicate the remote is in STB mode (see page 38). 25 If you have a Satellite receiver, use this button to turn the Plasma TV on or off when the remote is in TV mode (see page 24 for instructions on how to set the remote control to TV...
Owners Guide
Page 26
Enter one, two, or three numbers to the channel display on your TV, then enter the remaining two numbers using the number buttons. NOTE: The Plasma TV may also be performed by pressing CH up to a maximum of three hours. Once set . 3:32 PM Ant A 22 Stereo R 1080i Format Time Main ... PLUS+ VID 1 VID 2 PIP FREEZE VID 3 PIP CH PIP ACCESS VIDEO SWAP PIP MODE REC CLU-5723TSI HOW TO USE THE REMOTE TO CONTROL YOUR PLASMA TV ቨ CD, PVR, AMP buttons When pressed, each time the button is connected to VIDEO: 3.
Enter one, two, or three numbers to the channel display on your TV, then enter the remaining two numbers using the number buttons. NOTE: The Plasma TV may also be performed by pressing CH up to a maximum of three hours. Once set . 3:32 PM Ant A 22 Stereo R 1080i Format Time Main ... PLUS+ VID 1 VID 2 PIP FREEZE VID 3 PIP CH PIP ACCESS VIDEO SWAP PIP MODE REC CLU-5723TSI HOW TO USE THE REMOTE TO CONTROL YOUR PLASMA TV ቨ CD, PVR, AMP buttons When pressed, each time the button is connected to VIDEO: 3.
Owners Guide
Page 27
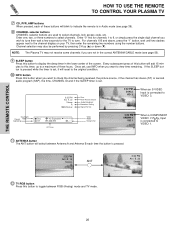
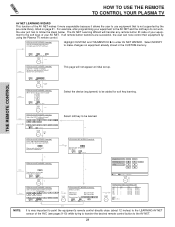
... Device Setting CH ̆ 3 6 9 MENU INFO GUIDE THUMB STICK Cable Box Set Top Box Custom SETUP Move INFO Device Setting THUMB STICK HITACHI AV NET WIZARD (Learning) Use this button to access the Audio/Video network (AV Net) menu. The window will pop up or down.... press the AV NET button, the following the instructions of a specific equipment. 27 Use THUMBSTICK to navigate and SELECT to control external components with the Plasma TV's remote control. DVD VCR PV Recorder AV Receiver POWER CH ̄ CH ̆ MENU THUMB STICK 1 2 3 TV/VCR SELECT 4 5 7 8 LAST CH...
... Device Setting CH ̆ 3 6 9 MENU INFO GUIDE THUMB STICK Cable Box Set Top Box Custom SETUP Move INFO Device Setting THUMB STICK HITACHI AV NET WIZARD (Learning) Use this button to access the Audio/Video network (AV Net) menu. The window will pop up or down.... press the AV NET button, the following the instructions of a specific equipment. 27 Use THUMBSTICK to navigate and SELECT to control external components with the Plasma TV's remote control. DVD VCR PV Recorder AV Receiver POWER CH ̄ CH ̆ MENU THUMB STICK 1 2 3 TV/VCR SELECT 4 5 7 8 LAST CH...
Owners Guide
Page 28
... (Learning) A device is stored in the CUSTOM memory. TV Softkeys POWER MENU Done Move Continue SEL Select SELECT EXIT No Done THUMB STICK SELECT HITACHI AV NET WIZARD (Learning) DVD2 (Custom) Video Input Audio Input No Connection No Connection Transmission Test POWER PLAY CH UP BACK Move OK SEL Select... This function of the AV NET makes it more expandable because it allows the user to use equipment that is not supported by using the Plasma TV remote control. If all remote button transfers are successful, the user can now control their equipment by the pre-code library, listed on...
... (Learning) A device is stored in the CUSTOM memory. TV Softkeys POWER MENU Done Move Continue SEL Select SELECT EXIT No Done THUMB STICK SELECT HITACHI AV NET WIZARD (Learning) DVD2 (Custom) Video Input Audio Input No Connection No Connection Transmission Test POWER PLAY CH UP BACK Move OK SEL Select... This function of the AV NET makes it more expandable because it allows the user to use equipment that is not supported by using the Plasma TV remote control. If all remote button transfers are successful, the user can now control their equipment by the pre-code library, listed on...
Owners Guide
Page 29
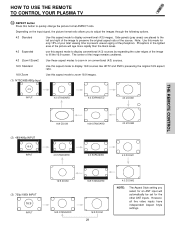
... change the picture format ASPECT ratio. THE REMOTE CONTROL MODE EXIT MUTE VCR PLUS+ SVCS VID 2 VID 1 HOW TO USE THE REMOTE TO CONTROL YOUR PLASMA TV VOL TV POWER SLEEP ANT TV/RGB MENU DVD 1 VCR CDSOURCE WIZARDCBL TAPE STB 4 7 2 5 AMP 3 8 6 0 9 A/V NET ASPECT INFO SELECT CH PIP PIP MODE PIP...
... change the picture format ASPECT ratio. THE REMOTE CONTROL MODE EXIT MUTE VCR PLUS+ SVCS VID 2 VID 1 HOW TO USE THE REMOTE TO CONTROL YOUR PLASMA TV VOL TV POWER SLEEP ANT TV/RGB MENU DVD 1 VCR CDSOURCE WIZARDCBL TAPE STB 4 7 2 5 AMP 3 8 6 0 9 A/V NET ASPECT INFO SELECT CH PIP PIP MODE PIP...
Owners Guide
Page 30
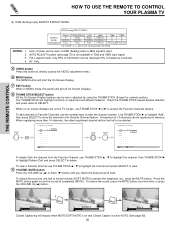
... PLUS+ VID 1 VID 2 PIP FREEZE VID 3 PIP CH PIP ACCESS VIDEO SWAP PIP MODE REC CLU-5723TSI HOW TO USE THE REMOTE TO CONTROL YOUR PLASMA TV (4) RGB (Analog Input) ASPECT DISPLAY MODE. AUTO ADJUST function (see corresponding note below. THUMB STICK 8 Favorite Channels Ant A 8 A6 A3 - - - - - - - - - - - - - - - - - - - - - - - - - To view a Favorite Channel...
... PLUS+ VID 1 VID 2 PIP FREEZE VID 3 PIP CH PIP ACCESS VIDEO SWAP PIP MODE REC CLU-5723TSI HOW TO USE THE REMOTE TO CONTROL YOUR PLASMA TV (4) RGB (Analog Input) ASPECT DISPLAY MODE. AUTO ADJUST function (see corresponding note below. THUMB STICK 8 Favorite Channels Ant A 8 A6 A3 - - - - - - - - - - - - - - - - - - - - - - - - - To view a Favorite Channel...


