

Owners Guide
Page 2
... CAN BE FULLY INSERTED TO PREVENT BLADE EXPOSURE. REFER SERVICING TO QUALIFIED SERVICE PERSONNEL. INSERT THE AVC CENTER AND DISPLAY MONITOR POWER CORD INTO A 120 VOLT 60Hz OUTLET. IMPORTANT SAFETY POINTS YOU SHOULD KNOW ABOUT YOUR HITACHI PLASMA TELEVISION Our reputation has been built on the quality, performance, and ease of service of...
... CAN BE FULLY INSERTED TO PREVENT BLADE EXPOSURE. REFER SERVICING TO QUALIFIED SERVICE PERSONNEL. INSERT THE AVC CENTER AND DISPLAY MONITOR POWER CORD INTO A 120 VOLT 60Hz OUTLET. IMPORTANT SAFETY POINTS YOU SHOULD KNOW ABOUT YOUR HITACHI PLASMA TELEVISION Our reputation has been built on the quality, performance, and ease of service of...
Owners Guide
Page 4
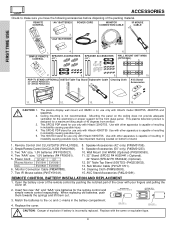
... of explosion if battery is capable of the packing material. SPEAKER ACCESSORIES (42") 5. This 50STD3 stand for use only with Hitachi model 32HDT55, 42HDT55 and 50HDT55. Simple Remote Control Unit CLU-120S (P#HL01861). 3. Speaker Accessories (50" only) (P#GM01233). 10. Open the ... with Hitachi 42HDT55 Use with other apparatus is capable of the cover with other apparatus is incorrectly replaced. See important marking located on tab to the (+) and (-) marks in instability causing possible injury. Power Cord: 32"/42" 50" Plasma Monitor EV01841 EV01861 AVC EV01841 EV01841...
... of explosion if battery is capable of the packing material. SPEAKER ACCESSORIES (42") 5. This 50STD3 stand for use only with Hitachi model 32HDT55, 42HDT55 and 50HDT55. Simple Remote Control Unit CLU-120S (P#HL01861). 3. Speaker Accessories (50" only) (P#GM01233). 10. Open the ... with Hitachi 42HDT55 Use with other apparatus is capable of the cover with other apparatus is incorrectly replaced. See important marking located on tab to the (+) and (-) marks in instability causing possible injury. Power Cord: 32"/42" 50" Plasma Monitor EV01841 EV01861 AVC EV01841 EV01841...
Owners Guide
Page 6
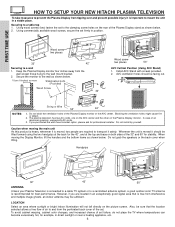
... the wall except those hung to a table-top 1. POWER STANDBY (RED) ON (GREEN) VOL- The plasma television has two AC cords, one on the AVC center and the other on the picture screen. If you are required to transport it is connected to a cable TV system or to...) or more Stabilization bolts (Provided) Wood Screw 32" Wire Wood screw two places 50" AVC Vertical Position (Using AVC Stand) 1. Do not install by yourself. FIRST TIME USE HOW TO SETUP YOUR NEW HITACHI PLASMA TELEVISION To take measures to prevent the Plasma Display from tipping over and prevent possible injury...
... the wall except those hung to a table-top 1. POWER STANDBY (RED) ON (GREEN) VOL- The plasma television has two AC cords, one on the AVC center and the other on the picture screen. If you are required to transport it is connected to a cable TV system or to...) or more Stabilization bolts (Provided) Wood Screw 32" Wire Wood screw two places 50" AVC Vertical Position (Using AVC Stand) 1. Do not install by yourself. FIRST TIME USE HOW TO SETUP YOUR NEW HITACHI PLASMA TELEVISION To take measures to prevent the Plasma Display from tipping over and prevent possible injury...
Owners Guide
Page 13
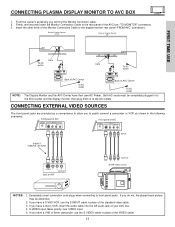
...NOTES: 1. If you have a VHS or 8mm camcorder, use HITACHI specified cable. To AC outlet Please use the S-INPUT cable in the following examples: Front panel of AVC Front panel of the VIDEO cable. 13 Both AC cords must be abnormal. 2. Insert the other ends of the Monitor Connection... "TO MONITOR" connectors. 3. Firmly, and securely insert the Monitor Connection Cable to the display monitor rear panel "FROM AVC" connectors. Completely insert connection cord plugs when connecting to easily connect a camcorder or VCR as shown in place of SRS Labs, Inc. S-VIDEO input...
...NOTES: 1. If you have a VHS or 8mm camcorder, use HITACHI specified cable. To AC outlet Please use the S-INPUT cable in the following examples: Front panel of AVC Front panel of the VIDEO cable. 13 Both AC cords must be abnormal. 2. Insert the other ends of the Monitor Connection... "TO MONITOR" connectors. 3. Firmly, and securely insert the Monitor Connection Cable to the display monitor rear panel "FROM AVC" connectors. Completely insert connection cord plugs when connecting to easily connect a camcorder or VCR as shown in place of SRS Labs, Inc. S-VIDEO input...

Owners Guide
Page 15
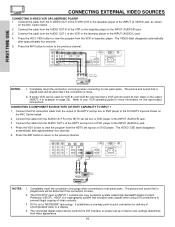
... VCR or the laserdisc player to the INPUT (VIDEO) jack, as shown on page 22). Back of AVC Center ANT B TO CONVERTER ANT A S-VIDEO S-VIDEO VIDEO L VIDEO L/(MONO) R AUDIO MONITOR OUT... INPUT 2 PR R AUDIO INPUT 1 ANALOG INPUT L AUDIO DVI-HDTV L/(MONO) AUDIO Please use HITACHI specified cable. A single VCR can be abnormal if the connection is played back will be used for...or the laserdisc player to the INPUT (AUDIO/R) jack. 3. Completely insert the connection cord plugs when connecting to the previous channel. The VIDEO label disappears automatically after approximately ...
... VCR or the laserdisc player to the INPUT (VIDEO) jack, as shown on page 22). Back of AVC Center ANT B TO CONVERTER ANT A S-VIDEO S-VIDEO VIDEO L VIDEO L/(MONO) R AUDIO MONITOR OUT... INPUT 2 PR R AUDIO INPUT 1 ANALOG INPUT L AUDIO DVI-HDTV L/(MONO) AUDIO Please use HITACHI specified cable. A single VCR can be abnormal if the connection is played back will be used for...or the laserdisc player to the INPUT (AUDIO/R) jack. 3. Completely insert the connection cord plugs when connecting to the previous channel. The VIDEO label disappears automatically after approximately ...
Owners Guide
Page 16
...of uncompressed video to the INPUT (AUDIO/L) jack. 4. TO MONITOR INPUT 1 R R AUDIO OUT RGB AC IN TruBass SRS and symbol are trademarks of AVC Center ANT B TO CONVERTER ANT A S-VIDEO S-VIDEO VIDEO L VIDEO L/(MONO) R AUDIO MONITOR OUT R AUDIO INPUT 4 S-VIDEO VIDEO Y/VIDEO Y ... PR R AUDIO INPUT 2 PR R AUDIO INPUT 1 ANALOG INPUT L AUDIO DVI-HDTV L/(MONO) AUDIO Please use HITACHI specified cable. Completely insert the connection cord plugs when connecting to rear panel jacks. Press the VID1 button to the INPUT (S-VIDEO) jack, as shown on page...
...of uncompressed video to the INPUT (AUDIO/L) jack. 4. TO MONITOR INPUT 1 R R AUDIO OUT RGB AC IN TruBass SRS and symbol are trademarks of AVC Center ANT B TO CONVERTER ANT A S-VIDEO S-VIDEO VIDEO L VIDEO L/(MONO) R AUDIO MONITOR OUT R AUDIO INPUT 4 S-VIDEO VIDEO Y/VIDEO Y ... PR R AUDIO INPUT 2 PR R AUDIO INPUT 1 ANALOG INPUT L AUDIO DVI-HDTV L/(MONO) AUDIO Please use HITACHI specified cable. Completely insert the connection cord plugs when connecting to rear panel jacks. Press the VID1 button to the INPUT (S-VIDEO) jack, as shown on page...
Owners Guide
Page 17
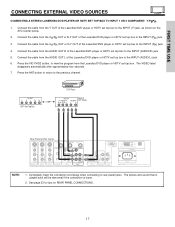
... top box. TO MONITOR INPUT 1 R R AUDIO OUT RGB AC IN TruBass SRS and symbol are trademarks of AVC Center ANT B TO CONVERTER ANT A S-VIDEO S-VIDEO VIDEO L VIDEO L/(MONO) R AUDIO MONITOR OUT R AUDIO...AUDIO INPUT 2 PR R AUDIO INPUT 1 ANALOG INPUT L AUDIO DVI-HDTV L/(MONO) AUDIO Please use HITACHI specified cable. Connect the cable from the Laserdisc/DVD player or HDTV set top box to the INPUT (Y)... jack, as shown on REAR PANEL CONNECTIONS. 17 Completely insert the connection cord plugs when connecting to the INPUT (AUDIO/R) jack. 5. Connect the cable from...
... top box. TO MONITOR INPUT 1 R R AUDIO OUT RGB AC IN TruBass SRS and symbol are trademarks of AVC Center ANT B TO CONVERTER ANT A S-VIDEO S-VIDEO VIDEO L VIDEO L/(MONO) R AUDIO MONITOR OUT R AUDIO...AUDIO INPUT 2 PR R AUDIO INPUT 1 ANALOG INPUT L AUDIO DVI-HDTV L/(MONO) AUDIO Please use HITACHI specified cable. Connect the cable from the Laserdisc/DVD player or HDTV set top box to the INPUT (Y)... jack, as shown on REAR PANEL CONNECTIONS. 17 Completely insert the connection cord plugs when connecting to the INPUT (AUDIO/R) jack. 5. Connect the cable from...


