Owners Guide
Page 2
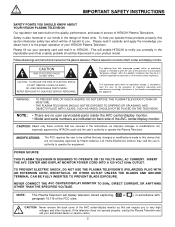
... products properly, this device that a safety problem should be of a sufficient magnitude to constitute a risk of electric shock to HITACHI. NOTE: • There are no user serviceable parts inside the AVC center/display monitor. • Model and serial numbers are indicated on the quality, performance, and ease of service of HITACHI Plasma Televisions. NEVER CONNECT THE AVC CENTER/DISPLAY MONITOR TO 50Hz, DIRECT CURRENT, OR ANYTHING OTHER...
... products properly, this device that a safety problem should be of a sufficient magnitude to constitute a risk of electric shock to HITACHI. NOTE: • There are no user serviceable parts inside the AVC center/display monitor. • Model and serial numbers are indicated on the quality, performance, and ease of service of HITACHI Plasma Televisions. NEVER CONNECT THE AVC CENTER/DISPLAY MONITOR TO 50Hz, DIRECT CURRENT, OR ANYTHING OTHER...
Owners Guide
Page 3
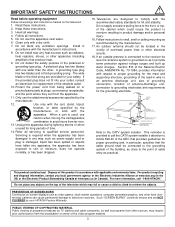
..., specifies that produce heat. 9. Servicing is grounded so as recommended by your HITACHI Factory Warranty. Such "SCREEN BURNS" constitute misuse and are designed to qualified service personnel. Keep these instructions. 2. If an outside antenna is connected to the receiver be connected to the grounding system of programs broadcast by TV stations and cable companies, as well as power-supply cord or plug is used, use the attachments/accessories specified...
..., specifies that produce heat. 9. Servicing is grounded so as recommended by your HITACHI Factory Warranty. Such "SCREEN BURNS" constitute misuse and are designed to qualified service personnel. Keep these instructions. 2. If an outside antenna is connected to the receiver be connected to the grounding system of programs broadcast by TV stations and cable companies, as well as power-supply cord or plug is used, use the attachments/accessories specified...
Owners Guide
Page 4
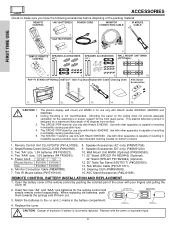
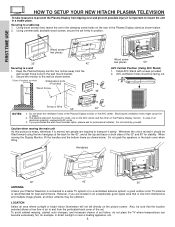
... possible injury. FIRST TIME USE MENU VID 5 ACCESSORIES Check to remove back cover. SIMPLE REMOTE CONTROL 4. CH - MUTE MENU VOL + FAV CH ANT EXIT POWER 2. 8. 9. 10. CAUTION: 1. 2. 3. 4. 5. The plasma display wall mount unit WM50 is capable of 45 degrees from vertical. Ceiling mounting is incorrectly replaced. This plasma television product is capable of the packing material. This SPD321 PDP stand for use only with Hitachi model 32HDX60, 42HDX60 and 50HDX60. Use with other apparatus...
... possible injury. FIRST TIME USE MENU VID 5 ACCESSORIES Check to remove back cover. SIMPLE REMOTE CONTROL 4. CH - MUTE MENU VOL + FAV CH ANT EXIT POWER 2. 8. 9. 10. CAUTION: 1. 2. 3. 4. 5. The plasma display wall mount unit WM50 is capable of 45 degrees from vertical. Ceiling mounting is incorrectly replaced. This plasma television product is capable of the packing material. This SPD321 PDP stand for use only with Hitachi model 32HDX60, 42HDX60 and 50HDX60. Use with other apparatus...
Owners Guide
Page 6
... As this product is heavy, whenever it is free from interference and multiple image ghosts, an indoor antenna may be sufficient. Securing to a wall 1. Install AVC Stand with screws provided. 2. To avoid cabinet warping, cabinet color changes, and increased chance of the Plasma Display monitor or the AVC center. CH+ INPUT/EXIT AUDIO VIDEO CONTROL CENTER PULL AUDIO VIDEO CONTROL CENTER CH+ INPUT/EXIT CH- If you are required to...
... As this product is heavy, whenever it is free from interference and multiple image ghosts, an indoor antenna may be sufficient. Securing to a wall 1. Install AVC Stand with screws provided. 2. To avoid cabinet warping, cabinet color changes, and increased chance of the Plasma Display monitor or the AVC center. CH+ INPUT/EXIT AUDIO VIDEO CONTROL CENTER PULL AUDIO VIDEO CONTROL CENTER CH+ INPUT/EXIT CH- If you are required to...

Owners Guide
Page 7
... slightly moving pictures. infrared controlling equipment. 3 Bright and dark spots High-precision technology is its best, test various locations in the room to find the optimum spot for a period of more than a Cathode-ray-tube. 6 Plasma Surface The plasma panel is turned on the screen. HOW TO SET UP YOUR NEW HITACHI PLASMA TELEVISION FIRST TIME USE VIEWING The major benefit of the HITACHI Plasma Television is used to reduce...
... slightly moving pictures. infrared controlling equipment. 3 Bright and dark spots High-precision technology is its best, test various locations in the room to find the optimum spot for a period of more than a Cathode-ray-tube. 6 Plasma Surface The plasma panel is turned on the screen. HOW TO SET UP YOUR NEW HITACHI PLASMA TELEVISION FIRST TIME USE VIEWING The major benefit of the HITACHI Plasma Television is used to reduce...

Owners Guide
Page 8
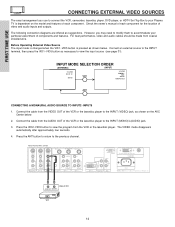
... external audio component input to the subwoofer output of the Display Monitor. Consult your cable box and VCR. Before purchasing any cables, be set correctly to display the signal on the Plasma Television. RGB Input). The resolution should use 75-Ohm coaxial shielded wire. For best performance, video cables should be sure of the output and input connector types required by the various components and the length of the VHF or UHF adapter. S-Video...
... external audio component input to the subwoofer output of the Display Monitor. Consult your cable box and VCR. Before purchasing any cables, be set correctly to display the signal on the Plasma Television. RGB Input). The resolution should use 75-Ohm coaxial shielded wire. For best performance, video cables should be sure of the output and input connector types required by the various components and the length of the VHF or UHF adapter. S-Video...
Owners Guide
Page 10
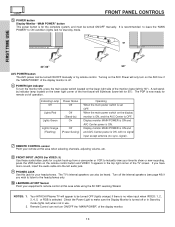
...'s internal speakers can also be turned OFF (lights orange) if there is no sync. Remote Control can be turned ON/OFF manually. Display monitor MAIN POWER is ON and AVC Center power is set OFF. press the VID5 button on the lower right corner of the TV screen. A red standby indicator lamp located on the remote control button and VIDEO: 5 appears in Stand-by remote control. Indicating Lamp Power Status Off Off Lights Red Lights Green Off (Stand-by mode. Turn off or...
...'s internal speakers can also be turned OFF (lights orange) if there is no sync. Remote Control can be turned ON/OFF manually. Display monitor MAIN POWER is ON and AVC Center power is set OFF. press the VID5 button on the lower right corner of the TV screen. A red standby indicator lamp located on the remote control button and VIDEO: 5 appears in Stand-by remote control. Indicating Lamp Power Status Off Off Lights Red Lights Green Off (Stand-by mode. Turn off or...
Owners Guide
Page 11
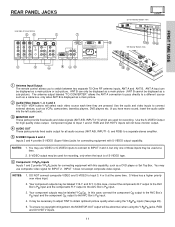
..." Monitor Bottom View 2 15 ቢ Antenna Input/Output The remote control allows you have monitor output. ብ AUDIO OUT These jacks provide fixed audio output for recording, only when the input is displayed as VCRs, camcorders, laserdisc players, DVD players etc. (if you to the AVC Box's PR input. 3. You may be used at the same time. INPUT 1 does not accept composite video signal. S-Video has a higher priority over video input. 2. In this case, connect the component CB output to...
..." Monitor Bottom View 2 15 ቢ Antenna Input/Output The remote control allows you have monitor output. ብ AUDIO OUT These jacks provide fixed audio output for recording, only when the input is displayed as VCRs, camcorders, laserdisc players, DVD players etc. (if you to the AVC Box's PR input. 3. You may be used at the same time. INPUT 1 does not accept composite video signal. S-Video has a higher priority over video input. 2. In this case, connect the component CB output to...
Owners Guide
Page 14
...MONO) R AUDIO MONITOR OUT R AUDIO INPUT 4 S-VIDEO VIDEO Y/VIDEO Y L/(MONO) PB L/(MONO) PB L/(MONO) R AUDIO INPUT 3 IR BLASTER PR R AUDIO INPUT 2 PR R AUDIO INPUT 1 ANALOG INPUT L AUDIO DVI-HDTV L/(MONO) AUDIO Please use to connect the VCR, camcorder, laserdisc player, DVD player, or HDTV Set Top Box to the previous channel. Before Operating External Video Source The input mode is changed when the VID1~VID5 button is dependent on the AVC Center below . Connect the cable from coaxial shielded wire. However, you use HITACHI specified cable. Rear Panel of SRS...
...MONO) R AUDIO MONITOR OUT R AUDIO INPUT 4 S-VIDEO VIDEO Y/VIDEO Y L/(MONO) PB L/(MONO) PB L/(MONO) R AUDIO INPUT 3 IR BLASTER PR R AUDIO INPUT 2 PR R AUDIO INPUT 1 ANALOG INPUT L AUDIO DVI-HDTV L/(MONO) AUDIO Please use to connect the VCR, camcorder, laserdisc player, DVD player, or HDTV Set Top Box to the previous channel. Before Operating External Video Source The input mode is changed when the VID1~VID5 button is dependent on the AVC Center below . Connect the cable from coaxial shielded wire. However, you use HITACHI specified cable. Rear Panel of SRS...

Owners Guide
Page 16
... INPUT 1 1. Rear Panel of the VCR or the laserdisc player to the INPUT (AUDIO/R) jack. 3. Completely insert the connection cord plugs when connecting to the previous channel. The connected digital output device controls the DVI interface so proper set top box or DVD player. Connect the cable from the VCR or laserdisc player. Press the ANT button to return to rear panel jacks. Connect the DVI connection cable from the AUDIO OUT L of AVC Center ANT B TO CONVERTER ANT A S-VIDEO S-VIDEO VIDEO L VIDEO L/(MONO) R AUDIO MONITOR OUT R AUDIO INPUT 4 S-VIDEO VIDEO Y/VIDEO...
... INPUT 1 1. Rear Panel of the VCR or the laserdisc player to the INPUT (AUDIO/R) jack. 3. Completely insert the connection cord plugs when connecting to the previous channel. The connected digital output device controls the DVI interface so proper set top box or DVD player. Connect the cable from the VCR or laserdisc player. Press the ANT button to return to rear panel jacks. Connect the DVI connection cable from the AUDIO OUT L of AVC Center ANT B TO CONVERTER ANT A S-VIDEO S-VIDEO VIDEO L VIDEO L/(MONO) R AUDIO MONITOR OUT R AUDIO INPUT 4 S-VIDEO VIDEO Y/VIDEO...
Owners Guide
Page 19
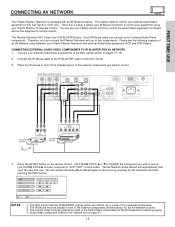
... R AUDIO INPUT 1 ANALOG INPUT L AUDIO DVI-HDTV L/(MONO) AUDIO Please use HITACHI specified cable. Infrared Sensor IR Mouse V L R OUTPUT VCR Infrared Sensor OUTPUT Y PB/CB PR/CR R L DVD Player 4. Audio/Video component codes for the AV Network to work. 3. FIRST TIME USE CONNECTING AV NETWORK Your Hitachi Plasma Television is setup, it allows your IR Mouse connector to control your equipment using your Hitachi Plasma TV Remote Control. You can access the Setup Menu Wizard again in the future by pressing the AV net button and...
... R AUDIO INPUT 1 ANALOG INPUT L AUDIO DVI-HDTV L/(MONO) AUDIO Please use HITACHI specified cable. Infrared Sensor IR Mouse V L R OUTPUT VCR Infrared Sensor OUTPUT Y PB/CB PR/CR R L DVD Player 4. Audio/Video component codes for the AV Network to work. 3. FIRST TIME USE CONNECTING AV NETWORK Your Hitachi Plasma Television is setup, it allows your IR Mouse connector to control your equipment using your Hitachi Plasma TV Remote Control. You can access the Setup Menu Wizard again in the future by pressing the AV net button and...

Owners Guide
Page 26
... the single digit channel you want to check the channel being received, the picture source, if the channel has stereo (ST) or second audio program (SAP), the time, CHANNEL ID and if the SLEEP timer is set. 3:32 PM Ant A 22 Stereo R 1080i Format Time Main Picture Source Audio Broadcast Broadcast Rating Signal Format 3:32 PM S-IN:3 VID 3 When an S-VIDEO Input is connected to display the sleep timer in the lower center of the screen.
... the single digit channel you want to check the channel being received, the picture source, if the channel has stereo (ST) or second audio program (SAP), the time, CHANNEL ID and if the SLEEP timer is set. 3:32 PM Ant A 22 Stereo R 1080i Format Time Main Picture Source Audio Broadcast Broadcast Rating Signal Format 3:32 PM S-IN:3 VID 3 When an S-VIDEO Input is connected to display the sleep timer in the lower center of the screen.
Owners Guide
Page 27
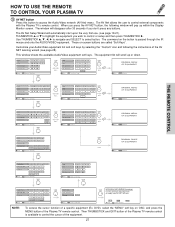
... Setting THUMB STICK INFO DVD VCR PV Recorder AV Receiver POWER MENU MORE Move INFO Device Setting THUMB STICK Cable Box POWER CH ̄ Set Top Box 1 2 Custom 4 5 7 8 Move LAST CH 0 INFO Device Setting CH ̆ 3 6 9 MENU INFO GUIDE THUMB STICK Cable Box Set Top Box Custom SETUP Move INFO Device Setting THUMB STICK HITACHI AV NET WIZARD (Learning) Use this button to access the Audio/Video network (AV Net) menu. The AV Net allows the user to control...
... Setting THUMB STICK INFO DVD VCR PV Recorder AV Receiver POWER MENU MORE Move INFO Device Setting THUMB STICK Cable Box POWER CH ̄ Set Top Box 1 2 Custom 4 5 7 8 Move LAST CH 0 INFO Device Setting CH ̆ 3 6 9 MENU INFO GUIDE THUMB STICK Cable Box Set Top Box Custom SETUP Move INFO Device Setting THUMB STICK HITACHI AV NET WIZARD (Learning) Use this button to access the Audio/Video network (AV Net) menu. The AV Net allows the user to control...
Owners Guide
Page 28
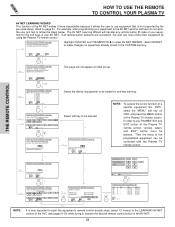
... HITACHI AV NET SETTING LIST Device DVD VCR PVR AVR CBL STB DVD2 Code 0672 Video INPUT 1 Not Setup Not Setup Not Setup Not Setup Not Setup Not Setup Audio Using TV Not Setup Not Setup Not Setup Not Setup Not Setup Not Setup EXIT SEL Select NOTE: BACK It is very important to point the equipment's remote control directly close (about 12 inches) to the soft keys of the Plasma TV remote control, "arrows, select, and EXIT" button...
... HITACHI AV NET SETTING LIST Device DVD VCR PVR AVR CBL STB DVD2 Code 0672 Video INPUT 1 Not Setup Not Setup Not Setup Not Setup Not Setup Not Setup Audio Using TV Not Setup Not Setup Not Setup Not Setup Not Setup Not Setup EXIT SEL Select NOTE: BACK It is very important to point the equipment's remote control directly close (about 12 inches) to the soft keys of the Plasma TV remote control, "arrows, select, and EXIT" button...

Owners Guide
Page 36
REC MY CABLE BOX CODE IS: NOTE: Refer to CABLE mode. ባ PRECODED CABLE BOX buttons These buttons transmit the chosen precoded cable codes. ቤ EXCLUSIVE TV buttons These buttons are removed from the remote control. This remote is programmed for operating the TV. If the cable box does not turn off , try a different two digit preset code. 6. NOTES: 1. The ANT button will act as stated above. ባ POWER TV DVD VCR CBL SOURCE WIZARD CD PVR STB...
REC MY CABLE BOX CODE IS: NOTE: Refer to CABLE mode. ባ PRECODED CABLE BOX buttons These buttons transmit the chosen precoded cable codes. ቤ EXCLUSIVE TV buttons These buttons are removed from the remote control. This remote is programmed for operating the TV. If the cable box does not turn off , try a different two digit preset code. 6. NOTES: 1. The ANT button will act as stated above. ባ POWER TV DVD VCR CBL SOURCE WIZARD CD PVR STB...
Owners Guide
Page 37
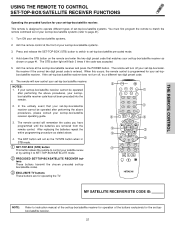
... 1 USING THE REMOTE TO CONTROL SET-TOP-BOX/SATELLITE RECEIVER FUNCTIONS VOL TV POWER SLEEP ANT TV/RGB MENU DVD 1 VCR CDSOURCE WIZARDCBL TAPE STB 4 2 AMP 7 5 3 8 6 0 9 A/V NET ASPECT INFO SELECT CH PIP PIP MODE LAST CH PIP VID 3 CH GUIDE/TV VID 4 SWAPPIP ACCESS FREEZE VIDEO SCHD VID 5 REC CLU-5723TSI Operating the precoded function for your set-top-box/satellite receiver operating guide. 3. The STB button light will turn off your set...
... 1 USING THE REMOTE TO CONTROL SET-TOP-BOX/SATELLITE RECEIVER FUNCTIONS VOL TV POWER SLEEP ANT TV/RGB MENU DVD 1 VCR CDSOURCE WIZARDCBL TAPE STB 4 2 AMP 7 5 3 8 6 0 9 A/V NET ASPECT INFO SELECT CH PIP PIP MODE LAST CH PIP VID 3 CH GUIDE/TV VID 4 SWAPPIP ACCESS FREEZE VIDEO SCHD VID 5 REC CLU-5723TSI Operating the precoded function for your set-top-box/satellite receiver operating guide. 3. The STB button light will turn off your set...
Owners Guide
Page 43
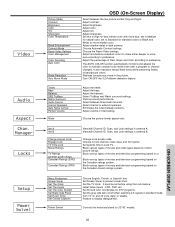
.... Change Lock access code. Video Audio Aspect Chan. Adjust sharpness. Select between stations. Choose Automatic Contrast settings. Set specific time to Standard for standard colors or Black and White for natural color, set before using the Lock feature. Day and Night. Manager Locks Setup Power Swivel Picture Mode Contrast Brightness Color Tint Sharpness Color Temperature Black Enhancement Contrast Mode Reset Video Settings Color Management Color Decoding Auto Color Noise Reduction Auto Movie Mode Treble Bass Balance SRS TruBass Matrix Surround Audio Source Internal Speakers...
.... Change Lock access code. Video Audio Aspect Chan. Adjust sharpness. Select between stations. Choose Automatic Contrast settings. Set specific time to Standard for standard colors or Black and White for natural color, set before using the Lock feature. Day and Night. Manager Locks Setup Power Swivel Picture Mode Contrast Brightness Color Tint Sharpness Color Temperature Black Enhancement Contrast Mode Reset Video Settings Color Management Color Decoding Auto Color Noise Reduction Auto Movie Mode Treble Bass Balance SRS TruBass Matrix Surround Audio Source Internal Speakers...

Owners Guide
Page 46
... THUMB STICK Video Color Management Set User Colors Magenta 50% Red 50% Yellow 50% Green 50% Cyan 50% Blue 50% Reset Move SEL Select Use THUMBSTICK to highlight functions. Press down on the selected VIDEO mode. Use THUMBSTICK ̄ to default settings. Use THUMBSTICK to highlight and select "Reset" to return all colors to access other video settings. THUMB STICK SELECT Video Picture Mode Contrast Brightness Color Tint Sharpness Color Temperature Black Enhancement Contrast Mode Reset Video Settings Move SEL...
... THUMB STICK Video Color Management Set User Colors Magenta 50% Red 50% Yellow 50% Green 50% Cyan 50% Blue 50% Reset Move SEL Select Use THUMBSTICK to highlight functions. Press down on the selected VIDEO mode. Use THUMBSTICK ̄ to default settings. Use THUMBSTICK to highlight and select "Reset" to return all colors to access other video settings. THUMB STICK SELECT Video Picture Mode Contrast Brightness Color Tint Sharpness Color Temperature Black Enhancement Contrast Mode Reset Video Settings Move SEL...
Owners Guide
Page 63
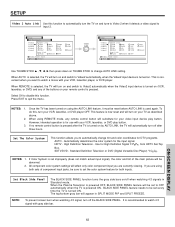
... DVD play button. All component color system settings will appear in Standard mode. NOTE: To prevent screen burn when watching 4:3 signal, turn on . SETUP Video 2 Auto Link Use this function. Once the TV has been turned on using REMOTE mode, any of the main picture will turn the TV on your VCR, laserdisc, or DVD player OFF. It is now reset and will be sure to watch 4:3 signal with your remote control is turned ON. Set The Color System...
... DVD play button. All component color system settings will appear in Standard mode. NOTE: To prevent screen burn when watching 4:3 signal, turn on . SETUP Video 2 Auto Link Use this function. Once the TV has been turned on using REMOTE mode, any of the main picture will turn the TV on your VCR, laserdisc, or DVD player OFF. It is now reset and will be sure to watch 4:3 signal with your remote control is turned ON. Set The Color System...
Owners Guide
Page 82
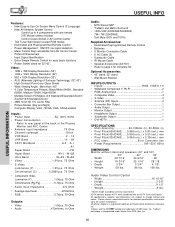
... specifications and dimensions for Consumer Use • Power Requirements 108-132V, 60Hz DIMENSIONS Monitor without prior notice. W+28 Ultra Band W+29 - Audio Video Control Center • Width 16 15/16" • Height 3 3/8" • Depth 9 1/2" • Weight 9 lbs. 1 Screen mode availability varies by input format HDTV Monitors display HDTV when combined with one remote 2 IR Mouse cables included Control Codes Stored in AV Control Center • Two Tuner Split Screen except RGB modes. • Illuminated and Preprogrammed Remote Control • Power...
... specifications and dimensions for Consumer Use • Power Requirements 108-132V, 60Hz DIMENSIONS Monitor without prior notice. W+28 Ultra Band W+29 - Audio Video Control Center • Width 16 15/16" • Height 3 3/8" • Depth 9 1/2" • Weight 9 lbs. 1 Screen mode availability varies by input format HDTV Monitors display HDTV when combined with one remote 2 IR Mouse cables included Control Codes Stored in AV Control Center • Two Tuner Split Screen except RGB modes. • Illuminated and Preprogrammed Remote Control • Power...


