
HP vp6200 Series Lamp - Installation
Page 1
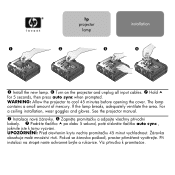
... unplug all input cables. If the lamp breaks, adequately ventilate the area. WARNING: Allow the projector to cool 45 minutes before opening the cover. Zapněte promítačku a odpojte v&#... instalaci na stropě noste ochranné brýle a rukavice. Hold i for 5 seconds, then press auto sync when prompted. hp projector lamp installation Install the new lamp. Podržte tlačítko i po dobu 5 sekund, poté stiskněte tlač... 45 minut vychladnout. Žárovka obsahuje malé množství rtuti. See the projector manual.
... unplug all input cables. If the lamp breaks, adequately ventilate the area. WARNING: Allow the projector to cool 45 minutes before opening the cover. Zapněte promítačku a odpojte v&#... instalaci na stropě noste ochranné brýle a rukavice. Hold i for 5 seconds, then press auto sync when prompted. hp projector lamp installation Install the new lamp. Podržte tlačítko i po dobu 5 sekund, poté stiskněte tlač... 45 minut vychladnout. Žárovka obsahuje malé množství rtuti. See the projector manual.
HP vp6200 Series Digital Projector User's Guide
Page 3
... 23 Hide the Picture 23 Zoom / Focusing 23 Picture Mode 24 Slide Operation 24 Contents 3 Introduction 7 Projector Features 7 Shipping Contents 8 Accessories 9 Projector Exterior View 9 Front / Upper Side 9 Rear Side 9 Connector Panel 10 Controls and Functions 11 Projector 11 Remote Control 12 Aiming the Remote Control 13 Replacing the Battery in the Remote Control...
... 23 Hide the Picture 23 Zoom / Focusing 23 Picture Mode 24 Slide Operation 24 Contents 3 Introduction 7 Projector Features 7 Shipping Contents 8 Accessories 9 Projector Exterior View 9 Front / Upper Side 9 Rear Side 9 Connector Panel 10 Controls and Functions 11 Projector 11 Remote Control 12 Aiming the Remote Control 13 Replacing the Battery in the Remote Control...
HP vp6200 Series Digital Projector User's Guide
Page 4
... 40 Japan 40 Korea 40 International 40 4 Contents Maintenance 31 Care of the Projector 31 Cleaning the Lens 31 Cleaning the Projector Case 31 Storing the Projector 31 Transporting the projector 31 Lamp Information 32 Warning Messages 32 Replacing the Lamp 32 Indicators 34 Power ... Lamp indicator 34 Temperature indicator 34 Updating the firmware 34 7. Information Menu 30 6. Advanced Setup Menu 29 5. Specifications 36 Projector Specifications 36 Timing Chart 37 Supported Timing for PC Input 37 Supported Timing for Component-YPbPr Input 37 Supported Timing for Composite-...
... 40 Japan 40 Korea 40 International 40 4 Contents Maintenance 31 Care of the Projector 31 Cleaning the Lens 31 Cleaning the Projector Case 31 Storing the Projector 31 Transporting the projector 31 Lamp Information 32 Warning Messages 32 Replacing the Lamp 32 Indicators 34 Power ... Lamp indicator 34 Temperature indicator 34 Updating the firmware 34 7. Information Menu 30 6. Advanced Setup Menu 29 5. Specifications 36 Projector Specifications 36 Timing Chart 37 Supported Timing for PC Input 37 Supported Timing for Component-YPbPr Input 37 Supported Timing for Composite-...
HP vp6200 Series Digital Projector User's Guide
Page 5
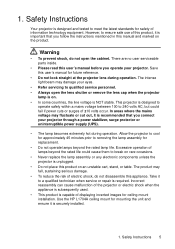
... Do not operate lamps beyond the rated life could fail if power cuts or surges of lamps beyond the rated lamp life. Use the HP L1704A ceiling mount for mounting the unit and ensure it is recommended that you follow the instructions mentioned in this product, it to a ...; The lamp becomes extremely hot during operation. Warning • To prevent shock, do not disassemble this user's manual before you connect your projector. Allow the projector to cool for approximately 45 minutes prior to ensure safe use of electric shock, do not open the lens shutter or remove the lens...
... Do not operate lamps beyond the rated life could fail if power cuts or surges of lamps beyond the rated lamp life. Use the HP L1704A ceiling mount for mounting the unit and ensure it is recommended that you follow the instructions mentioned in this product, it to a ...; The lamp becomes extremely hot during operation. Warning • To prevent shock, do not disassemble this user's manual before you connect your projector. Allow the projector to cool for approximately 45 minutes prior to ensure safe use of electric shock, do not open the lens shutter or remove the lens...
HP vp6200 Series Digital Projector User's Guide
Page 6
... a blanket, bedding or any other soft surface. - Allow at least 50 cm clearance from the power supply's wall socket and contact HP to have the projector serviced. 6 1. Locations where temperatures may result in accidents and possible injury. • Do not place liquids near the...during operation. • Do not stand the unit on end vertically. Safety Instructions Do not place this unit or place any of air around the projector. - Space that is poorly ventilated or confined. Locations where excessive humidity, dust, or cigarette smoke may cause it . • Do not ...
... a blanket, bedding or any other soft surface. - Allow at least 50 cm clearance from the power supply's wall socket and contact HP to have the projector serviced. 6 1. Locations where temperatures may result in accidents and possible injury. • Do not place liquids near the...during operation. • Do not stand the unit on end vertically. Safety Instructions Do not place this unit or place any of air around the projector. - Space that is poorly ventilated or confined. Locations where excessive humidity, dust, or cigarette smoke may cause it . • Do not ...
HP vp6200 Series Digital Projector User's Guide
Page 7
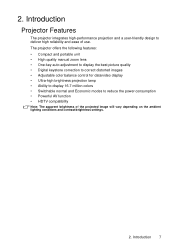
Introduction 7 The projector offers the following features: • Compact and portable unit • High quality manual zoom lens • One-key auto-adjustment to display the best picture quality • Digital keystone correction to correct distorted images • Adjustable color balance... ease of the projected image will vary depending on the ambient lighting conditions and contrast/brightness settings. 2. Introduction Projector Features The projector integrates high-performance projection and a user-friendly design to reduce the power consumption • Powerful AV function &#...
Introduction 7 The projector offers the following features: • Compact and portable unit • High quality manual zoom lens • One-key auto-adjustment to display the best picture quality • Digital keystone correction to correct distorted images • Adjustable color balance... ease of the projected image will vary depending on the ambient lighting conditions and contrast/brightness settings. 2. Introduction Projector Features The projector integrates high-performance projection and a user-friendly design to reduce the power consumption • Powerful AV function &#...
HP vp6200 Series Digital Projector User's Guide
Page 8
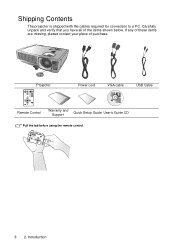
Projector Power cord VGA cable USB Cable Remote Control Warranty and Support Quick Setup Guide User's Guide CD Pull the tab before using the remote control. 8 2. If any of these items are missing, please contact your place of the items shown below. Carefully unpack and verify that you have all of purchase. Shipping Contents The projector is shipped with the cables required for connection to a PC. Introduction
Projector Power cord VGA cable USB Cable Remote Control Warranty and Support Quick Setup Guide User's Guide CD Pull the tab before using the remote control. 8 2. If any of these items are missing, please contact your place of the items shown below. Carefully unpack and verify that you have all of purchase. Shipping Contents The projector is shipped with the cables required for connection to a PC. Introduction
HP vp6200 Series Digital Projector User's Guide
Page 9
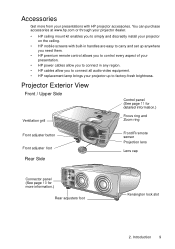
... allow you to simply and discreetly install your projector up to connect all audio-video equipment. • HP replacement lamp brings your projector on the ceiling. • HP mobile screens with HP projector accessories. You can purchase accessories at www.hp.com or through your projector dealer. • HP ceiling mount kit enables you to factory-fresh brightness. Introduction...
... allow you to simply and discreetly install your projector up to connect all audio-video equipment. • HP replacement lamp brings your projector on the ceiling. • HP mobile screens with HP projector accessories. You can purchase accessories at www.hp.com or through your projector dealer. • HP ceiling mount kit enables you to factory-fresh brightness. Introduction...
HP vp6200 Series Digital Projector User's Guide
Page 11
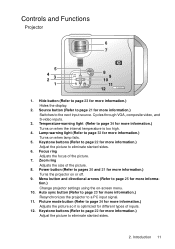
... or off. 9. Auto sync button (Refer to page 23 for more information.) Resynchronizes the projector to page 23 for more information.) Hides the display. 2. Controls and Functions Projector 6 7 5 4 23 1 8 9 10 11 12 1. Hide button (Refer to a PC input signal. 11. Source button (Refer to page 21 for ... for more information.) Adjusts the picture so it is too high. 4. Lamp-warning light (Refer to page 25 for more information.) Change projector settings using the on when lamp fails. 5. Menu button and directional arrows (Refer to page 32 for more information.) Turns on -screen menu. ...
... or off. 9. Auto sync button (Refer to page 23 for more information.) Resynchronizes the projector to page 23 for more information.) Hides the display. 2. Controls and Functions Projector 6 7 5 4 23 1 8 9 10 11 12 1. Hide button (Refer to a PC input signal. 11. Source button (Refer to page 21 for ... for more information.) Adjusts the picture so it is too high. 4. Lamp-warning light (Refer to page 25 for more information.) Change projector settings using the on when lamp fails. 5. Menu button and directional arrows (Refer to page 32 for more information.) Turns on -screen menu. ...
HP vp6200 Series Digital Projector User's Guide
Page 12
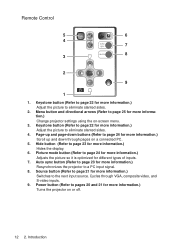
...more information.) Hides the display. 6. Cycles through pages on -screen menu. 3. Power button (Refer to page 24 for more information.) Turns the projector on or off. 12 2. Menu button and directional arrows (Refer to page 25 for more information.) Adjust the picture to a PC input signal.... 8. Hide button (Refer to page 23 for more information.) Resynchronizes the projector to eliminate slanted sides. 4. Introduction Auto sync button (Refer to page 24 for more information.) Adjusts the picture so it is optimized for...
...more information.) Hides the display. 6. Cycles through pages on -screen menu. 3. Power button (Refer to page 24 for more information.) Turns the projector on or off. 12 2. Menu button and directional arrows (Refer to page 25 for more information.) Adjust the picture to a PC input signal.... 8. Hide button (Refer to page 23 for more information.) Resynchronizes the projector to eliminate slanted sides. 4. Introduction Auto sync button (Refer to page 24 for more information.) Adjusts the picture so it is optimized for...
HP vp6200 Series Digital Projector User's Guide
Page 13
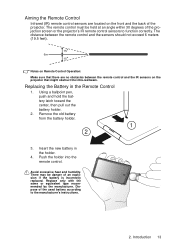
... sensors should not exceed 6 meters (19.5 feet). 6m Notes on Remote Control Operation: Make sure that there are located on the projector that might obstruct the infra-red beam. Using a ballpoint pen, push and hold the battery latch toward the center, then pull out... 3. Avoid excessive heat and humidity. The remote control must be danger of the projection screen or the projector's IR remote control sensors to the manufacturer's instructions. 2. Dispose of the projector. Aiming the Remote Control Infrared (IR) remote control sensors are no obstacles between the remote control and ...
... sensors should not exceed 6 meters (19.5 feet). 6m Notes on Remote Control Operation: Make sure that there are located on the projector that might obstruct the infra-red beam. Using a ballpoint pen, push and hold the battery latch toward the center, then pull out... 3. Avoid excessive heat and humidity. The remote control must be danger of the projection screen or the projector's IR remote control sensors to the manufacturer's instructions. 2. Dispose of the projector. Aiming the Remote Control Infrared (IR) remote control sensors are no obstacles between the remote control and ...
HP vp6200 Series Digital Projector User's Guide
Page 14
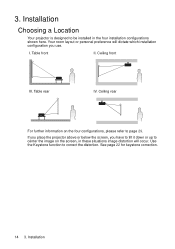
... the image on the four configurations, please refer to page 29. See page 22 for keystone correction. 14 3. Table front II. 3. If you place the projector above or below the screen, you use. Your room layout or personal preference will occur. Ceiling front III. Installation Installation Choosing a Location Your...
... the image on the four configurations, please refer to page 29. See page 22 for keystone correction. 14 3. Table front II. 3. If you place the projector above or below the screen, you use. Your room layout or personal preference will occur. Ceiling front III. Installation Installation Choosing a Location Your...
HP vp6200 Series Digital Projector User's Guide
Page 15
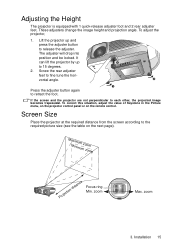
... each other, the projected image becomes trapezoidal. zoom Max. Adjusting the Height The projector is equipped with 1 quick-release adjuster foot and 2 rear adjuster feet. To adjust the projector, 1. Screen Size Place the projector at the required distance from the screen according to 15 degrees. 2. zoom 3.... These adjusters change the image height and projection angle. It can lift the projector by up and press the adjuster button to retract the foot. Press the adjuster button again to release the adjuster. To correct ...
... each other, the projected image becomes trapezoidal. zoom Max. Adjusting the Height The projector is equipped with 1 quick-release adjuster foot and 2 rear adjuster feet. To adjust the projector, 1. Screen Size Place the projector at the required distance from the screen according to 15 degrees. 2. zoom 3.... These adjusters change the image height and projection angle. It can lift the projector by up and press the adjuster button to retract the foot. Press the adjuster button again to release the adjuster. To correct ...
HP vp6200 Series Digital Projector User's Guide
Page 17
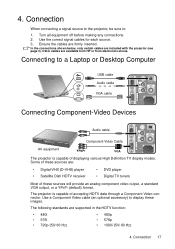
...data through a Component Video connector. Use the correct signal cables for each source. 3. Connecting to : 1. The following standards are available from HP or from electronics stores. Other cables are supported in the HDTV function: • 480i • 576i • 720p (50/ 60 Hz)... making any connections. 2. Ensure the cables are included with the projector (see page 8). Some of these sources are: • Digital-VHS (D-VHS) player • DVD player • Satellite Dish HDTV receiver • Digital TV tuners Most of displaying various High Definition TV display modes. ...
...data through a Component Video connector. Use the correct signal cables for each source. 3. Connecting to : 1. The following standards are available from HP or from electronics stores. Other cables are supported in the HDTV function: • 480i • 576i • 720p (50/ 60 Hz)... making any connections. 2. Ensure the cables are included with the projector (see page 8). Some of these sources are: • Digital-VHS (D-VHS) player • DVD player • Satellite Dish HDTV receiver • Digital TV tuners Most of displaying various High Definition TV display modes. ...
HP vp6200 Series Digital Projector User's Guide
Page 18
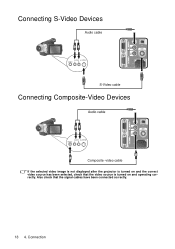
Connection Connecting S-Video Devices Audio cable S-Video cable Connecting Composite-Video Devices Audio cable Composite -video cable If the selected video image is not displayed after the projector is turned on and the correct video source has been selected, check that the signal cables have been connected correctly. 18 4. Also check that the video source is turned on and operating correctly.
Connection Connecting S-Video Devices Audio cable S-Video cable Connecting Composite-Video Devices Audio cable Composite -video cable If the selected video image is not displayed after the projector is turned on and the correct video source has been selected, check that the signal cables have been connected correctly. 18 4. Also check that the video source is turned on and operating correctly.
HP vp6200 Series Digital Projector User's Guide
Page 19
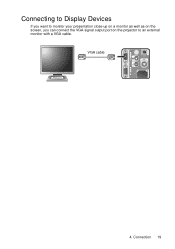
Connection 19 VGA cable 4. Connecting to Display Devices If you want to monitor your presentation close-up on a monitor as well as on the screen, you can connect the VGA signal output port on the projector to an external monitor with a VGA cable.
Connection 19 VGA cable 4. Connecting to Display Devices If you want to monitor your presentation close-up on a monitor as well as on the screen, you can connect the VGA signal output port on the projector to an external monitor with a VGA cable.
HP vp6200 Series Digital Projector User's Guide
Page 20
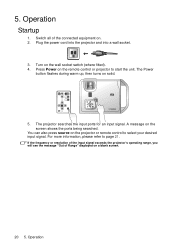
.... 2. You can also press source on the screen shows the ports being searched. Operation If the frequency or resolution of the input signal exceeds the projector's operating range, you will see the message "Out of the connected equipment on the wall socket switch (where fitted). 4. The Power button flashes during... warm up, then turns on a blank screen. 20 5. 5. A message on the projector or remote control to start the unit. Operation Startup 1. For more information, please refer to page 21.
.... 2. You can also press source on the screen shows the ports being searched. Operation If the frequency or resolution of the input signal exceeds the projector's operating range, you will see the message "Out of the connected equipment on the wall socket switch (where fitted). 4. The Power button flashes during... warm up, then turns on a blank screen. 20 5. 5. A message on the projector or remote control to start the unit. Operation Startup 1. For more information, please refer to page 21.
HP vp6200 Series Digital Projector User's Guide
Page 21
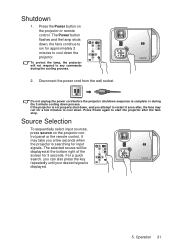
... or during the cooling process. 2. The selected source will not respond to restart it soon after the fans stop. Press Power again to start the projector after , the fans may take you attempt to any commands during the 2-minute cooling down , and you a few minutes to run for 3 seconds. ...Operation 21 Do not unplug the power cord before the projector shutdown sequence is not properly shut down process. It may run for input signals. The Power button flashes and the lamp shuts down the...
... or during the cooling process. 2. The selected source will not respond to restart it soon after the fans stop. Press Power again to start the projector after , the fans may take you attempt to any commands during the 2-minute cooling down , and you a few minutes to run for 3 seconds. ...Operation 21 Do not unplug the power cord before the projector shutdown sequence is not properly shut down process. It may run for input signals. The Power button flashes and the lamp shuts down the...
HP vp6200 Series Digital Projector User's Guide
Page 22
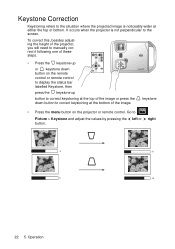
Go to Picture > Keystone and adjust the values by pressing the left or right button. 0 -6 0 +6 22 5. To correct this, besides adjusting the height of the projector, you will need to manually correct it following one of these steps. • Press the keystone up button to correct keystoning at the top of ... top or bottom. Operation Keystone Correction Keystoning refers to the situation where the projected image is not perpendicular to the screen. It occurs when the projector is noticeably wider at the bottom of the image or press the down button on the...
Go to Picture > Keystone and adjust the values by pressing the left or right button. 0 -6 0 +6 22 5. To correct this, besides adjusting the height of the projector, you will need to manually correct it following one of these steps. • Press the keystone up button to correct keystoning at the top of ... top or bottom. Operation Keystone Correction Keystoning refers to the situation where the projected image is not perpendicular to the screen. It occurs when the projector is noticeably wider at the bottom of the image or press the down button on the...
HP vp6200 Series Digital Projector User's Guide
Page 23
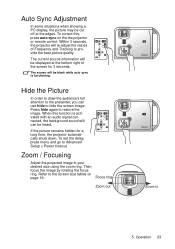
...ring. If the picture remains hidden for 3 seconds. The current source information will re-adjust the values of the screen for a long time, the projector automatically shuts down. When this , press auto sync on page 16. To set the delay, press menu and go to the presenter, you can ...PC display, the picture may be cut off at the bottom right of Frequency and Tracking to provide the best picture quality. Within 3 seconds, the projector will be displayed at the edges. Operation 23 Hide the Picture In order to draw the audience's full attention to Advanced Setup > Power timeout. ...
...ring. If the picture remains hidden for 3 seconds. The current source information will re-adjust the values of the screen for a long time, the projector automatically shuts down. When this , press auto sync on page 16. To set the delay, press menu and go to the presenter, you can ...PC display, the picture may be cut off at the bottom right of Frequency and Tracking to provide the best picture quality. Within 3 seconds, the projector will be displayed at the edges. Operation 23 Hide the Picture In order to draw the audience's full attention to Advanced Setup > Power timeout. ...


