User Manual
Page 2
...6 1.2 Package Contents 6 1.3 Product Overview 7 2 Getting Started 8 2.1 Inserting the Memory Card 8 2.2 Installing in Vehicles 9 2.2.1 Mount to Windshield 9 2.2.2 Adjust the device position 10 2.3 Connecting to Power 11 2.4 Powering the Camcorder On / Off 12 2.4.1 Auto Power On/Off 12 2.4.2 Manual Power On/Off 12 2.5 Initial Settings 13 2.5.1 Set Automatic Recording 13 2.5.2 Set the Date and Time 13 3 Using the Car Recorder 14 3.1 Recording Videos 14 3.1.1 Record videos while driving 14 3.1.2 Driver Fatigue Alert Function 14 3.1.3 Manual Video Recording 15 1
...6 1.2 Package Contents 6 1.3 Product Overview 7 2 Getting Started 8 2.1 Inserting the Memory Card 8 2.2 Installing in Vehicles 9 2.2.1 Mount to Windshield 9 2.2.2 Adjust the device position 10 2.3 Connecting to Power 11 2.4 Powering the Camcorder On / Off 12 2.4.1 Auto Power On/Off 12 2.4.2 Manual Power On/Off 12 2.5 Initial Settings 13 2.5.1 Set Automatic Recording 13 2.5.2 Set the Date and Time 13 3 Using the Car Recorder 14 3.1 Recording Videos 14 3.1.1 Record videos while driving 14 3.1.2 Driver Fatigue Alert Function 14 3.1.3 Manual Video Recording 15 1
User Manual
Page 3
3.1.4 3.1.5 3.1.6 Emergency Recording 15 The Recording Screen 16 Taking Photographs 17 3.2 Playback Videos and Photos 18 3.2.1 Playing Videos 19 3.2.2 Viewing Photos 19 3.2.3 The Playback Screen 20 3.2.4 Deleting Files 21 4 Adjusting the Settings 22 4.1 Using the Menu 22 4.2 Menu Tree 23 5 Specifications 26 2
3.1.4 3.1.5 3.1.6 Emergency Recording 15 The Recording Screen 16 Taking Photographs 17 3.2 Playback Videos and Photos 18 3.2.1 Playing Videos 19 3.2.2 Viewing Photos 19 3.2.3 The Playback Screen 20 3.2.4 Deleting Files 21 4 Adjusting the Settings 22 4.1 Using the Menu 22 4.2 Menu Tree 23 5 Specifications 26 2
User Manual
Page 4
... Electronic Equipment and/or Battery by handling it is recycled in accordance with Part 15 of the following two conditions: (1) This device may have occurred. Operation is subject to ensure that interference will help . You must accept any errors and omissions that may cause undesired operation. For more of the FCC Rules. About this Guide The content in...
... Electronic Equipment and/or Battery by handling it is recycled in accordance with Part 15 of the following two conditions: (1) This device may have occurred. Operation is subject to ensure that interference will help . You must accept any errors and omissions that may cause undesired operation. For more of the FCC Rules. About this Guide The content in...

User Manual
Page 5
... power consumption of electrical and electronic household and office equipment, and the Directive 2009/125/EC of the European parliament and of the council establishing a framework for the setting of the Council with regard to obtain the best open-field view. Do not install the device on Installation 1. Make sure that the lens is not hindered by the tinted window. 4 Clean...
... power consumption of electrical and electronic household and office equipment, and the Directive 2009/125/EC of the European parliament and of the council establishing a framework for the setting of the Council with regard to obtain the best open-field view. Do not install the device on Installation 1. Make sure that the lens is not hindered by the tinted window. 4 Clean...

User Manual
Page 6
... loss of this product. Doing so may damage the camcorder, cause electric shock and void your product warranty. Never short-circuit the battery. Exposing the camcorder to open flames can cause explosion. Due to the above statements. 5 Caution Use the authorized charger only. Never disassemble or attempt repair of any data/content during operation.
... loss of this product. Doing so may damage the camcorder, cause electric shock and void your product warranty. Never short-circuit the battery. Exposing the camcorder to open flames can cause explosion. Due to the above statements. 5 Caution Use the authorized charger only. Never disassemble or attempt repair of any data/content during operation.

User Manual
Page 7
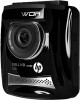
This device is specifically designed for real time video and audio recording when driving. 1.1 Features Full HD camera (1920x1080 @ 30fps) 2.4" LCD color screen Up to 130 degree Wide angle lens Motion detection Automatic Emergency recording for collision detection Supports micro-SDHC up to 32GB (Class 6 or greater speed required for purchasing this advanced Car Camcorder. Car Recorder USB cable Bracket Quick start guide Car adapter 6 1 Introduction Thank you...
This device is specifically designed for real time video and audio recording when driving. 1.1 Features Full HD camera (1920x1080 @ 30fps) 2.4" LCD color screen Up to 130 degree Wide angle lens Motion detection Automatic Emergency recording for collision detection Supports micro-SDHC up to 32GB (Class 6 or greater speed required for purchasing this advanced Car Camcorder. Car Recorder USB cable Bracket Quick start guide Car adapter 6 1 Introduction Thank you...

User Manual
Page 8
Item 1 Bracket Socket 2 Microphone 3 Power Button 4 Memory Card Slot 5 USB Connector 6 HD(Mini HDMI) Connector 7 Back Button ( ) No. Item 8 LCD Panel 9 Up Button ( ) 10 Down Button ( ) 11 Enter Button ( ) 12 Wide Angle Lens 13 Speaker Note: To operate the Camcorder, press the corresponding buttons (7, 9,10,11) below the desired according to guide icons shown the screen. 7 1.3 Product Overview Top and Bottom Views 1 2 Side (Left and Right) Views 7 3 5 12 4 6 Front View 8 9 10 11 Rear View 13 No.
Item 1 Bracket Socket 2 Microphone 3 Power Button 4 Memory Card Slot 5 USB Connector 6 HD(Mini HDMI) Connector 7 Back Button ( ) No. Item 8 LCD Panel 9 Up Button ( ) 10 Down Button ( ) 11 Enter Button ( ) 12 Wide Angle Lens 13 Speaker Note: To operate the Camcorder, press the corresponding buttons (7, 9,10,11) below the desired according to guide icons shown the screen. 7 1.3 Product Overview Top and Bottom Views 1 2 Side (Left and Right) Views 7 3 5 12 4 6 Front View 8 9 10 11 Rear View 13 No.

User Manual
Page 12
... , the camcorder will automatically will power up and begin recording in battery. 1. The orange LED lights up the device and charge the built-in 3 or 5 minute loop intervals. Connect one end of the car adapter to camcorder, but it may not charge the battery. Plug the other end of the car charger to power up while the battery is not a malfunction. 11 Note: 1. 2.3 Connecting to Power Use only the...
... , the camcorder will automatically will power up and begin recording in battery. 1. The orange LED lights up the device and charge the built-in 3 or 5 minute loop intervals. Connect one end of the car adapter to camcorder, but it may not charge the battery. Plug the other end of the car charger to power up while the battery is not a malfunction. 11 Note: 1. 2.3 Connecting to Power Use only the...
User Manual
Page 13
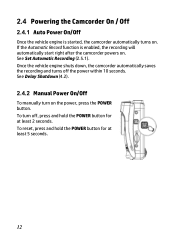
See Set Automatic Recording (2.5.1). If the Automatic Record function is started, the camcorder automatically turns on. To turn on the power, press the POWER button. To reset, press and hold the POWER button for at least 2 seconds. See Delay Shutdown (4.2). 2.4.2 Manual Power On/Off To manually turn off the power within 10 seconds. Once the vehicle engine shuts down, the camcorder automatically saves the recording and turns off , press and hold the POWER button for...
See Set Automatic Recording (2.5.1). If the Automatic Record function is started, the camcorder automatically turns on. To turn on the power, press the POWER button. To reset, press and hold the POWER button for at least 2 seconds. See Delay Shutdown (4.2). 2.4.2 Manual Power On/Off To manually turn off the power within 10 seconds. Once the vehicle engine shuts down, the camcorder automatically saves the recording and turns off , press and hold the POWER button for...
User Manual
Page 14
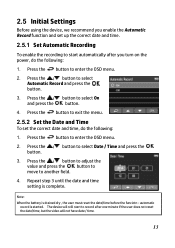
... date and time. 2.5.1 Set Automatic Recording To enable the recording to start to record after you turn on the power, do the following : 1. Note: When the battery is drained dry , the user must reset the date/time before the funciotn - Press the button to select Date / Time and press the button. 3. Press the / button to enter the OSD menu. 2. 2.5 Initial Settings Before using the device, we recommend you enable the Automatic Record function and set...
... date and time. 2.5.1 Set Automatic Recording To enable the recording to start to record after you turn on the power, do the following : 1. Note: When the battery is drained dry , the user must reset the date/time before the funciotn - Press the button to select Date / Time and press the button. 3. Press the / button to enter the OSD menu. 2. 2.5 Initial Settings Before using the device, we recommend you enable the Automatic Record function and set...
User Manual
Page 15
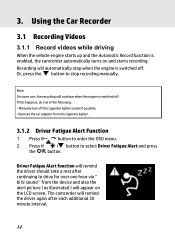
... menu. 2. Remove the car adapter from the device and also the alert picture ( as illustrated ) will appear on and starts recording. The camcorder will remind the driver should take a rest after each additional 30 minute interval. 14 Driver Fatigue Alert function will remind the driver again after continuing to stop when the engine is enabled, the camcorder automatically turns on the LCD screen. Manually turn off . Using the Car Recorder 3.1 Recording Videos 3.1.1 Record videos...
... menu. 2. Remove the car adapter from the device and also the alert picture ( as illustrated ) will appear on and starts recording. The camcorder will remind the driver should take a rest after each additional 30 minute interval. 14 Driver Fatigue Alert function will remind the driver again after continuing to stop when the engine is enabled, the camcorder automatically turns on the LCD screen. Manually turn off . Using the Car Recorder 3.1 Recording Videos 3.1.1 Record videos...
User Manual
Page 16
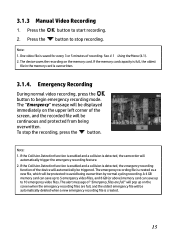
... file will be displayed immediately on the memory card. If the Collision Detection function is enabled and a collision is detected, the camcorder will be protected to stop the recording, press the button. If the Collision Detection function is enabled and a collision is created. 15 Press the button to begin emergency recording mode. One video file is saved for every 3 or 5 minutes of the device will be automatically deleted...
... file will be displayed immediately on the memory card. If the Collision Detection function is enabled and a collision is detected, the camcorder will be protected to stop the recording, press the button. If the Collision Detection function is enabled and a collision is created. 15 Press the button to begin emergency recording mode. One video file is saved for every 3 or 5 minutes of the device will be automatically deleted...
User Manual
Page 17
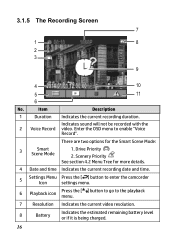
Indicates sound will not be recorded with the 2 Voice Record video. Drive Priority 2. Scenery Priority See section 4.2 Menu Tree for the Smart Scene Mode: 3 Smart Scene Mode 1. 3.1.5 The Recording Screen 7 1 8 2 3 9 4 10 5 11 6 No. There are two options for more details. 4 Date and time Indicates the current recording date and time. 5 Settings Menu Press the [ ] button to enter the camcorder Icon settings menu. 6 Playback icon Press the [ menu. ] button to go to enable "Voice Record". Item Description...
Indicates sound will not be recorded with the 2 Voice Record video. Drive Priority 2. Scenery Priority See section 4.2 Menu Tree for the Smart Scene Mode: 3 Smart Scene Mode 1. 3.1.5 The Recording Screen 7 1 8 2 3 9 4 10 5 11 6 No. There are two options for more details. 4 Date and time Indicates the current recording date and time. 5 Settings Menu Press the [ ] button to enter the camcorder Icon settings menu. 6 Playback icon Press the [ menu. ] button to go to enable "Voice Record". Item Description...
User Manual
Page 18
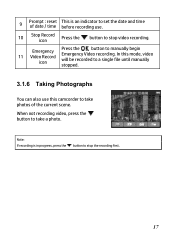
... button to stop video recording. 11 Emergency Video Record icon Press the button to manually begin Emergency Video recording. Note: If recording is an indicator to set the date and time of the current scene. In this mode, video will be recorded to a single file until manually stopped. 3.1.6 Taking Photographs You can also use this camcorder to stop the recording first. 17 When not recording video, press the button to take photos of date / time before recording use. 10 Stop Record icon Press the button...
... button to stop video recording. 11 Emergency Video Record icon Press the button to manually begin Emergency Video recording. Note: If recording is an indicator to set the date and time of the current scene. In this mode, video will be recorded to a single file until manually stopped. 3.1.6 Taking Photographs You can also use this camcorder to stop the recording first. 17 When not recording video, press the button to take photos of date / time before recording use. 10 Stop Record icon Press the button...

User Manual
Page 19
If recording is in full screen. button. The last 18 Press the button to stop recording. 2. button to enter the OSD menu. 3. Note: From the standby screen, you want to view the file in progress, press the The standby screen is displayed on the screen. Press the / button to view the next or the previous file and press the button to browse and press the button. 4. Press the / button to select the file category that you can directly enter Playback mode by pressing recorded video is displayed. 3.2 Playback Videos and Photos 1.
If recording is in full screen. button. The last 18 Press the button to stop recording. 2. button to enter the OSD menu. 3. Note: From the standby screen, you want to view the file in progress, press the The standby screen is displayed on the screen. Press the / button to view the next or the previous file and press the button to browse and press the button. 4. Press the / button to select the file category that you can directly enter Playback mode by pressing recorded video is displayed. 3.2 Playback Videos and Photos 1.

User Manual
Page 20
... the button. 5. 3.2.1 Playing Videos To play the video. 6. Press the / button to select File Playback and press the button. 4. Press the / button to select File Playback and press the button. 4. Press the / button to select Picture and press the button. 5. Press the / button to browse for the desired photo file and press the button to enter the OSD menu. 3. If recording is in progress, press the button to stop recording. 2. Press the button to view the file in...
... the button. 5. 3.2.1 Playing Videos To play the video. 6. Press the / button to select File Playback and press the button. 4. Press the / button to select File Playback and press the button. 4. Press the / button to select Picture and press the button. 5. Press the / button to browse for the desired photo file and press the button to enter the OSD menu. 3. If recording is in progress, press the button to stop recording. 2. Press the button to view the file in...

User Manual
Page 21
3.2.3 The Playback Screen Video Playback Screen 1 7 6 Photo Playback Screen 7 2 3 4 5 2 3 4 No. Item Description 1 Date and time Indicates the recorded date and time. 2 Guide icon Press the (Back) display. button to return to file selection 3 Guide icon Press the button to view the previous (Previous) video/photo. 4 Guide icon (Next) Press the button to view the next video/photo. 5 Guide icon (Pause) Press the button to pause the video playback. 6 Duration Indicates the elapse time. 7 Battery Indicates the estimated remaining battery level. 20
3.2.3 The Playback Screen Video Playback Screen 1 7 6 Photo Playback Screen 7 2 3 4 5 2 3 4 No. Item Description 1 Date and time Indicates the recorded date and time. 2 Guide icon Press the (Back) display. button to return to file selection 3 Guide icon Press the button to view the previous (Previous) video/photo. 4 Guide icon (Next) Press the button to view the next video/photo. 5 Guide icon (Pause) Press the button to pause the video playback. 6 Duration Indicates the elapse time. 7 Battery Indicates the estimated remaining battery level. 20
User Manual
Page 23
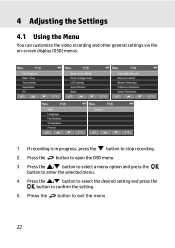
Press the button to enter the selected menu. 4. Press the / button to select a menu option and press the button to open the OSD menu. 3. 4 Adjusting the Settings 4.1 Using the Menu You can customize the video recording and other general settings via the on-screen display (OSD) menus. 1. Press the / button to select the desired setting and press the button to stop recording. 2. If recording is in progress, press the button to confirm the setting. 5. Press the button to exit the menu. 22
Press the button to enter the selected menu. 4. Press the / button to select a menu option and press the button to open the OSD menu. 3. 4 Adjusting the Settings 4.1 Using the Menu You can customize the video recording and other general settings via the on-screen display (OSD) menus. 1. Press the / button to select the desired setting and press the button to stop recording. 2. If recording is in progress, press the button to confirm the setting. 5. Press the button to exit the menu. 22
User Manual
Page 24
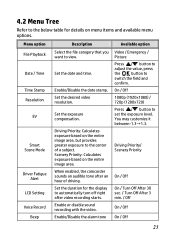
... view. You may customize it between-1.3~+1.3. Menu option Description Available option File Playback Date / Time Time Stamp Resolution EV Smart Scene Mode Driver Fatigue Alert LCD Setting Voice Record Beep Select the file category that you want to the center of driving. When enabled, the camcorder sounds an audible tone after video recording starts. Set the duration for details on the entire image area. Driving Priority/ Scenery Priority On / Off On / Turn...
... view. You may customize it between-1.3~+1.3. Menu option Description Available option File Playback Date / Time Time Stamp Resolution EV Smart Scene Mode Driver Fatigue Alert LCD Setting Voice Record Beep Select the file category that you want to the center of driving. When enabled, the camcorder sounds an audible tone after video recording starts. Set the duration for details on the entire image area. Driving Priority/ Scenery Priority On / Off On / Turn...
User Manual
Page 25
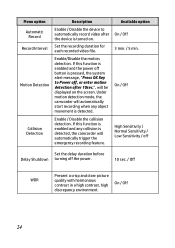
... automatically trigger the emergency recording feature. Under motion detection mode, the camcorder will automatically start recording when any collision is detected, the camcorder will be displayed on . Enable / Disable the collision detection. Set the recording duration for each recorded video file. On / Off 24 Menu option Automatic Record Record Interval Motion Detection Collision Detection Description Enable / Disable the device to Power off, or enter motion detection after the device is turned on the screen.
... automatically trigger the emergency recording feature. Under motion detection mode, the camcorder will automatically start recording when any collision is detected, the camcorder will be displayed on . Enable / Disable the collision detection. Set the recording duration for each recorded video file. On / Off 24 Menu option Automatic Record Record Interval Motion Detection Collision Detection Description Enable / Disable the device to Power off, or enter motion detection after the device is turned on the screen.


