
Safety and Regulatory Information Desktops, Thin Clients, and Personal Workstations
Page 29
... requirement in SJ/T11363-2006. Table 2-2 Toxic and Hazardous Substances and Elements (continued) Part Name Lead (Pb) Mercury (Hg) Cadmium (Cd) Hexavalent Chromium (Cr(VI)) Memory X O O O I/O PCAs X O O O Power supply X O O O Keyboard X O O O Mouse X O O O Chassis/Other X O O O Fans X O O O Internal/External Media Reading X O O O Devices External Control Devices X O O O Cable X O O O Hard Disk Drive X O O O Display X X O O Polybrominated biphenyls (PBB) Polybrominated...
... requirement in SJ/T11363-2006. Table 2-2 Toxic and Hazardous Substances and Elements (continued) Part Name Lead (Pb) Mercury (Hg) Cadmium (Cd) Hexavalent Chromium (Cr(VI)) Memory X O O O I/O PCAs X O O O Power supply X O O O Keyboard X O O O Mouse X O O O Chassis/Other X O O O Fans X O O O Internal/External Media Reading X O O O Devices External Control Devices X O O O Cable X O O O Hard Disk Drive X O O O Display X X O O Polybrominated biphenyls (PBB) Polybrominated...
HP Client Manager 6.1
Page 3
... classes of information that you can perform the following types of computers. Manage HP ProtectTools enabled clients: Identify and inventory HP client computers that our customers have specified, such as new or missing PCs, memory, battery, disk drives, CPUs, and monitors. For example, you specify. Note...change the BIOS settings, such as the Storage Options or the Boot Order, as the chassis serial number, computer model number, memory size, operating system, CPU identification, and many more secure client infrastructure. You can also monitor the status of these events occurs...
... classes of information that you can perform the following types of computers. Manage HP ProtectTools enabled clients: Identify and inventory HP client computers that our customers have specified, such as new or missing PCs, memory, battery, disk drives, CPUs, and monitors. For example, you specify. Note...change the BIOS settings, such as the Storage Options or the Boot Order, as the chassis serial number, computer model number, memory size, operating system, CPU identification, and many more secure client infrastructure. You can also monitor the status of these events occurs...
HP Client Manager 6.1
Page 4
...etc. • Improved BIOS Settings Wizard lets you can be displayed locally on newer desktops and workstations (notebooks coming soon) 4 Point-and-click to keep the HP tool components (e.g. These capabilities make it works, you are currently available via F10 Setup on computer ...customizable reporting tools so you remotely set of test results. - Information collected includes manufacturer, OS, language, processor, memory, and free disk space. • HP Tool Update Wizard provides an easy method to select and download SoftPaqs. Figure 2. Furthermore, HPCM provides a rich ...
...etc. • Improved BIOS Settings Wizard lets you can be displayed locally on newer desktops and workstations (notebooks coming soon) 4 Point-and-click to keep the HP tool components (e.g. These capabilities make it works, you are currently available via F10 Setup on computer ...customizable reporting tools so you remotely set of test results. - Information collected includes manufacturer, OS, language, processor, memory, and free disk space. • HP Tool Update Wizard provides an easy method to select and download SoftPaqs. Figure 2. Furthermore, HPCM provides a rich ...
HP Client Manager 6.1
Page 8
Sample Health Monitoring display Note: The number of health events that can be monitored varies by alerting you to memory changes, disk drive changes, or CPU changes. Figure 5. You can select the threshold values for free disk space and battery charge level. The health monitoring ...
Sample Health Monitoring display Note: The number of health events that can be monitored varies by alerting you to memory changes, disk drive changes, or CPU changes. Figure 5. You can select the threshold values for free disk space and battery charge level. The health monitoring ...
HP Client Manager 6.1
Page 9
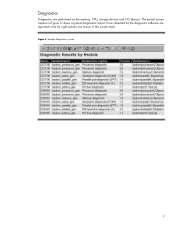
Sample Diagnostics screen 9 Figure 6. Errors detected by the diagnostic software are performed on the memory, CPU, storage devices and I/O devices. Diagnostics Diagnostics are reported in the far right column (not shown in Figure 6 shows a typical diagnostics report. The partial screen capture in this screen shot).
Sample Diagnostics screen 9 Figure 6. Errors detected by the diagnostic software are performed on the memory, CPU, storage devices and I/O devices. Diagnostics Diagnostics are reported in the far right column (not shown in Figure 6 shows a typical diagnostics report. The partial screen capture in this screen shot).

hp workstations xw4000 - hardware reference guide
Page 3
... Installation Sequence 2-1 Smart Cover Lock 2-2 Using the Smart Cover FailSafe Key 2-2 Removing the Computer Access Panel 2-4 Removing the Front Bezel 2-5 Removing Bezel Blanks 2-6 Installing Additional Memory 2-7 Memory Module Installation 2-8 Installing or Removing an Expansion Card 2-10 Removing an Expansion Slot Cover 2-10 Removing or Installing an Expansion Card 2-11 Hardware Reference Guide...
... Installation Sequence 2-1 Smart Cover Lock 2-2 Using the Smart Cover FailSafe Key 2-2 Removing the Computer Access Panel 2-4 Removing the Front Bezel 2-5 Removing Bezel Blanks 2-6 Installing Additional Memory 2-7 Memory Module Installation 2-8 Installing or Removing an Expansion Card 2-10 Removing an Expansion Slot Cover 2-10 Removing or Installing an Expansion Card 2-11 Hardware Reference Guide...

hp workstations xw4000 - hardware reference guide
Page 25
... the preinstalled DIMM with a higher capacity DIMM. Ä CAUTION: Some models support ECC memory and some support non-ECC memory. For those systems that do support ECC, HP does not support mixing ECC and non-ECC memory. In addition, the system will be a short beep followed by two long beeps. Also..., x16 (double-sided) and x4 DIMMs are populated with industry-standard DDR DIMMs. These memory module slots are not supported. ...
... the preinstalled DIMM with a higher capacity DIMM. Ä CAUTION: Some models support ECC memory and some support non-ECC memory. For those systems that do support ECC, HP does not support mixing ECC and non-ECC memory. In addition, the system will be a short beep followed by two long beeps. Also..., x16 (double-sided) and x4 DIMMs are populated with industry-standard DDR DIMMs. These memory module slots are not supported. ...

hp workstations xw4000 - hardware reference guide
Page 26
...procedures, ensure that you have gold metal contacts. See Appendix E, "Electrostatic Discharge," for more information. Ä CAUTION: When handling a memory module, be careful not to touch any external devices, then disconnect the power cord from the power outlet. 3. Doing so may damage the...internal system components to cool before touching. 2-8 Hardware Reference Guide Hardware Upgrades Memory Module Installation Ä CAUTION: Your memory module sockets have locked the Smart Cover Lock, use memory modules with gold metal contacts to prevent corrosion and/or oxidation resulting from...
...procedures, ensure that you have gold metal contacts. See Appendix E, "Electrostatic Discharge," for more information. Ä CAUTION: When handling a memory module, be careful not to touch any external devices, then disconnect the power cord from the power outlet. 3. Doing so may damage the...internal system components to cool before touching. 2-8 Hardware Reference Guide Hardware Upgrades Memory Module Installation Ä CAUTION: Your memory module sockets have locked the Smart Cover Lock, use memory modules with gold metal contacts to prevent corrosion and/or oxidation resulting from...

hp workstations xw4000 - hardware reference guide
Page 27
... notch on the module with the tab on the computer. Repeat steps 4 to 6 to relock the lock and enable the Smart Cover Sensor. A memory module can be installed in only one way. Hardware Reference Guide 2-9 Installing a DIMM 5. Push the module down into the socket 2. If you turn... Begin by installing a module into the socket nearest the preinstalled module and install the modules following the numerical order of the memory module socket 1 and insert the memory module into the socket, ensuring that the module is fully inserted and properly seated and then secure the latches 3. 7.
... notch on the module with the tab on the computer. Repeat steps 4 to 6 to relock the lock and enable the Smart Cover Sensor. A memory module can be installed in only one way. Hardware Reference Guide 2-9 Installing a DIMM 5. Push the module down into the socket 2. If you turn... Begin by installing a module into the socket nearest the preinstalled module and install the modules following the numerical order of the memory module socket 1 and insert the memory module into the socket, ensuring that the module is fully inserted and properly seated and then secure the latches 3. 7.

hp workstations xw4000 - hardware reference guide
Page 63
... Keyboard 1-4 Keyboard 1-4 Rear Panel 1-3, 1-11 computer access panel removing 2-4 computer care F-1 Configuration desktop 1-8 minitower 1-11 Configuration Features 1-1 D DDR (double data rate memory) 2-7 DDR DIMMs installing 2-7 Drive positions 2-13 DVD-ROM 2-15 E Easy Access Keyboard 1-4 Index electrostatic discharge E-1 F front bezel removing 2-5 H hard drive installation... drives 2-14 an expansion card 2-11 CD-ROM 2-15 K keyboard 1-4 Easy Access Keyboard Buttons 1-6 Windows Logo Key 1-5 M memory DDR 2-7 DIMMs 2-9 illustration 2-9 metric screws 2-14 Hardware Reference Guide Index-1
... Keyboard 1-4 Keyboard 1-4 Rear Panel 1-3, 1-11 computer access panel removing 2-4 computer care F-1 Configuration desktop 1-8 minitower 1-11 Configuration Features 1-1 D DDR (double data rate memory) 2-7 DDR DIMMs installing 2-7 Drive positions 2-13 DVD-ROM 2-15 E Easy Access Keyboard 1-4 Index electrostatic discharge E-1 F front bezel removing 2-5 H hard drive installation... drives 2-14 an expansion card 2-11 CD-ROM 2-15 K keyboard 1-4 Easy Access Keyboard Buttons 1-6 Windows Logo Key 1-5 M memory DDR 2-7 DIMMs 2-9 illustration 2-9 metric screws 2-14 Hardware Reference Guide Index-1


