

Wireless Setup Guide
Page 3
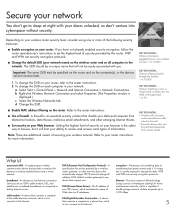
... wireless button and light varies by opening your router is temporarily connected to AC power during the router setup, contact your or WPA-PSK. Location of the network and to Disable, WEP, through 5, or contact your router manufacturer for technical assistance. 6 Test the Internet connection by model. 3 Connect the wireless router according to the manufacturer's instructions. (During this information in green) Wireless Router Cable Modem Network connections with router Ethernet cable...
... wireless button and light varies by opening your router is temporarily connected to AC power during the router setup, contact your or WPA-PSK. Location of the network and to Disable, WEP, through 5, or contact your router manufacturer for technical assistance. 6 Test the Internet connection by model. 3 Connect the wireless router according to the manufacturer's instructions. (During this information in green) Wireless Router Cable Modem Network connections with router Ethernet cable...
Wireless Setup Guide
Page 5
... each computer in the network. Chance of securing your network: a Select Start > Control Panel > Network and Internet Connection > Network Connections. Refer to the router instructions. ■ Use a firewall. cable modem-A device that connects a computer to the cable television network, which is displayed.) c Select the Wireless Networks tab. encryption-The process of data at night with you have not already enabled security encryption, follow the router manufacturer's instructions to access and receive some router...
... each computer in the network. Chance of securing your network: a Select Start > Control Panel > Network and Internet Connection > Network Connections. Refer to the router instructions. ■ Use a firewall. cable modem-A device that connects a computer to the cable television network, which is displayed.) c Select the Wireless Networks tab. encryption-The process of data at night with you have not already enabled security encryption, follow the router manufacturer's instructions to access and receive some router...
Wireless Setup Guide
Page 7
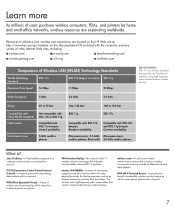
...-A fixed address assigned to communicate among 802.11 products. wireless LAN (WLAN)-A system of connecting computers and other features. Learn more As millions of users purchase wireless computers, PDAs, and printers for home and small-office networks, wireless resources are located on the HP Web site at http://www.hp.com/go/wireless, on number-sequence encryption. WEP (Wired Equivalent Privacy)-A type of wireless security...
...-A fixed address assigned to communicate among 802.11 products. wireless LAN (WLAN)-A system of connecting computers and other features. Learn more As millions of users purchase wireless computers, PDAs, and printers for home and small-office networks, wireless resources are located on the HP Web site at http://www.hp.com/go/wireless, on number-sequence encryption. WEP (Wired Equivalent Privacy)-A type of wireless security...
Compaq Presario V6000 Notebook PC Maintenance and Service Guide
Page 15
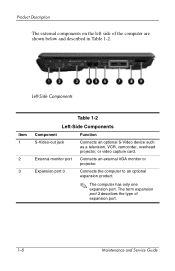
... expansion port 3 describes the type of the computer are shown below and described in Table 1-2. Product Description The external components on the left side of expansion port. 1-8 Maintenance and Service Guide Expansion port 3 Connects the computer to an optional expansion product. ✎ The computer has only one expansion port. Left-Side Components Item 1 2 3 Table 1-2 Left-Side Components Component Function S-Video-out jack Connects an optional S-Video device such...
... expansion port 3 describes the type of the computer are shown below and described in Table 1-2. Product Description The external components on the left side of expansion port. 1-8 Maintenance and Service Guide Expansion port 3 Connects the computer to an optional expansion product. ✎ The computer has only one expansion port. Left-Side Components Item 1 2 3 Table 1-2 Left-Side Components Component Function S-Video-out jack Connects an optional S-Video device such...

Compaq Presario V6000 Notebook PC Maintenance and Service Guide
Page 20
... the cursor around the screen. Maintenance and Service Guide 1-13 Windows logo key Displays the Microsoft Windows Start menu. Embedded numeric keypad keys Can be used system functions when pressed in combination with a function key or the esc key. fn key Executes frequently used like the keys on an external numeric keypad. Windows applications key Displays a shortcut menu for items beneath the pointer. caps lock key Enables caps lock and turns on the num lock light. num lock key Enables numeric lock, turns on the embedded...
... the cursor around the screen. Maintenance and Service Guide 1-13 Windows logo key Displays the Microsoft Windows Start menu. Embedded numeric keypad keys Can be used system functions when pressed in combination with a function key or the esc key. fn key Executes frequently used like the keys on an external numeric keypad. Windows applications key Displays a shortcut menu for items beneath the pointer. caps lock key Enables caps lock and turns on the num lock light. num lock key Enables numeric lock, turns on the embedded...

Compaq Presario V6000 Notebook PC Maintenance and Service Guide
Page 29
...; Audio ■ Display ■ ExpressCard ■ Fan ■ Hard drive ■ Intel Core Duo and Celeron processors ■ Keyboard and TouchPad ■ Memory module ■ Mini Card module Ä CAUTION: To properly ventilate the computer, allow at least a 7.6-cm (3-inch) clearance on the left and right sides of the computer. The fan is controlled by high external temperatures, system power consumption, power management/battery conservation configurations, battery fast charging, and software. Exhaust...
...; Audio ■ Display ■ ExpressCard ■ Fan ■ Hard drive ■ Intel Core Duo and Celeron processors ■ Keyboard and TouchPad ■ Memory module ■ Mini Card module Ä CAUTION: To properly ventilate the computer, allow at least a 7.6-cm (3-inch) clearance on the left and right sides of the computer. The fan is controlled by high external temperatures, system power consumption, power management/battery conservation configurations, battery fast charging, and software. Exhaust...

Compaq Presario V6000 Notebook PC Maintenance and Service Guide
Page 33
Troubleshooting Using Advanced Setup Utility Features This guide describes the Setup Utility features recommended for boot order preferences. For more information about the Setup Utility features recommended for a Network Service Boot. Then use the f10 procedure, you press enter. 2-4 Maintenance and Service Guide When you use the arrow keys to the menu display. or - ❏ If the Setup Utility menus are offered an option to return to the Help and Support Center, which is accessible only when the computer is...
Troubleshooting Using Advanced Setup Utility Features This guide describes the Setup Utility features recommended for boot order preferences. For more information about the Setup Utility features recommended for a Network Service Boot. Then use the f10 procedure, you press enter. 2-4 Maintenance and Service Guide When you use the arrow keys to the menu display. or - ❏ If the Setup Utility menus are offered an option to return to the Help and Support Center, which is accessible only when the computer is...

Compaq Presario V6000 Notebook PC Maintenance and Service Guide
Page 39
...; Your password, security, and language settings are not changed when you restore the factory default settings. The Setup Utility features available for advanced users include a hard drive self-test, a Network Service Boot, and settings for advanced users only, refer to restore the Setup Utility default settings. When the Setup Confirmation is displayed, press enter to boot from LAN" message that is displayed in Windows. The " to save your preferences and exit the Setup Utility, press f10, and then follow the instructions on...
...; Your password, security, and language settings are not changed when you restore the factory default settings. The Setup Utility features available for advanced users include a hard drive self-test, a Network Service Boot, and settings for advanced users only, refer to restore the Setup Utility default settings. When the Setup Confirmation is displayed, press enter to boot from LAN" message that is displayed in Windows. The " to save your preferences and exit the Setup Utility, press f10, and then follow the instructions on...

Compaq Presario V6000 Notebook PC Maintenance and Service Guide
Page 58
... Setup utility? OS loading? N N Boot from diskette drive. Y Go to OS loading? Y Replace the following components Nonsystem disk error? Maintenance and Service Guide 2-29 individually, retesting after each replacement: N ■ Diskette drive ■ System board Y Reset the computer. Go to "Flowchart 2.17-Nonfunctioning Device." Done Section 1.2, "Resetting the N Computer," for system files. Check diskette for instructions. Y Reseat diskette drive. Done N Y Nonsystem disk message? Install bootable diskette and reboot computer. Enable drive and cold boot...
... Setup utility? OS loading? N N Boot from diskette drive. Y Go to OS loading? Y Replace the following components Nonsystem disk error? Maintenance and Service Guide 2-29 individually, retesting after each replacement: N ■ Diskette drive ■ System board Y Reset the computer. Go to "Flowchart 2.17-Nonfunctioning Device." Done Section 1.2, "Resetting the N Computer," for system files. Check diskette for instructions. Y Reseat diskette drive. Done N Y Nonsystem disk message? Install bootable diskette and reboot computer. Enable drive and cold boot...

Compaq Presario V6000 Notebook PC Maintenance and Service Guide
Page 118
... lock board Keyboard 3 Maintenance and Service Guide 5-3 Then contact technical support by the governmental agency that regulates wireless devices in your country or region. Optical Drive 1 to remove the optical drive 2 to remove the optical drive bracket Switch Cover 2 to remove the switch cover 1 to restore computer functionality. Section 5.3 5.4 5.5 5.6 5.7 5.8 5.9 5.10 5.11 Disassembly Sequence Chart Description # of Screws Removed Preparing the Computer For Disassembly Battery 0 Hard Drive 2 loosened to remove the hard drive cover 6 removed to disassemble the hard...
... lock board Keyboard 3 Maintenance and Service Guide 5-3 Then contact technical support by the governmental agency that regulates wireless devices in your country or region. Optical Drive 1 to remove the optical drive 2 to remove the optical drive bracket Switch Cover 2 to remove the switch cover 1 to restore computer functionality. Section 5.3 5.4 5.5 5.6 5.7 5.8 5.9 5.10 5.11 Disassembly Sequence Chart Description # of Screws Removed Preparing the Computer For Disassembly Battery 0 Hard Drive 2 loosened to remove the hard drive cover 6 removed to disassemble the hard...

Compaq Presario V6000 Notebook PC Maintenance and Service Guide
Page 240
If the driver is not listed, it does not need to the factory image but cannot restore your personal settings. Select Start > All Programs > Recovery Manager > Recovery Manager. Recovery Manager opens. b. b. Reinstall the program or driver: a. d. e. Restart the computer if prompted. Select Start > Control Panel > Programs > Uninstall a program. c. Click either Software program re-installation or Hardware driver re-installation, and then click Next. Insert the disc into the optical drive. 2. C-6 Maintenance and Service Guide Follow the on the screen. 3. When...
If the driver is not listed, it does not need to the factory image but cannot restore your personal settings. Select Start > All Programs > Recovery Manager > Recovery Manager. Recovery Manager opens. b. b. Reinstall the program or driver: a. d. e. Restart the computer if prompted. Select Start > Control Panel > Programs > Uninstall a program. c. Click either Software program re-installation or Hardware driver re-installation, and then click Next. Insert the disc into the optical drive. 2. C-6 Maintenance and Service Guide Follow the on the screen. 3. When...

Compaq Presario V6000 Notebook PC Maintenance and Service Guide
Page 271
...inverter removal 5-37 spare part number 3-21, 3-36, 5-37 K keyboard removal 5-25 spare part numbers 3-3, 3-5, 3-41, 5-25 troubleshooting 2-34 keyboard components 1-12 keypad keys 1-13 L left-side components 1-8 Logo Kit, spare part number 3-27, 3-37 M mass storage devices, spare part numbers 3-23 media button 1-17 memory module removal 5-11 spare part numbers 3-20, 3-36, 3-39, 5-11 memory module compartment 1-21 memory module compartment cover illustrated 3-25 removal 5-12 Memory Reader 1-9 microphone location 1-15 removal 5-41 spare part number 3-22, 3-36, 5-41 Maintenance and Service Guide...
...inverter removal 5-37 spare part number 3-21, 3-36, 5-37 K keyboard removal 5-25 spare part numbers 3-3, 3-5, 3-41, 5-25 troubleshooting 2-34 keyboard components 1-12 keypad keys 1-13 L left-side components 1-8 Logo Kit, spare part number 3-27, 3-37 M mass storage devices, spare part numbers 3-23 media button 1-17 memory module removal 5-11 spare part numbers 3-20, 3-36, 3-39, 5-11 memory module compartment 1-21 memory module compartment cover illustrated 3-25 removal 5-12 Memory Reader 1-9 microphone location 1-15 removal 5-41 spare part number 3-22, 3-36, 5-41 Maintenance and Service Guide...

Compaq Presario V6000 Notebook PC Maintenance and Service Guide
Page 273
... part number 3-37 S Screw Kit, spare part numbers 3-29, 3-37, 3-40 screw listing A-1 security cable slot 1-11 serial number 3-1, 5-2 service considerations 4-2 Setup Utility 2-1 speakers 1-15 specifications battery 6-7 computer 6-1 display 6-3 DVD/CD-RW Combo Drive 6-8 DVD±RW/R and CD-RW Combo Drive 6-10 hard drive 6-4 I/O addresses 6-15 interrupts 6-13 optical drive 6-8 system DMA 6-12 static shielding materials 4-8 S-Video-out jack location 1-8 pin assignments D-3 switch cover removal 5-22 spare part numbers 3-3, 3-37, 5-22 system board removal 5-57 Maintenance and Service Guide Index...
... part number 3-37 S Screw Kit, spare part numbers 3-29, 3-37, 3-40 screw listing A-1 security cable slot 1-11 serial number 3-1, 5-2 service considerations 4-2 Setup Utility 2-1 speakers 1-15 specifications battery 6-7 computer 6-1 display 6-3 DVD/CD-RW Combo Drive 6-8 DVD±RW/R and CD-RW Combo Drive 6-10 hard drive 6-4 I/O addresses 6-15 interrupts 6-13 optical drive 6-8 system DMA 6-12 static shielding materials 4-8 S-Video-out jack location 1-8 pin assignments D-3 switch cover removal 5-22 spare part numbers 3-3, 3-37, 5-22 system board removal 5-57 Maintenance and Service Guide Index...
Drives - Windows XP
Page 9
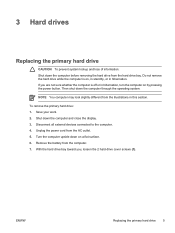
... close the display. 3. Shut down the computer through the operating system. Remove the battery from the AC outlet. 5. Do not remove the hard drive while the computer is off or in hibernation. Save your work. 2. If you , loosen the 2 hard drive cover screws (1). Unplug the power cord from the computer. 7. ENWW Replacing the primary hard drive 5 Disconnect all external devices connected to the computer. 4. With the hard drive bay toward...
... close the display. 3. Shut down the computer through the operating system. Remove the battery from the AC outlet. 5. Do not remove the hard drive while the computer is off or in hibernation. Save your work. 2. If you , loosen the 2 hard drive cover screws (1). Unplug the power cord from the computer. 7. ENWW Replacing the primary hard drive 5 Disconnect all external devices connected to the computer. 4. With the hard drive bay toward...
Drives - Windows XP
Page 19
Index A airport security devices 1 C CD inserting 10 removing, with power 11 removing, without power 12 CD drive 9 D drive light 3 drives caring for 1 drive light 3 hard 5, 6 optical 9 secondary hard 7 See also hard drive, optical drive DVD inserting 10 removing, with power 11 removing, without power 12 DVD drive 9 O optical disc inserting 10 removing, with power 11 removing, without power 12 optical drive 9 S secondary hard drive 7 standby 13 H hard disk drive installing 6 removing 5 replacing 5 hard drive installing 6 removing 5 replacing 5 hibernation 13 L light, drive 3 ENWW Index 15
Index A airport security devices 1 C CD inserting 10 removing, with power 11 removing, without power 12 CD drive 9 D drive light 3 drives caring for 1 drive light 3 hard 5, 6 optical 9 secondary hard 7 See also hard drive, optical drive DVD inserting 10 removing, with power 11 removing, without power 12 DVD drive 9 O optical disc inserting 10 removing, with power 11 removing, without power 12 optical drive 9 S secondary hard drive 7 standby 13 H hard disk drive installing 6 removing 5 replacing 5 hard drive installing 6 removing 5 replacing 5 hibernation 13 L light, drive 3 ENWW Index 15
Bluetooth for Windows XP
Page 7
... light, select computer models include Wireless Assistant software that allows you can be enabled and turned on . To turn off , or disabled. Click Turn Bluetooth on : ▲ Place the cursor over the Wireless Assistant icon in the notification area. 2. During the initial configuration, you to your computer documentation for the location of the wireless button. Refer to turn on and turn on , the Bluetooth device must be used to enable the Bluetooth device...
... light, select computer models include Wireless Assistant software that allows you can be enabled and turned on . To turn off , or disabled. Click Turn Bluetooth on : ▲ Place the cursor over the Wireless Assistant icon in the notification area. 2. During the initial configuration, you to your computer documentation for the location of the wireless button. Refer to turn on and turn on , the Bluetooth device must be used to enable the Bluetooth device...
Drives - Windows XP
Page 12
... safely delete to free up disk space and help the computer to defragment, usually listed as (C:), and then click Defragment. For additional information, access the Disk Defragmenter online Help. Select Start > All Programs > Accessories > System Tools > Disk Cleanup. 2. 4 Improving hard drive performance Using Disk Defragmenter As you use the computer, files on -screen instructions. 8 Chapter 4 Improving hard drive performance ENWW To run Disk Defragmenter: 1. To run Disk Cleanup: 1. Select Start...
... safely delete to free up disk space and help the computer to defragment, usually listed as (C:), and then click Defragment. For additional information, access the Disk Defragmenter online Help. Select Start > All Programs > Accessories > System Tools > Disk Cleanup. 2. 4 Improving hard drive performance Using Disk Defragmenter As you use the computer, files on -screen instructions. 8 Chapter 4 Improving hard drive performance ENWW To run Disk Defragmenter: 1. To run Disk Cleanup: 1. Select Start...

Multimedia
Page 12
... video capture card. To transmit video signals through the S-Video-out jack, you need a standard audio cable, available from most electronics retailers, to connect to the computer. 8 Chapter 1 Using multimedia hardware ENWW NOTE If the S-Video-out jack on the computer is not accessible because the computer is docked in the user guide included with the device. 3. NOTE The S-Video connection provides a higher quality image than a composite-video connection. Plug one S-Video device connected...
... video capture card. To transmit video signals through the S-Video-out jack, you need a standard audio cable, available from most electronics retailers, to connect to the computer. 8 Chapter 1 Using multimedia hardware ENWW NOTE If the S-Video-out jack on the computer is not accessible because the computer is docked in the user guide included with the device. 3. NOTE The S-Video connection provides a higher quality image than a composite-video connection. Plug one S-Video device connected...
Multimedia
Page 27
... hotkeys 16 Media button 5 microphones, supported 3 monitor, connecting 7 multimedia software described 19 using 20 mute button 2, 4 O optical disc inserting 13 removing, with power 14 removing, without power 15 writing to 19 optical drive playing 21 protecting 19 P ports external monitor 7 programs multimedia 19 using 20 projector, connecting 7 protecting playback 21 Q QuickPlay 5 QuickPlay buttons 5 R region codes, DVD 22 S S-Video-out jack 8 S/PDIF digital audio 3 software multimedia 19 using 20 speakers 1 T TV 3 V VCR 3 volume mute button 2, 4 volume scroll zone 2, 4 volume, adjusting...
... hotkeys 16 Media button 5 microphones, supported 3 monitor, connecting 7 multimedia software described 19 using 20 mute button 2, 4 O optical disc inserting 13 removing, with power 14 removing, without power 15 writing to 19 optical drive playing 21 protecting 19 P ports external monitor 7 programs multimedia 19 using 20 projector, connecting 7 protecting playback 21 Q QuickPlay 5 QuickPlay buttons 5 R region codes, DVD 22 S S-Video-out jack 8 S/PDIF digital audio 3 software multimedia 19 using 20 speakers 1 T TV 3 V VCR 3 volume mute button 2, 4 volume scroll zone 2, 4 volume, adjusting...
Troubleshooting
Page 10
... a wireless network: 1. a. b. Select Start > HP Info Center > HP Wireless Assistant. ● Be sure that the wireless hardware is properly installed by ensuring there is displayed in the lower-left corner of the screen. NOTE If the wireless button is not working. Drivers may not be available on the device as expected: ● Turn on a CD included with your operating system. If an external device does not function as instructed in the device user guide. b. An external device is...
... a wireless network: 1. a. b. Select Start > HP Info Center > HP Wireless Assistant. ● Be sure that the wireless hardware is properly installed by ensuring there is displayed in the lower-left corner of the screen. NOTE If the wireless button is not working. Drivers may not be available on the device as expected: ● Turn on a CD included with your operating system. If an external device does not function as instructed in the device user guide. b. An external device is...


