
Limited Warranty and Support Guide
Page 12
...be heavy; WARNING: To reduce the risk of decimal (base 10) capacity. The grounding plug is an important safety feature. • Plug the power cord in the User Guides folder. be sure to the Regulatory and Safety Information document in a grounded (earthed) outlet that is as FDISK, use ...window because it shows information about one gigabyte is located on the Web at http://www.hp.com/ergo 10 Because of electrical shock or damage to your equipment: • Do not disable the power cord grounding plug. WARNING: To reduce the risk of the different measuring systems, you may see...
...be heavy; WARNING: To reduce the risk of decimal (base 10) capacity. The grounding plug is an important safety feature. • Plug the power cord in the User Guides folder. be sure to the Regulatory and Safety Information document in a grounded (earthed) outlet that is as FDISK, use ...window because it shows information about one gigabyte is located on the Web at http://www.hp.com/ergo 10 Because of electrical shock or damage to your equipment: • Do not disable the power cord grounding plug. WARNING: To reduce the risk of the different measuring systems, you may see...

Limited Warranty and Support Guide - Refurbished
Page 13
...Safety & Comfort Guide. The grounding plug is an important safety feature. • Plug the power cord in the User Guides folder. WARNING: To reduce the risk of the CD or DVD drives...exposure to laser beam, do not try to your equipment: • Do not disable the power cord grounding plug. be heavy; Safety Information For more information, refer to use ergonomically correct lifting ... outlet that is located on the Web at all times. • Disconnect power from the equipment by unplugging the power cord from the electrical outlet. Click the Start button, All Programs, and then ...
...Safety & Comfort Guide. The grounding plug is an important safety feature. • Plug the power cord in the User Guides folder. WARNING: To reduce the risk of the CD or DVD drives...exposure to laser beam, do not try to your equipment: • Do not disable the power cord grounding plug. be heavy; Safety Information For more information, refer to use ergonomically correct lifting ... outlet that is located on the Web at all times. • Disconnect power from the equipment by unplugging the power cord from the electrical outlet. Click the Start button, All Programs, and then ...
Upgrading and Servicing
Page 4
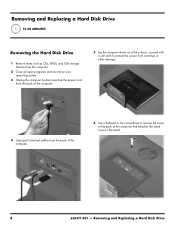
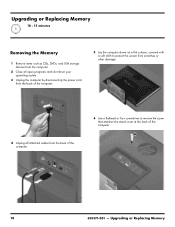
... CDs, DVDs, and USB storage devices from the computer. 2 Close all open programs and shut down your operating system. 3 Unplug the computer by disconnecting the power cord from the back of the computer. 5 Lay the computer down on a flat surface, covered with a soft cloth to protect the screen from scratches or other...
... CDs, DVDs, and USB storage devices from the computer. 2 Close all open programs and shut down your operating system. 3 Unplug the computer by disconnecting the power cord from the back of the computer. 5 Lay the computer down on a flat surface, covered with a soft cloth to protect the screen from scratches or other...

Upgrading and Servicing
Page 8
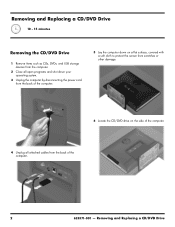
Removing and Replacing a CD/DVD Drive 10 Place the computer in an upright position. 12 Plug the power cord into the back of the computer. 11 Reconnect all the cables. 13 Press the power button to turn on the computer. 6 628371-001 -
Removing and Replacing a CD/DVD Drive 10 Place the computer in an upright position. 12 Plug the power cord into the back of the computer. 11 Reconnect all the cables. 13 Press the power button to turn on the computer. 6 628371-001 -
Upgrading and Servicing
Page 10
... CDs, DVDs, and USB storage devices from the computer. 2 Close all open programs and shut down your operating system. 3 Unplug the computer by disconnecting the power cord from the back of the computer. 5 Lay the computer down on a flat surface, covered with a soft cloth to protect the screen from scratches or other...
... CDs, DVDs, and USB storage devices from the computer. 2 Close all open programs and shut down your operating system. 3 Unplug the computer by disconnecting the power cord from the back of the computer. 5 Lay the computer down on a flat surface, covered with a soft cloth to protect the screen from scratches or other...
Upgrading and Servicing
Page 13
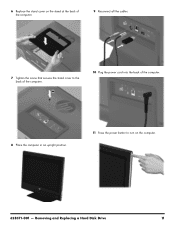
Removing and Replacing a Hard Disk Drive 11 6 Replace the stand cover on the stand at the back of the computer. 9 Reconnect all the cables. 7 Tighten the screw that secures the stand cover to the back of the computer. 10 Plug the power cord into the back of the computer. 8 Place the computer in an upright position. 11 Press the power button to turn on the computer. 628371-001 -
Removing and Replacing a Hard Disk Drive 11 6 Replace the stand cover on the stand at the back of the computer. 9 Reconnect all the cables. 7 Tighten the screw that secures the stand cover to the back of the computer. 10 Plug the power cord into the back of the computer. 8 Place the computer in an upright position. 11 Press the power button to turn on the computer. 628371-001 -
Upgrading and Servicing
Page 16
... CDs, DVDs, and USB storage devices from the computer. 2 Close all open programs and shut down your operating system. 3 Unplug the computer by disconnecting the power cord from the back of the computer. 5 Lay the computer down on a flat surface, covered with a soft cloth to protect the screen from scratches or other...
... CDs, DVDs, and USB storage devices from the computer. 2 Close all open programs and shut down your operating system. 3 Unplug the computer by disconnecting the power cord from the back of the computer. 5 Lay the computer down on a flat surface, covered with a soft cloth to protect the screen from scratches or other...
Upgrading and Servicing
Page 23
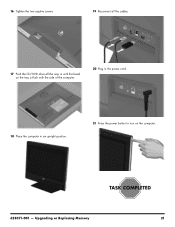
16 Tighten the two captive screws. 19 Reconnect all the cables. 17 Push the CD/DVD drive all the way in until the bezel on the tray is flush with the side of the computer. 20 Plug in the power cord. 18 Place the computer in an upright position. 21 Press the power button to turn on the computer. 628371-001 - Upgrading or Replacing Memory 21
16 Tighten the two captive screws. 19 Reconnect all the cables. 17 Push the CD/DVD drive all the way in until the bezel on the tray is flush with the side of the computer. 20 Plug in the power cord. 18 Place the computer in an upright position. 21 Press the power button to turn on the computer. 628371-001 - Upgrading or Replacing Memory 21

Upgrading and Servicing
Page 24
To install it into the compartment and then push down on it to snap it correctly, make sure the memory card is firmly seated. Upgrading or Replacing Memory Troubleshooting If the computer displays a memory error after you have turned it back on, turn the computer off and unplug the power cord, then open up the memory compartment and make sure it inserted all the way into place. 22 628371-001 -
To install it into the compartment and then push down on it to snap it correctly, make sure the memory card is firmly seated. Upgrading or Replacing Memory Troubleshooting If the computer displays a memory error after you have turned it back on, turn the computer off and unplug the power cord, then open up the memory compartment and make sure it inserted all the way into place. 22 628371-001 -

Upgrading and Servicing
Page 25
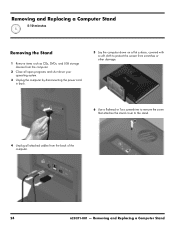
.... Removing and replacing a Computer Stand HP TouchSmart310 Computer features may damage your computer. Avoid touching sharp edges inside the computer. CAUTION: Static electricity can damage the electronic components inside the computer. Discharge static electricity by model. WARNING: Never open the cover with the power cord attached or power applied. Tools Needed ...
.... Removing and replacing a Computer Stand HP TouchSmart310 Computer features may damage your computer. Avoid touching sharp edges inside the computer. CAUTION: Static electricity can damage the electronic components inside the computer. Discharge static electricity by model. WARNING: Never open the cover with the power cord attached or power applied. Tools Needed ...
Upgrading and Servicing
Page 26
... CDs, DVDs, and USB storage devices from the computer. 2 Close all open programs and shut down your operating system. 3 Unplug the computer by disconnecting the power cord in back. 5 Lay the computer down on a flat surface, covered with a soft cloth to protect the screen from scratches or other damage. 6 Use a flathead or...
... CDs, DVDs, and USB storage devices from the computer. 2 Close all open programs and shut down your operating system. 3 Unplug the computer by disconnecting the power cord in back. 5 Lay the computer down on a flat surface, covered with a soft cloth to protect the screen from scratches or other damage. 6 Use a flathead or...

Upgrading and Servicing
Page 29
Copyright © 2010 Hewlett-Packard Development Company, L.P. Part Number: 628371-001 9 Plug in the power cord. 10 Press the power button to change without notice. The information contained herein is subject to turn on the computer.
Copyright © 2010 Hewlett-Packard Development Company, L.P. Part Number: 628371-001 9 Plug in the power cord. 10 Press the power button to change without notice. The information contained herein is subject to turn on the computer.
Getting Started Guide
Page 9
...your computer is located on the web at all power cords from the electrical outlet. To reduce the risk of Microsoft Windows. 1. Find out what operating system and version your computer. The grounding plug is easily accessible at http://www.hp.com/ergo. 2 Setting up your equipment: ... location away from water, dust, moisture, and soot. Connect all times. • Disconnect power from the equipment by unplugging the power cord from the monitor, computer, and accessories to http://www.hp.com/support. The computer may be sure to your computer NOTE: Some features might not be...
...your computer is located on the web at all power cords from the electrical outlet. To reduce the risk of Microsoft Windows. 1. Find out what operating system and version your computer. The grounding plug is easily accessible at http://www.hp.com/ergo. 2 Setting up your equipment: ... location away from water, dust, moisture, and soot. Connect all times. • Disconnect power from the equipment by unplugging the power cord from the monitor, computer, and accessories to http://www.hp.com/support. The computer may be sure to your computer NOTE: Some features might not be...

Getting Started Guide
Page 18
... audio is enabled and that the volume is set appropriately. If you want to enter the on . Ensure that you connected powered (active) speakers and that they are connected to your computer, and then unplug and reconnect the speakers. Internet access Symptom Possible...button to connect analog speakers. Ensure that the speakers are used for multiple-channel speakers.) Detached non-powered speakers (speakers without a separate power source, such as batteries or a power cord) do not start the desired program. 12 Chapter 3 Troubleshooting and maintenance ENWW Speakers and sound ...
... audio is enabled and that the volume is set appropriately. If you want to enter the on . Ensure that you connected powered (active) speakers and that they are connected to your computer, and then unplug and reconnect the speakers. Internet access Symptom Possible...button to connect analog speakers. Ensure that the speakers are used for multiple-channel speakers.) Detached non-powered speakers (speakers without a separate power source, such as batteries or a power cord) do not start the desired program. 12 Chapter 3 Troubleshooting and maintenance ENWW Speakers and sound ...
Getting Started Guide
Page 6
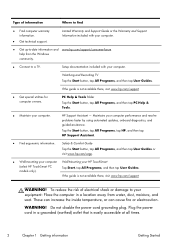
...temperature, or can cause fire or electrocution. Plug the power cord in a location away from the Windows community. ● Connect to find ● Find computer warranty information. ● Get technical support. Maintains your HP TouchSmart (select HP TouchSmart PC models only). Safety & Comfort Guide Tap the...tap All Programs, and then tap User Guides. HP Support Assistant - Tap the Start button, tap All Programs, tap HP, and then tap HP Support Assistant. ● Find ergonomic information. Do not disable the power cord grounding plug. Type of electrical shock or damage to...
...temperature, or can cause fire or electrocution. Plug the power cord in a location away from the Windows community. ● Connect to find ● Find computer warranty information. ● Get technical support. Maintains your HP TouchSmart (select HP TouchSmart PC models only). Safety & Comfort Guide Tap the...tap All Programs, and then tap User Guides. HP Support Assistant - Tap the Start button, tap All Programs, tap HP, and then tap HP Support Assistant. ● Find ergonomic information. Do not disable the power cord grounding plug. Type of electrical shock or damage to...
Getting Started Guide
Page 7
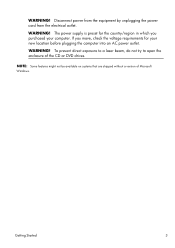
WARNING! NOTE: Some features might not be available on systems that are shipped without a version of the CD or DVD drives. To prevent direct exposure to a laser beam, do not try to open the enclosure of Microsoft Windows. Getting Started 3 Disconnect power from the equipment by unplugging the power cord from the electrical outlet. If you move, check the voltage requirements for the country/region in which you purchased your new location before plugging the computer into an AC power outlet. WARNING! WARNING! The power supply is preset for your computer.
WARNING! NOTE: Some features might not be available on systems that are shipped without a version of the CD or DVD drives. To prevent direct exposure to a laser beam, do not try to open the enclosure of Microsoft Windows. Getting Started 3 Disconnect power from the equipment by unplugging the power cord from the electrical outlet. If you move, check the voltage requirements for the country/region in which you purchased your new location before plugging the computer into an AC power outlet. WARNING! WARNING! The power supply is preset for your computer.
Getting Started Guide
Page 9
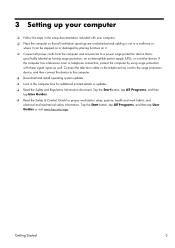
...habits, and electrical and mechanical safety information. Getting Started 5 Tap the Start button, tap All Programs, and then tap User Guides or visit www.hp.com/ergo. Tap the Start button, tap All Programs, and then tap User Guides. ❑ Read the Safety & Comfort Guide for additional ... and cabling is not in a walkway or where it can be stepped on or damaged by placing furniture on it. ❑ Connect all power cords from the computer and accessories to the computer. ❑ Download and install operating system updates. ❑ Look in the setup documentation included with...
...habits, and electrical and mechanical safety information. Getting Started 5 Tap the Start button, tap All Programs, and then tap User Guides or visit www.hp.com/ergo. Tap the Start button, tap All Programs, and then tap User Guides. ❑ Read the Safety & Comfort Guide for additional ... and cabling is not in a walkway or where it can be stepped on or damaged by placing furniture on it. ❑ Connect all power cords from the computer and accessories to the computer. ❑ Download and install operating system updates. ❑ Look in the setup documentation included with...
Getting Started Guide
Page 10
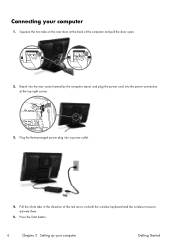
Connecting your computer Getting Started Plug the three-pronged power plug into the power connection at the back of the red arrow on the rear door at the top right corner. Reach into the rear cavity framed by the computer stand, and plug the power cord into a power outlet. 4. Sub IR out in the direction of the computer and pull the door open. 2. Press the Start button. 6 Chapter 3 Setting up your computer 1. Pull the white tabs in LAN 3. Squeeze the two tabs on both the wireless keyboard and the wireless mouse to activate them. 5.
Connecting your computer Getting Started Plug the three-pronged power plug into the power connection at the back of the red arrow on the rear door at the top right corner. Reach into the rear cavity framed by the computer stand, and plug the power cord into a power outlet. 4. Sub IR out in the direction of the computer and pull the door open. 2. Press the Start button. 6 Chapter 3 Setting up your computer 1. Pull the white tabs in LAN 3. Squeeze the two tabs on both the wireless keyboard and the wireless mouse to activate them. 5.

Getting Started Guide
Page 25
... to the Audio Out connector on . Log in computer speakers, use My Display TouchSmart Edition to ensure that the speakers are used for multiple-channel speakers.) Detached nonpowered speakers (speakers without a separate power source, such as headphones or external speakers) is very low or unsatisfactory. Replace...and that they are muted. Ensure that the volume is set appropriately. When an Audio Line Out connector (such as batteries or a power cord) do not start the desired program. To resume from Sleep mode, press the Sleep button (select models only), or press Esc. ...
... to the Audio Out connector on . Log in computer speakers, use My Display TouchSmart Edition to ensure that the speakers are used for multiple-channel speakers.) Detached nonpowered speakers (speakers without a separate power source, such as headphones or external speakers) is very low or unsatisfactory. Replace...and that they are muted. Ensure that the volume is set appropriately. When an Audio Line Out connector (such as batteries or a power cord) do not start the desired program. To resume from Sleep mode, press the Sleep button (select models only), or press Esc. ...
Getting Started Guide
Page 33
Wipe the body of the touch screen. Rinse the roller ball with isopropyl (rubbing) alcohol. 4. Disconnect the power cord from the wall. 3. CAUTION: Do not spray or place the cleaner directly on page 26. see Microsoft System Restore on the screen; Getting Started ... that could cause damage to clean the touch screen. 4. Cleaning the keyboard and mouse When cleaning the keyboard keys, use a low setting on a battery-powered vacuum cleaner, to remove the ring and release the roller ball. 2. Turn the mouse upside down, and rotate the ball-cover ring counterclockwise to avoid...
Wipe the body of the touch screen. Rinse the roller ball with isopropyl (rubbing) alcohol. 4. Disconnect the power cord from the wall. 3. CAUTION: Do not spray or place the cleaner directly on page 26. see Microsoft System Restore on the screen; Getting Started ... that could cause damage to clean the touch screen. 4. Cleaning the keyboard and mouse When cleaning the keyboard keys, use a low setting on a battery-powered vacuum cleaner, to remove the ring and release the roller ball. 2. Turn the mouse upside down, and rotate the ball-cover ring counterclockwise to avoid...


