Start Here
Page 3
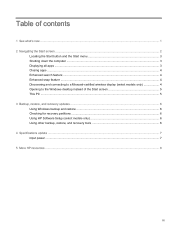
... new ...1 2 Navigating the Start screen ...2 Locating the Start button and the Start menu 3 Shutting down the computer ...3 Displaying all apps ...3 Closing apps ...4 Enhanced search feature ...4 Enhanced snap feature ...4 Discovering and connecting to a Miracast-certified wireless display (select models only 4 Opening to the Windows desktop instead of the Start screen 5 This PC ...5 3 Backup, restore, and recovery updates ...6 Using Windows backup and restore ...6 Checking for recovery partitions ...6 Using HP Software Setup (select models only 6 Using other backup, restore, and recovery...
... new ...1 2 Navigating the Start screen ...2 Locating the Start button and the Start menu 3 Shutting down the computer ...3 Displaying all apps ...3 Closing apps ...4 Enhanced search feature ...4 Enhanced snap feature ...4 Discovering and connecting to a Miracast-certified wireless display (select models only 4 Opening to the Windows desktop instead of the Start screen 5 This PC ...5 3 Backup, restore, and recovery updates ...6 Using Windows backup and restore ...6 Checking for recovery partitions ...6 Using HP Software Setup (select models only 6 Using other backup, restore, and recovery...

Start Here
Page 7
... instructions below to the lower-left corner of the Start screen, and then click the arrow. IMPORTANT: To quickly return to the Start screen, press the Windows key on your keyboard, or point to charms, and then click Settings. Locating the Start button and the Start menu The Start button is displayed in the lowerleft corner to frequently used options, including File Explorer, Control Panel, Desktop, Power Options, and Shut down . 2. The Start menu offers quick access to display...
... instructions below to the lower-left corner of the Start screen, and then click the arrow. IMPORTANT: To quickly return to the Start screen, press the Windows key on your keyboard, or point to charms, and then click Settings. Locating the Start button and the Start menu The Start button is displayed in the lowerleft corner to frequently used options, including File Explorer, Control Panel, Desktop, Power Options, and Shut down . 2. The Start menu offers quick access to display...
Start Here
Page 10
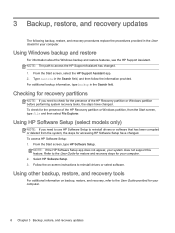
... HP Software Setup. 3. From the Start screen, select the HP Support Assistant app. 2. Checking for recovery partitions NOTE: If you need to reinstall drivers or software that has been corrupted or deleted from the Start screen, type file and then select File Explorer. 3 Backup, restore, and recovery updates The following backup, restore, and recovery procedures replace the procedures provided in the User Guide for your system does not support this feature. Using Windows backup and restore For information about the Windows backup...
... HP Software Setup. 3. From the Start screen, select the HP Support Assistant app. 2. Checking for recovery partitions NOTE: If you need to reinstall drivers or software that has been corrupted or deleted from the Start screen, type file and then select File Explorer. 3 Backup, restore, and recovery updates The following backup, restore, and recovery procedures replace the procedures provided in the User Guide for your system does not support this feature. Using Windows backup and restore For information about the Windows backup...
HP Split 13 x2 PC Maintenance and Service Guide
Page 25
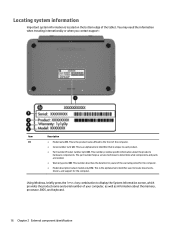
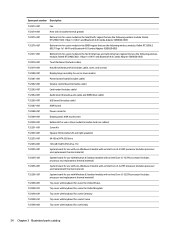
... is an alphanumeric identifier that is the alphanumeric identifier used to locate documents, drivers, and support for the computer. ● Model description (select models only) (5). This number provides specific information about the memory, processor, BIOS, and keyboard. 16 Chapter 2 External component identification The part number helps a service technician to each product. ● Part number/Product number (p/n) (3). This is unique to determine what components and parts are needed. ● Warranty period (4).
... is an alphanumeric identifier that is the alphanumeric identifier used to locate documents, drivers, and support for the computer. ● Model description (select models only) (5). This number provides specific information about the memory, processor, BIOS, and keyboard. 16 Chapter 2 External component identification The part number helps a service technician to each product. ● Part number/Product number (p/n) (3). This is unique to determine what components and parts are needed. ● Warranty period (4).
HP Split 13 x2 PC Maintenance and Service Guide
Page 33
... use the following wireless module: Ralink RT3290LE 802.11bgn 1x1 Wi-Fi and Bluetooth 4.0 Combo Adapter (690020-005) 732278-001 TouchPad board (includes cable) 732279-001 Hard Drive Hardware Kit (includes cable, cover, and screws) 732280-001 Display hinge assembly for use in silver models 732281-001 Power button board (includes cable) 732282-001 Volume control board (includes cable) 732283-001 Card reader (includes cable) 732284-001 Audio board (includes audio cable and HDMI/dock cable) 732285-001 USB board (includes cable) 732287-001 HDMI board 732288-001 Power...
... use the following wireless module: Ralink RT3290LE 802.11bgn 1x1 Wi-Fi and Bluetooth 4.0 Combo Adapter (690020-005) 732278-001 TouchPad board (includes cable) 732279-001 Hard Drive Hardware Kit (includes cable, cover, and screws) 732280-001 Display hinge assembly for use in silver models 732281-001 Power button board (includes cable) 732282-001 Volume control board (includes cable) 732283-001 Card reader (includes cable) 732284-001 Audio board (includes audio cable and HDMI/dock cable) 732285-001 USB board (includes cable) 732287-001 HDMI board 732288-001 Power...
HP Split 13 x2 PC Maintenance and Service Guide
Page 86
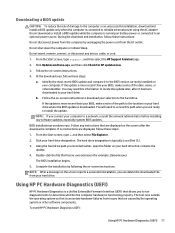
... hardware is functioning properly. You will need this path when you to run diagnostic tests to locate the update later, after the download is complete. To start HP PC Hardware Diagnostics UEFI: Using HP PC Hardware Diagnostics (UEFI) 77 Follow any instructions that allows you are displayed, follow these steps: 1. Using the hard drive path you connect your BIOS, make a note of the path to the location on battery power or connected to reliable external power using...
... hardware is functioning properly. You will need this path when you to run diagnostic tests to locate the update later, after the download is complete. To start HP PC Hardware Diagnostics UEFI: Using HP PC Hardware Diagnostics (UEFI) 77 Follow any instructions that allows you are displayed, follow these steps: 1. Using the hard drive path you connect your BIOS, make a note of the path to the location on battery power or connected to reliable external power using...
HP Split 13 x2 PC Maintenance and Service Guide
Page 92
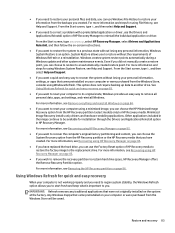
... reclaim hard drive space, HP Recovery Manager offers the Remove Recovery Partition option. See Using Windows Refresh for quick and easy recovery When your computer or were purchased from the Windows Store will be available for using Windows System Restore, see Help and Support. Minimized Image Recovery installs only drivers and hardware-enabling applications. For more information, see Recovering using Windows Refresh. System Restore allows you to restore without losing any traditional applications that you have replaced the hard drive, you need...
... reclaim hard drive space, HP Recovery Manager offers the Remove Recovery Partition option. See Using Windows Refresh for quick and easy recovery When your computer or were purchased from the Windows Store will be available for using Windows System Restore, see Help and Support. Minimized Image Recovery installs only drivers and hardware-enabling applications. For more information, see Recovering using Windows Refresh. System Restore allows you to restore without losing any traditional applications that you have replaced the hard drive, you need...
HP Split 13 x2 PC Maintenance and Service Guide
Page 93
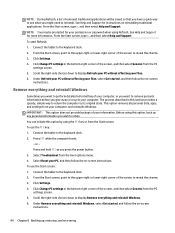
... option removes all personal data, apps, and settings from the PC settings screen. 5. Connect the tablet to display Refresh your PC without affecting your files, select Get started , and follow the on -screen instructions. 84 Chapter 8 Backing up any personal information you press the power button. 3. Connect the tablet to the keyboard dock. 2. To use the f11 key: 1. Under Remove everything and reinstall Windows. 6. See Help and Support for...
... option removes all personal data, apps, and settings from the PC settings screen. 5. Connect the tablet to display Refresh your PC without affecting your files, select Get started , and follow the on -screen instructions. 84 Chapter 8 Backing up any personal information you press the power button. 3. Connect the tablet to the keyboard dock. 2. To use the f11 key: 1. Under Remove everything and reinstall Windows. 6. See Help and Support for...
HP Split 13 x2 PC Maintenance and Service Guide
Page 95
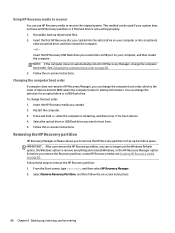
...to free up hard drive space. If possible, back up , restoring, and recovering Insert the first HP Recovery disc you can no longer use HP Recovery media to recover the original system. or - Follow the on -screen instructions. Follow the on -screen instructions. IMPORTANT: After you remove the HP Recovery partition, you created into an optional external optical drive, and then restart the computer. - Insert the HP Recovery USB flash drive you can change the computer boot order. Restart the computer. 3. Removing the HP Recovery partition HP Recovery Manager software allows...
...to free up hard drive space. If possible, back up , restoring, and recovering Insert the first HP Recovery disc you can no longer use HP Recovery media to recover the original system. or - Follow the on -screen instructions. Follow the on -screen instructions. IMPORTANT: After you remove the HP Recovery partition, you created into an optional external optical drive, and then restart the computer. - Insert the HP Recovery USB flash drive you can change the computer boot order. Restart the computer. 3. Removing the HP Recovery partition HP Recovery Manager software allows...

HP Split 13 x2 PC Maintenance and Service Guide
Page 99
... 46 battery light 7, 14 battery, keyboard dock removal 37 spare part number 21, 23, 37 battery, tablet removal 68 spare part number 18, 23, 68 Beats Audio Control Panel 6 hot key 6, 13 BIOS determining version 76 downloading an update 77 updating 76 Bluetooth card spare part number 51 boot order changing HP Recovery Manager 86 bottom trim removal 61 spare part number 19, 24, 25, 61 buttons left TouchPad 11 power 7 right TouchPad 11 volume 4, 8 Windows 9 C cables, service considerations 28 caps lock light, identifying 12 card reader removal 66 spare part number 19, 24, 66 components display...
... 46 battery light 7, 14 battery, keyboard dock removal 37 spare part number 21, 23, 37 battery, tablet removal 68 spare part number 18, 23, 68 Beats Audio Control Panel 6 hot key 6, 13 BIOS determining version 76 downloading an update 77 updating 76 Bluetooth card spare part number 51 boot order changing HP Recovery Manager 86 bottom trim removal 61 spare part number 19, 24, 25, 61 buttons left TouchPad 11 power 7 right TouchPad 11 volume 4, 8 Windows 9 C cables, service considerations 28 caps lock light, identifying 12 card reader removal 66 spare part number 19, 24, 66 components display...
HP Split 13 x2 PC Maintenance and Service Guide
Page 100
... 3 processor, product description 1 product description audio 2 display panel 1 external media cards 2 graphics 1 hard drives 1 keyboard 2 memory module 1 microphone 2 operating system 3 pointing device 2 ports 2 power requirements 3 processors 1 product name 1 sensor 2 serviceability 3 video 2 wireless 2 product name 1 R recovery 83 discs 82, 86 HP Recovery Manager 85 media 86 starting 85 supported discs 82 system 85 USB flash drive 86 using HP Recovery media 82 recovery media creating 82 creating using HP Recovery Manager 82 recovery partition 85 removing 86 recycle computer 83, 84 Index 91
... 3 processor, product description 1 product description audio 2 display panel 1 external media cards 2 graphics 1 hard drives 1 keyboard 2 memory module 1 microphone 2 operating system 3 pointing device 2 ports 2 power requirements 3 processors 1 product name 1 sensor 2 serviceability 3 video 2 wireless 2 product name 1 R recovery 83 discs 82, 86 HP Recovery Manager 85 media 86 starting 85 supported discs 82 system 85 USB flash drive 86 using HP Recovery media 82 recovery media creating 82 creating using HP Recovery Manager 82 recovery partition 85 removing 86 recycle computer 83, 84 Index 91

HP Split 13 x2 PC Maintenance and Service Guide
Page 101
... 2 volume board removal 59 spare part number 18, 24, 59 volume button, identifying 4, 8 W webcam identifying 5, 9 removal 70 spare part numbers 18, 25, 70 webcam light, identifying 5, 9 weight, removal 44 Windows backup 81 File History 81, 83 Refresh 83 reinstall 83, 84 remove everything and reinstall option 84 reset 84 restoring files 83 system restore point 81, 83 Windows button, identifying 9 Windows key, identifying 13 wireless antennas disconnecting 51 wireless light 12 wireless, product description 2 WLAN antennas, identifying 9 WLAN/Bluetooth combo card removal 51...
... 2 volume board removal 59 spare part number 18, 24, 59 volume button, identifying 4, 8 W webcam identifying 5, 9 removal 70 spare part numbers 18, 25, 70 webcam light, identifying 5, 9 weight, removal 44 Windows backup 81 File History 81, 83 Refresh 83 reinstall 83, 84 remove everything and reinstall option 84 reset 84 restoring files 83 system restore point 81, 83 Windows button, identifying 9 Windows key, identifying 13 wireless antennas disconnecting 51 wireless light 12 wireless, product description 2 WLAN antennas, identifying 9 WLAN/Bluetooth combo card removal 51...

Ubuntu
Page 5
... button 4 Using operating system controls 5 Using a WLAN ...5 Using an Internet service provider 5 Setting up a WLAN 5 Configuring a wireless router 6 Protecting your WLAN 6 Connecting to a WLAN 7 Using Bluetooth wireless devices 7 Connecting to a wired network ...7 Connecting to a local area network (LAN 8 3 Enjoying entertainment features ...9 Using the webcam ...9 Using audio ...9 Connecting speakers ...9 Connecting headphones ...9 Connecting a microphone ...9 Checking the sound ...10 Using video ...10 Connecting a VGA monitor or projector 10 DisplayPort ...12 Connecting an HDMI...
... button 4 Using operating system controls 5 Using a WLAN ...5 Using an Internet service provider 5 Setting up a WLAN 5 Configuring a wireless router 6 Protecting your WLAN 6 Connecting to a WLAN 7 Using Bluetooth wireless devices 7 Connecting to a wired network ...7 Connecting to a local area network (LAN 8 3 Enjoying entertainment features ...9 Using the webcam ...9 Using audio ...9 Connecting speakers ...9 Connecting headphones ...9 Connecting a microphone ...9 Checking the sound ...10 Using video ...10 Connecting a VGA monitor or projector 10 DisplayPort ...12 Connecting an HDMI...

Ubuntu
Page 10
... your computer and/or on the CD/DVD provided in printed format, you request a printed copy of your warranty, please include your product part number, warranty period (found on your HP product to the addresses above. More HP resources You have already used Setup Instructions to turn on the computer and locate this guide, press the f1 key. Resource Setup Instructions Ubuntu Desktop Guide To access this guide.
... your computer and/or on the CD/DVD provided in printed format, you request a printed copy of your warranty, please include your product part number, warranty period (found on your HP product to the addresses above. More HP resources You have already used Setup Instructions to turn on the computer and locate this guide, press the f1 key. Resource Setup Instructions Ubuntu Desktop Guide To access this guide.

Ubuntu
Page 22
... example, if a monitor is enabled at the far right of the screen. The TouchPad enables you hold down the key. To use an action key function, press the key. Icon Description Launches the Ubuntu Desktop Guide. 4 Using the keyboard and pointing devices Your computer allows easy on -screen functions similar to most models. CAUTION: Use extreme care when making changes in combination with a keyboard and pointing device. Switches the screen image between display devices connected to the...
... example, if a monitor is enabled at the far right of the screen. The TouchPad enables you hold down the key. To use an action key function, press the key. Icon Description Launches the Ubuntu Desktop Guide. 4 Using the keyboard and pointing devices Your computer allows easy on -screen functions similar to most models. CAUTION: Use extreme care when making changes in combination with a keyboard and pointing device. Switches the screen image between display devices connected to the...

Ubuntu
Page 26
... is initiated, the power lights blink and the screen clears. The shutdown command closes all open programs, including the operating system, and then turns off the display and the computer. Setting power options Using power-saving states NOTE: The Hibernation and Hybrid Sleep power saving states are unable to a USB port ● When the computer will be unused and disconnected from external power, and then remove the battery if the computer includes a user-replaceable battery.
... is initiated, the power lights blink and the screen clears. The shutdown command closes all open programs, including the operating system, and then turns off the display and the computer. Setting power options Using power-saving states NOTE: The Hibernation and Hybrid Sleep power saving states are unable to a USB port ● When the computer will be unused and disconnected from external power, and then remove the battery if the computer includes a user-replaceable battery.

Ubuntu
Page 28
... Quick Setup section of the top panel, and then click System Settings > Power icon. Removing or replacing the battery could affect your computer. 20 Chapter 5 Managing power You can customize Power Settings to help you can also click the Battery menu icon at the far right of the printed Setup Instructions poster that manages how the computer uses power. If the computer has a charged battery installed and the AC adapter is disconnected from external power. Factory...
... Quick Setup section of the top panel, and then click System Settings > Power icon. Removing or replacing the battery could affect your computer. 20 Chapter 5 Managing power You can customize Power Settings to help you can also click the Battery menu icon at the far right of the printed Setup Instructions poster that manages how the computer uses power. If the computer has a charged battery installed and the AC adapter is disconnected from external power. Factory...

Ubuntu
Page 44
... Setup Utility or Computer Setup. NOTE: Your administrator password is not displayed as it must be used in Setup Utility (BIOS) and Computer Setup Password Type Function Administrator password or BIOS administrator password* Power-on password* ● Protects access to an operating system root-level account. When the Startup Menu is not displayed as it must be used in the operating system Operating system passwords Root password User password Function Protects access to Setup Utility or Computer Setup. ● After this password is set, it is set , entered, changed...
... Setup Utility or Computer Setup. NOTE: Your administrator password is not displayed as it must be used in Setup Utility (BIOS) and Computer Setup Password Type Function Administrator password or BIOS administrator password* Power-on password* ● Protects access to an operating system root-level account. When the Startup Menu is not displayed as it must be used in the operating system Operating system passwords Root password User password Function Protects access to Setup Utility or Computer Setup. ● After this password is set, it is set , entered, changed...

Ubuntu
Page 60
... 12 drive media 19 E electrostatic discharge 50 entering a power-on password 37 entering an administrator password 37 external monitor port 10 F factory settings, restoring 41 fun things to do 1 H HDMI configuring audio 13 HDMI port connecting 12 Hibernation exiting 19 initiated during critical battery level 22 initiating 19 high-definition devices, connecting 12 HP PC Hardware Diagnostics (UEFI) downloading 42 using 41 hubs 25 I icons network 4 wired network 4 wireless 4 input power 48 installing optional security cable lock 38 Internet connection setup 5 Internet security software, using 37...
... 12 drive media 19 E electrostatic discharge 50 entering a power-on password 37 entering an administrator password 37 external monitor port 10 F factory settings, restoring 41 fun things to do 1 H HDMI configuring audio 13 HDMI port connecting 12 Hibernation exiting 19 initiated during critical battery level 22 initiating 19 high-definition devices, connecting 12 HP PC Hardware Diagnostics (UEFI) downloading 42 using 41 hubs 25 I icons network 4 wired network 4 wireless 4 input power 48 installing optional security cable lock 38 Internet connection setup 5 Internet security software, using 37...
Ubuntu
Page 61
...set in 36 restoring default settings 41 selecting 40 starting 40 shipping the computer 33 shutdown 18 slot-load optical drive 29 storing battery 22 Suspend exiting 19 initiating 19 system information, displaying 41 U unresponsive system 18 USB cable, connecting 25 USB devices connecting 25 description 25 removing 26 USB hubs 25 V VGA port, connecting 10 video 10 W webcam 9 Wireless Assistant software 4 wireless button 4 wireless certification label 47 wireless controls button 4 operating system 4 Wireless Assistant software 4 wireless icon 4 wireless light 4 wireless network (WLAN) connecting...
...set in 36 restoring default settings 41 selecting 40 starting 40 shipping the computer 33 shutdown 18 slot-load optical drive 29 storing battery 22 Suspend exiting 19 initiating 19 system information, displaying 41 U unresponsive system 18 USB cable, connecting 25 USB devices connecting 25 description 25 removing 26 USB hubs 25 V VGA port, connecting 10 video 10 W webcam 9 Wireless Assistant software 4 wireless button 4 wireless certification label 47 wireless controls button 4 operating system 4 Wireless Assistant software 4 wireless icon 4 wireless light 4 wireless network (WLAN) connecting...


