
HP Split 13 x2 PC Maintenance and Service Guide
Page 8
... Memory module ...47 Fan ...48 Heat sink ...49 WLAN/Bluetooth combo card ...51 mSATA Solid-State drive (SSD) ...53 RTC battery ...54 Antennas ...55 Display cable ...56 Touchscreen board ...58 Volume board ...59 Power button board ...60 Bottom trim ...61 Home LED board ...63 Audio board ...64 Card reader ...66 Speakers ...67 Battery ...68 Frame ...69 Webcam ...70 System board ...72 Vibration module ...74 6 Using Setup Utility (BIOS) and System Diagnostics 76 Starting Setup Utility (BIOS) ...76 Updating the BIOS ...76 Determining the BIOS version ...76 Downloading a BIOS update...
... Memory module ...47 Fan ...48 Heat sink ...49 WLAN/Bluetooth combo card ...51 mSATA Solid-State drive (SSD) ...53 RTC battery ...54 Antennas ...55 Display cable ...56 Touchscreen board ...58 Volume board ...59 Power button board ...60 Bottom trim ...61 Home LED board ...63 Audio board ...64 Card reader ...66 Speakers ...67 Battery ...68 Frame ...69 Webcam ...70 System board ...72 Vibration module ...74 6 Using Setup Utility (BIOS) and System Diagnostics 76 Starting Setup Utility (BIOS) ...76 Updating the BIOS ...76 Determining the BIOS version ...76 Downloading a BIOS update...

HP Split 13 x2 PC Maintenance and Service Guide
Page 9
... USB device 78 7 Specifications ...79 Computer specifications ...79 33.8-cm (13.3-in), HD display specifications ...80 8 Backing up, restoring, and recovering ...81 Creating recovery media and backups ...81 Creating HP Recovery media ...82 Restore and recovery ...82 Using Windows Refresh for quick and easy recovery 83 Remove everything and reinstall Windows 84 Recovering using HP Recovery Manager 85 What you need to know 85 Using the HP Recovery partition 85 Using HP Recovery media to recover 86 Changing the computer boot order 86 Removing the HP Recovery partition 86 9 Power cord set...
... USB device 78 7 Specifications ...79 Computer specifications ...79 33.8-cm (13.3-in), HD display specifications ...80 8 Backing up, restoring, and recovering ...81 Creating recovery media and backups ...81 Creating HP Recovery media ...82 Restore and recovery ...82 Using Windows Refresh for quick and easy recovery 83 Remove everything and reinstall Windows 84 Recovering using HP Recovery Manager 85 What you need to know 85 Using the HP Recovery partition 85 Using HP Recovery media to recover 86 Changing the computer boot order 86 Removing the HP Recovery partition 86 9 Power cord set...
HP Split 13 x2 PC Maintenance and Service Guide
Page 15
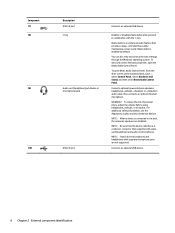
... properties, open Beats Audio Control Panel, from the Start screen on the keyboard dock, type c, select Control Panel, select Hardware and Sound, and then select Beats Audio Control Panel. For additional safety information, see the Regulatory, Safety and Environmental Notices. Connects an optional USB device. 6 Chapter 2 External component identification WARNING! NOTE: When a device is enabled by default. Component (7) (8) (9) (10) Description USB 3.0 port b key Audio-out (headphone) jack/Audio-in (microphone) jack USB 2.0 port Connects an optional USB device. Beats Audio is an...
... properties, open Beats Audio Control Panel, from the Start screen on the keyboard dock, type c, select Control Panel, select Hardware and Sound, and then select Beats Audio Control Panel. For additional safety information, see the Regulatory, Safety and Environmental Notices. Connects an optional USB device. 6 Chapter 2 External component identification WARNING! NOTE: When a device is enabled by default. Component (7) (8) (9) (10) Description USB 3.0 port b key Audio-out (headphone) jack/Audio-in (microphone) jack USB 2.0 port Connects an optional USB device. Beats Audio is an...
HP Split 13 x2 PC Maintenance and Service Guide
Page 17
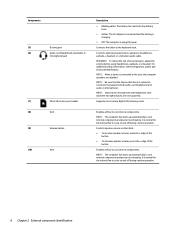
... internal components and prevent overheating. Enables airflow to cool internal components. NOTE: When a device is using headphones, earbuds, or a headset. NOTE: Be sure that the device cable has a 4-conductor connector that supports both audio-out (headphone) and audio-in (microphone) jack (7) Micro SD memory card reader (8) Vent (9) Volume button (10) Vent Description ● Blinking white: The battery has reached a low battery level. ● Amber: The AC adapter is connected and the battery is charging...
... internal components and prevent overheating. Enables airflow to cool internal components. NOTE: When a device is using headphones, earbuds, or a headset. NOTE: Be sure that the device cable has a 4-conductor connector that supports both audio-out (headphone) and audio-in (microphone) jack (7) Micro SD memory card reader (8) Vent (9) Volume button (10) Vent Description ● Blinking white: The battery has reached a low battery level. ● Amber: The AC adapter is connected and the battery is charging...
HP Split 13 x2 PC Maintenance and Service Guide
Page 25
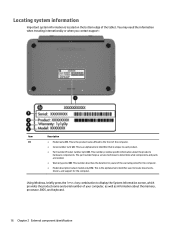
... well as information about the product's hardware components. Using Windows, briefly press the fn+esc key combination to each product. ● Part number/Product number (p/n) (3). This number provides specific information about the memory, processor, BIOS, and keyboard. 16 Chapter 2 External component identification This is the product name affixed to locate documents, drivers, and support for the computer. ● Model description (select models only) (5). This is the alphanumeric identifier...
... well as information about the product's hardware components. Using Windows, briefly press the fn+esc key combination to each product. ● Part number/Product number (p/n) (3). This number provides specific information about the memory, processor, BIOS, and keyboard. 16 Chapter 2 External component identification This is the product name affixed to locate documents, drivers, and support for the computer. ● Model description (select models only) (5). This is the alphanumeric identifier...
HP Split 13 x2 PC Maintenance and Service Guide
Page 33
... use the following wireless module: Ralink RT3290LE 802.11bgn 1x1 Wi-Fi and Bluetooth 4.0 Combo Adapter (690020-005) 732278-001 TouchPad board (includes cable) 732279-001 Hard Drive Hardware Kit (includes cable, cover, and screws) 732280-001 Display hinge assembly for use in silver models 732281-001 Power button board (includes cable) 732282-001 Volume control board (includes cable) 732283-001 Card reader (includes cable) 732284-001 Audio board (includes audio cable and HDMI/dock cable) 732285-001 USB board (includes cable) 732287-001 HDMI board 732288-001 Power...
... use the following wireless module: Ralink RT3290LE 802.11bgn 1x1 Wi-Fi and Bluetooth 4.0 Combo Adapter (690020-005) 732278-001 TouchPad board (includes cable) 732279-001 Hard Drive Hardware Kit (includes cable, cover, and screws) 732280-001 Display hinge assembly for use in silver models 732281-001 Power button board (includes cable) 732282-001 Volume control board (includes cable) 732283-001 Card reader (includes cable) 732284-001 Audio board (includes audio cable and HDMI/dock cable) 732285-001 USB board (includes cable) 732287-001 HDMI board 732288-001 Power...
HP Split 13 x2 PC Maintenance and Service Guide
Page 43
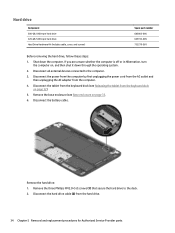
... all external devices connected to the dock. 2. Hard drive Component 500-GB, 5400-rpm hard drive 320-GB, 5400-rpm hard drive Hard Drive Hardware Kit (includes cable, cover, and screws) Spare part number 683802-005 645193-005 732279-001 Before removing the hard drive, follow these steps: 1. Disconnect the power from the computer by first unplugging the power cord from the AC outlet and then unplugging the AC adapter from the hard drive...
... all external devices connected to the dock. 2. Hard drive Component 500-GB, 5400-rpm hard drive 320-GB, 5400-rpm hard drive Hard Drive Hardware Kit (includes cable, cover, and screws) Spare part number 683802-005 645193-005 732279-001 Before removing the hard drive, follow these steps: 1. Disconnect the power from the computer by first unplugging the power cord from the AC outlet and then unplugging the AC adapter from the hard drive...
HP Split 13 x2 PC Maintenance and Service Guide
Page 49
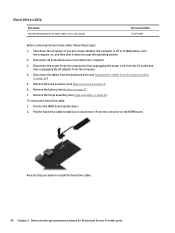
... then unplugging the AC adapter from the connector on page 32). 5. Remove the hinge assembly (see Battery on page 36. Remove the base enclosure (see Releasing the tablet from the keyboard dock on the HDMI board. Reverse this procedure to the computer. 3. Disconnect all external devices connected to install the hard drive cable. 40 Chapter 5 Removal and replacement procedures for Authorized Service Provider parts Shut down . 2. If you...
... then unplugging the AC adapter from the connector on page 32). 5. Remove the hinge assembly (see Battery on page 36. Remove the base enclosure (see Releasing the tablet from the keyboard dock on the HDMI board. Reverse this procedure to the computer. 3. Disconnect all external devices connected to install the hard drive cable. 40 Chapter 5 Removal and replacement procedures for Authorized Service Provider parts Shut down . 2. If you...
HP Split 13 x2 PC Maintenance and Service Guide
Page 60
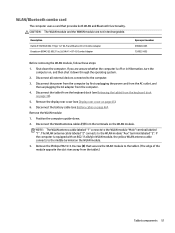
... on page 46). Disconnect all external devices connected to the WLAN module "Aux" terminal labeled "2". Remove the display rear cover (see Battery cable on the WLAN module. 3. Position the computer upside-down the computer. NOTE: The WLAN antenna cable labeled "1" connects to the WLAN module "Main" terminal labeled "1". Remove the Phillips PM2.5×3.0 screw (2) that provides both WLAN and Bluetooth functionality. Shut down . 2. If the computer...
... on page 46). Disconnect all external devices connected to the WLAN module "Aux" terminal labeled "2". Remove the display rear cover (see Battery cable on the WLAN module. 3. Position the computer upside-down the computer. NOTE: The WLAN antenna cable labeled "1" connects to the WLAN module "Main" terminal labeled "1". Remove the Phillips PM2.5×3.0 screw (2) that provides both WLAN and Bluetooth functionality. Shut down . 2. If the computer...
HP Split 13 x2 PC Maintenance and Service Guide
Page 83
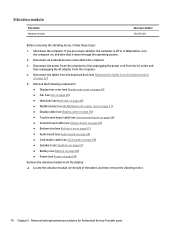
... Service Provider parts Disconnect all external devices connected to the computer. 3. Disconnect the power from the computer by first unplugging the power cord from the AC outlet and then unplugging the AC adapter from the display: ▲ Locate the vibration module on , and then shut it down the computer. Shut down through the operating system. 2. Remove the following components: ● Display rear cover (see Display rear cover...
... Service Provider parts Disconnect all external devices connected to the computer. 3. Disconnect the power from the computer by first unplugging the power cord from the AC outlet and then unplugging the AC adapter from the display: ▲ Locate the vibration module on , and then shut it down the computer. Shut down through the operating system. 2. Remove the following components: ● Display rear cover (see Display rear cover...

HP Split 13 x2 PC Maintenance and Service Guide
Page 85
... BIOS) can prevent the computer from operating properly. Setup Utility (BIOS) includes settings for the types of devices installed, the startup sequence of the computer, and the amount of the BIOS may be displayed by using Setup Utility (BIOS). 1. Starting Setup Utility (BIOS) To start Setup Utility (BIOS), turn on the HP website. NOTE: Use extreme care when making changes in compressed files called SoftPaqs. Updating the BIOS Updated versions of system and extended memory. Most BIOS updates on the computer, you need to navigate in Windows...
... BIOS) can prevent the computer from operating properly. Setup Utility (BIOS) includes settings for the types of devices installed, the startup sequence of the computer, and the amount of the BIOS may be displayed by using Setup Utility (BIOS). 1. Starting Setup Utility (BIOS) To start Setup Utility (BIOS), turn on the HP website. NOTE: Use extreme care when making changes in compressed files called SoftPaqs. Updating the BIOS Updated versions of system and extended memory. Most BIOS updates on the computer, you need to navigate in Windows...
HP Split 13 x2 PC Maintenance and Service Guide
Page 86
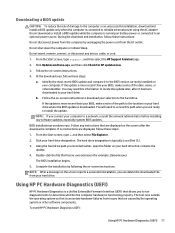
... downloaded to reliable external power using the AC adapter. You will need this path when you to run diagnostic tests to a network, consult the network administrator before installing any software updates, especially system BIOS updates. The BIOS installation begins. 5. BIOS installation procedures vary. From the Start screen, type e, and then select File Explorer. 2. Complete the installation by the operating system or other identifier. Follow any device, cable, or cord. 1. To start HP PC Hardware Diagnostics UEFI: Using HP PC Hardware...
... downloaded to reliable external power using the AC adapter. You will need this path when you to run diagnostic tests to a network, consult the network administrator before installing any software updates, especially system BIOS updates. The BIOS installation begins. 5. BIOS installation procedures vary. From the Start screen, type e, and then select File Explorer. 2. Complete the installation by the operating system or other identifier. Follow any device, cable, or cord. 1. To start HP PC Hardware Diagnostics UEFI: Using HP PC Hardware...
HP Split 13 x2 PC Maintenance and Service Guide
Page 91
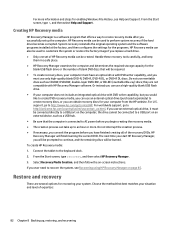
... ever need to a USB port on -screen instructions. HP Recovery media can use only high-quality blank DVD-R, DVD+R, DVD-R DL, or DVD+R DL discs. Handle these recovery tools carefully, and keep them in a safe place. ● HP Recovery Manager examines the computer and determines the required storage capacity for the blank USB flash drive or the number of expertise: 82 Chapter 8 Backing up to the keyboard dock. 2. For worldwide support, go /contactHP. From the Start screen, type...
... ever need to a USB port on -screen instructions. HP Recovery media can use only high-quality blank DVD-R, DVD+R, DVD-R DL, or DVD+R DL discs. Handle these recovery tools carefully, and keep them in a safe place. ● HP Recovery Manager examines the computer and determines the required storage capacity for the blank USB flash drive or the number of expertise: 82 Chapter 8 Backing up to the keyboard dock. 2. For worldwide support, go /contactHP. From the Start screen, type...
HP Split 13 x2 PC Maintenance and Service Guide
Page 92
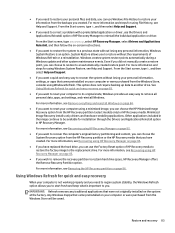
... factory. Using Windows Refresh for quick and easy recovery on page 85. ● If you have created. From the Start screen, type h, and then select Help and Support. ● If you want to remove all personal data, apps, and settings, and reinstall Windows. ● If you need to restore your personal files and data, you can use Windows File History to reclaim hard drive space, HP Recovery Manager offers the Remove Recovery Partition option. IMPORTANT: Refresh removes...
... factory. Using Windows Refresh for quick and easy recovery on page 85. ● If you have created. From the Start screen, type h, and then select Help and Support. ● If you want to remove all personal data, apps, and settings, and reinstall Windows. ● If you need to restore your personal files and data, you can use Windows File History to reclaim hard drive space, HP Recovery Manager offers the Remove Recovery Partition option. IMPORTANT: Refresh removes...
HP Split 13 x2 PC Maintenance and Service Guide
Page 93
... on -screen instructions. Scroll the right-side choices down to display Remove everything and reinstall Windows. 6. To use the Start screen: 1. From the Start screen, point to the upper-right or lower-right corner of the screen, and then select General from the PC settings screen. 5. Click Settings. 4. From the Start screen, type h, and then select Help and Support. Click Change PC settings in this option, back up , restoring, and recovering From the Start screen, point...
... on -screen instructions. Scroll the right-side choices down to display Remove everything and reinstall Windows. 6. To use the Start screen: 1. From the Start screen, point to the upper-right or lower-right corner of the screen, and then select General from the PC settings screen. 5. Click Settings. 4. From the Start screen, type h, and then select Help and Support. Click Change PC settings in this option, back up , restoring, and recovering From the Start screen, point...
HP Split 13 x2 PC Maintenance and Service Guide
Page 94
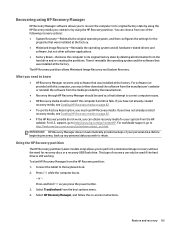
...the software that was installed at the factory. Connect the tablet to perform a minimized image recovery without the need to know ● HP Recovery Manager recovers only software that was installed at the factory. The HP Recovery partition allows Minimized Image Recovery and System Recovery. This type of your system from the HP website. Restore and recovery 85 support, go /contactHP. To start HP Recovery Manager from the boot options menu. 4. Select Troubleshoot from the HP Recovery partition: 1. Recovering using HP Recovery Manager HP Recovery Manager software allows...
...the software that was installed at the factory. Connect the tablet to perform a minimized image recovery without the need to know ● HP Recovery Manager recovers only software that was installed at the factory. The HP Recovery partition allows Minimized Image Recovery and System Recovery. This type of your system from the HP website. Restore and recovery 85 support, go /contactHP. To start HP Recovery Manager from the boot options menu. 4. Select Troubleshoot from the HP Recovery partition: 1. Recovering using HP Recovery Manager HP Recovery Manager software allows...
HP Split 13 x2 PC Maintenance and Service Guide
Page 95
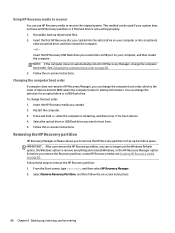
...to remove the HP Recovery partition to free up all personal files. 2. Removing the HP Recovery partition HP Recovery Manager software allows you can change the computer boot order, which is the order of devices listed in HP Recovery Manager, change the boot order: 1. From the Start screen, type recovery, and then select HP Recovery Manager. 2. Select Remove Recovery Partition, and then follow the on -screen instructions. You can no longer use HP Recovery media to recover the original system. So before you created into the optical drive on your computer or into a USB port...
...to remove the HP Recovery partition to free up all personal files. 2. Removing the HP Recovery partition HP Recovery Manager software allows you can change the computer boot order, which is the order of devices listed in HP Recovery Manager, change the boot order: 1. From the Start screen, type recovery, and then select HP Recovery Manager. 2. Select Remove Recovery Partition, and then follow the on -screen instructions. You can no longer use HP Recovery media to recover the original system. So before you created into the optical drive on your computer or into a USB port...

HP Split 13 x2 PC Maintenance and Service Guide
Page 99
... 46 battery light 7, 14 battery, keyboard dock removal 37 spare part number 21, 23, 37 battery, tablet removal 68 spare part number 18, 23, 68 Beats Audio Control Panel 6 hot key 6, 13 BIOS determining version 76 downloading an update 77 updating 76 Bluetooth card spare part number 51 boot order changing HP Recovery Manager 86 bottom trim removal 61 spare part number 19, 24, 25, 61 buttons left TouchPad 11 power 7 right TouchPad 11 volume 4, 8 Windows 9 C cables, service considerations 28 caps lock light, identifying 12 card reader removal 66 spare part number 19, 24, 66 components display...
... 46 battery light 7, 14 battery, keyboard dock removal 37 spare part number 21, 23, 37 battery, tablet removal 68 spare part number 18, 23, 68 Beats Audio Control Panel 6 hot key 6, 13 BIOS determining version 76 downloading an update 77 updating 76 Bluetooth card spare part number 51 boot order changing HP Recovery Manager 86 bottom trim removal 61 spare part number 19, 24, 25, 61 buttons left TouchPad 11 power 7 right TouchPad 11 volume 4, 8 Windows 9 C cables, service considerations 28 caps lock light, identifying 12 card reader removal 66 spare part number 19, 24, 66 components display...
HP Split 13 x2 PC Maintenance and Service Guide
Page 100
... 3 processor, product description 1 product description audio 2 display panel 1 external media cards 2 graphics 1 hard drives 1 keyboard 2 memory module 1 microphone 2 operating system 3 pointing device 2 ports 2 power requirements 3 processors 1 product name 1 sensor 2 serviceability 3 video 2 wireless 2 product name 1 R recovery 83 discs 82, 86 HP Recovery Manager 85 media 86 starting 85 supported discs 82 system 85 USB flash drive 86 using HP Recovery media 82 recovery media creating 82 creating using HP Recovery Manager 82 recovery partition 85 removing 86 recycle computer 83, 84 Index 91
... 3 processor, product description 1 product description audio 2 display panel 1 external media cards 2 graphics 1 hard drives 1 keyboard 2 memory module 1 microphone 2 operating system 3 pointing device 2 ports 2 power requirements 3 processors 1 product name 1 sensor 2 serviceability 3 video 2 wireless 2 product name 1 R recovery 83 discs 82, 86 HP Recovery Manager 85 media 86 starting 85 supported discs 82 system 85 USB flash drive 86 using HP Recovery media 82 recovery media creating 82 creating using HP Recovery Manager 82 recovery partition 85 removing 86 recycle computer 83, 84 Index 91

HP Split 13 x2 PC Maintenance and Service Guide
Page 101
... 2 volume board removal 59 spare part number 18, 24, 59 volume button, identifying 4, 8 W webcam identifying 5, 9 removal 70 spare part numbers 18, 25, 70 webcam light, identifying 5, 9 weight, removal 44 Windows backup 81 File History 81, 83 Refresh 83 reinstall 83, 84 remove everything and reinstall option 84 reset 84 restoring files 83 system restore point 81, 83 Windows button, identifying 9 Windows key, identifying 13 wireless antennas disconnecting 51 wireless light 12 wireless, product description 2 WLAN antennas, identifying 9 WLAN/Bluetooth combo card removal 51...
... 2 volume board removal 59 spare part number 18, 24, 59 volume button, identifying 4, 8 W webcam identifying 5, 9 removal 70 spare part numbers 18, 25, 70 webcam light, identifying 5, 9 weight, removal 44 Windows backup 81 File History 81, 83 Refresh 83 reinstall 83, 84 remove everything and reinstall option 84 reset 84 restoring files 83 system restore point 81, 83 Windows button, identifying 9 Windows key, identifying 13 wireless antennas disconnecting 51 wireless light 12 wireless, product description 2 WLAN antennas, identifying 9 WLAN/Bluetooth combo card removal 51...


