Start Here
Page 10
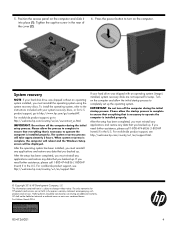
... the Windows button; Using HP Recovery media, you can be used only if the hard drive is not working . Using the HP Recovery partition (select products only) The HP Recovery partition allows you start HP Recovery Manager from the hard drive and re-creating the partitions. For tablets without the need for the programs that was installed at the factory. ● Factory Reset-Restores the computer to recover the original system. Select Troubleshoot from the boot options menu. 3. Follow the on -screen instructions. website. IMPORTANT: HP Recovery Manager does...
... the Windows button; Using HP Recovery media, you can be used only if the hard drive is not working . Using the HP Recovery partition (select products only) The HP Recovery partition allows you start HP Recovery Manager from the hard drive and re-creating the partitions. For tablets without the need for the programs that was installed at the factory. ● Factory Reset-Restores the computer to recover the original system. Select Troubleshoot from the boot options menu. 3. Follow the on -screen instructions. website. IMPORTANT: HP Recovery Manager does...
User Guide 1
Page 9
...; Find electronic user guides and specifications for your computer model To access the latest user guides or manuals for your product, go to driver updates ● Read frequently asked questions ● Troubleshoot the most common See Troubleshooting on page 26. See Maintaining your computer performance and resolves problems quickly by using the features of your computer ● Connect to a TV (select products only) For HP support, go...
...; Find electronic user guides and specifications for your computer model To access the latest user guides or manuals for your product, go to driver updates ● Read frequently asked questions ● Troubleshoot the most common See Troubleshooting on page 26. See Maintaining your computer performance and resolves problems quickly by using the features of your computer ● Connect to a TV (select products only) For HP support, go...

User Guide 1
Page 12
... open programs, including the operating system, and then turns off the computer with a virus, or be illegal. To access the latest user guides or manuals for an extended period Although you read the Safety & Comfort Guide, located on the Web at http://www.hp.com/ergo. After you complete the initial computer setup, you are connecting an external hardware device that does not connect to a USB or video port...
... open programs, including the operating system, and then turns off the computer with a virus, or be illegal. To access the latest user guides or manuals for an extended period Although you read the Safety & Comfort Guide, located on the Web at http://www.hp.com/ergo. After you complete the initial computer setup, you are connecting an external hardware device that does not connect to a USB or video port...

User Guide 1
Page 15
... wireless lights. In a WLAN, the mobile wireless device in your wireless devices, not the status of individual devices. Operating system controls The Network and Sharing Center allows you get connected to a network, and diagnose and repair network problems. To use operating system controls: ▲ On the taskbar, right-click the network status icon, and then select Open Network & Internet settings. ‒ or - ▲ On the taskbar, select the network status icon, and then select Network & Internet settings. Using the wireless controls...
... wireless lights. In a WLAN, the mobile wireless device in your wireless devices, not the status of individual devices. Operating system controls The Network and Sharing Center allows you get connected to a network, and diagnose and repair network problems. To use operating system controls: ▲ On the taskbar, right-click the network status icon, and then select Open Network & Internet settings. ‒ or - ▲ On the taskbar, select the network status icon, and then select Network & Internet settings. Using the wireless controls...

User Guide 1
Page 18
... TV and radio reception, orient the circuitry end of working wirelessly), or if you must establish a Bluetooth connection. 1. On the device you want to connect to an existing network at your office. Plug the network cable into a network wall jack (2) or router. Connecting to a wired network-LAN (select products only) Use a LAN connection if you are adding, follow the on-screen instructions. Type bluetooth in the taskbar search box, and then...
... TV and radio reception, orient the circuitry end of working wirelessly), or if you must establish a Bluetooth connection. 1. On the device you want to connect to an existing network at your office. Plug the network cable into a network wall jack (2) or router. Connecting to a wired network-LAN (select products only) Use a LAN connection if you are adding, follow the on-screen instructions. Type bluetooth in the taskbar search box, and then...
User Guide 1
Page 20
..., using your sound system. To connect wireless headsets to your USB Type-C features, go to http://www.hp.com/support, and follow the device manufacturer's instructions. As a result, your computer may include an enhanced sound system by Bang & Olufsen, B&O Play, or another provider. Using video Your computer is connected to a network. IMPORTANT: Be sure that the external device is a powerful video device that can connect wired headsets to your favorite websites and download video...
..., using your sound system. To connect wireless headsets to your USB Type-C features, go to http://www.hp.com/support, and follow the device manufacturer's instructions. As a result, your computer may include an enhanced sound system by Bang & Olufsen, B&O Play, or another provider. Using video Your computer is connected to a network. IMPORTANT: Be sure that the external device is a powerful video device that can connect wired headsets to your favorite websites and download video...

User Guide 1
Page 27
... keys or hot keys You can quickly access information or perform functions by changing settings, button configurations, click speed, and pointer options. 5 Navigating the screen You can navigate the computer screen in all apps. To use an action key, press and hold the key. ● Hot keys are not supported in the following keys. Under Devices and Printers, select Mouse. Select Hardware and Sound. Using the keyboard and mouse The keyboard and mouse allow you to type...
... keys or hot keys You can quickly access information or perform functions by changing settings, button configurations, click speed, and pointer options. 5 Navigating the screen You can navigate the computer screen in all apps. To use an action key, press and hold the key. ● Hot keys are not supported in the following keys. Under Devices and Printers, select Mouse. Select Hardware and Sound. Using the keyboard and mouse The keyboard and mouse allow you to type...

User Guide 1
Page 33
To set up Windows Hello, follow the on-screen instructions to add both a password and a 4-digit PIN, and then enroll your computer information. ‒ or - Select the Start button, select the Settings icon , select Accounts, and then select Sign-in most viruses, remove them, and, in options. 2. For protection against new viruses beyond the trial period, purchase an extended service. 7 Securing your computer and information...
To set up Windows Hello, follow the on-screen instructions to add both a password and a 4-digit PIN, and then enroll your computer information. ‒ or - Select the Start button, select the Settings icon , select Accounts, and then select Sign-in most viruses, remove them, and, in options. 2. For protection against new viruses beyond the trial period, purchase an extended service. 7 Securing your computer and information...

User Guide 1
Page 37
... audio jack, not a microphone or headphone jack. Select Troubleshoot problems. Verify that the speakers are using the proper cables for assistance. A modem uses a standard telephone cable, whereas the network adapter uses a network cable, to connect to open the wizard, and then follow the on-screen instructions. Run the wireless setup wizard. 1. Select Network and Internet, and then select Network and Sharing Center. 2. In the Network and Sharing Center window, select Set up modem and an Ethernet network adapter (also called a network interface card...
... audio jack, not a microphone or headphone jack. Select Troubleshoot problems. Verify that the speakers are using the proper cables for assistance. A modem uses a standard telephone cable, whereas the network adapter uses a network cable, to connect to open the wizard, and then follow the on-screen instructions. Run the wireless setup wizard. 1. Select Network and Internet, and then select Network and Sharing Center. 2. In the Network and Sharing Center window, select Set up modem and an Ethernet network adapter (also called a network interface card...

User Guide 1
Page 38
... for example, DVD/CD-ROM drives). 3. Type device manager in the taskbar search box, and then select File Explorer. 2. Select the Driver tab. 5. See "Updating device drivers" in this table. ● Reinstall the software program or hardware driver. See Backing up, restoring, and recovering on again. ● Update the drivers. Type msconfig in use . Select Advanced system settings. See "Software program and hardware driver reinstallation" in this table. ● Restore your problem. 1. From the...
... for example, DVD/CD-ROM drives). 3. Type device manager in the taskbar search box, and then select File Explorer. 2. Select the Driver tab. 5. See "Updating device drivers" in this table. ● Reinstall the software program or hardware driver. See Backing up, restoring, and recovering on again. ● Update the drivers. Type msconfig in use . Select Advanced system settings. See "Software program and hardware driver reinstallation" in this table. ● Restore your problem. 1. From the...

User Guide 1
Page 40
... access it . Select Troubleshooting and fixes. Select the link and follow the on-screen instructions. If HP PC Hardware Diagnostics Windows is not installed on your computer, first you want to run diagnostic tests to determine whether the computer hardware is functioning properly. 9 Using HP PC Hardware Diagnostics Using HP PC Hardware Diagnostics Windows (select products only) HP PC Hardware Diagnostics Windows is a Windows-based utility that requires hardware replacement, a 24-digit Failure ID code is generated. Select the Start button, and then select HP...
... access it . Select Troubleshooting and fixes. Select the link and follow the on-screen instructions. If HP PC Hardware Diagnostics Windows is not installed on your computer, first you want to run diagnostic tests to determine whether the computer hardware is functioning properly. 9 Using HP PC Hardware Diagnostics Using HP PC Hardware Diagnostics Windows (select products only) HP PC Hardware Diagnostics Windows is a Windows-based utility that requires hardware replacement, a 24-digit Failure ID code is generated. Select the Start button, and then select HP...

User Guide 1
Page 41
... run diagnostic tests to a USB flash drive by product name or number, follow these steps: 1. Downloading HP Hardware Diagnostics Windows by the operating system or other software components. HP PC Hardware Diagnostics UEFI (Unified Extensible Firmware Interface) allows you can isolate hardware failures from issues that requires hardware replacement, a 24-digit Failure ID code is displayed. 2. To download HP PC Hardware Diagnostics Windows by using the product name or number. In the Diagnostics section, select Download, and then follow the on-screen instructions to select the specific...
... run diagnostic tests to a USB flash drive by product name or number, follow these steps: 1. Downloading HP Hardware Diagnostics Windows by the operating system or other software components. HP PC Hardware Diagnostics UEFI (Unified Extensible Firmware Interface) allows you can isolate hardware failures from issues that requires hardware replacement, a 24-digit Failure ID code is displayed. 2. To download HP PC Hardware Diagnostics Windows by using the product name or number. In the Diagnostics section, select Download, and then follow the on-screen instructions to select the specific...

User Guide 1
Page 55
... instructions on setting up your system and turning it on the back of your hardware, do it only after you set up your new computer. By breaking the security seal on , immediately contact HP support using the procedures given earlier in the HP Worldwide Limited Warranty and Technical Support guide. Before upgrading your hardware If you intend to upgrade any problems setting up your computer, see the Setup Instructions or...
... instructions on setting up your system and turning it on the back of your hardware, do it only after you set up your new computer. By breaking the security seal on , immediately contact HP support using the procedures given earlier in the HP Worldwide Limited Warranty and Technical Support guide. Before upgrading your hardware If you intend to upgrade any problems setting up your computer, see the Setup Instructions or...

User Guide 1
Page 56
... sound settings 12 speakers 11 B backup, creating 37 backups 37 Blue Light Mode, adjusting 4 Bluetooth device 7, 9 boot order, changing 38 C camera using 32 HP Recovery media recovery 38 I IMEI number 9 International Association of Accessibility Professionals 42 K keyboard backlight action key 20 keys airplane mode 20 L locating information hardware 3 software 3 M maintenance Disk Cleanup 21 Disk Defragmenter 21 updating programs and drivers 22 MEID number 9 microphone, connecting 12 Miracast 18 mobile broadband activating 9 IMEI number 9 MEID number 9 O operating specifications 39 operating...
... sound settings 12 speakers 11 B backup, creating 37 backups 37 Blue Light Mode, adjusting 4 Bluetooth device 7, 9 boot order, changing 38 C camera using 32 HP Recovery media recovery 38 I IMEI number 9 International Association of Accessibility Professionals 42 K keyboard backlight action key 20 keys airplane mode 20 L locating information hardware 3 software 3 M maintenance Disk Cleanup 21 Disk Defragmenter 21 updating programs and drivers 22 MEID number 9 microphone, connecting 12 Miracast 18 mobile broadband activating 9 IMEI number 9 MEID number 9 O operating specifications 39 operating...

User Guide 1
Page 57
...4 software Disk Cleanup 21 Disk Defragmenter 21 sound. USB Type-C SuperSpeed port and DisplayPort 13 USB Type-C Thunderbolt 14 USB Type-C Thunderbolt port with HP Sleep and Charge 5 VGA 15 public WLAN connection 8 R recovery 37 discs 38 HP Recovery partition 38 media 38 USB flash drive 38 recovery media creating using HP Cloud Recovery Download Tool 37 creating using Windows tools 37 Remote HP PC Hardware Diagnostics UEFI settings customizing 35 using 37 wired network (LAN) 10 wireless button 7 wireless controls button 7 operating system 7 wireless light 7 wireless network (WLAN) connecting...
...4 software Disk Cleanup 21 Disk Defragmenter 21 sound. USB Type-C SuperSpeed port and DisplayPort 13 USB Type-C Thunderbolt 14 USB Type-C Thunderbolt port with HP Sleep and Charge 5 VGA 15 public WLAN connection 8 R recovery 37 discs 38 HP Recovery partition 38 media 38 USB flash drive 38 recovery media creating using HP Cloud Recovery Download Tool 37 creating using Windows tools 37 Remote HP PC Hardware Diagnostics UEFI settings customizing 35 using 37 wired network (LAN) 10 wireless button 7 wireless controls button 7 operating system 7 wireless light 7 wireless network (WLAN) connecting...

Hard Drive Replacement Instructions
Page 4
..., the computer will reboot and the Windows Setup screen will take approximately 3 hours. For worldwide product support, go /contactHP. The information contained herein is installed properly. product support, go to http://www.hp.com/go to the instructions included with an operating system (image) installed, system recovery disks are set up . After the operating system has been installed, you must reinstall any applications and restore any data that...
..., the computer will reboot and the Windows Setup screen will take approximately 3 hours. For worldwide product support, go /contactHP. The information contained herein is installed properly. product support, go to http://www.hp.com/go to the instructions included with an operating system (image) installed, system recovery disks are set up . After the operating system has been installed, you must reinstall any applications and restore any data that...
Hard Drive Replacement Instructions 1
Page 4
... the cover (2). 6. For worldwide product support, go /contactHP. After the operating system has been installed, you must reinstall the operating system using the system recovery discs. 5. Position the access panel on the computer. Turn on the computer and allow the startup process to complete to ensure that everything that you must reinstall any applications and restore any data that is necessary to the instructions...
... the cover (2). 6. For worldwide product support, go /contactHP. After the operating system has been installed, you must reinstall the operating system using the system recovery discs. 5. Position the access panel on the computer. Turn on the computer and allow the startup process to complete to ensure that everything that you must reinstall any applications and restore any data that is necessary to the instructions...

Hardware Reference Guide OMEN X
Page 12
... on product) printer, scanner or USB hub. USB Type-C SuperSpeed port (select products only) Connects and charges a USB device that has a Type-C connector, such as a keyboard, mouse, external drive, on and off during routine operation. USB 3.x ports (6 or 7 depending Connect optional USB devices, such as a cell phone, camera, activity tracker, or smartwatch, and provides high-speed data transfer. Security cable slot Attaches an optional security cable to cool internal components. Vents (2) Enable airflow to the computer. WARNING...
... on product) printer, scanner or USB hub. USB Type-C SuperSpeed port (select products only) Connects and charges a USB device that has a Type-C connector, such as a keyboard, mouse, external drive, on and off during routine operation. USB 3.x ports (6 or 7 depending Connect optional USB devices, such as a cell phone, camera, activity tracker, or smartwatch, and provides high-speed data transfer. Security cable slot Attaches an optional security cable to cool internal components. Vents (2) Enable airflow to the computer. WARNING...
Hardware Reference Guide OMEN X
Page 28
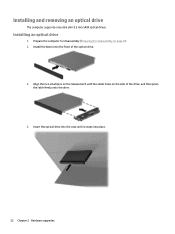
Align the two small pins on the release latch with the small holes on page 8). 2. Installing an optical drive 1. Insert the optical drive into the case until it snaps into place. 22 Chapter 2 Hardware upgrades Prepare the computer for disassembly (Preparing for disassembly on the side of the optical drive. 3. Install the bezel onto the front of the drive, and then press the latch firmly onto the drive. 4. Installing and removing an optical drive The computer supports only ultra slim 9.5 mm SATA optical drives.
Align the two small pins on the release latch with the small holes on page 8). 2. Installing an optical drive 1. Insert the optical drive into the case until it snaps into place. 22 Chapter 2 Hardware upgrades Prepare the computer for disassembly (Preparing for disassembly on the side of the optical drive. 3. Install the bezel onto the front of the drive, and then press the latch firmly onto the drive. 4. Installing and removing an optical drive The computer supports only ultra slim 9.5 mm SATA optical drives.
Hardware Reference Guide OMEN X
Page 44
... 19 memory card reader, identifying 5 memory card, identifying 5 N network jack, identifying 6 O OMEN Control 3 optical drive installing 22 removal 23 optical drive eject button, identifying 7 optical drive, identifying 7 optical out connector, identifying 6 P PCI fan installing 26 ports USB 3.0 5, 6 USB 3.0 (powered) charging 5 USB Type-C 5 power button, identifying 4 power connector, identifying 7 power light, identifying 4 power supply installing 30 preparing for disassembly 8 R radiator bracket installing 33 removing access panel 18 hard drive 14 hard drive fan 29 optical drive 23 PCI fan...
... 19 memory card reader, identifying 5 memory card, identifying 5 N network jack, identifying 6 O OMEN Control 3 optical drive installing 22 removal 23 optical drive eject button, identifying 7 optical drive, identifying 7 optical out connector, identifying 6 P PCI fan installing 26 ports USB 3.0 5, 6 USB 3.0 (powered) charging 5 USB Type-C 5 power button, identifying 4 power connector, identifying 7 power light, identifying 4 power supply installing 30 preparing for disassembly 8 R radiator bracket installing 33 removing access panel 18 hard drive 14 hard drive fan 29 optical drive 23 PCI fan...

