
HP Mini 5102 - Maintenance and Service Guide
Page 11
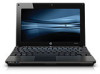
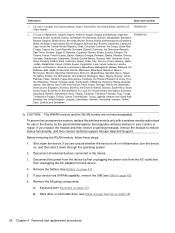
...● 6 cell Li-Ion (66-Wh) 3.0-Ah ● 6 cell Li-ion (55-Wh) 2.55-Ah ● 4-cell Li-ion (29-Wh) 2.0-Ah Supports HP Kensington Security Lock Preinstalled: Windows 7 Professional 32 Windows 7 Professional 32 with 2 TouchPad buttons and 2-way scrolling (taps enabled as default) AC adapter ● 65-W Smart ... TouchPad, with Windows XP Pro images Windows 7 Home Premium Windows 7 Starter Windows XP Home SP3 for NetBooks FreeDOS SUSE Linux (SLED 11) Customer Self-Replacement (CSR): ● AC adapter ● Battery (system) ● Keyboard ● Memory module ● Hard drive 3
...● 6 cell Li-Ion (66-Wh) 3.0-Ah ● 6 cell Li-ion (55-Wh) 2.55-Ah ● 4-cell Li-ion (29-Wh) 2.0-Ah Supports HP Kensington Security Lock Preinstalled: Windows 7 Professional 32 Windows 7 Professional 32 with 2 TouchPad buttons and 2-way scrolling (taps enabled as default) AC adapter ● 65-W Smart ... TouchPad, with Windows XP Pro images Windows 7 Home Premium Windows 7 Starter Windows XP Home SP3 for NetBooks FreeDOS SUSE Linux (SLED 11) Customer Self-Replacement (CSR): ● AC adapter ● Battery (system) ● Keyboard ● Memory module ● Hard drive 3
HP Mini 5102 - Maintenance and Service Guide
Page 39
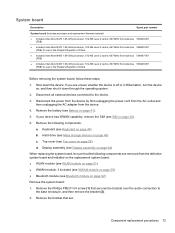
...11b/g/n 1x2 for use in Russia and Ukraine Hard drive, 160-GB, 7200-RPM, for use with WWAN option Hard drive, 250-GB, 7200-RPM, for use with WWAN option Hard drive, 320-GB, 7200-RPM, for use with WWAN option System board (including replacement thermal material and RTC battery), Intel Atom N450... 1.66-GHz processor, 512-KB Level 2 cache, 667-MHz front-side bus (FSB) System board (including replacement thermal material and RTC battery...
...11b/g/n 1x2 for use in Russia and Ukraine Hard drive, 160-GB, 7200-RPM, for use with WWAN option Hard drive, 250-GB, 7200-RPM, for use with WWAN option Hard drive, 320-GB, 7200-RPM, for use with WWAN option System board (including replacement thermal material and RTC battery), Intel Atom N450... 1.66-GHz processor, 512-KB Level 2 cache, 667-MHz front-side bus (FSB) System board (including replacement thermal material and RTC battery...
HP Mini 5102 - Maintenance and Service Guide
Page 43
... replacement requirements 35 Drive handling CAUTION: Drives are unsure whether the device is off or in Hibernation, turn the device on surfaces covered with care. If you are discharged of protective packaging and label the package "FRAGILE." Before handling a drive,...hard drive, shut down through the operating system. To prevent damage to the device, damage to a drive, or loss of shock-proof foam. After removing a hard drive, an optical drive, or a diskette drive, place it down the device. While handling a drive, avoid touching the connector. Avoid exposing a hard drive...
... replacement requirements 35 Drive handling CAUTION: Drives are unsure whether the device is off or in Hibernation, turn the device on surfaces covered with care. If you are discharged of protective packaging and label the package "FRAGILE." Before handling a drive,...hard drive, shut down through the operating system. To prevent damage to the device, damage to a drive, or loss of shock-proof foam. After removing a hard drive, an optical drive, or a diskette drive, place it down the device. While handling a drive, avoid touching the connector. Avoid exposing a hard drive...
HP Mini 5102 - Maintenance and Service Guide
Page 56
... 4 Removal and replacement procedures Remove the battery (see Keyboard on page 41). 5. Remove the keyboard (see Battery on page 45). Description Hard drive, 320-GB, 7200-RPM, for use with WWAN option Hard drive, 320-GB, 7200-RPM, SATA Hard drive, 250-GB, 7200-RPM, for use with WWAN option Hard drive, 250-GB, 7200-RPM, SATA Hard drive, 160-GB...
... 4 Removal and replacement procedures Remove the battery (see Keyboard on page 41). 5. Remove the keyboard (see Battery on page 45). Description Hard drive, 320-GB, 7200-RPM, for use with WWAN option Hard drive, 320-GB, 7200-RPM, SATA Hard drive, 250-GB, 7200-RPM, for use with WWAN option Hard drive, 250-GB, 7200-RPM, SATA Hard drive, 160-GB...

HP Mini 5102 - Maintenance and Service Guide
Page 57
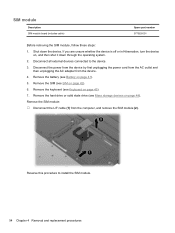
... a solid state drive: a. Component replacement procedures 49 Use the Mylar tab to slide the assembly to the right (3) to remove it , and remove the assembly (4). 3. Using the Mylar tab, lift the bracket (2) away from the hard drive. - b. On a hard drive: a. Remove the 4 Phillips PM3.0×3.0 screws (1) that secure the solid-state drive bracket to the hard drive. 2. Remove the...
... a solid state drive: a. Component replacement procedures 49 Use the Mylar tab to slide the assembly to the right (3) to remove it , and remove the assembly (4). 3. Using the Mylar tab, lift the bracket (2) away from the hard drive. - b. On a hard drive: a. Remove the 4 Phillips PM3.0×3.0 screws (1) that secure the solid-state drive bracket to the hard drive. 2. Remove the...

HP Mini 5102 - Maintenance and Service Guide
Page 58
Reverse this procedure to install a hard drive or solid state drive. 50 Chapter 4 Removal and replacement procedures
Reverse this procedure to install a hard drive or solid state drive. 50 Chapter 4 Removal and replacement procedures
HP Mini 5102 - Maintenance and Service Guide
Page 60
Remove the following components: a. If you replace the module and then receive a warning message, remove the module to the device. 3. Disconnect the power from the device by the governmental agency that regulates ..., St. To prevent an unresponsive system, replace the wireless module only with a wireless module authorized for use in your device has WWAN capability, remove the SIM (see Battery on , and then shut it down the device. If you are not interchangeable. Hard drive or solid state drive (see Keyboard on page 48) 52 Chapter...
Remove the following components: a. If you replace the module and then receive a warning message, remove the module to the device. 3. Disconnect the power from the device by the governmental agency that regulates ..., St. To prevent an unresponsive system, replace the wireless module only with a wireless module authorized for use in your device has WWAN capability, remove the SIM (see Battery on , and then shut it down the device. If you are not interchangeable. Hard drive or solid state drive (see Keyboard on page 48) 52 Chapter...
HP Mini 5102 - Maintenance and Service Guide
Page 62
... device. 3. Remove the SIM (see Mass storage devices on page 48). Disconnect all external devices connected to install the SIM module. 54 Chapter 4 Removal and replacement procedures SIM module Description SIM module board (includes cable) Spare part number 577923-001 Before removing the SIM module, follow these steps: 1. Disconnect the power... first unplugging the power cord from the AC outlet and then unplugging the AC adapter from the computer, and remove the SIM module (2). Remove the hard drive or solid state drive (see SIM on page 45). 7.
... device. 3. Remove the SIM (see Mass storage devices on page 48). Disconnect all external devices connected to install the SIM module. 54 Chapter 4 Removal and replacement procedures SIM module Description SIM module board (includes cable) Spare part number 577923-001 Before removing the SIM module, follow these steps: 1. Disconnect the power... first unplugging the power cord from the AC outlet and then unplugging the AC adapter from the computer, and remove the SIM module (2). Remove the hard drive or solid state drive (see SIM on page 45). 7.
HP Mini 5102 - Maintenance and Service Guide
Page 63
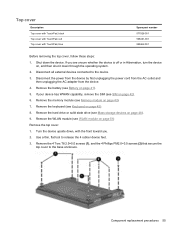
... page 41). 5. Remove the 4 Torx T8 2.5×5.0 screws (1), and the 4 Phillips PM2.0×3.0 screws (2) that secure the top cover to the base enclosure. Remove the hard drive or solid state drive (see SIM on , and then shut it down through the operating system. 2. Component replacement procedures 55 If you . 2.
... page 41). 5. Remove the 4 Torx T8 2.5×5.0 screws (1), and the 4 Phillips PM2.0×3.0 screws (2) that secure the top cover to the base enclosure. Remove the hard drive or solid state drive (see SIM on , and then shut it down through the operating system. 2. Component replacement procedures 55 If you . 2.
HP Mini 5102 - Maintenance and Service Guide
Page 66
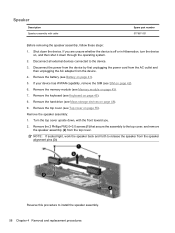
... the device by first unplugging the power cord from the AC outlet and then unplugging the AC adapter from the speaker alignment pins (3). Remove the hard drive (see SIM on page 42). 6. Remove the speaker assembly: 1. Remove the battery (see Top cover on page 55). Remove the 2 Phillips ...from the device. 4. NOTE: If seated tight, work the speaker back and forth to install the speaker assembly. 58 Chapter 4 Removal and replacement procedures Turn the top cover upside down, with cable Spare part number 577967-001 Before removing the speaker assembly, follow these steps: 1. Shut...
... the device by first unplugging the power cord from the AC outlet and then unplugging the AC adapter from the speaker alignment pins (3). Remove the hard drive (see SIM on page 42). 6. Remove the speaker assembly: 1. Remove the battery (see Top cover on page 55). Remove the 2 Phillips ...from the device. 4. NOTE: If seated tight, work the speaker back and forth to install the speaker assembly. 58 Chapter 4 Removal and replacement procedures Turn the top cover upside down, with cable Spare part number 577967-001 Before removing the speaker assembly, follow these steps: 1. Shut...
HP Mini 5102 - Maintenance and Service Guide
Page 67
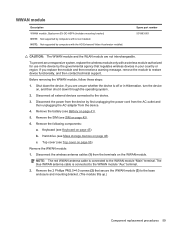
... support. Disconnect the wireless antenna cables (1) from the device. 4. To prevent an unresponsive system, replace the wireless module only with Linux installed. Remove the following components: a. Hard drive (see Top cover on page 55) Remove the WWAN module: 1. The blue WWAN antenna cable is...through the operating system. 2. Disconnect all external devices connected to the base enclosure and mounting bracket. (The module tilts up.) Component replacement procedures 59 Remove the SIM (see SIM on , and then shut it down the device. Before removing the WWAN module, follow ...
... support. Disconnect the wireless antenna cables (1) from the device. 4. To prevent an unresponsive system, replace the wireless module only with Linux installed. Remove the following components: a. Hard drive (see Top cover on page 55) Remove the WWAN module: 1. The blue WWAN antenna cable is...through the operating system. 2. Disconnect all external devices connected to the base enclosure and mounting bracket. (The module tilts up.) Component replacement procedures 59 Remove the SIM (see SIM on , and then shut it down the device. Before removing the WWAN module, follow ...
HP Mini 5102 - Maintenance and Service Guide
Page 69
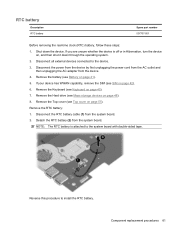
Remove the Top cover (see Top cover on page 48). 8. Disconnect the RTC battery cable (1) from the device. 4. Remove the Hard drive (see Battery on page 45). 7. If you are unsure whether the device is attached to the system board with double-sided tape. .... 3. Detach the RTC battery (2) from the system board. Remove the Keyboard (see SIM on , and then shut it down the device. Component replacement procedures 61 Shut down through the operating system. 2. RTC battery Description RTC battery Spare part number 507707-001 Before removing the real-time clock (RTC...
Remove the Top cover (see Top cover on page 48). 8. Disconnect the RTC battery cable (1) from the device. 4. Remove the Hard drive (see Battery on page 45). 7. If you are unsure whether the device is attached to the system board with double-sided tape. .... 3. Detach the RTC battery (2) from the system board. Remove the Keyboard (see SIM on , and then shut it down the device. Component replacement procedures 61 Shut down through the operating system. 2. RTC battery Description RTC battery Spare part number 507707-001 Before removing the real-time clock (RTC...
HP Mini 5102 - Maintenance and Service Guide
Page 70
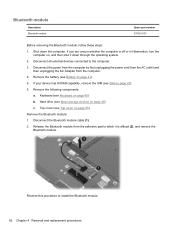
.... 4. Reverse this procedure to the computer. 3. Disconnect all external devices connected to install the Bluetooth module. 62 Chapter 4 Removal and replacement procedures Remove the battery (see Mass storage devices on page 45) b. Hard drive (see Battery on page 42). 6. Keyboard (see Top cover on , and then shut it is off or in Hibernation...
.... 4. Reverse this procedure to the computer. 3. Disconnect all external devices connected to install the Bluetooth module. 62 Chapter 4 Removal and replacement procedures Remove the battery (see Mass storage devices on page 45) b. Hard drive (see Battery on page 42). 6. Keyboard (see Top cover on , and then shut it is off or in Hibernation...

HP Mini 5102 - Maintenance and Service Guide
Page 71
... the AC adapter from the device. 4. Remove the battery (see SIM on page 41). 5. Keyboard (see Mass storage devices on page 45) b. Hard drive (see Keyboard on page 48) c. Component replacement procedures 63 Top cover (see Top cover on , and then shut it down the device. Remove the 3 Phillips PM2.0×2.0×7.0 broad...
... the AC adapter from the device. 4. Remove the battery (see SIM on page 41). 5. Keyboard (see Mass storage devices on page 45) b. Hard drive (see Keyboard on page 48) c. Component replacement procedures 63 Top cover (see Top cover on , and then shut it down the device. Remove the 3 Phillips PM2.0×2.0×7.0 broad...
HP Mini 5102 - Maintenance and Service Guide
Page 73
If you are unsure whether the device is off or in Hibernation, turn the device on page 55) Component replacement procedures 65 Disconnect the power from the device by first unplugging the power cord from the AC outlet and then unplugging the AC adapter from ... microphone with cable ● WWAN antennas (2) with non-touch screen, red ● For use in WSVGA display assembly Display cable kit includes the following components: a. Hard drive (see Keyboard on page 48) c. Disconnect all external devices connected to the device. 3. Keyboard (see Mass storage devices on page 45) b.
If you are unsure whether the device is off or in Hibernation, turn the device on page 55) Component replacement procedures 65 Disconnect the power from the device by first unplugging the power cord from the AC outlet and then unplugging the AC adapter from ... microphone with cable ● WWAN antennas (2) with non-touch screen, red ● For use in WSVGA display assembly Display cable kit includes the following components: a. Hard drive (see Keyboard on page 48) c. Disconnect all external devices connected to the device. 3. Keyboard (see Mass storage devices on page 45) b.
HP Mini 5102 - Maintenance and Service Guide
Page 81
... (see Display assembly on page 41). 5. If your device has WWAN capability, remove the SIM (see Battery on page 64) When replacing the system board, be sure that the following components: a. Disconnect the power from the device by first unplugging the power cord from the... to the device. 3. Disconnect all external devices connected to the base enclosure, and then remove the bracket (2). 2. Hard drive (see Top cover on page 48) c. Remove the Phillips PM2.0×3.0 screw (1) that sec Component replacement procedures 73 Top cover (see Mass storage devices on page 55) d.
... (see Display assembly on page 41). 5. If your device has WWAN capability, remove the SIM (see Battery on page 64) When replacing the system board, be sure that the following components: a. Disconnect the power from the device by first unplugging the power cord from the... to the device. 3. Disconnect all external devices connected to the base enclosure, and then remove the bracket (2). 2. Hard drive (see Top cover on page 48) c. Remove the Phillips PM2.0×3.0 screw (1) that sec Component replacement procedures 73 Top cover (see Mass storage devices on page 55) d.
HP Mini 5102 - Maintenance and Service Guide
Page 83
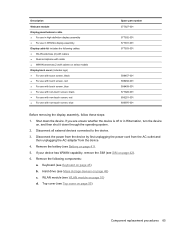
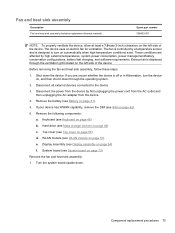
Fan and heat sink assembly Description Fan and heat sink assembly (includes replacement thermal material) Spare part number 598452-001 NOTE: To properly ventilate the device, ...4. Keyboard (see WLAN module on page 42). 6. WLAN module (see Keyboard on automatically when high temperature conditions exist. Component replacement procedures 75 Exhaust air is off or in Hibernation, turn on page 45) b. If your device has WWAN capability, remove... are unsure whether the device is displaced through the operating system. 2. Shut down . Hard drive (see System board on page 48) c.
Fan and heat sink assembly Description Fan and heat sink assembly (includes replacement thermal material) Spare part number 598452-001 NOTE: To properly ventilate the device, ...4. Keyboard (see WLAN module on page 42). 6. WLAN module (see Keyboard on automatically when high temperature conditions exist. Component replacement procedures 75 Exhaust air is off or in Hibernation, turn on page 45) b. If your device has WWAN capability, remove... are unsure whether the device is displaced through the operating system. 2. Shut down . Hard drive (see System board on page 48) c.
HP Mini 5102 - Maintenance and Service Guide
Page 95
... components needed for starting the computer. ● Run-In Test-Runs a comprehensive check on system memory. ● Hard Disk Test-Runs a comprehensive self-test on any hard drive in the system. ● Memory Test-Runs a comprehensive test on any memory installed in the computer. ●...this chapter may not be supported by your computer. Replace the configuration settings in the system. ● View specification information for the computer and the batteries in Computer Setup with the original factory settings. (Hard drive mode, password settings, and security settings are not ...
... components needed for starting the computer. ● Run-In Test-Runs a comprehensive check on system memory. ● Hard Disk Test-Runs a comprehensive self-test on any hard drive in the system. ● Memory Test-Runs a comprehensive test on any memory installed in the computer. ●...this chapter may not be supported by your computer. Replace the configuration settings in the system. ● View specification information for the computer and the batteries in Computer Setup with the original factory settings. (Hard drive mode, password settings, and security settings are not ...
HP Mini 5102 - Maintenance and Service Guide
Page 103
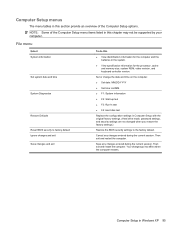
...: HH:MM ● F1: System information ● F2: Start-up test ● F3: Run-in test ● F4: Hard disk test Replace the configuration settings in Computer Setup with the original factory settings. (Hard drive mode, password settings, and security settings are not changed when you restore the factory settings.) Restore the BIOS security...
...: HH:MM ● F1: System information ● F2: Start-up test ● F3: Run-in test ● F4: Hard disk test Replace the configuration settings in Computer Setup with the original factory settings. (Hard drive mode, password settings, and security settings are not changed when you restore the factory settings.) Restore the BIOS security...
HP Mini 5102 - Maintenance and Service Guide
Page 145
...drive 2 wireless 2 product name 1 product name and number, computer 13 Q QuickLook button, identifying 7 QuickLook light, identifying 6 QuickWeb button, identifying 7 QuickWeb light, identifying 6 R recovering 114, 118, 119 release latches, battery 13 removal/replacement... HP SpareKey enrollment 88 Automatic DriveLock 88 change password 88 Disk Sanitizer 88 DriveLock 88 fingerprint reader reset 88 HP Sparekey 88 HP ...part number 20 speakers 9 specifications device 106 display 108, 109 hard drive 110 solid state drive 111 system resources 112 static-shielding materials 38 switch, wireless 9 ...
...drive 2 wireless 2 product name 1 product name and number, computer 13 Q QuickLook button, identifying 7 QuickLook light, identifying 6 QuickWeb button, identifying 7 QuickWeb light, identifying 6 R recovering 114, 118, 119 release latches, battery 13 removal/replacement... HP SpareKey enrollment 88 Automatic DriveLock 88 change password 88 Disk Sanitizer 88 DriveLock 88 fingerprint reader reset 88 HP Sparekey 88 HP ...part number 20 speakers 9 specifications device 106 display 108, 109 hard drive 110 solid state drive 111 system resources 112 static-shielding materials 38 switch, wireless 9 ...


