
HP LaserJet M1130/M1210 MFP User Guide
Page 160
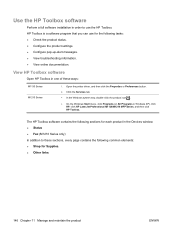
...following sections for each product in order to these ways: M1130 Series M1210 Series 1. Use the HP Toolbox software Perform a full software installation in the Devices window: ● Status ● Fax (M1210 Series only) In addition to use for the following common elements:...Other links. 146 Chapter 11 Manage and maintain the product ENWW View HP Toolbox software Open HP Toolbox in Windows XP), click HP, click HP LaserJet Professional M1130/M1210 MFP Series, and then click HP Toolbox. Open the printer driver, and then click the Properties or Preferences button. 2. Click ...
...following sections for each product in order to these ways: M1130 Series M1210 Series 1. Use the HP Toolbox software Perform a full software installation in the Devices window: ● Status ● Fax (M1210 Series only) In addition to use for the following common elements:...Other links. 146 Chapter 11 Manage and maintain the product ENWW View HP Toolbox software Open HP Toolbox in Windows XP), click HP, click HP LaserJet Professional M1130/M1210 MFP Series, and then click HP Toolbox. Open the printer driver, and then click the Properties or Preferences button. 2. Click ...

HP LaserJet M1130/M1210 MFP User Guide
Page 246
...340-2445 for Alaska and Hawaii. Non-U.S. Paper This product is suitable for this product include the following: HP LaserJet Professional M1210 MFP Series Type Carbon monofluoride lithium Weight 0.8 g Location On formatter board User-removable No 232 Appendix D Regulatory information ... program, just follow the simple directions in the HP LaserJet Printer Family Print Media Guide. This product is capable of the box. Material restrictions (M1130 Series) This HP product does not contain added mercury. This HP product contains a battery that might require special handling...
...340-2445 for Alaska and Hawaii. Non-U.S. Paper This product is suitable for this product include the following: HP LaserJet Professional M1210 MFP Series Type Carbon monofluoride lithium Weight 0.8 g Location On formatter board User-removable No 232 Appendix D Regulatory information ... program, just follow the simple directions in the HP LaserJet Printer Family Print Media Guide. This product is capable of the box. Material restrictions (M1130 Series) This HP product does not contain added mercury. This HP product contains a battery that might require special handling...

Service Manual
Page 9
... check 108 Half self-test functional check 108 Diagrams ...109 Plug/jack locations 109 HP LaserJet Professional M1130 MFP series 109 HP LaserJet Professional M1210 MFP series 110 Location of connectors 111 Locations of major components 112 General timing charts 115 General...quality troubleshooting tools 119 Repetitive defect ruler 119 Interpret control-panel light patterns (HP LaserJet Professional M1130 MFP series only) ...120 Interpret control-panel messages (HP LaserJet Professional M1210 MFP series only) ...123 Control-panel message types 123 Control-panel messages 123 Clear...
... check 108 Half self-test functional check 108 Diagrams ...109 Plug/jack locations 109 HP LaserJet Professional M1130 MFP series 109 HP LaserJet Professional M1210 MFP series 110 Location of connectors 111 Locations of major components 112 General timing charts 115 General...quality troubleshooting tools 119 Repetitive defect ruler 119 Interpret control-panel light patterns (HP LaserJet Professional M1130 MFP series only) ...120 Interpret control-panel messages (HP LaserJet Professional M1210 MFP series only) ...123 Control-panel message types 123 Control-panel messages 123 Clear...

Service Manual
Page 10
...scan-quality problems 143 Solve scan-quality problems 143 Optimize and improve image quality 144 Change print density 144 Manage and configure printer drivers 144 Clean the product ...145 Clean the pickup roller ...145 Clean the separation pad 149 Clean the paper path ...Solve performance problems ...159 Solve connectivity problems ...160 Solve direct-connect problems 160 Solve network problems 160 Solve fax problems (HP LaserJet Professional M1210 MFP series only 162 Fax troubleshooting checklist 162 Fax error messages ...163 Alert and warning messages 163 Fax logs and reports ...168 ...
...scan-quality problems 143 Solve scan-quality problems 143 Optimize and improve image quality 144 Change print density 144 Manage and configure printer drivers 144 Clean the product ...145 Clean the pickup roller ...145 Clean the separation pad 149 Clean the paper path ...Solve performance problems ...159 Solve connectivity problems ...160 Solve direct-connect problems 160 Solve network problems 160 Solve fax problems (HP LaserJet Professional M1210 MFP series only 162 Fax troubleshooting checklist 162 Fax error messages ...163 Alert and warning messages 163 Fax logs and reports ...168 ...

Service Manual
Page 11
...; HP LaserJet Professional M1210 MFP series 196 Scanner assembly; HP LaserJet Professional M1210 MFP series 208 Covers ...210 Product base ...210 Internal assemblies ...212 Internal assemblies (1 of 3 212 Internal assemblies (2 of 3 214 Internal assemblies (3 of 2); HP LaserJet Professional M1210 MFP series 198 Scanner drive assembly; HP LaserJet Professional M1130 MFP series 192 Scanner drive assembly; HP LaserJet Professional M1130 MFP series 194 ADF/scanner assembly; HP LaserJet Professional M1210 MFP series 200 ADF assembly; HP LaserJet Professional M1130 MFP series 190...
...; HP LaserJet Professional M1210 MFP series 196 Scanner assembly; HP LaserJet Professional M1210 MFP series 208 Covers ...210 Product base ...210 Internal assemblies ...212 Internal assemblies (1 of 3 212 Internal assemblies (2 of 3 214 Internal assemblies (3 of 2); HP LaserJet Professional M1210 MFP series 198 Scanner drive assembly; HP LaserJet Professional M1130 MFP series 192 Scanner drive assembly; HP LaserJet Professional M1130 MFP series 194 ADF/scanner assembly; HP LaserJet Professional M1210 MFP series 200 ADF assembly; HP LaserJet Professional M1130 MFP series 190...

Service Manual
Page 13
... Internal assemblies (2 of 3) ...215 Table 3-21 Internal assemblies (3 of 2); HP LaserJet Professional M1210 MFP series 199 Table 3-13 Scanner drive assembly; HP LaserJet Professional M1210 MFP series 203 Table 3-15 ADF top cover; HP LaserJet Professional M1130 MFP series 195 Table 3-11 ADF/scanner assembly; HP LaserJet Professional M1210 MFP series 201 Table 3-14 ADF assembly; HP LaserJet Professional M1210 MFP series 205 Table 3-16 ADF core; List of tables Table...
... Internal assemblies (2 of 3) ...215 Table 3-21 Internal assemblies (3 of 2); HP LaserJet Professional M1210 MFP series 199 Table 3-13 Scanner drive assembly; HP LaserJet Professional M1210 MFP series 203 Table 3-15 ADF top cover; HP LaserJet Professional M1130 MFP series 195 Table 3-11 ADF/scanner assembly; HP LaserJet Professional M1210 MFP series 201 Table 3-14 ADF assembly; HP LaserJet Professional M1210 MFP series 205 Table 3-16 ADF core; List of tables Table...

Service Manual
Page 15
... (1 of 5) ...25 Figure 1-34 Remove the left cover (2 of figures Figure 1-1 Phillips and pozidrive screwdriver comparison 3 Figure 1-2 Parts removal order; List of 5) ...25 ENWW xiii HP LaserJet Professional M1210 MFP series ADF/scanner 6 Figure 1-3 Parts removal order; HP LaserJet Professional M1130 MFP series scanner 7 Figure 1-4 Parts removal order;
... (1 of 5) ...25 Figure 1-34 Remove the left cover (2 of figures Figure 1-1 Phillips and pozidrive screwdriver comparison 3 Figure 1-2 Parts removal order; List of 5) ...25 ENWW xiii HP LaserJet Professional M1210 MFP series ADF/scanner 6 Figure 1-3 Parts removal order; HP LaserJet Professional M1130 MFP series scanner 7 Figure 1-4 Parts removal order;

Service Manual
Page 16
... assembly lid (2 of 3 52 Figure 1-76 Remove the ADF base or scanner assembly lid (3 of 3 52 Figure 1-77 Remove the scanner assembly bezel (1 of 5; HP LaserJet Professional M1130 MFP series) ...53 xiv ENWW Figure 1-35 Remove the right cover (3 of 5) ...26 Figure 1-36 Remove the left cover (4 of 5) ...26 Figure 1-37 Remove the right...of 4) ...28 Figure 1-40 Remove the front cover (3 of 4) ...29 Figure 1-41 Remove the front cover (4 of 4) ...29 Figure 1-42 Remove the scanner assembly (1 of 2; HP LaserJet Professional M1130 MFP series 30 Figure 1-43 Remove the scanner assembly (2 of 5;
... assembly lid (2 of 3 52 Figure 1-76 Remove the ADF base or scanner assembly lid (3 of 3 52 Figure 1-77 Remove the scanner assembly bezel (1 of 5; HP LaserJet Professional M1130 MFP series) ...53 xiv ENWW Figure 1-35 Remove the right cover (3 of 5) ...26 Figure 1-36 Remove the left cover (4 of 5) ...26 Figure 1-37 Remove the right...of 4) ...28 Figure 1-40 Remove the front cover (3 of 4) ...29 Figure 1-41 Remove the front cover (4 of 4) ...29 Figure 1-42 Remove the scanner assembly (1 of 2; HP LaserJet Professional M1130 MFP series 30 Figure 1-43 Remove the scanner assembly (2 of 5;

Service Manual
Page 17
... 1-118 Remove the fuser (4 of 4; HP LaserJet Professional M1130 MFP series 68 Figure 1-98 Remove the formatter PCA (2 of 6) ...81 ENWW xv Figure 1-78 Remove the scanner assembly bezel (2 of 4; HP LaserJet Professional M1130 MFP series 69 Figure 1-100 Remove the formatter PCA (4 of 2; HP LaserJet Professional M1210 MFP series) ...54 Figure 1-79 Remove the scanner ... Figure 1-86 Remove the CIS scanner motor and gears 61 Figure 1-87 Remove the control-panel assembly (1 of 5; HP LaserJet Professional M1130 MFP series) ...62 Figure 1-88 Remove the control-panel assembly (2 of 5;
... 1-118 Remove the fuser (4 of 4; HP LaserJet Professional M1130 MFP series 68 Figure 1-98 Remove the formatter PCA (2 of 6) ...81 ENWW xv Figure 1-78 Remove the scanner assembly bezel (2 of 4; HP LaserJet Professional M1130 MFP series 69 Figure 1-100 Remove the formatter PCA (4 of 2; HP LaserJet Professional M1210 MFP series) ...54 Figure 1-79 Remove the scanner ... Figure 1-86 Remove the CIS scanner motor and gears 61 Figure 1-87 Remove the control-panel assembly (1 of 5; HP LaserJet Professional M1130 MFP series) ...62 Figure 1-88 Remove the control-panel assembly (2 of 5;

Service Manual
Page 18
...3-5 Internal assemblies (2 of 4; lift plate in raised position 89 Figure 1-132 Reinstall the pickup assembly (4 of major components; HP LaserJet Professional M1130 MFP series 184 Figure 3-2 Locations of 6) ...82 Figure 1-121 Reinstall the fuser; Figure 1-119 Remove the fuser (5 of 6) ...81... 4 100 Figure 2-1 Sample engine test page ...107 Figure 2-2 Engine controller PCA connectors 111 Figure 2-3 Locations of 4; HP LaserJet Professional M1130 MFP series 112 Figure 2-4 Locations of 4; incorrect wire harness installation 83 Figure 1-123 Remove the pickup assembly (1 of 6 84 ...
...3-5 Internal assemblies (2 of 4; lift plate in raised position 89 Figure 1-132 Reinstall the pickup assembly (4 of major components; HP LaserJet Professional M1130 MFP series 184 Figure 3-2 Locations of 6) ...82 Figure 1-121 Reinstall the fuser; Figure 1-119 Remove the fuser (5 of 6) ...81... 4 100 Figure 2-1 Sample engine test page ...107 Figure 2-2 Engine controller PCA connectors 111 Figure 2-3 Locations of 4; HP LaserJet Professional M1130 MFP series 112 Figure 2-4 Locations of 4; incorrect wire harness installation 83 Figure 1-123 Remove the pickup assembly (1 of 6 84 ...
Service Manual
Page 25
... the necessary reassembly steps. 2. Make a copy from the ADF, and then verify that the expected startup sounds occur. 5. Verify that the output meets expectations (HP LaserJet Professional M1210 MFP series only). 10. Clean the outside of the product with a damp cloth. Post-service test Perform the following test to verify that the output meets...
... the necessary reassembly steps. 2. Make a copy from the ADF, and then verify that the expected startup sounds occur. 5. Verify that the output meets expectations (HP LaserJet Professional M1210 MFP series only). 10. Clean the outside of the product with a damp cloth. Post-service test Perform the following test to verify that the output meets...

Service Manual
Page 26
Parts removal order Figure 1-2 Parts removal order; HP LaserJet Professional M1210 MFP series ADF/scanner Scanner assembly Automatic document feeder assembly ADF top cover ADF pre-pickup arm and roller ADF core ADF tray ADF base White plate (document backing) Scanner assembly Scanner bezel Scan-drive system Cable, scan module DC servo motor 1200 PPI scanner assembly SSA latch Control panel 6 Chapter 1 Removal and replacement ENWW
Parts removal order Figure 1-2 Parts removal order; HP LaserJet Professional M1210 MFP series ADF/scanner Scanner assembly Automatic document feeder assembly ADF top cover ADF pre-pickup arm and roller ADF core ADF tray ADF base White plate (document backing) Scanner assembly Scanner bezel Scan-drive system Cable, scan module DC servo motor 1200 PPI scanner assembly SSA latch Control panel 6 Chapter 1 Removal and replacement ENWW

Service Manual
Page 27
HP LaserJet Professional M1130 MFP series scanner Scanner assembly Scanner lid White plate (document backing) Scanner assembly Scanner bezel Scan-drive system Cable, scan module DC servo motor 1200 PPI scanner assembly SSA latch Control Panel ENWW Parts removal order 7 Figure 1-3 Parts removal order;
HP LaserJet Professional M1130 MFP series scanner Scanner assembly Scanner lid White plate (document backing) Scanner assembly Scanner bezel Scan-drive system Cable, scan module DC servo motor 1200 PPI scanner assembly SSA latch Control Panel ENWW Parts removal order 7 Figure 1-3 Parts removal order;

Service Manual
Page 30
Figure 1-8 Remove the ADF pre-pickup arm and pickup roller assembly (2 of 4) 2. ADF pre-pickup arm and pickup roller NOTE: HP LaserJet Professional M1210 MFP series only Remove the ADF pre-pickup arm and pickup roller 1. Release one tab, and then fully release the ADF top cover. Figure 1-7 Remove the ADF pre-pickup arm and pickup roller assembly (1 of 4) 10 Chapter 1 Removal and replacement ENWW Open the ADF top cover.
Figure 1-8 Remove the ADF pre-pickup arm and pickup roller assembly (2 of 4) 2. ADF pre-pickup arm and pickup roller NOTE: HP LaserJet Professional M1210 MFP series only Remove the ADF pre-pickup arm and pickup roller 1. Release one tab, and then fully release the ADF top cover. Figure 1-7 Remove the ADF pre-pickup arm and pickup roller assembly (1 of 4) 10 Chapter 1 Removal and replacement ENWW Open the ADF top cover.

Service Manual
Page 34
Release one tab, and then fully open the ADF cover. Figure 1-14 Remove the ADF separation pad assembly (2 of 4) 2. Figure 1-13 Remove the ADF separation pad assembly (1 of 4) 14 Chapter 1 Removal and replacement ENWW Open the ADF top cover. ADF separation pad NOTE: HP LaserJet Professional M1210 MFP series only 1.
Release one tab, and then fully open the ADF cover. Figure 1-14 Remove the ADF separation pad assembly (2 of 4) 2. Figure 1-13 Remove the ADF separation pad assembly (1 of 4) 14 Chapter 1 Removal and replacement ENWW Open the ADF top cover. ADF separation pad NOTE: HP LaserJet Professional M1210 MFP series only 1.
Service Manual
Page 42
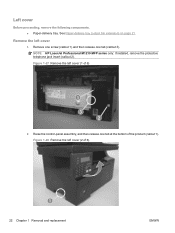
.... Remove one screw (callout 1) and then release one tab at the bottom of 6) 1 3 2 2. Figure 1-27 Remove the left cover (1 of the product (callout 1). NOTE: HP LaserJet Professional M1210 MFP series only: If installed, remove the protective telephone jack insert (callout 2). Raise the control-panel assembly, and then release one tab (callout 3). Remove the left...
.... Remove one screw (callout 1) and then release one tab at the bottom of 6) 1 3 2 2. Figure 1-27 Remove the left cover (1 of the product (callout 1). NOTE: HP LaserJet Professional M1210 MFP series only: If installed, remove the protective telephone jack insert (callout 2). Raise the control-panel assembly, and then release one tab (callout 3). Remove the left...
Service Manual
Page 50
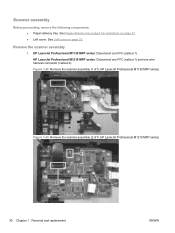
...; Paper-delivery tray. Remove the scanner assembly 1. HP LaserJet Professional M1130 MFP series: Disconnect one wire harness connector (callout 2). See Paper-delivery tray (output bin extension) on page 22. See Left cover on page 21. ● Left cover. HP LaserJet Professional M1130 MFP series) 1 Figure 1-43 Remove the scanner assembly (2 of 5; HP LaserJet Professional M1210 MFP series) 2 1 30 Chapter 1 Removal and replacement ENWW Figure...
...; Paper-delivery tray. Remove the scanner assembly 1. HP LaserJet Professional M1130 MFP series: Disconnect one wire harness connector (callout 2). See Paper-delivery tray (output bin extension) on page 22. See Left cover on page 21. ● Left cover. HP LaserJet Professional M1130 MFP series) 1 Figure 1-43 Remove the scanner assembly (2 of 5; HP LaserJet Professional M1210 MFP series) 2 1 30 Chapter 1 Removal and replacement ENWW Figure...

Service Manual
Page 51
Figure 1-45 Remove the scanner assembly (4 of the product base. HP LaserJet Professional M1130 MFP series only: Carefully feed the FFC through the slot in the chassis (callout 1), and then lift the scanner assembly up and off of 5) 1 ENWW Covers 31 2. Figure 1-44 Remove the scanner assembly (3 of 5) 1 2 3. Support the scanner assembly, and then release one tab (callout 1) and remove the scanner support (callout 2). CAUTION: The scanner assembly is not captive and can easily be separated from the product base if it is opened too far.
Figure 1-45 Remove the scanner assembly (4 of the product base. HP LaserJet Professional M1130 MFP series only: Carefully feed the FFC through the slot in the chassis (callout 1), and then lift the scanner assembly up and off of 5) 1 ENWW Covers 31 2. Figure 1-44 Remove the scanner assembly (3 of 5) 1 2 3. Support the scanner assembly, and then release one tab (callout 1) and remove the scanner support (callout 2). CAUTION: The scanner assembly is not captive and can easily be separated from the product base if it is opened too far.

Service Manual
Page 52
Figure 1-46 Remove the scanner assembly (5 of the product base. 4. HP LaserJet Professional M1210 MFP series only: Remove one screw (callout 1), carefully feed the FFC through the slot in the chassis (callout 2), and then lift the scanner assembly up and off of 5) 1 2 32 Chapter 1 Removal and replacement ENWW
Figure 1-46 Remove the scanner assembly (5 of the product base. 4. HP LaserJet Professional M1210 MFP series only: Remove one screw (callout 1), carefully feed the FFC through the slot in the chassis (callout 2), and then lift the scanner assembly up and off of 5) 1 2 32 Chapter 1 Removal and replacement ENWW

Service Manual
Page 61
White plate (document backing) 1. Figure 1-58 Remove the white plate (1 of individual scanner components. Scanner components NOTE: This section describes replacement and removal of 3) ENWW Scanner components 41 To remove the complete scanner assembly, see Scanner assembly on page 14. Open the scanner lid. See ADF pre-pickup arm and pickup roller on page 10 or ADF separation pad on page 30. HP LaserJet Professional M1210 MFP series only: replacement and removal of the ADF pickup roller and separation pad are described earlier in this chapter.
White plate (document backing) 1. Figure 1-58 Remove the white plate (1 of individual scanner components. Scanner components NOTE: This section describes replacement and removal of 3) ENWW Scanner components 41 To remove the complete scanner assembly, see Scanner assembly on page 14. Open the scanner lid. See ADF pre-pickup arm and pickup roller on page 10 or ADF separation pad on page 30. HP LaserJet Professional M1210 MFP series only: replacement and removal of the ADF pickup roller and separation pad are described earlier in this chapter.


