
HP LD4200 and LD4700 LCD Monitors User Guide
Page 5
Table of contents 1 Product Features HP Digital Signage Models ...1 2 Safety and Maintenance Guidelines Important Safety Information ...2 Maintenance Guidelines ...3 Cleaning the Monitor ...3 Shipping the Monitor ...3 3 Setting Up the Monitor Installing the Stand (Sold Separately 4 Connecting the Speakers (Sold Separately 6 Rotating ... Rear Components ...11 Connecting to External Devices ...12 Connecting to the Computer 12 Connecting Daisy Chain Monitors 14 VESA Mounting Support ...14 Connecting Video Input ...15 Connecting Component Input (480p/720p/1080p/1080i/480i 16 Connecting...
Table of contents 1 Product Features HP Digital Signage Models ...1 2 Safety and Maintenance Guidelines Important Safety Information ...2 Maintenance Guidelines ...3 Cleaning the Monitor ...3 Shipping the Monitor ...3 3 Setting Up the Monitor Installing the Stand (Sold Separately 4 Connecting the Speakers (Sold Separately 6 Rotating ... Rear Components ...11 Connecting to External Devices ...12 Connecting to the Computer 12 Connecting Daisy Chain Monitors 14 VESA Mounting Support ...14 Connecting Video Input ...15 Connecting Component Input (480p/720p/1080p/1080i/480i 16 Connecting...
HP LD4200 and LD4700 LCD Monitors User Guide
Page 9
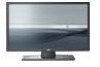
The monitors feature: ● LD4200 model, 106.7 cm (42-inch) widescreen diagonal viewable area display with 1920 x 1080 native resolution ● LD4700 model, 119.28 cm (47-inch) widescreen diagonal ...; Optional stand with cable management feature to position monitor on a desktop or table ● Optional mounting speakers ● Optional Thin Client mounting adapter plate ● Software and documentation CD provided ENWW HP Digital Signage Models 1 1 Product Features HP Digital Signage Models The HP LCD digital signage monitors have a wide aspect active matrix thin-film transistor...
The monitors feature: ● LD4200 model, 106.7 cm (42-inch) widescreen diagonal viewable area display with 1920 x 1080 native resolution ● LD4700 model, 119.28 cm (47-inch) widescreen diagonal ...; Optional stand with cable management feature to position monitor on a desktop or table ● Optional mounting speakers ● Optional Thin Client mounting adapter plate ● Software and documentation CD provided ENWW HP Digital Signage Models 1 1 Product Features HP Digital Signage Models The HP LCD digital signage monitors have a wide aspect active matrix thin-film transistor...
HP LD4200 and LD4700 LCD Monitors User Guide
Page 14
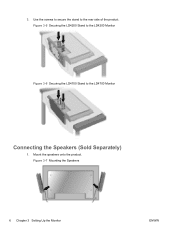
3. Use the screws to secure the stand to the LD4700 Monitor Connecting the Speakers (Sold Separately) 1. Mount the speakers onto the product. Figure 3-7 Mounting the Speakers 6 Chapter 3 Setting Up the Monitor ENWW Figure 3-5 Securing the LD4200 Stand to the LD4200 Monitor Figure 3-6 Securing the LD4700 Stand to the rear side of the product.
3. Use the screws to secure the stand to the LD4700 Monitor Connecting the Speakers (Sold Separately) 1. Mount the speakers onto the product. Figure 3-7 Mounting the Speakers 6 Chapter 3 Setting Up the Monitor ENWW Figure 3-5 Securing the LD4200 Stand to the LD4200 Monitor Figure 3-6 Securing the LD4700 Stand to the rear side of the product.
HP LD4200 and LD4700 LCD Monitors User Guide
Page 22
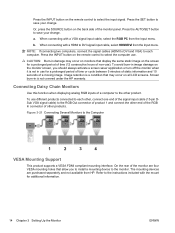
...image. Screen burn-in damage may occur on all LCD screens. To use for a prolonged period of time or cycle between 5 minutes of static information and 10 seconds of the monitor are purchased separately and not available from HP. Or, press the SOURCE button on the back ... computer. Figure 3-21 Connecting Several Monitors to select the computer use ). The mounting devices are four VESA mounting holes that may occur on monitors that display the same static image on the screen for additional information. 14 Chapter 3 Setting Up the Monitor ENWW To avoid burn-in image...
...image. Screen burn-in damage may occur on all LCD screens. To use for a prolonged period of time or cycle between 5 minutes of static information and 10 seconds of the monitor are purchased separately and not available from HP. Or, press the SOURCE button on the back ... computer. Figure 3-21 Connecting Several Monitors to select the computer use ). The mounting devices are four VESA mounting holes that may occur on monitors that display the same static image on the screen for additional information. 14 Chapter 3 Setting Up the Monitor ENWW To avoid burn-in image...
HP LD4200 and LD4700 LCD Monitors User Guide
Page 23
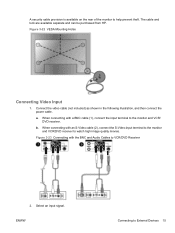
...Figure 3-23 Connecting with the BNC and Audio Cables to the monitor and VCR/ DVD receiver. Figure 3-22 VESA Mounting Holes Connecting Video Input 1. When connecting with an S-Video cable (2), connect the S-Video input terminal to the monitor and VCR/DVD receiver to External Devices 15 When connecting with...are available separate and can be purchased from HP. a. Connect the video cable (not included) as shown in the following illustration, and then connect the power cable. A security cable provision is available on the rear of the monitor to help prevent theft. Select an input...
...Figure 3-23 Connecting with the BNC and Audio Cables to the monitor and VCR/ DVD receiver. Figure 3-22 VESA Mounting Holes Connecting Video Input 1. When connecting with an S-Video cable (2), connect the S-Video input terminal to the monitor and VCR/DVD receiver to External Devices 15 When connecting with...are available separate and can be purchased from HP. a. Connect the video cable (not included) as shown in the following illustration, and then connect the power cable. A security cable provision is available on the rear of the monitor to help prevent theft. Select an input...
HP LD4200 LCD Monitor User Guide
Page 5
Table of contents 1 Product Features HP LD4200 Model ...1 2 Safety and Maintenance Guidelines Important Safety Information ...2 Maintenance Guidelines ...3 Cleaning the Monitor ...3 Shipping the Monitor ...3 3 Setting Up the Monitor Installing the Stand (Select Models) ...4 Connecting the Speakers (Select Models 5 Rotating to...9 Identifying Rear Components ...10 Connecting to External Devices ...11 Connecting to the Computer 11 Connecting Daisy Chain Monitors 13 VESA Mounting Support ...13 Connecting Video Input ...14 Connecting Component Input (480p/720p/1080p/1080i/480i 15 Connecting HDMI...
Table of contents 1 Product Features HP LD4200 Model ...1 2 Safety and Maintenance Guidelines Important Safety Information ...2 Maintenance Guidelines ...3 Cleaning the Monitor ...3 Shipping the Monitor ...3 3 Setting Up the Monitor Installing the Stand (Select Models) ...4 Connecting the Speakers (Select Models 5 Rotating to...9 Identifying Rear Components ...10 Connecting to External Devices ...11 Connecting to the Computer 11 Connecting Daisy Chain Monitors 13 VESA Mounting Support ...13 Connecting Video Input ...14 Connecting Component Input (480p/720p/1080p/1080i/480i 15 Connecting HDMI...

HP LD4200 LCD Monitor User Guide
Page 9
The monitor features: ● 106.7 cm (42-inch) widescreen diagonal viewable area display with 1920 x 1080 native resolution ● Wide viewing angle up to 178° horizontal and 178° vertical ● Landscape or portrait wall mounting position &#...with cable management feature to position monitor on a desktop or table ● Optional mounting speakers ● Optional Thin Client mounting adapter plate ● Software and documentation CD provided ENWW HP LD4200 Model 1 1 Product Features HP LD4200 Model The HP LD4200 LCD digital signage monitor has a wide aspect active matrix...
The monitor features: ● 106.7 cm (42-inch) widescreen diagonal viewable area display with 1920 x 1080 native resolution ● Wide viewing angle up to 178° horizontal and 178° vertical ● Landscape or portrait wall mounting position &#...with cable management feature to position monitor on a desktop or table ● Optional mounting speakers ● Optional Thin Client mounting adapter plate ● Software and documentation CD provided ENWW HP LD4200 Model 1 1 Product Features HP LD4200 Model The HP LD4200 LCD digital signage monitor has a wide aspect active matrix...

HP LD4200 LCD Monitor User Guide
Page 13
Mount the speakers onto the product. Figure 3-5 Securing the Speakers to the Monitor Connecting the Speakers (Select Models) 1. Figure 3-3 Securing the Stand to the Monitor ENWW Connecting the Speakers (Select Models) 5 Use the four Taptite D3 x 12mm screws to secure the speakers to the rear side of the product. Use the screws to secure the stand to the monitor. Figure 3-4 Mounting the Speakers 2. 3.
Mount the speakers onto the product. Figure 3-5 Securing the Speakers to the Monitor Connecting the Speakers (Select Models) 1. Figure 3-3 Securing the Stand to the Monitor ENWW Connecting the Speakers (Select Models) 5 Use the four Taptite D3 x 12mm screws to secure the speakers to the rear side of the product. Use the screws to secure the stand to the monitor. Figure 3-4 Mounting the Speakers 2. 3.
HP LD4200 LCD Monitor User Guide
Page 21
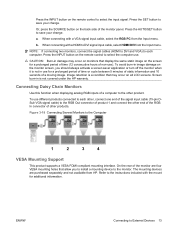
To avoid burn-in image damage on the monitor screen, you to install a mounting device to DVI signal input cable, select HDMI/DVI from HP. Screen burn-in damage may occur on all LCD screens. Connecting Daisy Chain Monitors Use this function when displaying analog RGB inputs of a computer to ... cable, select the RGB PC from the Input menu. When connecting with a HDMI to the monitor. Image retention is not covered under the HP warranty. The mounting devices are four VESA mounting holes that display the same static image on the screen for additional information. Press the AUTO/SET...
To avoid burn-in image damage on the monitor screen, you to install a mounting device to DVI signal input cable, select HDMI/DVI from HP. Screen burn-in damage may occur on all LCD screens. Connecting Daisy Chain Monitors Use this function when displaying analog RGB inputs of a computer to ... cable, select the RGB PC from the Input menu. When connecting with a HDMI to the monitor. Image retention is not covered under the HP warranty. The mounting devices are four VESA mounting holes that display the same static image on the screen for additional information. Press the AUTO/SET...

HP LD4200 LCD Monitor User Guide
Page 22
The cable and lock are available separate and can be purchased from HP. When connecting with an S-Video cable (2), connect the S-Video input terminal to the monitor and VCR/DVD receiver to the monitor and VCR/ DVD receiver. b. Figure 3-19 VESA Mounting Holes Connecting Video Input 1. When connecting with a BNC cable (1), connect the input terminal...
The cable and lock are available separate and can be purchased from HP. When connecting with an S-Video cable (2), connect the S-Video input terminal to the monitor and VCR/DVD receiver to the monitor and VCR/ DVD receiver. b. Figure 3-19 VESA Mounting Holes Connecting Video Input 1. When connecting with a BNC cable (1), connect the input terminal...


