Quick Setup Guide
Page 1
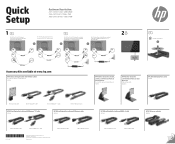
....6-inch: 1366 x 768 1 HP L7010t, L7014t, L7016t Retail Point of Sale Touch Monitors attached to HP RP9 G1 Retail Systems HP L7014 Retail Point of Sale Monitors attached to HP RP9 G1 Retail Systems OR HP L7010t, L7014t, L7016t Retail Point of Sale Touch Monitors attached to HP RP5 or RP5800 Retail Systems, or an HP Desktop Mini OR HP L7014 Retail Point...
....6-inch: 1366 x 768 1 HP L7010t, L7014t, L7016t Retail Point of Sale Touch Monitors attached to HP RP9 G1 Retail Systems HP L7014 Retail Point of Sale Monitors attached to HP RP9 G1 Retail Systems OR HP L7010t, L7014t, L7016t Retail Point of Sale Touch Monitors attached to HP RP5 or RP5800 Retail Systems, or an HP Desktop Mini OR HP L7014 Retail Point...

User Guide
Page 3
... additional information to hardware or software. TIP: Provides helpful hints for example, messages related to complete a task. About This Guide This guide provides information on monitor features, setting up the monitor, and technical specifications. Indicates a hazardous situation that, if not avoided, could result in loss of the main text.
... additional information to hardware or software. TIP: Provides helpful hints for example, messages related to complete a task. About This Guide This guide provides information on monitor features, setting up the monitor, and technical specifications. Indicates a hazardous situation that, if not avoided, could result in loss of the main text.
User Guide
Page 5
... models only 6 Connecting the cables ...9 Connecting a touch monitor to a retail system computer with a 12 V powered USB option ...9 Connecting a non-touch monitor to a retail system computer with a 12 V powered USB option ...9 Connecting a touch monitor to a retail system computer without a 12 V powered ...a 12 V powered USB option ...11 Configuration options ...12 Installing touch drivers ...13 Turning on the monitor ...14 Installing a security cable ...14 2 Using the monitor ...15 Software and utilities ...15 The Setup information file ...15 The Image Color Matching file ...15 Installing...
... models only 6 Connecting the cables ...9 Connecting a touch monitor to a retail system computer with a 12 V powered USB option ...9 Connecting a non-touch monitor to a retail system computer with a 12 V powered USB option ...9 Connecting a touch monitor to a retail system computer without a 12 V powered ...a 12 V powered USB option ...11 Configuration options ...12 Installing touch drivers ...13 Turning on the monitor ...14 Installing a security cable ...14 2 Using the monitor ...15 Software and utilities ...15 The Setup information file ...15 The Image Color Matching file ...15 Installing...
User Guide
Page 6
... lockouts ...20 Product support ...21 Preparing to call technical support ...21 Locating the serial number and product number 22 4 Maintaining the monitor ...23 Maintenance guidelines ...23 Cleaning the monitor ...23 Shipping the monitor ...23 Appendix A Technical specifications ...24 25.7 cm/10.1-inch model ...24 35.6 cm/14-inch model ...24 39.6 cm/15...
... lockouts ...20 Product support ...21 Preparing to call technical support ...21 Locating the serial number and product number 22 4 Maintaining the monitor ...23 Maintenance guidelines ...23 Cleaning the monitor ...23 Shipping the monitor ...23 Appendix A Technical specifications ...24 25.7 cm/10.1-inch model ...24 35.6 cm/14-inch model ...24 39.6 cm/15...
User Guide
Page 7
...over them so that are inappropriately situated on the power label to properly support your HP LCD monitor. Look on dressers, bookcases, shelves, desks, speakers, chests, or carts may fall over . Do not drop the monitor or place it from the computer by pulling the cord. If another cord is ...easily accessible at http://www.hp.com/ergo. WARNING! The grounding pin is suitable for the computer and its peripheral devices (such as a monitor, printer, scanner) to some form of electric shock or damage to the equipment: •...
...over them so that are inappropriately situated on the power label to properly support your HP LCD monitor. Look on dressers, bookcases, shelves, desks, speakers, chests, or carts may fall over . Do not drop the monitor or place it from the computer by pulling the cord. If another cord is ...easily accessible at http://www.hp.com/ergo. WARNING! The grounding pin is suitable for the computer and its peripheral devices (such as a monitor, printer, scanner) to some form of electric shock or damage to the equipment: •...
User Guide
Page 8
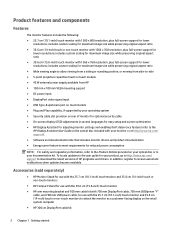
... documentation kit. In addition, register to attach the monitor as a customer-facing display on rear of HP programs and drivers. Accessories (sold separately) ● HP Monitor Stand for use with the 25.7 cm (10.1-inch) touch monitor and 35.6 cm (14-inch) touch or non-touch monitors ● HP Compact Stand for use with the 39.6 cm...
... documentation kit. In addition, register to attach the monitor as a customer-facing display on rear of HP programs and drivers. Accessories (sold separately) ● HP Monitor Stand for use with the 25.7 cm (10.1-inch) touch monitor and 35.6 cm (14-inch) touch or non-touch monitors ● HP Compact Stand for use with the 39.6 cm...

User Guide
Page 9
... for 25.7 cm (10.1-inch), 35.6 cm (14-inch), and 39.6 cm (15.6-inch) touch monitors ● HP 300 cm DisplayPort cable and USB power cable kit for the 35.6 cm (14-inch) non-touch monitor ● HP 300 cm DisplayPort cable and USB B-A cable kit for 25.7 cm (10.1-inch), 35.6 cm (14...-inch), and 39.6 cm (15.6-inch) touch monitors ● HP 45 W power adapter Rear components Component Function (1) USB 2.0 Type-B upstream port (touch...
... for 25.7 cm (10.1-inch), 35.6 cm (14-inch), and 39.6 cm (15.6-inch) touch monitors ● HP 300 cm DisplayPort cable and USB power cable kit for the 35.6 cm (14-inch) non-touch monitor ● HP 300 cm DisplayPort cable and USB B-A cable kit for 25.7 cm (10.1-inch), 35.6 cm (14...-inch), and 39.6 cm (15.6-inch) touch monitors ● HP 45 W power adapter Rear components Component Function (1) USB 2.0 Type-B upstream port (touch...
User Guide
Page 11
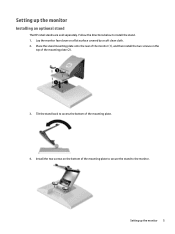
Place the stand mounting plate onto the rear of the monitor (1), and then install the two screws on the bottom of the mounting plate to secure the stand to the monitor. Tilt the stand back to install the stand. 1. Install the two screws on the top of the mounting plate. 4. Lay the monitor face down on a flat surface covered by a soft clean cloth. 2. Setting up the monitor Installing an optional stand The HP retail stands are sold separately. Follow the directions below to access the bottom of the mounting plate (2). 3. Setting up the monitor 5
Place the stand mounting plate onto the rear of the monitor (1), and then install the two screws on the bottom of the mounting plate to secure the stand to the monitor. Tilt the stand back to install the stand. 1. Install the two screws on the top of the mounting plate. 4. Lay the monitor face down on a flat surface covered by a soft clean cloth. 2. Setting up the monitor Installing an optional stand The HP retail stands are sold separately. Follow the directions below to access the bottom of the mounting plate (2). 3. Setting up the monitor 5
User Guide
Page 12
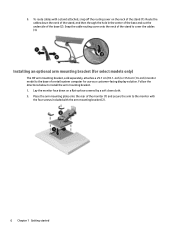
...as a customer-facing display solution. Place the arm mounting plate onto the rear of the monitor (1) and secure the arm to the base of the stand to install the arm mounting bracket. 1. 5. Lay the monitor face down the neck of the stand, and then through the hole in the center ...the cable routing cover onto the neck of a retail system computer for select models only) The HP arm mounting bracket, sold separately, attaches a 25.7 cm (10.1-inch) or 35.6 cm (14-inch) monitor model to the monitor with the four screws included with a stand attached, snap off the routing cover on a flat...
...as a customer-facing display solution. Place the arm mounting plate onto the rear of the monitor (1) and secure the arm to the base of the stand to install the arm mounting bracket. 1. 5. Lay the monitor face down the neck of the stand, and then through the hole in the center ...the cable routing cover onto the neck of a retail system computer for select models only) The HP arm mounting bracket, sold separately, attaches a 25.7 cm (10.1-inch) or 35.6 cm (14-inch) monitor model to the monitor with the four screws included with a stand attached, snap off the routing cover on a flat...

User Guide
Page 13
... center retainer on the arm (2) and then through the bottom retainer (3), and then snap the routing cover onto the arm to the rear I/O on the monitor. To route the cables on the arm mounting bracket, snap off the routing cover on a flat surface covered by a soft clean cloth. 5. Setting up the...
... center retainer on the arm (2) and then through the bottom retainer (3), and then snap the routing cover onto the arm to the rear I/O on the monitor. To route the cables on the arm mounting bracket, snap off the routing cover on a flat surface covered by a soft clean cloth. 5. Setting up the...

User Guide
Page 14
6. NOTE: For more information on connecting the cables to the retail system computer, refer to the retail system computer's rear I/O. Route the cables from the monitor's arm mounting bracket up through the center hole in the base of the retail system computer and connect the cables to the documentation included with the computer. 8 Chapter 1 Getting started
6. NOTE: For more information on connecting the cables to the retail system computer, refer to the retail system computer's rear I/O. Route the cables from the monitor's arm mounting bracket up through the center hole in the base of the retail system computer and connect the cables to the documentation included with the computer. 8 Chapter 1 Getting started

User Guide
Page 15
... a stand-alone display that connects to a retail system computer with a 12 V powered USB option If you are mounting a touch monitor to the base of the monitor and the other end to a retail system computer with a 12 V powered USB option), connect the following cables. ● DisplayPort cable ...powered USB port on page 12 for your video input and power port configuration. Setting up the monitor with a retail system computer depend on your configuration are sold separately and are available from HP. Connect one end of the combination USB/power "Y" cable to the USB Type-B port and...
... a stand-alone display that connects to a retail system computer with a 12 V powered USB option If you are mounting a touch monitor to the base of the monitor and the other end to a retail system computer with a 12 V powered USB option), connect the following cables. ● DisplayPort cable ...powered USB port on page 12 for your video input and power port configuration. Setting up the monitor with a retail system computer depend on your configuration are sold separately and are available from HP. Connect one end of the combination USB/power "Y" cable to the USB Type-B port and...

User Guide
Page 16
...connector on the retail system computer. Connect the barrel end of the power cable to the power connector on the rear of the monitor and connect the powered USB end of the monitor and the other end to a 12 V powered USB port on the retail system computer. ● USB B-A cable - ...system computer without a 12 V powered USB option If you are using a touch monitor as a stand-alone display connected to a USB 2.0 Type-A port on the monitor and connect the Type-A end of the cable to a retail system computer or HP desktop computer that does not have a 12 V powered USB port, connect the ...
...connector on the retail system computer. Connect the barrel end of the power cable to the power connector on the rear of the monitor and connect the powered USB end of the monitor and the other end to a 12 V powered USB port on the retail system computer. ● USB B-A cable - ...system computer without a 12 V powered USB option If you are using a touch monitor as a stand-alone display connected to a USB 2.0 Type-A port on the monitor and connect the Type-A end of the cable to a retail system computer or HP desktop computer that does not have a 12 V powered USB port, connect the ...

User Guide
Page 17
... adapter cable - Connect the DC end of the 45 W power adapter cable to the rear of the monitor and connect the AC power cable to the power adapter and to a retail system computer or HP desktop computer that does not have a 12 V powered USB port, connect the following cables. ● ...DisplayPort cable - ● Power adapter cable - Setting up the monitor 11 Connect the DC end of the 45 W power adapter cable to ...
... adapter cable - Connect the DC end of the 45 W power adapter cable to the rear of the monitor and connect the AC power cable to the power adapter and to a retail system computer or HP desktop computer that does not have a 12 V powered USB port, connect the following cables. ● ...DisplayPort cable - ● Power adapter cable - Setting up the monitor 11 Connect the DC end of the 45 W power adapter cable to ...
User Guide
Page 18
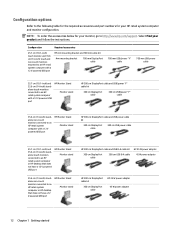
...700 mm USB power cable 25.7 cm (10.1-inch) and 35.6 cm (14-inch) standalone touch monitors connected to an HP retail system computer with a 12 V powered USB port HP Monitor Stand Monitor stand HP 300 cm DisplayPort cable and USB/power "Y" cable kit 300 cm DisplayPort cable 300 cm USB/power "Y"... cable 35.6 cm (14-inch) standalone non-touch monitor connected to an HP retail system computer with a 12 V powered USB port HP Monitor Stand Monitor stand HP 300 cm DisplayPort cable and USB power cable kit 300 cm DisplayPort cable 300 cm USB power ...
...700 mm USB power cable 25.7 cm (10.1-inch) and 35.6 cm (14-inch) standalone touch monitors connected to an HP retail system computer with a 12 V powered USB port HP Monitor Stand Monitor stand HP 300 cm DisplayPort cable and USB/power "Y" cable kit 300 cm DisplayPort cable 300 cm USB/power "Y"... cable 35.6 cm (14-inch) standalone non-touch monitor connected to an HP retail system computer with a 12 V powered USB port HP Monitor Stand Monitor stand HP 300 cm DisplayPort cable and USB power cable kit 300 cm DisplayPort cable 300 cm USB power ...
User Guide
Page 19
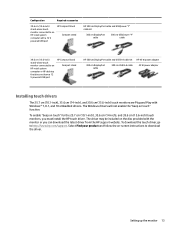
...; 7, 8.1, and 10 embedded drivers. Configuration Required accessories 39.6 cm (15.6-inch) stand-alone touch monitor connected to an HP retail system computer with a 12 V powered USB port HP Compact Stand Compact stand HP 300 cm DisplayPort cable and USB/power "Y" cable kit 300 cm DisplayPort cable 300 cm USB/power "Y"... cable 39.6 cm (15.6-inch) stand-alone touch monitor connected to http://www.hp.com/support. To enable "beep on the disc provided with the monitor or you must install the HP touch driver. The driver may be included on touch" for the 25.7 cm ...
...; 7, 8.1, and 10 embedded drivers. Configuration Required accessories 39.6 cm (15.6-inch) stand-alone touch monitor connected to an HP retail system computer with a 12 V powered USB port HP Compact Stand Compact stand HP 300 cm DisplayPort cable and USB/power "Y" cable kit 300 cm DisplayPort cable 300 cm USB/power "Y"... cable 39.6 cm (15.6-inch) stand-alone touch monitor connected to http://www.hp.com/support. To enable "beep on the disc provided with the monitor or you must install the HP touch driver. The driver may be included on touch" for the 25.7 cm ...
User Guide
Page 20
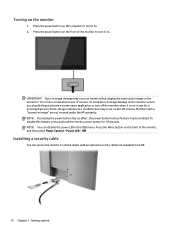
...of nonuse. IMPORTANT: Burn-in image damage may occur on monitors that may be enabled. To disable this feature, press and hold the monitor power button for a prolonged period of time. Monitors with an optional security cable lock available from HP. 14 Chapter 1 Getting started Installing a security cable You ... LCD screens. To avoid burn-in the OSD menu. NOTE: You can secure the monitor to turn off the monitor when it on. 2. Image retention is not in image" are not covered under the HP warranty. Press the power button on the computer to a fixed object with a "burned...
...of nonuse. IMPORTANT: Burn-in image damage may occur on monitors that may be enabled. To disable this feature, press and hold the monitor power button for a prolonged period of time. Monitors with an optional security cable lock available from HP. 14 Chapter 1 Getting started Installing a security cable You ... LCD screens. To avoid burn-in the OSD menu. NOTE: You can secure the monitor to turn off the monitor when it on. 2. Image retention is not in image" are not covered under the HP warranty. Press the power button on the computer to a fixed object with a "burned...
User Guide
Page 21
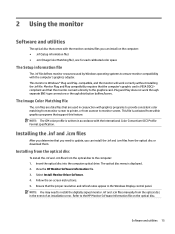
...profile is VESA DDC2- Installing from the optical disc To install the .inf and .icm files from the optical disc to the HP Monitor Software Information file on the optical disc. Refer to the computer: 1. Software and utilities 15 The Image Color Matching file The ....them. Plug and Play does not work correctly without installing the .inf file. View the HP Monitor Software Information file. 3. Follow the on-screen instructions. 5. Select Install Monitor Driver Software. 4. This monitor is displayed. 2. compliant and that you need to the graphics card. Insert the optical disc...
...profile is VESA DDC2- Installing from the optical disc To install the .inf and .icm files from the optical disc to the HP Monitor Software Information file on the optical disc. Refer to the computer: 1. Software and utilities 15 The Image Color Matching file The ....them. Plug and Play does not work correctly without installing the .inf file. View the HP Monitor Software Information file. 3. Follow the on-screen instructions. 5. Select Install Monitor Driver Software. 4. This monitor is displayed. 2. compliant and that you need to the graphics card. Insert the optical disc...
User Guide
Page 22
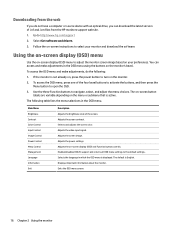
Downloading from the HP monitors support web site. 1. Adjusts the power settings. Exits the OSD menu screen. 16 Chapter 2 Using the monitor Go to navigate, select, and adjust the menu choices. Follow the on the monitor's bezel. The following : 1. Adjusts the video input signal. Displays important information about the monitor. You can access and make adjustments...
Downloading from the HP monitors support web site. 1. Adjusts the power settings. Exits the OSD menu screen. 16 Chapter 2 Using the monitor Go to navigate, select, and adjust the menu choices. Follow the on the monitor's bezel. The following : 1. Adjusts the video input signal. Displays important information about the monitor. You can access and make adjustments...

User Guide
Page 24
...the Menu button to open the OSD. In the OSD menu select Power Control > Auto-Sleep Mode > Off. 18 Chapter 2 Using the monitor Using Auto-Sleep Mode The monitor supports an OSD (on-screen display) menu option called Auto-Sleep Mode that allows you to enable or disable a reduced power state for... example, if you activate the mouse or keyboard). You can disable Auto-Sleep Mode in this reduced power state (sleep mode), the monitor screen is blanked, the backlight is enabled (enabled by default), the monitor will wake from the sleep mode when the host computer sends an active signal to the...
...the Menu button to open the OSD. In the OSD menu select Power Control > Auto-Sleep Mode > Off. 18 Chapter 2 Using the monitor Using Auto-Sleep Mode The monitor supports an OSD (on-screen display) menu option called Auto-Sleep Mode that allows you to enable or disable a reduced power state for... example, if you activate the mouse or keyboard). You can disable Auto-Sleep Mode in this reduced power state (sleep mode), the monitor screen is blanked, the backlight is enabled (enabled by default), the monitor will wake from the sleep mode when the host computer sends an active signal to the...