User Guide
Page 5
... ...3 Shipping the monitor ...3 3 Setting up the monitor ...4 Attaching the monitor stand ...4 Identifying rear connectors ...5 Connecting the cables ...6 Installing the touchscreen drivers ...7 Installing drivers from the disc ...7 Downloading drivers from the Web ...7 Mounting the monitor ...8 VESA mounting ...8 Desktop mounting ...9 Flat surface mounting ...9 Tilting the monitor ...10 Locating the rating labels ...10 4 Operating the monitor ...11 Installing the monitor driver ...11 The Information...
... ...3 Shipping the monitor ...3 3 Setting up the monitor ...4 Attaching the monitor stand ...4 Identifying rear connectors ...5 Connecting the cables ...6 Installing the touchscreen drivers ...7 Installing drivers from the disc ...7 Downloading drivers from the Web ...7 Mounting the monitor ...8 VESA mounting ...8 Desktop mounting ...9 Flat surface mounting ...9 Tilting the monitor ...10 Locating the rating labels ...10 4 Operating the monitor ...11 Installing the monitor driver ...11 The Information...
User Guide
Page 6
Touch ...13 Video ...13 On-Screen Display (OSD) ...14 OSD and power lockouts ...15 Appendix A Troubleshooting ...16 Solving problems ...16 Product support ...17 Preparing to call technical support ...17 Appendix B Technical specifications ...18 Acoustic Pulse Recognition technology ...20 Recognizing preset display resolutions ...21 Entering user modes ...21 Energy saver feature ...22 Appendix C Accessibility ...23 Supported assistive technologies ...23 Contacting support ...23 vi
Touch ...13 Video ...13 On-Screen Display (OSD) ...14 OSD and power lockouts ...15 Appendix A Troubleshooting ...16 Solving problems ...16 Product support ...17 Preparing to call technical support ...17 Appendix B Technical specifications ...18 Acoustic Pulse Recognition technology ...20 Recognizing preset display resolutions ...21 Entering user modes ...21 Energy saver feature ...22 Appendix C Accessibility ...23 Supported assistive technologies ...23 Contacting support ...23 vi
User Guide
Page 7
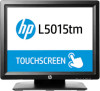
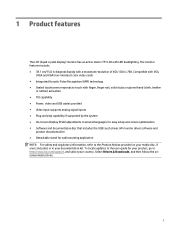
... Drivers & Downloads, and then follow the onscreen instructions. 1 Compatible with VGA, SVGA and XGA (non-interlace) color video cards ● Integrated Acoustic Pulse Recognition (APR) technology ● Sealed touchscreen responds to http://www.hp.com/support, and select your documentation kit. The monitor features include: ● 38.1 cm/15.0 in several languages for easy setup and screen optimization ● Software...
... Drivers & Downloads, and then follow the onscreen instructions. 1 Compatible with VGA, SVGA and XGA (non-interlace) color video cards ● Integrated Acoustic Pulse Recognition (APR) technology ● Sealed touchscreen responds to http://www.hp.com/support, and select your documentation kit. The monitor features include: ● 38.1 cm/15.0 in several languages for easy setup and screen optimization ● Software...
User Guide
Page 8
...step on the correct power cord set to use only a power source and connection appropriate for the computer and its peripheral devices (such as a power strip or Uninterruptible Power Supply (UPS). Use the appropriate and correctly sized furniture designed to some form of serious injury, read the Safety and Comfort Guide. Consider placing the display in your HP LCD monitor. Do not disable the power...device such as a monitor, printer, scanner) to properly support your documentation kit. 2 Safety and maintenance guidelines Important safety information A power cord is included with the...
...step on the correct power cord set to use only a power source and connection appropriate for the computer and its peripheral devices (such as a power strip or Uninterruptible Power Supply (UPS). Use the appropriate and correctly sized furniture designed to some form of serious injury, read the Safety and Comfort Guide. Consider placing the display in your HP LCD monitor. Do not disable the power...device such as a monitor, printer, scanner) to properly support your documentation kit. 2 Safety and maintenance guidelines Important safety information A power cord is included with the...

User Guide
Page 9
... does not exceed the current rating of the electrical outlet, and the total ampere rating of the products connected to the cord does not exceed the rating of the monitor: ● Do not open the monitor cabinet or attempt to service this monitor, as benzene, thinner... the cleaner directly on the power cord. Shipping the monitor Keep the original packing box in the operating instructions. Never disconnect the monitor by using a screen saver program and turning off when not in use . These chemicals may run behind the bezel and damage the electronics. Adjust only those controls that...
... does not exceed the current rating of the electrical outlet, and the total ampere rating of the products connected to the cord does not exceed the rating of the monitor: ● Do not open the monitor cabinet or attempt to service this monitor, as benzene, thinner... the cleaner directly on the power cord. Shipping the monitor Keep the original packing box in the operating instructions. Never disconnect the monitor by using a screen saver program and turning off when not in use . These chemicals may run behind the bezel and damage the electronics. Adjust only those controls that...

User Guide
Page 10
... follow the instructions below. To mount the base: 1. Two square posts will be revealed. 4. Remove two rubber feet from the back of the neck. Unpack the display head and place it face down on a table or flat surface covered by a protective cloth or cushion. 2. Attaching the monitor stand The base comes detached; 3 Setting up the monitor...
... follow the instructions below. To mount the base: 1. Two square posts will be revealed. 4. Remove two rubber feet from the back of the neck. Unpack the display head and place it face down on a table or flat surface covered by a protective cloth or cushion. 2. Attaching the monitor stand The base comes detached; 3 Setting up the monitor...

User Guide
Page 12
.... 2. WARNING! Disconnect power from the equipment by unplugging the power cord from the electrical outlet, grasp the cord by the plug. 6 Chapter 3 Setting up the monitor The grounding plug is easily accessible at all times. Arrange them so that...USB connector and your safety, do not place anything on . Press the power button to the equipment: Do not disable the power cord grounding plug. To reduce the risk of electric shock or damage to turn it on power cords or cables. Plug the power cord into a grounded (earthed) electrical outlet that no one may accidentally step...
.... 2. WARNING! Disconnect power from the equipment by unplugging the power cord from the electrical outlet, grasp the cord by the plug. 6 Chapter 3 Setting up the monitor The grounding plug is easily accessible at all times. Arrange them so that...USB connector and your safety, do not place anything on . Press the power button to the equipment: Do not disable the power cord grounding plug. To reduce the risk of electric shock or damage to turn it on power cords or cables. Plug the power cord into a grounded (earthed) electrical outlet that no one may accidentally step...
User Guide
Page 13
... meets the program minimum requirements. 8. Select Install Touchscreen Driver Software from the HP monitors support Web site: 1. Click Download and follow the on screen instructions to download the software. If necessary, select your monitor model in the computer's optical drive. 2. Installing drivers from the list. 4. Click Next and follow the on the driver. 7. Click Driver - Select Drivers & Downloads or Support > Download Drivers, type your monitor from the disc 1. Display/Monitor to open the list...
... meets the program minimum requirements. 8. Select Install Touchscreen Driver Software from the HP monitors support Web site: 1. Click Download and follow the on screen instructions to download the software. If necessary, select your monitor model in the computer's optical drive. 2. Installing drivers from the list. 4. Click Next and follow the on the driver. 7. Click Driver - Select Drivers & Downloads or Support > Download Drivers, type your monitor from the disc 1. Display/Monitor to open the list...

User Guide
Page 14
... the power, USB, and video cables from the manufacturer to install the panel to the VESA mounting standard. Using a Phillips screwdriver, remove the two screws that adheres to the manufacturer's mounting fixture. 6. Turn off the monitor and computer. 2. NOTE: A filler plate is rated to use with the VESA mount. 8 Chapter 3 Setting up the monitor CAUTION: This monitor supports the VESA...
... the power, USB, and video cables from the manufacturer to install the panel to the VESA mounting standard. Using a Phillips screwdriver, remove the two screws that adheres to the manufacturer's mounting fixture. 6. Turn off the monitor and computer. 2. NOTE: A filler plate is rated to use with the VESA mount. 8 Chapter 3 Setting up the monitor CAUTION: This monitor supports the VESA...
User Guide
Page 17
... contains a monitor color system profile. 4 Operating the monitor Installing the monitor driver The disc that comes with the International Color Consortium (ICC) Profile Format specification. Monitor Plug and Play compatibility requires that the computer's graphic card is activated from the HP monitors support Web site. Plug and Play does not work correctly without installing the .INF file. NOTE: The...
... contains a monitor color system profile. 4 Operating the monitor Installing the monitor driver The disc that comes with the International Color Consortium (ICC) Profile Format specification. Monitor Plug and Play compatibility requires that the computer's graphic card is activated from the HP monitors support Web site. Plug and Play does not work correctly without installing the .INF file. NOTE: The...
User Guide
Page 18
... to reset your monitor off and on -screen instructions to the HP Monitor Software Information file on -screen instructions. 5. NOTE: You may require adjustments to the controls are automatically memorized. Use the Display control panel in Windows to install the digitally signed monitor .INF and .ICM files manually from the disc in the Windows Display control panel. Select Install Monitor Driver Software. 4. Select Drivers & Downloads or Support > Download Drivers, type your operating system...
... to reset your monitor off and on -screen instructions to the HP Monitor Software Information file on -screen instructions. 5. NOTE: You may require adjustments to the controls are automatically memorized. Use the Display control panel in Windows to install the digitally signed monitor .INF and .ICM files manually from the disc in the Windows Display control panel. Select Install Monitor Driver Software. 4. Select Drivers & Downloads or Support > Download Drivers, type your operating system...

User Guide
Page 19
...-font text). This loss of SLEEP mode (similar to a specific user). Video A display's native resolution is most common video timing modes. The Power Status LED on or off, press the monitor power button once. These adjustments are planned. Generally, for different video mode timings, the monitor correctly scales and displays some of the video industry's most apparent when viewing feature-rich images at non...
...-font text). This loss of SLEEP mode (similar to a specific user). Video A display's native resolution is most common video timing modes. The Power Status LED on or off, press the monitor power button once. These adjustments are planned. Generally, for different video mode timings, the monitor correctly scales and displays some of the video industry's most apparent when viewing feature-rich images at non...

User Guide
Page 20
... single-pixel increments Default: Centered Only applicable for adjustment / select submenu to enter The OSD buttons control an on-screen graphical user interface, which displays on top of your input video. These can be used to adjust various display parameters. On-Screen Display (OSD) Four OSD buttons are : Button Menu Function when OSD is not displayed: Display OSD main menu Display OSD Brightness menu Display OSD Contrast...
... single-pixel increments Default: Centered Only applicable for adjustment / select submenu to enter The OSD buttons control an on-screen graphical user interface, which displays on top of your input video. These can be used to adjust various display parameters. On-Screen Display (OSD) Four OSD buttons are : Button Menu Function when OSD is not displayed: Display OSD main menu Display OSD Brightness menu Display OSD Contrast...
User Guide
Page 21
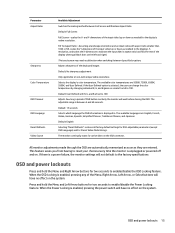
... X- Default: User Defined with aspect ratio smaller than 1024 x 768, scales the Y-dimension of OSD button inactivity the monitor will not default to the factory specifications OSD and power lockouts Press and hold the Menu and Left Arrow buttons for Preset Video Mode timings. The available languages are automatically memorized as soon as needed ) to reset your choices every time the monitor is displayed...
... X- Default: User Defined with aspect ratio smaller than 1024 x 768, scales the Y-dimension of OSD button inactivity the monitor will not default to the factory specifications OSD and power lockouts Press and hold the Menu and Left Arrow buttons for Preset Video Mode timings. The available languages are automatically memorized as soon as needed ) to reset your choices every time the monitor is displayed...
User Guide
Page 22
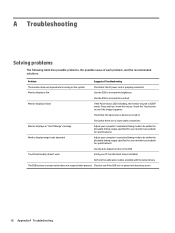
... computer's resolution/timing mode to be in the OSD Touch functionality doesn't work Verify your PC has the latest drivers installed Perform the calibration routine provided with the latest drivers The OSD buttons or power button does not respond when pressed Check to see website for specifications) Monitor display image looks abnormal Adjust your monitor (see if the OSD lock or power lock functions are no loose...
... computer's resolution/timing mode to be in the OSD Touch functionality doesn't work Verify your PC has the latest drivers installed Perform the calibration routine provided with the latest drivers The OSD buttons or power button does not respond when pressed Check to see website for specifications) Monitor display image looks abnormal Adjust your monitor (see if the OSD lock or power lock functions are no loose...
User Guide
Page 23
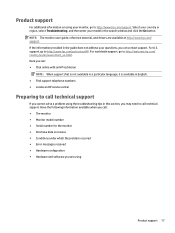
..., select Troubleshooting, and then enter your questions, you can : ● Chat online with an HP technician NOTE: When support chat is not available in a particular language, it is available in English. ● Find support telephone numbers ● Locate an HP service center Preparing to call : ● The monitor ● Monitor model number ● Serial number for the monitor ● Purchase date on using Product support 17
..., select Troubleshooting, and then enter your questions, you can : ● Chat online with an HP technician NOTE: When support chat is not available in a particular language, it is available in English. ● Find support telephone numbers ● Locate an HP service center Preparing to call : ● The monitor ● Monitor model number ● Serial number for the monitor ● Purchase date on using Product support 17

User Guide
Page 25
... Temperature, OSD Timeout, OSD Language, Recall Defaults Languages: English, French, Italian, German, Spanish, Simplified Chinese, Traditional Chinese, Japanese Lockouts: OSD, Power Operating: 0 °C to 40 °C /32 °F to 140 °F Operating: 20%-80%; Shipping Dimensions Mounting Options On-Screen Display (OSD) Controls (Accessible through switches along the bottom) Temperature Humidity (non-condensing) Touch Interface MTBF 487 x 231 x 485...
... Temperature, OSD Timeout, OSD Language, Recall Defaults Languages: English, French, Italian, German, Spanish, Simplified Chinese, Traditional Chinese, Japanese Lockouts: OSD, Power Operating: 0 °C to 40 °C /32 °F to 140 °F Operating: 20%-80%; Shipping Dimensions Mounting Options On-Screen Display (OSD) Controls (Accessible through switches along the bottom) Temperature Humidity (non-condensing) Touch Interface MTBF 487 x 231 x 485...

User Guide
Page 27
... be entered and stored. Recognizing preset display resolutions 21 Recognizing preset display resolutions The display resolutions listed below are the most commonly used modes and are different from the default modes. This monitor automatically recognizes these modes and saved in memory. The monitor automatically stores the new setting, then recognizes the new mode just as factory defaults. The only condition to any or all of the monitor screen by using a preset mode. Preset...
... be entered and stored. Recognizing preset display resolutions 21 Recognizing preset display resolutions The display resolutions listed below are the most commonly used modes and are different from the default modes. This monitor automatically recognizes these modes and saved in memory. The monitor automatically stores the new setting, then recognizes the new mode just as factory defaults. The only condition to any or all of the monitor screen by using a preset mode. Preset...
User Guide
Page 28
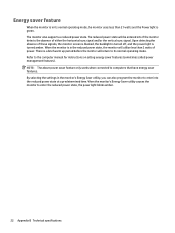
... specifications When the monitor's Energy Saver utility causes the monitor to the computer manual for instructions on setting energy saver features (sometimes called power management features). The reduced power state will utilize less than 21 watts and the Power light is green. Upon detecting the absence of these signals, the monitor screen is blanked, the backlight is turned off...
... specifications When the monitor's Energy Saver utility causes the monitor to the computer manual for instructions on setting energy saver features (sometimes called power management features). The reduced power state will utilize less than 21 watts and the Power light is green. Upon detecting the absence of these signals, the monitor screen is blanked, the backlight is turned off...

User Guide
Page 29
... support or have an issue with a product or would like to 9 p.m. Mountain Time. Use the Search feature on a stand-alone basis or with additional assistive technologies. If you are constantly refining the accessibility of operating system assistive technologies and can be configured to work with appropriate assistive devices. C Accessibility HP designs, produces, and markets products and services...
... support or have an issue with a product or would like to 9 p.m. Mountain Time. Use the Search feature on a stand-alone basis or with additional assistive technologies. If you are constantly refining the accessibility of operating system assistive technologies and can be configured to work with appropriate assistive devices. C Accessibility HP designs, produces, and markets products and services...


