

HP Device Manager User Manual
Page 8
6 Advanced Tasks Add-ons ...120 Introduction ...120 Applying an Add-on to a Thin Client 120 Images ...130 Introduction ...130 Images & Repository Management 130 Client BIOS Settings for PXE 130 Pulling a PXE Image From a Client 131 Pushing a PXE Image to a Client 134 Cloning an Image from an HP Thin Client 137 Updating Images ...140 Changing Registry Settings ...143 Getting Registry Settings...
6 Advanced Tasks Add-ons ...120 Introduction ...120 Applying an Add-on to a Thin Client 120 Images ...130 Introduction ...130 Images & Repository Management 130 Client BIOS Settings for PXE 130 Pulling a PXE Image From a Client 131 Pushing a PXE Image to a Client 134 Cloning an Image from an HP Thin Client 137 Updating Images ...140 Changing Registry Settings ...143 Getting Registry Settings...

HP Device Manager User Manual
Page 81
...Pane in the main Console window. 2. Power Management 71 Power Management The Management Console enables you right-click on the screen of the client's BIOS must be achieved either by using the templates available on the Operations tab, or by selecting from the popup menu when you to ...perform the task. up menu. 3. Click OK to reboot, shutdown and wake a client remotely. When the client receives the task, a warning dialog box will appear on a device as described below. This can be enabled. Select a device from the pop...
...Pane in the main Console window. 2. Power Management 71 Power Management The Management Console enables you right-click on the screen of the client's BIOS must be achieved either by using the templates available on the Operations tab, or by selecting from the popup menu when you to ...perform the task. up menu. 3. Click OK to reboot, shutdown and wake a client remotely. When the client receives the task, a warning dialog box will appear on a device as described below. This can be enabled. Select a device from the pop...

HP Device Manager User Manual
Page 140
...HP Device Manager manages images through the Repository Management tool, which also provides utilities to recreate the digital signature. NOTE: Pushing and pulling images uses the PXE functions of reading and writing images depending on whether or not a PXE Server is only required on a thin client...write images to update a device using an image from supported clients. Images Introduction HP Device Manager can pull or push a PXE image, you must make sure that the source and target client devices have their BIOS settings configured correctly. 130 Chapter 6 Advanced Tasks It also...
...HP Device Manager manages images through the Repository Management tool, which also provides utilities to recreate the digital signature. NOTE: Pushing and pulling images uses the PXE functions of reading and writing images depending on whether or not a PXE Server is only required on a thin client...write images to update a device using an image from supported clients. Images Introduction HP Device Manager can pull or push a PXE image, you must make sure that the source and target client devices have their BIOS settings configured correctly. 130 Chapter 6 Advanced Tasks It also...
HP Device Manager User Manual
Page 141
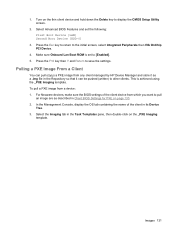
... Imaging tab in the Task Templates pane, then double-click on the thin client device and hold down the Delete key to [Enabled]. 5. Pulling a PXE Image From a Client You can pull (copy) a PXE image from any client managed by HP Device Manager and store it as a .img file in the Repository ...in its Device Tree. 3. Images 131 For Neoware devices, make sure the BIOS settings of the client in Client BIOS Settings for PXE on page 130. 2. 1. In the Management Console, display the OS tab containing the name of the client device from a device: 1. Make sure Onboard Lan Boot ROM is achieved ...
... Imaging tab in the Task Templates pane, then double-click on the thin client device and hold down the Delete key to [Enabled]. 5. Pulling a PXE Image From a Client You can pull (copy) a PXE image from any client managed by HP Device Manager and store it as a .img file in the Repository ...in its Device Tree. 3. Images 131 For Neoware devices, make sure the BIOS settings of the client in Client BIOS Settings for PXE on page 130. 2. 1. In the Management Console, display the OS tab containing the name of the client device from a device: 1. Make sure Onboard Lan Boot ROM is achieved ...
HP Device Manager User Manual
Page 144
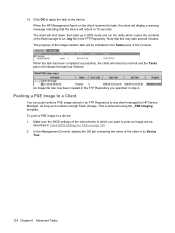
...display a warning message indicating that this may take several minutes. Pushing a PXE Image to a Client You can push (write) a PXE image stored in Client BIOS Settings for PXE on the client receives the task, the client will shut down, then start up in DOS mode and run the utility which you specified ... task has finished. To push a PXE image to any client managed by HP Device Manager, as long as normal and the Tasks pane will reboot as it contains enough Flash storage. 10. Make sure the BIOS settings of the client device to which copies the contents of the flash storage to...
...display a warning message indicating that this may take several minutes. Pushing a PXE Image to a Client You can push (write) a PXE image stored in Client BIOS Settings for PXE on the client receives the task, the client will shut down, then start up in DOS mode and run the utility which you specified ... task has finished. To push a PXE image to any client managed by HP Device Manager, as long as normal and the Tasks pane will reboot as it contains enough Flash storage. 10. Make sure the BIOS settings of the client device to which copies the contents of the flash storage to...

HP Device Manager User Manual
Page 252
Index A Activity Directory 166 add-ons 120 add-ons, applying to thin client 120 adding group 163 report template 193 to repository 206 users 159 advanced tasks 120 agents configuration for client discovery 42 configuring 156 device 2 discover 37 mode 4 setting parameters 156 updating version 157...143 user password 161 client BIOS settings, PXE 130 client discovery DHCP tag 41 discover agent 37 management agent broadcast 37 manual configuration 42 walking with IP list 40 walking with IP range 38 client, discovering 37 cloning device settings 95 image from thin client 137 command execution, ...
Index A Activity Directory 166 add-ons 120 add-ons, applying to thin client 120 adding group 163 report template 193 to repository 206 users 159 advanced tasks 120 agents configuration for client discovery 42 configuring 156 device 2 discover 37 mode 4 setting parameters 156 updating version 157...143 user password 161 client BIOS settings, PXE 130 client discovery DHCP tag 41 discover agent 37 management agent broadcast 37 manual configuration 42 walking with IP list 40 walking with IP range 38 client, discovering 37 cloning device settings 95 image from thin client 137 command execution, ...

HP Device Manager User Manual
Page 254
N NAT environment 42 NeoLinux 4.x devices 212 Neoware, legacy client BIOS settings 130 network checking connection status 67 configuring settings 102 requirements 10 O opening VNC viewer 84 OS tabs 3 overview 1 overview, system structure 1 P ...power management 71 properties displaying task 79 grouping 182 pulling PXE image from client 131 pushing PXE image to client 134 PXE client BIOS settings 130 configuring DHCP server 27 configuring routers 29 pulling image from client 131 pushing image to client 134 R region, configuring settings 106 registry changing settings 143 editing settings 149...
N NAT environment 42 NeoLinux 4.x devices 212 Neoware, legacy client BIOS settings 130 network checking connection status 67 configuring settings 102 requirements 10 O opening VNC viewer 84 OS tabs 3 overview 1 overview, system structure 1 P ...power management 71 properties displaying task 79 grouping 182 pulling PXE image from client 131 pushing PXE image to client 134 PXE client BIOS settings 130 configuring DHCP server 27 configuring routers 29 pulling image from client 131 pushing image to client 134 R region, configuring settings 106 registry changing settings 143 editing settings 149...
HP Image Manager 5.0: Quick Setup Guide
Page 35
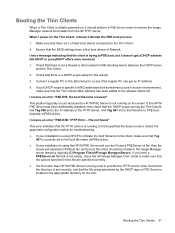
... a regular PC to this sometimes occurs in the Image Manager server directory (typically C:\Program Files\HP Image Manager\Server). File not found" This error indicates that the Thin Clients MAC address has been added to see a message indicating that the options specified in the appropriate directory... a tool other network traffic blocking device between the DHCP server and the Thin Client. 2. I power on the server. Ensure that the BIOS settings have a PXEServer.ini file that is not empty, check the HP Image Manager User Guide to make sure that Tag 067 is correctly set ...
... a regular PC to this sometimes occurs in the Image Manager server directory (typically C:\Program Files\HP Image Manager\Server). File not found" This error indicates that the Thin Clients MAC address has been added to see a message indicating that the options specified in the appropriate directory... a tool other network traffic blocking device between the DHCP server and the Thin Client. 2. I power on the server. Ensure that the BIOS settings have a PXEServer.ini file that is not empty, check the HP Image Manager User Guide to make sure that Tag 067 is correctly set ...

HP ThinPro GT Administrator's Guide
Page 128
System Information screen four tabs: ● General on page 120 ● Network on page 121 ● Net Tools on page 122 ● Software Information on page 123 General The General tab displays the following information: ● BIOS and OS ◦ Serial Number ◦ BIOS Version ◦ BIOS Release Date 120 Chapter 2 Installation System Information You can view and change system information in System Information. ▲ Click System Information in the left pane.
System Information screen four tabs: ● General on page 120 ● Network on page 121 ● Net Tools on page 122 ● Software Information on page 123 General The General tab displays the following information: ● BIOS and OS ◦ Serial Number ◦ BIOS Version ◦ BIOS Release Date 120 Chapter 2 Installation System Information You can view and change system information in System Information. ▲ Click System Information in the left pane.

HP ThinPro GT Administrator's Guide
Page 132
...VDM 53 Xdmcp 56 XenDesktop 44 admin mode, switch to 3 administrator, log in as 5 Agent Config 87 aggregation, client 68 Altiris Agent settings 67 Altiris configuration 67 B BIOS information 120 C Citrix ICA adding connection 22 Application options 26 Common Settings options 29 configuring connection 7 Connection options 24 Firewall...70 disabling 75 computer information 120 configuring display position 77 display settings 77 connect 6 connection, adding Citrix ICA 22 Custom 63 HP SAM Client 42 ICA 22 Iceweasel 41 Leostream 45 PNAgent 44 Provision 47 RDP 29 RGS 20 SSH 58 Teemtalk 35 Telnet 61 VDM ...
...VDM 53 Xdmcp 56 XenDesktop 44 admin mode, switch to 3 administrator, log in as 5 Agent Config 87 aggregation, client 68 Altiris Agent settings 67 Altiris configuration 67 B BIOS information 120 C Citrix ICA adding connection 22 Application options 26 Common Settings options 29 configuring connection 7 Connection options 24 Firewall...70 disabling 75 computer information 120 configuring display position 77 display settings 77 connect 6 connection, adding Citrix ICA 22 Custom 63 HP SAM Client 42 ICA 22 Iceweasel 41 Leostream 45 PNAgent 44 Provision 47 RDP 29 RGS 20 SSH 58 Teemtalk 35 Telnet 61 VDM ...

Troubleshooting Guide: HP gt7725 Thin Clients
Page 5
... ...5 Dual-head Configuration 5 Quad-head Configuration 6 Installing the Rubber Feet ...7 Installing the Stand ...8 Removing the Stand ...8 Thin Client Management Solutions ...9 2 Hardware Changes General Hardware Installation Sequence 10 Removing and Replacing the Secure USB Compartment Cover 12 Removing the ...Thin Client Options ...18 Installing the USB Device 18 Removing and Replacing the Battery 18 Installing the PCI-Express Card 19 External Drives ...20 3 BIOS Settings, (F10) Utility Using the BIOS Settings ...21 Changing BIOS Settings from the repset utility 21 Changing BIOS...
... ...5 Dual-head Configuration 5 Quad-head Configuration 6 Installing the Rubber Feet ...7 Installing the Stand ...8 Removing the Stand ...8 Thin Client Management Solutions ...9 2 Hardware Changes General Hardware Installation Sequence 10 Removing and Replacing the Secure USB Compartment Cover 12 Removing the ...Thin Client Options ...18 Installing the USB Device 18 Removing and Replacing the Battery 18 Installing the PCI-Express Card 19 External Drives ...20 3 BIOS Settings, (F10) Utility Using the BIOS Settings ...21 Changing BIOS Settings from the repset utility 21 Changing BIOS...

Troubleshooting Guide: HP gt7725 Thin Clients
Page 6
... Actions 25 4 Diagnostics and Troubleshooting LEDs ...26 Power-On Sequence ...27 Power-On Diagnostic Tests ...27 Beep Codes ...28 Boot Block Beep Codes ...28 POST BIOS Beep Codes 28 POST Error Messages ...28 Troubleshooting ...30 Basic Troubleshooting ...30 Diskless (No-Flash) Unit Troubleshooting 31 Troubleshooting Flowcharts 33 Initial Troubleshooting 33 Initial...
... Actions 25 4 Diagnostics and Troubleshooting LEDs ...26 Power-On Sequence ...27 Power-On Diagnostic Tests ...27 Beep Codes ...28 Boot Block Beep Codes ...28 POST BIOS Beep Codes 28 POST Error Messages ...28 Troubleshooting ...30 Basic Troubleshooting ...30 Diskless (No-Flash) Unit Troubleshooting 31 Troubleshooting Flowcharts 33 Initial Troubleshooting 33 Initial...

Troubleshooting Guide: HP gt7725 Thin Clients
Page 7
... ...59 Appendix D FTP Update Server Requirements ...60 DCHP Server ...60 FTP Server ...60 Description ...61 Host Settings ...61 Select Image to Update ...62 Appendix E System BIOS Restoring a Corrupt BIOS ...64 Updating a BIOS ...65 Appendix F Electrostatic Discharge Preventing Electrostatic Damage ...66 Grounding Methods ...66 Index ...67 vii
... ...59 Appendix D FTP Update Server Requirements ...60 DCHP Server ...60 FTP Server ...60 Description ...61 Host Settings ...61 Select Image to Update ...62 Appendix E System BIOS Restoring a Corrupt BIOS ...64 Updating a BIOS ...65 Appendix F Electrostatic Discharge Preventing Electrostatic Damage ...66 Grounding Methods ...66 Index ...67 vii

Troubleshooting Guide: HP gt7725 Thin Clients
Page 29
...ATA Flash Network Off Enabled Enabled Enabled 3F8/IRQ PWRON After PWR-Fail Wake-on-PME BIOS Wake Up Asset Tag No Setup Password Power-On Password USB Controller Secure USB Ports ... input (8 chars max) Disabled Disabled Disabled No Errors Always Using the BIOS Settings 21 Changing BIOS Settings from the repset utility Some BIOS settings may be controlled with this method. This table identifies the items ...system without having to go through the F10 utility1. 3 BIOS Settings, (F10) Utility Using the BIOS Settings AMD Turion Griffin ZM84 processor and the RS780/SB700 chipset are used in...
...ATA Flash Network Off Enabled Enabled Enabled 3F8/IRQ PWRON After PWR-Fail Wake-on-PME BIOS Wake Up Asset Tag No Setup Password Power-On Password USB Controller Secure USB Ports ... input (8 chars max) Disabled Disabled Disabled No Errors Always Using the BIOS Settings 21 Changing BIOS Settings from the repset utility Some BIOS settings may be controlled with this method. This table identifies the items ...system without having to go through the F10 utility1. 3 BIOS Settings, (F10) Utility Using the BIOS Settings AMD Turion Griffin ZM84 processor and the RS780/SB700 chipset are used in...

Troubleshooting Guide: HP gt7725 Thin Clients
Page 30
... 23 Integrated Peripherals Setup Utility-Integrated Peripherals on page 24 Power Management Setup Setup Utility-Power Management Setup on or restart the thin client. 2. Turn on page 25 22 Chapter 3 BIOS Settings, (F10) Utility CAUTION: Do NOT turn off while the ROM is saving the Setup (F10) changes, because the CMOS could become...
... 23 Integrated Peripherals Setup Utility-Integrated Peripherals on page 24 Power Management Setup Setup Utility-Power Management Setup on or restart the thin client. 2. Turn on page 25 22 Chapter 3 BIOS Settings, (F10) Utility CAUTION: Do NOT turn off while the ROM is saving the Setup (F10) changes, because the CMOS could become...

Troubleshooting Guide: HP gt7725 Thin Clients
Page 31
...IDE Primary Master Indicates ATA Flash settings. Enabled/Disabled. Default is Enabled 1st Boot Device Select Boot Device Priority. Using the BIOS Settings 23 Setup Utility-Standard CMOS Features Table 3-3 Setup Utility-Standard CMOS Features Option Description Date (mm:dd:yy) Allows you... All Errors, No Errors, or All But Keyboard when POST Error has been detected. Setup Utility-Advanced BIOS Features Table 3-4 Setup Utility-Advanced BIOS Features Option Description Quick Power-on the hardware configuration. Default is required every time the system boots or ...
...IDE Primary Master Indicates ATA Flash settings. Enabled/Disabled. Default is Enabled 1st Boot Device Select Boot Device Priority. Using the BIOS Settings 23 Setup Utility-Standard CMOS Features Table 3-3 Setup Utility-Standard CMOS Features Option Description Date (mm:dd:yy) Allows you... All Errors, No Errors, or All But Keyboard when POST Error has been detected. Setup Utility-Advanced BIOS Features Table 3-4 Setup Utility-Advanced BIOS Features Option Description Quick Power-on the hardware configuration. Default is required every time the system boots or ...

Troubleshooting Guide: HP gt7725 Thin Clients
Page 32
.... Default is None. Default is 3F8/IRQ4. Default is enabled. Default is Auto. F12 Boot Enable/Disable F12 network boot. Default is Auto. 24 Chapter 3 BIOS Settings, (F10) Utility USB Mouse Support Allows use of internal fan. USB Controller Enable or Disable USB controller. Default is Enabled. Default is added to... POST to allow more time to press F10 to enter the Setup Utility. Table 3-4 Setup Utility-Advanced BIOS Features (continued) POST Delay (secs) Set a delay that is disabled.
.... Default is None. Default is 3F8/IRQ4. Default is enabled. Default is Auto. F12 Boot Enable/Disable F12 network boot. Default is Auto. 24 Chapter 3 BIOS Settings, (F10) Utility USB Mouse Support Allows use of internal fan. USB Controller Enable or Disable USB controller. Default is Enabled. Default is added to... POST to allow more time to press F10 to enter the Setup Utility. Table 3-4 Setup Utility-Advanced BIOS Features (continued) POST Delay (secs) Set a delay that is disabled.

Troubleshooting Guide: HP gt7725 Thin Clients
Page 33
...Setup Utility-Utility Task Actions Table 3-7 Setup (F10) Utility Task Actions Heading Table Load Factory Defaults Select OK or Cancel. Using the BIOS Settings 25 Default is lost and comes back, the option determines what power state the system should go to. Save & Exit Setup... Setup options. Setup Utility-Power Management Setup Table 3-6 Setup Utility-Power Management Setup Option Description PWRON After PWRFail When power is enabled. BIOS Wake up Enable RTC alarm wakeup. NOTE: When the user password is set , change , and disable the administrator password. Day of...
...Setup Utility-Utility Task Actions Table 3-7 Setup (F10) Utility Task Actions Heading Table Load Factory Defaults Select OK or Cancel. Using the BIOS Settings 25 Default is lost and comes back, the option determines what power state the system should go to. Save & Exit Setup... Setup options. Setup Utility-Power Management Setup Table 3-6 Setup Utility-Power Management Setup Option Description PWRON After PWRFail When power is enabled. BIOS Wake up Enable RTC alarm wakeup. NOTE: When the user password is set , change , and disable the administrator password. Day of...

Troubleshooting Guide: HP gt7725 Thin Clients
Page 36
... Flash EPROM detected 8 The first 8 beeps mean that the system is low. CMOS battery is going to erase the BIOS ROM. 8 The second 8 beeps mean that the system is going to flash the BIOS ROM. 10 Flash Erase error 11 Flash Program error 12 '786R6.ROM' file size error 13... BIOS ROM image mismatch (file layout does not match image present in flash device) POST BIOS Beep Codes Table 4-4 POST BIOS Beep Codes Number of Beeps Description 1 CMOS Checksum Error 2 Need to be resolved by using...
... Flash EPROM detected 8 The first 8 beeps mean that the system is low. CMOS battery is going to erase the BIOS ROM. 8 The second 8 beeps mean that the system is going to flash the BIOS ROM. 10 Flash Erase error 11 Flash Program error 12 '786R6.ROM' file size error 13... BIOS ROM image mismatch (file layout does not match image present in flash device) POST BIOS Beep Codes Table 4-4 POST BIOS Beep Codes Number of Beeps Description 1 CMOS Checksum Error 2 Need to be resolved by using...

Troubleshooting Guide: HP gt7725 Thin Clients
Page 37
... Keyboard Error Keyboard is not present or the hardware is not responding when the keyboard controller is a generic message indicated the BIOS could not find a bootable device in the system and/or removable media drive Insert Boot Media in the setup. Boot Failure...... a problem with keyboard controller initialization. NO ROM BASIC This message occurs on some systems when no media is required to continue the BIOS POST. Table 4-5 POST Error Messages (continued) CMOS Checksum Bad CMOS contents failed the Checksum check. This may occur for data transfer...
... Keyboard Error Keyboard is not present or the hardware is not responding when the keyboard controller is a generic message indicated the BIOS could not find a bootable device in the system and/or removable media drive Insert Boot Media in the setup. Boot Failure...... a problem with keyboard controller initialization. NO ROM BASIC This message occurs on some systems when no media is required to continue the BIOS POST. Table 4-5 POST Error Messages (continued) CMOS Checksum Bad CMOS contents failed the Checksum check. This may occur for data transfer...


