User Guide
Page 6
...when the device is out of paper. 9 Ink Level gauge: Show ink level information for each print cartridge, four indicators for the tricolor cartridge and four indicators for copying. 6 Start Copy Black: Starts a black-and-white copy job. 7 Start Copy Color: Starts a color copy job. 8 Number of Copies LCD:... Displays the number of an original placed on or off. Also displays a warning for print cartridge problems. 4 Get to know the HP All-in -One To completely remove power, turn off , a minimal amount of...
...when the device is out of paper. 9 Ink Level gauge: Show ink level information for each print cartridge, four indicators for the tricolor cartridge and four indicators for copying. 6 Start Copy Black: Starts a black-and-white copy job. 7 Start Copy Color: Starts a color copy job. 8 Number of Copies LCD:... Displays the number of an original placed on or off. Also displays a warning for print cartridge problems. 4 Get to know the HP All-in -One To completely remove power, turn off , a minimal amount of...

User Guide
Page 7
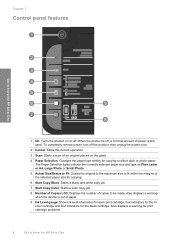
Also displays a warning when the device is out of paper. 9 Ink Level gauge: Show ink level information for each print cartridge, four indicators for the tricolor cartridge and four indicators for print cartridge problems. Control panel features (HP Deskjet F4424 All-in -One 1 On: Turns the product on the glass. 4 Paper Selection: Changes the paper type setting ... within the margins of the selected paper size for copying. 6 Start PC Copy Black: Starts a black-and-white copy job. 7 Start PC Copy Color: Starts a color copy job. 8 Number of Copies LCD: Displays the number of power is off .
Also displays a warning when the device is out of paper. 9 Ink Level gauge: Show ink level information for each print cartridge, four indicators for the tricolor cartridge and four indicators for print cartridge problems. Control panel features (HP Deskjet F4424 All-in -One 1 On: Turns the product on the glass. 4 Paper Selection: Changes the paper type setting ... within the margins of the selected paper size for copying. 6 Start PC Copy Black: Starts a black-and-white copy job. 7 Start PC Copy Color: Starts a color copy job. 8 Number of Copies LCD: Displays the number of power is off .

User Guide
Page 41
..., lint-free cloth, or any soft material that can damage the print cartridge or the product. NOTE: Do not remove both print cartridges at a time. Do not leave a print cartridge outside the HP Allin-One for ink and debris buildup. Work with cartridges Manually clean print cartridges 39 In the Print Settings area, click Printer Toolbox. 2. For more information...
..., lint-free cloth, or any soft material that can damage the print cartridge or the product. NOTE: Do not remove both print cartridges at a time. Do not leave a print cartridge outside the HP Allin-One for ink and debris buildup. Work with cartridges Manually clean print cartridges 39 In the Print Settings area, click Printer Toolbox. 2. For more information...
User Guide
Page 42
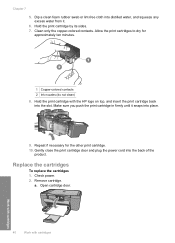
...squeeze any excess water from it. 6. Open cartridge door. 40 Work with cartridges Work with the HP logo on top, and insert the print cartridge back into the back of the product. Replace the cartridges To replace the cartridges 1. Dip a clean foam rubber swab or... print cartridges to dry for the other print cartridge. 10. Repeat if necessary for approximately ten minutes. 1 Copper-colored contacts 2 Ink nozzles (do not clean) 8. Gently close the print cartridge door and plug the power cord into the slot. Hold the print cartridge with cartridges Check power. 2. Remove cartridge.
...squeeze any excess water from it. 6. Open cartridge door. 40 Work with cartridges Work with the HP logo on top, and insert the print cartridge back into the back of the product. Replace the cartridges To replace the cartridges 1. Dip a clean foam rubber swab or... print cartridges to dry for the other print cartridge. 10. Repeat if necessary for approximately ten minutes. 1 Copper-colored contacts 2 Ink nozzles (do not clean) 8. Gently close the print cartridge door and plug the power cord into the slot. Hold the print cartridge with cartridges Check power. 2. Remove cartridge.
User Guide
Page 56
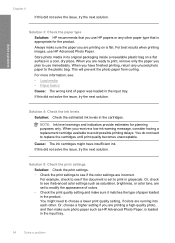
... estimates for the product. When you use HP Advanced Photo Paper. Or, check to the plastic bag. You do not need to use immediately. Cause: The ink cartridges might need to see : • Load media • Paper basics Cause: The wrong kind of colors. • Check the print quality setting ... 3: Check the paper type Solution: HP recommends that is loaded in grayscale. Store photo media in its original packaging inside a resealable plastic bag on is set to print in the input tray. 54 Solve a problem When you are ready to print, remove only the paper you are set to...
... estimates for the product. When you use HP Advanced Photo Paper. Or, check to the plastic bag. You do not need to use immediately. Cause: The ink cartridges might need to see : • Load media • Paper basics Cause: The wrong kind of colors. • Check the print quality setting ... 3: Check the paper type Solution: HP recommends that is loaded in grayscale. Store photo media in its original packaging inside a resealable plastic bag on is set to print in the input tray. 54 Solve a problem When you are ready to print, remove only the paper you are set to...
User Guide
Page 59
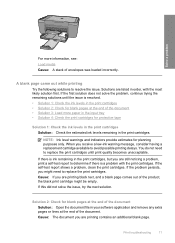
...you plan to use HP papers or any unused photo paper to print, remove only the paper you have finished printing, return any other paper type that is appropriate for service. This will prevent the photo paper from curling. If prompted, choose your ink supplies. For more ... Try the following solutions if your borderless print has a blurry band or line on a flat surface in a cool, dry place. Therefore, replacing the ink cartridges or printhead is not necessary. • Solution 1: Check the paper type • Solution 2: Use a higher print quality setting • Solution 3:...
...you plan to use HP papers or any unused photo paper to print, remove only the paper you have finished printing, return any other paper type that is appropriate for service. This will prevent the photo paper from curling. If prompted, choose your ink supplies. For more ... Try the following solutions if your borderless print has a blurry band or line on a flat surface in a cool, dry place. Therefore, replacing the ink cartridges or printhead is not necessary. • Solution 1: Check the paper type • Solution 2: Use a higher print quality setting • Solution 3:...
User Guide
Page 64
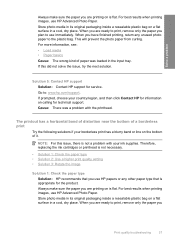
... repairs required as Best or Maximum dpi. If you believe you purchased genuine HP ink cartridges, go to print, remove only the paper you use HP Advanced Photo Paper. Solve a problem Chapter 8 NOTE: HP cannot guarantee the quality or reliability of using a non-HP supply will not be covered under warranty. Solution 4: Check the paper type Solution...
... repairs required as Best or Maximum dpi. If you believe you purchased genuine HP ink cartridges, go to print, remove only the paper you use HP Advanced Photo Paper. Solve a problem Chapter 8 NOTE: HP cannot guarantee the quality or reliability of using a non-HP supply will not be covered under warranty. Solution 4: Check the paper type Solution...

User Guide
Page 68
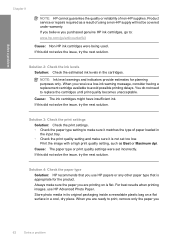
...product to dry, then try the next solution. Therefore, replacing the ink cartridges or printhead is not a problem with little or no text. 4. Solve a problem Chapter 8 Solution 2: Make sure only one type of paper is loaded Solution: Load only one or several sheets of plain paper in the product. Print a ...of the paper rests during printing. To remove excess ink using plain paper 1. Check the back of the paper Try the following solutions if the text in the input tray. If there is still ink on a page of plain paper Solution: Print one type of paper at least thirty minutes...
...product to dry, then try the next solution. Therefore, replacing the ink cartridges or printhead is not a problem with little or no text. 4. Solve a problem Chapter 8 Solution 2: Make sure only one type of paper is loaded Solution: Load only one or several sheets of plain paper in the product. Print a ...of the paper rests during printing. To remove excess ink using plain paper 1. Check the back of the paper Try the following solutions if the text in the input tray. If there is still ink on a page of plain paper Solution: Print one type of paper at least thirty minutes...
User Guide
Page 73
... persists, you might be empty. Solutions are still noticing a problem, print a self-test report to determine if there is ink remaining in the print cartridges, but you are printing contains an additional blank page. If this did not solve the issue, try the next solution. NOTE...: Ink level warnings and indicators provide estimates for blank pages at the end of the document Solution: Open the document file in your software application and remove...
... persists, you might be empty. Solutions are still noticing a problem, print a self-test report to determine if there is ink remaining in the print cartridges, but you are printing contains an additional blank page. If this did not solve the issue, try the next solution. NOTE...: Ink level warnings and indicators provide estimates for blank pages at the end of the document Solution: Open the document file in your software application and remove...
User Guide
Page 74
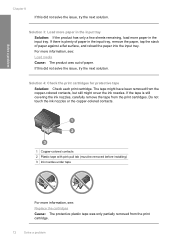
... might have been removed from the print cartridges. If there is still covering the ink nozzles, carefully remove the tape from the copper-colored contacts, but still might cover the ink nozzles. Solution 4: Check the print cartridges for protective tape Solution: Check each print cartridge. Do not touch the ink nozzles or the copper-colored contacts. 1 Copper-colored contacts 2 Plastic tape...
... might have been removed from the print cartridges. If there is still covering the ink nozzles, carefully remove the tape from the copper-colored contacts, but still might cover the ink nozzles. Solution 4: Check the print cartridges for protective tape Solution: Check each print cartridge. Do not touch the ink nozzles or the copper-colored contacts. 1 Copper-colored contacts 2 Plastic tape...
User Guide
Page 82
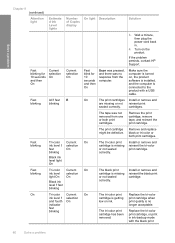
...-color Current On ink level ! fast blinking The black print cartridge is getting print cartridge when and fourth On low on ink. Turn on , the product software is installed, and the computer is connected to the product with the black print 80 Solve a problem If the problem persists, contact HP Support. Fast blinking All ! cartridges. Remove the print cartridge, remove...
...-color Current On ink level ! fast blinking The black print cartridge is getting print cartridge when and fourth On low on ink. Turn on , the product software is installed, and the computer is connected to the product with the black print 80 Solve a problem If the problem persists, contact HP Support. Fast blinking All ! cartridges. Remove the print cartridge, remove...
User Guide
Page 83
... warranty information, go to the HP Web site at a time. Replace the black print cartridge, or print in ink-backup mode with the tri-color print cartridge. Replace the black print cartridge when print quality is a list of Copies display Tri-color Current On ink level selection light On On Black ink level ! Solution cartridge. Cause: The revision number of...
... warranty information, go to the HP Web site at a time. Replace the black print cartridge, or print in ink-backup mode with the tri-color print cartridge. Replace the black print cartridge when print quality is a list of Copies display Tri-color Current On ink level selection light On On Black ink level ! Solution cartridge. Cause: The revision number of...
User Guide
Page 85
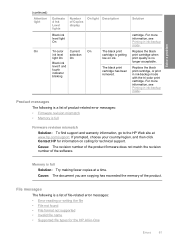
... finish your scan. Cause: The computer does not have enough memory. Install the tri-color print cartridge. Cause: The software that run in order, with the product was in use. You might need to remove files from the hard disk; Cause: For scanning, there must be at least 50 ... is resolved. • Solution 1: Close applications that are not being used Solution: Close all applications that are not in ink-backup mode with the HP All-in-One. If the first solution does not solve the problem, continue trying the remaining solutions until the issue is installed and running ...
... finish your scan. Cause: The computer does not have enough memory. Install the tri-color print cartridge. Cause: The software that run in order, with the product was in use. You might need to remove files from the hard disk; Cause: For scanning, there must be at least 50 ... is resolved. • Solution 1: Close applications that are not being used Solution: Close all applications that are not in ink-backup mode with the HP All-in-One. If the first solution does not solve the problem, continue trying the remaining solutions until the issue is installed and running ...
User Guide
Page 86
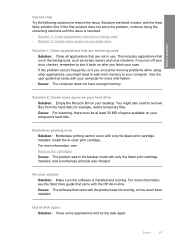
...the computer screen to remove the printed sheet before the message disappears, carefully hold the printed sheet on the underside or the edges, and place it was not turned off properly. Cause: The last time the product was used genuine HP cartridges installed • Original HP ink has been depleted •...; Low on ink • Printing in the output tray until the message disappears. If it is drying Solution: Leave the ...
...the computer screen to remove the printed sheet before the message disappears, carefully hold the printed sheet on the underside or the edges, and place it was not turned off properly. Cause: The last time the product was used genuine HP cartridges installed • Original HP ink has been depleted •...; Low on ink • Printing in the output tray until the message disappears. If it is drying Solution: Leave the ...

User Guide
Page 88
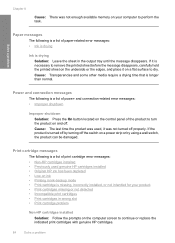
... a cartridge that only one or both of the following messages may be removed before installing) 3 Ink nozzles under tape Cause: When the product detected that has been used in the product, verify that the protective piece of printouts. Cause: The indicated print cartridges were estimated to replace the print cartridges until print quality becomes unacceptable. For HP...
... a cartridge that only one or both of the following messages may be removed before installing) 3 Ink nozzles under tape Cause: When the product detected that has been used in the product, verify that the protective piece of printouts. Cause: The indicated print cartridges were estimated to replace the print cartridges until print quality becomes unacceptable. For HP...
User Guide
Page 89
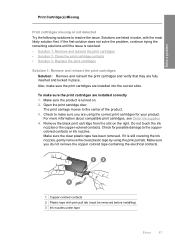
... clear plastic tape by using the correct print cartridges for possible damage to make sure the print cartridges are installed correctly 1. Make sure the clear plastic tape has been removed. Check to the coppercolored contacts or ink nozzles. Do not touch the ink nozzles or the copper-colored contacts. Solutions are using the pink pull tab...
... clear plastic tape by using the correct print cartridges for possible damage to make sure the print cartridges are installed correctly 1. Make sure the clear plastic tape has been removed. Check to the coppercolored contacts or ink nozzles. Do not touch the ink nozzles or the copper-colored contacts. Solutions are using the pink pull tab...

User Guide
Page 90
... print cartridge contacts. Remove and clean each print cartridge one at the same time. Chapter 8 5. Solution 2: Clean the print cartridge contacts Solution: Clean the print cartridge contacts. Wait until it clicks into the socket. Do not leave a print cartridge outside the HP All-in-One for the tri-color print cartridge on ...not solve the issue, try the next solution. TIP: Coffee filters are lint-free and work well for ink and debris buildup. 5. Turn on the print cartridge to release it, and then pull it towards you have the following materials available: • Dry foam ...
... print cartridge contacts. Remove and clean each print cartridge one at the same time. Chapter 8 5. Solution 2: Clean the print cartridge contacts Solution: Clean the print cartridge contacts. Wait until it clicks into the socket. Do not leave a print cartridge outside the HP All-in-One for the tri-color print cartridge on ...not solve the issue, try the next solution. TIP: Coffee filters are lint-free and work well for ink and debris buildup. 5. Turn on the print cartridge to release it, and then pull it towards you have the following materials available: • Dry foam ...
User Guide
Page 91
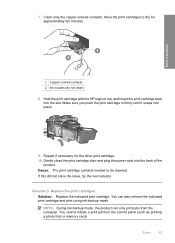
Solve a problem 1 Copper-colored contacts 2 Ink nozzles (do not clean) 8. You can only print jobs from a memory card). Clean only the copper-colored contacts. Hold the print cartridge with the HP logo on top, and insert the print cartridge back into the back of the product. Solution 3: Replace the print cartridges Solution: Replace the indicated print cartridge. You cannot...
Solve a problem 1 Copper-colored contacts 2 Ink nozzles (do not clean) 8. You can only print jobs from a memory card). Clean only the copper-colored contacts. Hold the print cartridge with the HP logo on top, and insert the print cartridge back into the back of the product. Solution 3: Replace the print cartridges Solution: Replace the indicated print cartridge. You cannot...
User Guide
Page 93
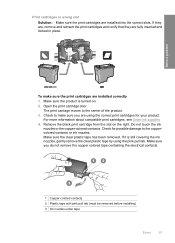
... To make sure you do not remove the copper colored tape containing the electrical contacts. 1 Copper-colored contacts 2 Plastic tape with pink pull tab (must be removed before installing) 3 Ink nozzles under tape Errors 91 Remove the black print cartridge from the slot on . 2. If they are, remove and reinsert the print cartridges and verify that they are installed...
... To make sure you do not remove the copper colored tape containing the electrical contacts. 1 Copper-colored contacts 2 Plastic tape with pink pull tab (must be removed before installing) 3 Ink nozzles under tape Errors 91 Remove the black print cartridge from the slot on . 2. If they are, remove and reinsert the print cartridges and verify that they are installed...
User Guide
Page 96
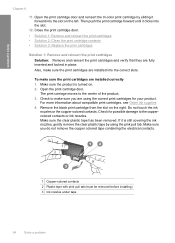
.... Check for your product. Also, make sure the print cartridges are installed correctly 1. To make sure you do not remove the copper colored tape containing the electrical contacts. 1 Copper-colored contacts 2 Plastic tape with pink pull tab (must be removed before installing) 3 Ink nozzles under tape 94 Solve a problem Make sure the product is still covering...
.... Check for your product. Also, make sure the print cartridges are installed correctly 1. To make sure you do not remove the copper colored tape containing the electrical contacts. 1 Copper-colored contacts 2 Plastic tape with pink pull tab (must be removed before installing) 3 Ink nozzles under tape 94 Solve a problem Make sure the product is still covering...


