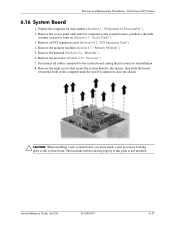
HP Business Desktop dx5150 Series Service Reference Guide, 1st Edition
Page 7
...MT) Chassis 6.1 Preparation for Disassembly 6-1 6.2 External Security Devices 6-2 6.2.1 Installing a Cable Lock 6-2 6.2.2 Installing a Padlock 6-2 6.3 Access Panel 6-3 6.4 Front Bezel 6-4 6.5 Front Drive Bezels 6-5 6.5.1 5.25" Drive Bezel Blank 6-5 6.5.2 Diskette Drive Bezel 6-6 6.5.3 3.5" Drive Bezel Blank 6-6 6.6 Cable Management 6-7 6.6.1 Cable Connections 6-8 6.7 Memory... 3 Battery Holder 6-32 6.18 Speaker 6-33 6.19 Power Supply 6-34 Service Reference Guide, dx5150 361685-001 v Contents 5.4 Routine Care 5-5 5.4.1 General Cleaning Safety Precautions 5-5 5.4.2 Cleaning the ...
HP Business Desktop dx5150 Series Service Reference Guide, 1st Edition
Page 67
...supply. Always position the cables to push cables down into the chassis. Service Reference Guide, dx5150 361685-001 6-7 When removing the power supply power cables from the P1 or P3 connectors ... the top of the retaining latch attached to the cable end of expansion cards or memory modules. Grasp the cable end of sliding or moveable parts to prevent their being cut...of the connector and pull it straight up 2. Ä CAUTION: Always pull the connector - Microtower (MT) Chassis 6.6 Cable Management Always follow these cables. ■ Do not bend any cable sharply. Printed ...
HP Business Desktop dx5150 Series Service Reference Guide, 1st Edition
Page 69
... latches of the computer or optional cards. Microtower (MT) Chassis 6.7 Memory Modules Ä CAUTION: The memory module sockets have locked the Smart Cover Lock, use memory modules with the tab on (Section 6.3, "Access Panel"). When handling a memory module, be careful not to touch any additional modules... that you have gold metal contacts. Service Reference Guide, dx5150 361685-001 6-9 When upgrading the memory, it easier to prevent corrosion and/or oxidation resulting from hot surfaces, allow the internal system components to ...
HP Business Desktop dx5150 Series Service Reference Guide, 1st Edition
Page 87
...make it easier to the system board, noting their location for Disassembly"). 2. Service Reference Guide, dx5150 361685-001 6-27 Removal and Replacement Procedures- Remove the access panel and rotate the computer so the system... board is not installed. Remove the memory modules (Section 6.7, "Memory Modules"). 5. Remove the eight screws that secure the system board to the chassis, then slide ... plate to the system board. Remove the processor (Section 6.15, "Processor"). 7. Microtower (MT) Chassis 6.16 System Board 1.
HP Business Desktop dx5150 Series Service Reference Guide, 1st Edition
Page 179
...M Master Boot Record Security, setting 3-13 memory dual channel mode E-2 locating sockets E-2 MT removal and replacement 6-9 SFF removal and replacement...A-3 µT chassis, illustrated 5-1 MT 3.5" drive bezel removal and replacement ...15 heatsink removal and replacement 6-26 memory removal and replacement 6-9 optical drive cable... pin assignments A-5 mouse cleaning 5-7 pin assignments A-1 MT heatsink removal and replacement 6-25 N numeric codes C-2...replacement 7-14 optical drive cable MT connecting 6-18 MT disconnecting 6-14 overheating, prevention 5-5 P padlock MT 6-2 SFF 7-3 parallel interface ...
HP Business Desktop dx5150 Series Service Reference Guide, 1st Edition
Page 180
... replacement MT 3.5" drive bezel 6-6 MT 5.25" drive bezel 6-5 MT access panel 6-3 MT battery 6-29 MT cable lock 6-2 MT chassis fan 6-20 MT diskette drive bezel 6-6 MT drive 6-14 MT expansion card 6-11 MT front bezel 6-4 MT front I/O devices 6-22 MT front I/O panel 6-21 MT heatsink 6-26 MT memory 6-9 MT padlock 6-2 MT PCI expansion card 6-11 MT power supply 6-34 MT power switch assembly 6-23 MT processor 6-25 MT speaker 6-33 MT system...
HP Business Desktop dx5150 Series Service Reference Guide, 1st Edition
Page 181
See Web sites USB pin assignments A-3 Service Reference Guide, dx5150 361685-001 Index-5 Index SFF memory 7-7 SFF optical drive 7-14 SFF padlock 7-3 SFF power supply 7-32 SFF power switch assembly 7-22 SFF primary hard ...Windows 2-12 S safety precautions, cleaning 5-5 SATA data cable pinouts 4-1 power cable pinouts 4-2 SATA pin assignments A-7 screws, correct size 5-7 SCSI pin assignments A-4 security MT 6-2 SFF 7-2 security settings, setup of 3-9 security, master boot record 3-13 serial interface pin assignments A-3 service considerations 5-7 setup software 1-3 windows 1-1 setup, initial...