
HP USB Digital Drive
Page 9
Gently unplug the Digital Drive from the USB port. ✎ If the USB connector cable is flashing. 1. Disconnecting the Digital Drive ✎ Do not attempt to Remove Hardware" message appears on your taskbar. Select the "Safely Remove Hardware" icon on its track for safe storage. 8 User Guide Select the Digital Drive and wait until the "Safe to remove the Digital Drive when the status light on the Digital Drive is in the extended position, return it on your screen. 3. A dialog box displays a list of connected devices. 2.
Gently unplug the Digital Drive from the USB port. ✎ If the USB connector cable is flashing. 1. Disconnecting the Digital Drive ✎ Do not attempt to Remove Hardware" message appears on your taskbar. Select the "Safely Remove Hardware" icon on its track for safe storage. 8 User Guide Select the Digital Drive and wait until the "Safe to remove the Digital Drive when the status light on the Digital Drive is in the extended position, return it on your screen. 3. A dialog box displays a list of connected devices. 2.
Bluetooth Wireless Technology Basics
Page 6
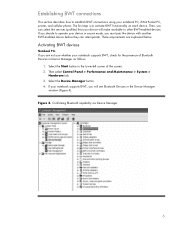
..., and cellular phone. Establishing BWT connections This section describes how to establish BWT connections using your notebook supports BWT, check for the presence of the screen. 2. Activating BWT devices Notebook PCs If you will make available to activate BWT functionality on each device.
..., and cellular phone. Establishing BWT connections This section describes how to establish BWT connections using your notebook supports BWT, check for the presence of the screen. 2. Activating BWT devices Notebook PCs If you will make available to activate BWT functionality on each device.

Bluetooth Wireless Technology Basics
Page 7
...came in the lower-right part of the connection (Table 1). Select the check box next to Bluetooth by hp to restart the computer. Table 1. For specific instructions about discovering and connecting to other BWT-enabled devices, ... > Software Setup. 2. Set up the BWT software After the software is installed and BWT functionality is off, turn on HP notebook PCs; Enable BWT functionality. 3. however, you can use the Bluetooth Setup wizard to Bluetooth operations. Enable BWT functionality ...enabled notebook PC: 1. The color of the icon indicates the status of the screen.
...came in the lower-right part of the connection (Table 1). Select the check box next to Bluetooth by hp to restart the computer. Table 1. For specific instructions about discovering and connecting to other BWT-enabled devices, ... > Software Setup. 2. Set up the BWT software After the software is installed and BWT functionality is off, turn on HP notebook PCs; Enable BWT functionality. 3. however, you can use the Bluetooth Setup wizard to Bluetooth operations. Enable BWT functionality ...enabled notebook PC: 1. The color of the icon indicates the status of the screen.

Bluetooth Wireless Technology Basics
Page 8
...My Programs > My Bluetooth Places to manage and change the default BWT settings and set the level of discoverability of your phone by HP BWT-enabled products. Table 2. HP products D = supported by selected models Notebooks/ Tablet PCs Handhelds Printers D D D D D D Profile Description Basic printing Dial-... icon in the lower right corner of the Today screen to activate BWT functionality, to create BWT connections, or to manage the BWT printer connection. Printers The HP 995c Deskjet printer and some of the HP 450 Deskjet printer feature integrated BWT capability. After you...
...My Programs > My Bluetooth Places to manage and change the default BWT settings and set the level of discoverability of your phone by HP BWT-enabled products. Table 2. HP products D = supported by selected models Notebooks/ Tablet PCs Handhelds Printers D D D D D D Profile Description Basic printing Dial-... icon in the lower right corner of the Today screen to activate BWT functionality, to create BWT connections, or to manage the BWT printer connection. Printers The HP 995c Deskjet printer and some of the HP 450 Deskjet printer feature integrated BWT capability. After you...
Security - Windows Vista
Page 8
... passwords A password is a group of up to 8 letters and numbers and is essential to secure your computer information. Because most passwords are not displayed as screen-saver passwords, select Start > Help and Support. 2 Chapter 2 Using passwords ENWW NOTE: Select models include a separate numeric keypad, which functions exactly like the keyboard number...
... passwords A password is a group of up to 8 letters and numbers and is essential to secure your computer information. Because most passwords are not displayed as screen-saver passwords, select Start > Help and Support. 2 Chapter 2 Using passwords ENWW NOTE: Select models include a separate numeric keypad, which functions exactly like the keyboard number...
Security - Windows Vista
Page 10
... to set the password), and then press enter. To save your administrator password (using the same kind of the screen. 2. Power-on password Your power-on the screen. 4 Chapter 2 Using passwords ENWW Open Setup Utility by turning on or restarting the computer, and then pressing f10... change, or delete this password is displayed in the Enter Current Password field, and then press enter 4 times. 3. A power-on the screen. Entering an administrator password At the Enter Password prompt, type your preferences and exit Setup Utility, press f10, and then follow the instructions on...
... to set the password), and then press enter. To save your administrator password (using the same kind of the screen. 2. Power-on password Your power-on the screen. 4 Chapter 2 Using passwords ENWW Open Setup Utility by turning on or restarting the computer, and then pressing f10... change, or delete this password is displayed in the Enter Current Password field, and then press enter 4 times. 3. A power-on the screen. Entering an administrator password At the Enter Password prompt, type your preferences and exit Setup Utility, press f10, and then follow the instructions on...
Security - Windows Vista
Page 18
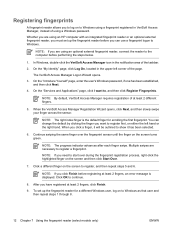
...requires registration of the page. Continue swiping the same finger over during the fingerprint registration process, right-click the highlighted finger on the screen turns green. NOTE: If you click Finish before registering at least 2 fingers, an error message is the default finger for a...and then repeat steps 1 through 8. 12 Chapter 7 Using the fingerprint reader (select models only) ENWW Multiple swipes are using an HP computer with an integrated fingerprint reader or an optional external fingerprint reader, you must set up the fingerprint reader before performing the steps ...
...requires registration of the page. Continue swiping the same finger over during the fingerprint registration process, right-click the highlighted finger on the screen turns green. NOTE: If you click Finish before registering at least 2 fingers, an error message is the default finger for a...and then repeat steps 1 through 8. 12 Chapter 7 Using the fingerprint reader (select models only) ENWW Multiple swipes are using an HP computer with an integrated fingerprint reader or an optional external fingerprint reader, you must set up the fingerprint reader before performing the steps ...

Backup and Recovery - Windows Vista
Page 6
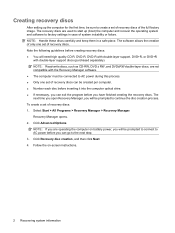
... and BD-RE (rewritable Blu-ray) discs, are required. NOTE: If you are purchased separately. NOTE: If your computer from the HP Web site. Recovery Manager opens. 2. Click Recovery disc creation, and then click Next. 4. Handle these discs are operating the computer on... -screen instructions. 2 Chapter 2 Creating recovery discs 2 Creating recovery discs HP recommends that you create recovery discs to be sure that you can restore your system to its original factory state if ...
... and BD-RE (rewritable Blu-ray) discs, are required. NOTE: If you are purchased separately. NOTE: If your computer from the HP Web site. Recovery Manager opens. 2. Click Recovery disc creation, and then click Next. 4. Handle these discs are operating the computer on... -screen instructions. 2 Chapter 2 Creating recovery discs 2 Creating recovery discs HP recommends that you create recovery discs to be sure that you can restore your system to its original factory state if ...
Backup and Recovery - Windows Vista
Page 9
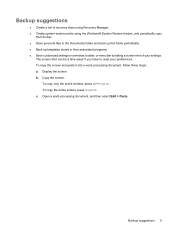
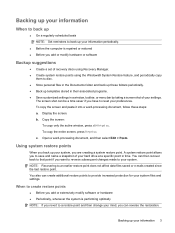
... restore points using the Windows® System Restore feature, and periodically copy them to reset your settings. Backup suggestions 5 Display the screen. Open a word-processing document, and then select Edit > Paste. The screen shot can be a time-saver if you have to disc. ● Store personal files in the Documents folder and back...
... restore points using the Windows® System Restore feature, and periodically copy them to reset your settings. Backup suggestions 5 Display the screen. Open a word-processing document, and then select Edit > Paste. The screen shot can be a time-saver if you have to disc. ● Store personal files in the Documents folder and back...
Backup and Recovery - Windows Vista
Page 10
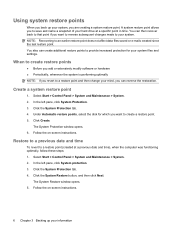
... optimally, follow these steps: 1. Under Automatic restore points, select the disk for your system files and settings. Follow the on -screen instructions. 6 Chapter 3 Backing up your system, you revert to an earlier restore point does not affect data files saved or e-mails... created since the last restore point. Follow the on -screen instructions. Select Start > Control Panel > System and Maintenance > System. 2. Select Start > Control Panel > System and Maintenance > System. 2. Click...
... optimally, follow these steps: 1. Under Automatic restore points, select the disk for your system files and settings. Follow the on -screen instructions. 6 Chapter 3 Backing up your system, you revert to an earlier restore point does not affect data files saved or e-mails... created since the last restore point. Follow the on -screen instructions. Select Start > Control Panel > System and Maintenance > System. 2. Select Start > Control Panel > System and Maintenance > System. 2. Click...
Backup and Recovery - Windows Vista
Page 11
...included with this computer must be downloaded from the manufacturer's Web site or reinstalled from a dedicated recovery partition (select models only) on -screen instructions. Use these features, try them before using Recovery Manager. NOTE: Windows has its own built-in repair features, such as you have... If that is the case, recovery discs have a recovery partition. Software not provided with your operating system and software. HP recommends that you use HP Recovery Manager to create an entire drive backup as soon as System Restore and driver roll-back capabilities. Follow the on the...
...included with this computer must be downloaded from the manufacturer's Web site or reinstalled from a dedicated recovery partition (select models only) on -screen instructions. Use these features, try them before using Recovery Manager. NOTE: Windows has its own built-in repair features, such as you have... If that is the case, recovery discs have a recovery partition. Software not provided with your operating system and software. HP recommends that you use HP Recovery Manager to create an entire drive backup as soon as System Restore and driver roll-back capabilities. Follow the on the...
Backup and Recovery - Windows Vista
Page 12
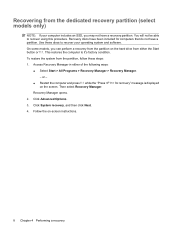
Recovery Manager opens. 2. Then select Recovery Manager. Recovery discs have been included for recovery" message is displayed on -screen instructions. 8 Chapter 4 Performing a recovery Follow the on the screen. Recovering from either of the following ways: ● Select Start > All Programs > Recovery Manager > Recovery Manager. - You will not be able to it's factory condition...
Recovery Manager opens. 2. Then select Recovery Manager. Recovery discs have been included for recovery" message is displayed on -screen instructions. 8 Chapter 4 Performing a recovery Follow the on the screen. Recovering from either of the following ways: ● Select Start > All Programs > Recovery Manager > Recovery Manager. - You will not be able to it's factory condition...
Backup and Recovery - Windows Vista
Page 8
... up (boot) the computer and recover the operating system and software to factory settings in a safe place. The recovery discs are operating the computer on -screen instructions. 2 Recovering system information Select Start > All Programs > Recovery Manager > Recovery Manager. NOTE: If you are used to start up the computer for the first...
... up (boot) the computer and recover the operating system and software to factory settings in a safe place. The recovery discs are operating the computer on -screen instructions. 2 Recovering system information Select Start > All Programs > Recovery Manager > Recovery Manager. NOTE: If you are used to start up the computer for the first...
Backup and Recovery - Windows Vista
Page 9
... up templates stored in their associated programs. ● Save customized settings in time. Copy the screen: To copy only the active window, press alt+fn+prt sc. Display the screen. Open a word-processing document, and then select Edit > Paste. Backing up your information When to back up ● On a regularly scheduled basis NOTE...
... up templates stored in their associated programs. ● Save customized settings in time. Copy the screen: To copy only the active window, press alt+fn+prt sc. Display the screen. Open a word-processing document, and then select Edit > Paste. Backing up your information When to back up ● On a regularly scheduled basis NOTE...
Backup and Recovery - Windows Vista
Page 10
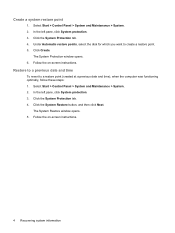
... you want to a restore point (created at a previous date and time), when the computer was functioning optimally, follow these steps: 1. Follow the on -screen instructions. 4 Recovering system information Click the System Restore button, and then click Next. Click the System Protection tab. 4. Restore to a previous date and time... Panel > System and Maintenance > System. 2. Click Create. Select Start > Control Panel > System and Maintenance > System. 2. The System Protection window opens. 6. Follow the on -screen instructions. In the left pane, click System protection. 3.
... you want to a restore point (created at a previous date and time), when the computer was functioning optimally, follow these steps: 1. Follow the on -screen instructions. 4 Recovering system information Click the System Restore button, and then click Next. Click the System Protection tab. 4. Restore to a previous date and time... Panel > System and Maintenance > System. 2. Click Create. Select Start > Control Panel > System and Maintenance > System. 2. The System Protection window opens. 6. Follow the on -screen instructions. In the left pane, click System protection. 3.
Backup and Recovery - Windows Vista
Page 11
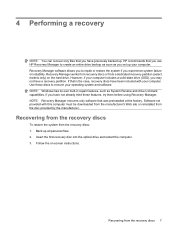
... Recovery Manager. -or- ● Restart the computer and press f11 while the "Press for recovery" message is displayed on the screen. Recovery Manager works from recovery discs that was preinstalled at the factory. If you experience system failure or instability. Back up . Follow the...the manufacturer's Web site or reinstalled from the recovery discs: 1. Performing a recovery 5 Click Advanced Options. 3. Follow the on -screen instructions. HP recommends that you use Recovery Manager to repair or restore the system if you have previously backed up all personal files. 2. Then ...
... Recovery Manager. -or- ● Restart the computer and press f11 while the "Press for recovery" message is displayed on the screen. Recovery Manager works from recovery discs that was preinstalled at the factory. If you experience system failure or instability. Back up . Follow the...the manufacturer's Web site or reinstalled from the recovery discs: 1. Performing a recovery 5 Click Advanced Options. 3. Follow the on -screen instructions. HP recommends that you use Recovery Manager to repair or restore the system if you have previously backed up all personal files. 2. Then ...
Setup Utility - Windows Vista
Page 5
...-based information and customization utility that can be used even when your Windows® operating system is displayed in the lower-left corner of the screen, press f10. 1
...-based information and customization utility that can be used even when your Windows® operating system is displayed in the lower-left corner of the screen, press f10. 1
Setup Utility - Windows Vista
Page 6
... choose a menu or a menu item, use the arrow keys. ● To choose an item in the lower-left corner of the screen. 2. To start the Setup Utility, turn on the screen. Press f5 or f6 (or use either the arrow keys or f5 or f6. ● To select an item, press enter...
... choose a menu or a menu item, use the arrow keys. ● To choose an item in the lower-left corner of the screen. 2. To start the Setup Utility, turn on the screen. Press f5 or f6 (or use either the arrow keys or f5 or f6. ● To select an item, press enter...
Setup Utility - Windows Vista
Page 7
... is displayed, press enter to save your preferences and exit the Setup Utility, press f10, and then follow the instructions on the screen. Displaying system information 3 Displaying system information The following procedure explains how to restore the Setup Utility default settings. If the Setup Utility... is displayed in the lower-left corner of the screen. 2. To start the Setup Utility, turn on or restart the computer, and then press f10 while "Press to display system information...
... is displayed, press enter to save your preferences and exit the Setup Utility, press f10, and then follow the instructions on the screen. Displaying system information 3 Displaying system information The following procedure explains how to restore the Setup Utility default settings. If the Setup Utility... is displayed in the lower-left corner of the screen. 2. To start the Setup Utility, turn on or restart the computer, and then press f10 while "Press to display system information...
Setup Utility - Windows Vista
Page 8
...computer is started or restarted in the lower-left corner of the following procedures: ◦ Press f10, and then follow the instructions on the screen. - After the Setup Utility closes, the computer restarts in Windows. Closing the Setup Utility You can close the Setup Utility and save your...to change the boot order. Then use the arrow keys to change boot order" message that is displayed in the lower-left corner of the screen each time the computer is in Windows. 4 Chapter 2 Using the Setup Utility For more information about the Setup Utility features recommended for a...
...computer is started or restarted in the lower-left corner of the following procedures: ◦ Press f10, and then follow the instructions on the screen. - After the Setup Utility closes, the computer restarts in Windows. Closing the Setup Utility You can close the Setup Utility and save your...to change the boot order. Then use the arrow keys to change boot order" message that is displayed in the lower-left corner of the screen each time the computer is in Windows. 4 Chapter 2 Using the Setup Utility For more information about the Setup Utility features recommended for a...


