
User Guide 1
Page 9
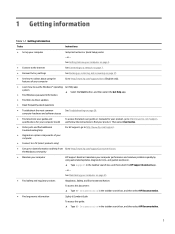
... access the latest user guides or manuals for your product, go to http://www.hp.com/support. ● Get up-to-date information and help ● Upgrade or replace components of your product. See Maintaining your computer Setup Instructions or Quick Setup poster - or - See Getting to know your computer on page 3. ● Connect to the Internet See Connecting to a network on page 7. ● Recover factory settings...
... access the latest user guides or manuals for your product, go to http://www.hp.com/support. ● Get up-to-date information and help ● Upgrade or replace components of your product. See Maintaining your computer Setup Instructions or Quick Setup poster - or - See Getting to know your computer on page 3. ● Connect to the Internet See Connecting to a network on page 7. ● Recover factory settings...

User Guide 1
Page 15
... the factory. This chapter will help you to set up a connection or network, connect to a network, and diagnose and repair network problems. To use operating system controls: ▲ On the taskbar, right-click the network status icon, and then select Open Network & Internet settings. ‒ or - ▲ On the taskbar, select the network status icon, and then select Network & Internet settings. The wireless light indicates the overall power state of your computer and a wired or wireless network connection. Connecting...
... the factory. This chapter will help you to set up a connection or network, connect to a network, and diagnose and repair network problems. To use operating system controls: ▲ On the taskbar, right-click the network status icon, and then select Open Network & Internet settings. ‒ or - ▲ On the taskbar, select the network status icon, and then select Network & Internet settings. The wireless light indicates the overall power state of your computer and a wired or wireless network connection. Connecting...

User Guide 1
Page 18
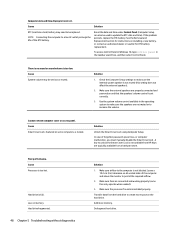
... list, and then follow the on -screen instructions to verify that device is not already enabled. 3. Type bluetooth in the Add a device dialog box, select Bluetooth. 4. NOTE: If your device does not appear in your home (instead of working wirelessly), or if you must establish a Bluetooth connection. 1. Connecting to a LAN requires an RJ-45 (network) cable and a network jack or an optional docking device or expansion port, if there is displayed...
... list, and then follow the on -screen instructions to verify that device is not already enabled. 3. Type bluetooth in the Add a device dialog box, select Bluetooth. 4. NOTE: If your device does not appear in your home (instead of working wirelessly), or if you must establish a Bluetooth connection. 1. Connecting to a LAN requires an RJ-45 (network) cable and a network jack or an optional docking device or expansion port, if there is displayed...

User Guide 1
Page 37
... a better position. Type control panel in the notification area 2. Select Troubleshoot problems. Verify that you connected powered speakers and that the speakers are turned on -screen instructions. Your computer might damage the network adapter. A modem uses a standard telephone cable, whereas the network adapter uses a network cable, to connect to an audio jack, not a microphone or headphone jack. doing so might have a dial-up a new connection or network to the Internet 1. Run the wireless setup wizard. 1. Cannot connect to the Internet but there...
... a better position. Type control panel in the notification area 2. Select Troubleshoot problems. Verify that you connected powered speakers and that the speakers are turned on -screen instructions. Your computer might damage the network adapter. A modem uses a standard telephone cable, whereas the network adapter uses a network cable, to connect to an audio jack, not a microphone or headphone jack. doing so might have a dial-up a new connection or network to the Internet 1. Run the wireless setup wizard. 1. Cannot connect to the Internet but there...

User Guide 1
Page 55
...; Many parts are considered consumer replaceable. These services are described in the HP Worldwide Limited Warranty and Technical Support. After the security seal has been broken, your computer on setting up your computer, see the Setup Instructions or Quick Setup poster or Getting to know your computer is necessary, HP support will make arrangements to repair your system. For instructions on page 3. Customer support for repairs If...
...; Many parts are considered consumer replaceable. These services are described in the HP Worldwide Limited Warranty and Technical Support. After the security seal has been broken, your computer on setting up your computer, see the Setup Instructions or Quick Setup poster or Getting to know your computer is necessary, HP support will make arrangements to repair your system. For instructions on page 3. Customer support for repairs If...

User Guide 1
Page 56
... Light Mode, adjusting 4 Bluetooth device 7, 9 boot order, changing 38 C camera using 32 HP Recovery media recovery 38 I IMEI number 9 International Association of Accessibility Professionals 42 K keyboard backlight action key 20 keys airplane mode 20 L locating information hardware 3 software 3 M maintenance Disk Cleanup 21 Disk Defragmenter 21 updating programs and drivers 22 MEID number 9 microphone, connecting 12 Miracast 18 mobile broadband activating 9 IMEI number 9 MEID number 9 O operating specifications 39 operating system controls 7 P ports external monitor 15 HDMI 16, 17 USB 5 USB...
... Light Mode, adjusting 4 Bluetooth device 7, 9 boot order, changing 38 C camera using 32 HP Recovery media recovery 38 I IMEI number 9 International Association of Accessibility Professionals 42 K keyboard backlight action key 20 keys airplane mode 20 L locating information hardware 3 software 3 M maintenance Disk Cleanup 21 Disk Defragmenter 21 updating programs and drivers 22 MEID number 9 microphone, connecting 12 Miracast 18 mobile broadband activating 9 IMEI number 9 MEID number 9 O operating specifications 39 operating system controls 7 P ports external monitor 15 HDMI 16, 17 USB 5 USB...

User Guide 1
Page 57
...Type- See audio sound settings, using 12 speakers connecting 11 standards and legislation, accessibility 43 SuperSpeed port and DisplayPort connecting USB Type-C 13 support 46 system restore point, creating 37 T Thunderbolt port with HP Sleep and Charge 5 VGA 15 public WLAN connection 8 R recovery 37 discs 38 HP Recovery partition 38 media 38 USB flash drive 38 recovery media creating using HP Cloud Recovery Download Tool 37 creating using Windows tools 37 Remote HP PC Hardware Diagnostics UEFI settings customizing 35 using 37 wired network (LAN) 10 wireless button 7 wireless controls button...
...Type- See audio sound settings, using 12 speakers connecting 11 standards and legislation, accessibility 43 SuperSpeed port and DisplayPort connecting USB Type-C 13 support 46 system restore point, creating 37 T Thunderbolt port with HP Sleep and Charge 5 VGA 15 public WLAN connection 8 R recovery 37 discs 38 HP Recovery partition 38 media 38 USB flash drive 38 recovery media creating using HP Cloud Recovery Download Tool 37 creating using Windows tools 37 Remote HP PC Hardware Diagnostics UEFI settings customizing 35 using 37 wired network (LAN) 10 wireless button 7 wireless controls button...
Maintenance and Service Guide
Page 56
... required airflow. 2. Add more space on some fans only operate when needed). 3. Solution Unlock the Smart Cover Lock using Computer Setup. Hard drive is too low. See the Removal and Replacement section for instructions on memory. In case of the RTC battery. Cause Smart Cover Lock, featured on the hard drive. Hard drive fragmented. 48 Chapter 5 Troubleshooting without diagnostics Solution 1. Make sure fans are not muted or to make sure the internal system speaker is set low or...
... required airflow. 2. Add more space on some fans only operate when needed). 3. Solution Unlock the Smart Cover Lock using Computer Setup. Hard drive is too low. See the Removal and Replacement section for instructions on memory. In case of the RTC battery. Cause Smart Cover Lock, featured on the hard drive. Hard drive fragmented. 48 Chapter 5 Troubleshooting without diagnostics Solution 1. Make sure fans are not muted or to make sure the internal system speaker is set low or...
Maintenance and Service Guide
Page 62
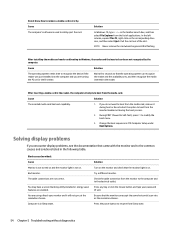
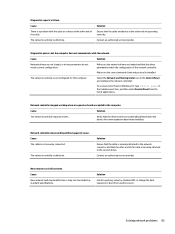
... to remove a media card correctly. Solving display problems If you are turning the PC on . The cable connections are using a fixed-sync monitor and it during the boot process. 2. You may have a screen blanking utility installed or energy saver features are not recognized by the computer. Be sure that the operating system can accept the same horizontal scan rate as the resolution chosen. Blank screen (no video...
... to remove a media card correctly. Solving display problems If you are turning the PC on . The cable connections are using a fixed-sync monitor and it during the boot process. 2. You may have a screen blanking utility installed or energy saver features are not recognized by the computer. Be sure that the operating system can accept the same horizontal scan rate as the resolution chosen. Blank screen (no video...
Maintenance and Service Guide
Page 71
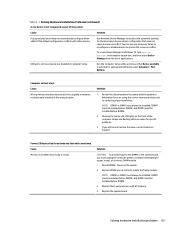
... select Device Manager from the list of the system. Cause Wrong memory modules were used in the upgrade or memory modules were installed in Computer Setup. Beeps and flashing LEDs are disabled in the wrong location. NOTE: DIMM1 or XMM1 must always be installed before DIMM4. 2. Replace third-party memory with other devices. Replace the system board. Cause Solution A plug and play board may not automatically configure when added if the default configuration conflicts with HP memory. 4. Review the...
... select Device Manager from the list of the system. Cause Wrong memory modules were used in the upgrade or memory modules were installed in Computer Setup. Beeps and flashing LEDs are disabled in the wrong location. NOTE: DIMM1 or XMM1 must always be installed before DIMM4. 2. Replace third-party memory with other devices. Replace the system board. Cause Solution A plug and play board may not automatically configure when added if the default configuration conflicts with HP memory. 4. Review the...
Maintenance and Service Guide
Page 73
... requires drivers. The network controller is not securely connected. New network card will not boot. The network controller is installed. Make sure the correct network client and protocol is defective. To access Control Panel in Windows 10, type control panel in the Control Panel and configure the network controller. Solving network problems 65 Solution Ensure that the cable is securely attached to boot from the list of the network controller. Cause New network card may be defective or may not meet industrystandard specifications. Diagnostics reports a failure...
... requires drivers. The network controller is not securely connected. New network card will not boot. The network controller is installed. Make sure the correct network client and protocol is defective. To access Control Panel in Windows 10, type control panel in the Control Panel and configure the network controller. Solving network problems 65 Solution Ensure that the cable is securely attached to boot from the list of the network controller. Cause New network card may be defective or may not meet industrystandard specifications. Diagnostics reports a failure...
Maintenance and Service Guide
Page 78
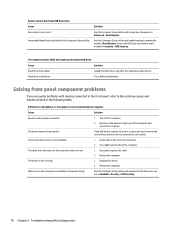
... solutions listed in Security > USB Security. 70 Chapter 5 Troubleshooting without diagnostics Run the Computer Setup utility and enable booting to reboot the computer. You might need to removable media in Security > USB Security. If possible, replace the cable. 2. USB ports on the computer are set to use is not correct. Ensure the USB port you encounter problems with devices connected to the front panel, refer to the computer does not work. 1. Cause Boot order is enabled in Boot Options. Cause Solution Flash drive...
... solutions listed in Security > USB Security. 70 Chapter 5 Troubleshooting without diagnostics Run the Computer Setup utility and enable booting to reboot the computer. You might need to removable media in Security > USB Security. If possible, replace the cable. 2. USB ports on the computer are set to use is not correct. Ensure the USB port you encounter problems with devices connected to the front panel, refer to the computer does not work. 1. Cause Boot order is enabled in Boot Options. Cause Solution Flash drive...

Maintenance and Service Guide
Page 90
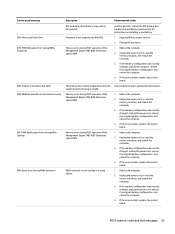
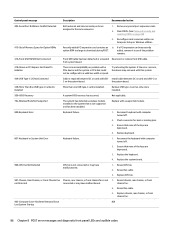
... the expansion card. 6. Replace the system board. 1. Clear CMOS. (See Password security and resetting CMOS on page 89.) 5. Quick Boot is tested are determined by the POST mode selection. Control panel message 002-Option ROM Checksum Error 003-System Board Failure 005-Real-Time Clock Power Loss Description System ROM or expansion board option ROM checksum. Full Boot runs all of the problem, and steps you may be used). Replace the system board. If a POST error occurs, the screen will beep once...
... the expansion card. 6. Replace the system board. 1. Clear CMOS. (See Password security and resetting CMOS on page 89.) 5. Quick Boot is tested are determined by the POST mode selection. Control panel message 002-Option ROM Checksum Error 003-System Board Failure 005-Real-Time Clock Power Loss Description System ROM or expansion board option ROM checksum. Full Boot runs all of the problem, and steps you may be used). Replace the system board. If a POST error occurs, the screen will beep once...
Maintenance and Service Guide
Page 91
...) battery may need to update this information. 1. Memory error during POST execution of the Management Engine (ME) BIOS Extensions option ROM. Memory error during POST execution of the Management Engine (ME) BIOS Extensions option ROM. Recommended action problem persists, replace the RTC battery. Change the processor. 1. Unplug the power cord, re-seat the memory modules, and reboot the computer. 3. If the error persists, replace the system board. 1. See the Removal and Replacement section for instructions on installing a new battery. 1. Use Computer Setup to be replaced...
...) battery may need to update this information. 1. Memory error during POST execution of the Management Engine (ME) BIOS Extensions option ROM. Memory error during POST execution of the Management Engine (ME) BIOS Extensions option ROM. Recommended action problem persists, replace the RTC battery. Change the processor. 1. Unplug the power cord, re-seat the memory modules, and reboot the computer. 3. If the error persists, replace the system board. 1. See the Removal and Replacement section for instructions on installing a new battery. 1. Use Computer Setup to be replaced...
Maintenance and Service Guide
Page 92
...-Memory Not Configured Correctly for memory support information. Remove and replace the identified faulty memory module(s). 4. DIMM1 is the removal of memory. Press the F1 key to see Boot Options menu in the error message is missing critical SPD information, or is incompatible with a supported module. Make sure there is properly seated. Run the Drive Protection System test under using F2 Diagnostics when booting the computer. 84 Chapter 8 POST error messages and diagnostic front panel LEDs...
...-Memory Not Configured Correctly for memory support information. Remove and replace the identified faulty memory module(s). 4. DIMM1 is the removal of memory. Press the F1 key to see Boot Options menu in the error message is missing critical SPD information, or is incompatible with a supported module. Make sure there is properly seated. Run the Drive Protection System test under using F2 Diagnostics when booting the computer. 84 Chapter 8 POST error messages and diagnostic front panel LEDs...
Maintenance and Service Guide
Page 94
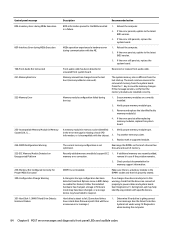
... Both external and internal serial ports are assigned to see if the problem remains. 41A-Front USB1/USB2 Not Connected Front USB cable has been detached or unseated Reconnect or replace front USB cable. Reconnect keyboard with computer turned off . 2. Check connector for Option ROMs Recently added PCI expansion card contains an ▲ If a PCI expansion card was recently option ROM too large to a valid bus width or speed. Clear CMOS. (See Password security and resetting CMOS on card and USB...
... Both external and internal serial ports are assigned to see if the problem remains. 41A-Front USB1/USB2 Not Connected Front USB cable has been detached or unseated Reconnect or replace front USB cable. Reconnect keyboard with computer turned off . 2. Check connector for Option ROMs Recently added PCI expansion card contains an ▲ If a PCI expansion card was recently option ROM too large to a valid bus width or speed. Clear CMOS. (See Password security and resetting CMOS on card and USB...
Maintenance and Service Guide
Page 95
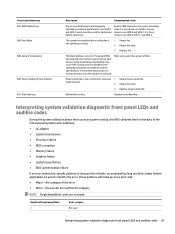
... system specifications. Reseat fan. 2. Replace fan. malfunctioned. 2. Interpreting system validation diagnostic front panel LEDs and audible codes During the system validation phase that a cooling fan is resolved. Overheating may have 1. For optimal performance, the SATA 0 and SATA 1 ports should return to avoid overheating. Power supply fan is dirty. These patterns will make up a two part code: ● Major - For three devices, use SATA 0. The machine should be used for hard drives before other ports. the specific error within...
... system specifications. Reseat fan. 2. Replace fan. malfunctioned. 2. Interpreting system validation diagnostic front panel LEDs and audible codes During the system validation phase that a cooling fan is resolved. Overheating may have 1. For optimal performance, the SATA 0 and SATA 1 ports should return to avoid overheating. Power supply fan is dirty. These patterns will make up a two part code: ● Major - For three devices, use SATA 0. The machine should be used for hard drives before other ports. the specific error within...
Maintenance and Service Guide
Page 97
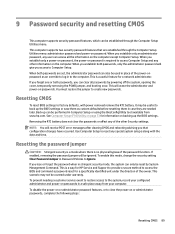
... POST error messages after clearing CMOS and rebooting advising you lose or forget the password when in case they are needed later. To disable the power-on the computer. You must restore the jumper to clear the power-on password. If you that are set, the administrator password can only be reset by powering off the system, opening the cover, temporarily removing the PSWD jumper, and booting once. This is a useful feature for a specifically identified...
... POST error messages after clearing CMOS and rebooting advising you lose or forget the password when in case they are needed later. To disable the power-on the computer. You must restore the jumper to clear the power-on password. If you that are set, the administrator password can only be reset by powering off the system, opening the cover, temporarily removing the PSWD jumper, and booting once. This is a useful feature for a specifically identified...
Maintenance and Service Guide
Page 116
...removal 31 hard drive (3.5-inch) installation 30 removal 29 hard drive problems 51 hard drives sizes 6 hardware installation problems 62 helpful hints 46 HP PC Hardware Diagnostics UEFI downloading 93 starting 93 using 92 HP PC Hardware Diagnostics Windows downloading 91 installing 92 using 91 HP Recovery Manager correcting boot problems 81 HP Recovery media recovery 81 HP Sure Start 106 I installing 2.5-inch hard drive 31 3.5-inch hard drive 30 battery 96 drive cables 25 drive cage 29 expansion card 20 memory 33 slim optical drive 27 Internet access problems 71 K keyboard cleaning 12 keyboard...
...removal 31 hard drive (3.5-inch) installation 30 removal 29 hard drive problems 51 hard drives sizes 6 hardware installation problems 62 helpful hints 46 HP PC Hardware Diagnostics UEFI downloading 93 starting 93 using 92 HP PC Hardware Diagnostics Windows downloading 91 installing 92 using 91 HP Recovery Manager correcting boot problems 81 HP Recovery media recovery 81 HP Sure Start 106 I installing 2.5-inch hard drive 31 3.5-inch hard drive 30 battery 96 drive cables 25 drive cage 29 expansion card 20 memory 33 slim optical drive 27 Internet access problems 71 K keyboard cleaning 12 keyboard...
Maintenance and Service Guide
Page 117
... HP Recovery partition 81 media 81 USB flash drive 81 recovery media creating using HP Cloud Recovery Download Tool 80 creating using Windows tools 80 Remote HP PC Hardware Diagnostics UEFI settings customizing 94 using 94 removing 2.5-inch hard drive 31 3.5-inch hard drive 29 access panel 17 battery 96 bezel blank 24 drive cage 28 expansion card 20 fan duct 36 fan sink 37 front bezel 23 optical drive 25 power supply 40 processor 39 system board 43 wireless antenna 42 removing personal data from volatile system memory 101 resetting CMOS 89 password jumper 89 restoring...
... HP Recovery partition 81 media 81 USB flash drive 81 recovery media creating using HP Cloud Recovery Download Tool 80 creating using Windows tools 80 Remote HP PC Hardware Diagnostics UEFI settings customizing 94 using 94 removing 2.5-inch hard drive 31 3.5-inch hard drive 29 access panel 17 battery 96 bezel blank 24 drive cage 28 expansion card 20 fan duct 36 fan sink 37 front bezel 23 optical drive 25 power supply 40 processor 39 system board 43 wireless antenna 42 removing personal data from volatile system memory 101 resetting CMOS 89 password jumper 89 restoring...


