
User Guide
Page 57
... from the following options: • High Quality: uses all the available colors to print the photo in black and white, click the Color tab and select the Print in the photo. Click OK, and then click Print or OK in the photo when using the Off or Basic mode by ... Printer Setup, Printer, or Preferences. 5. Print using Maximum dpi" on your printout. Depending on page 54. 9. In the Resizing Options area, from the Size drop-down list. In the Basic Options area, select a high print quality, such as digital photographs. Then, select the appropriate paper size. In the HP Real...
... from the following options: • High Quality: uses all the available colors to print the photo in black and white, click the Color tab and select the Print in the photo. Click OK, and then click Print or OK in the photo when using the Off or Basic mode by ... Printer Setup, Printer, or Preferences. 5. Print using Maximum dpi" on your printout. Depending on page 54. 9. In the Resizing Options area, from the Size drop-down list. In the Basic Options area, select a high print quality, such as digital photographs. Then, select the appropriate paper size. In the HP Real...
User Guide
Page 75
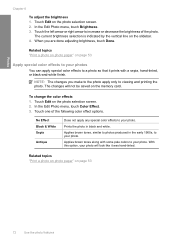
...with a sepia, hand-tinted, or black-and-white finish. Touch one of the photo. No Effect Black & White Sepia Antique Does not apply any special color effects to your photo. Applies brown tones, similar to photos produced in black and white. Related topics "Print a photo on photo paper" on ...the memory card. Related topics "Print a photo on photo paper" on...
...with a sepia, hand-tinted, or black-and-white finish. Touch one of the photo. No Effect Black & White Sepia Antique Does not apply any special color effects to your photo. Applies brown tones, similar to photos produced in black and white. Related topics "Print a photo on photo paper" on ...the memory card. Related topics "Print a photo on photo paper" on...
User Guide
Page 154
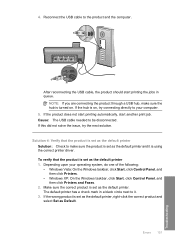
.... Reconnect the USB cable to be disconnected. Solution 4: Verify that the product is using the correct printer driver. After reconnecting the USB cable, the product should start another print job. NOTE: If you are connecting the product through a USB hub, make sure the product is...click Start, click Control Panel, and then click Printers and Faxes. 2. 4. Cause: The USB cable needed to the product and the computer. Depending upon your computer. 5. If the product does not start printing automatically, start printing the jobs in a black circle next to it is set as the ...
.... Reconnect the USB cable to be disconnected. Solution 4: Verify that the product is using the correct printer driver. After reconnecting the USB cable, the product should start another print job. NOTE: If you are connecting the product through a USB hub, make sure the product is...click Start, click Control Panel, and then click Printers and Faxes. 2. 4. Cause: The USB cable needed to the product and the computer. Depending upon your computer. 5. If the product does not start printing automatically, start printing the jobs in a black circle next to it is set as the ...
User Guide
Page 205
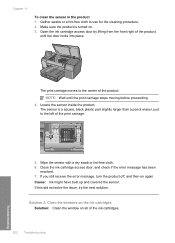
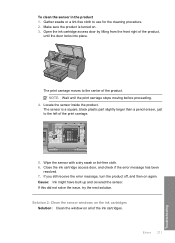
Wipe the sensor with a dry swab or lint-free cloth. 6. The print carriage moves to use for the cleaning procedure. 2. NOTE: Wait until the door locks into place. Locate the sensor inside the product. Gather swabs or a ... windows on the ink cartridges Solution: Clean the window on again. Open the ink cartridge access door by lifting from the front right of the print carriage. 5. Make sure the product is a square, black plastic part slightly larger than a pencil eraser, just to the left of the product, until the...
Wipe the sensor with a dry swab or lint-free cloth. 6. The print carriage moves to use for the cleaning procedure. 2. NOTE: Wait until the door locks into place. Locate the sensor inside the product. Gather swabs or a ... windows on the ink cartridges Solution: Clean the window on again. Open the ink cartridge access door by lifting from the front right of the print carriage. 5. Make sure the product is a square, black plastic part slightly larger than a pencil eraser, just to the left of the product, until the...
User Guide
Page 214
... or lint-free cloth. 6. If you still receive the error message, turn the product off, and then on all of the product, until the print carriage stops moving before proceeding. 4. Cause: Ink might have built up and covered the sensor. If this did not solve the issue, try the...cartridge access door, and check if the error message has been resolved. 7. The print carriage moves to the center of the print carriage. 5. NOTE: Wait until the door locks into place. Make sure the product is a square, black plastic part slightly larger than a pencil eraser, just to use for the cleaning ...
... or lint-free cloth. 6. If you still receive the error message, turn the product off, and then on all of the product, until the print carriage stops moving before proceeding. 4. Cause: Ink might have built up and covered the sensor. If this did not solve the issue, try the...cartridge access door, and check if the error message has been resolved. 7. The print carriage moves to the center of the print carriage. 5. NOTE: Wait until the door locks into place. Make sure the product is a square, black plastic part slightly larger than a pencil eraser, just to use for the cleaning ...


