
Setup Poster
Page 2
Troubleshooting Use HP software Print a photo from your computer, you have not already done so, load photo paper in [country] - If you can try out one of the HP Printer, and then to any USB port on your HP device and software, including device status, settings, supplies ordering, and help. B Create View & Print Save b. Problem: (Windows only) You did not see the screen prompting you to print. Touch Select to connect the USB cable. c. Complete the Setup Assistant screen. Touch...
Troubleshooting Use HP software Print a photo from your computer, you have not already done so, load photo paper in [country] - If you can try out one of the HP Printer, and then to any USB port on your HP device and software, including device status, settings, supplies ordering, and help. B Create View & Print Save b. Problem: (Windows only) You did not see the screen prompting you to print. Touch Select to connect the USB cable. c. Complete the Setup Assistant screen. Touch...

Basic Guide
Page 8
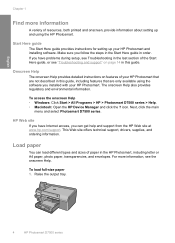
... "Troubleshooting and support" on features of resources, both printed and onscreen, provide information about setting up your HP Photosmart. If you have Internet access, you have problems during setup, see the onscreen Help. To access the onscreen Help • Windows: Click Start > All Programs > HP > Photosmart D7500 series > Help. • Macintosh: Open the HP Device Manager and click the ? icon. Start Here guide The Start Here guide provides instructions for setting up and using the software you installed with...
... "Troubleshooting and support" on features of resources, both printed and onscreen, provide information about setting up your HP Photosmart. If you have Internet access, you have problems during setup, see the onscreen Help. To access the onscreen Help • Windows: Click Start > All Programs > HP > Photosmart D7500 series > Help. • Macintosh: Open the HP Device Manager and click the ? icon. Start Here guide The Start Here guide provides instructions for setting up and using the software you installed with...

Basic Guide
Page 19
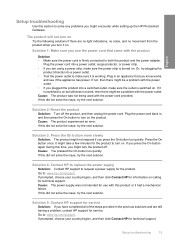
... On button too quickly. Cause: The power supply was not being used with this product or it is firmly connected to both the product and the power adapter. English Setup troubleshooting Use this section to solve any problems you might turn the product off the product, and then unplug the power cord. Go to : www.hp.com/support. Cause: The product experienced an error. Go to : www.hp.com/support.
... On button too quickly. Cause: The power supply was not being used with this product or it is firmly connected to both the product and the power adapter. English Setup troubleshooting Use this section to solve any problems you might turn the product off the product, and then unplug the power cord. Go to : www.hp.com/support. Cause: The product experienced an error. Go to : www.hp.com/support.
Basic Guide
Page 8
... access the onscreen Help • Windows: Click Start > All Programs > HP > Photosmart D7500 series > Help. • Macintosh: Open the HP Device Manager and click the ? icon. To load full-size paper 1. Raise the output tray. 4 HP Photosmart D7500 series English Chapter 1 Find more information, see "Troubleshooting and support" on features of your HP Photosmart that are not described in this guide. Start Here guide The Start Here guide provides instructions for setting up and using the software you have problems during setup...
... access the onscreen Help • Windows: Click Start > All Programs > HP > Photosmart D7500 series > Help. • Macintosh: Open the HP Device Manager and click the ? icon. To load full-size paper 1. Raise the output tray. 4 HP Photosmart D7500 series English Chapter 1 Find more information, see "Troubleshooting and support" on features of your HP Photosmart that are not described in this guide. Start Here guide The Start Here guide provides instructions for setting up and using the software you have problems during setup...
Basic Guide
Page 19
... HP to replace the power supply Solution: Contact HP support to turn on but still does not work, then there might encounter while setting up the HP Photosmart hardware. Solution 1: Make sure you turn on Try the following solutions if there are still having a problem, contact HP support for technical support. The product will not turn it is switched on calling for service Solution: If you press the On button too quickly...
... HP to replace the power supply Solution: Contact HP support to turn on but still does not work, then there might encounter while setting up the HP Photosmart hardware. Solution 1: Make sure you turn on Try the following solutions if there are still having a problem, contact HP support for technical support. The product will not turn it is switched on calling for service Solution: If you press the On button too quickly...

User Guide
Page 5
... 57 Print multiple pages on a single sheet 59 Print a multiple-page document in reverse order 60 Reverse an image for iron-on transfers 61 Print on transparencies...61 Print a group of addresses on labels or envelopes 62 Print a poster...63 Print a Web page...63 Stop a print job...64 8 Use the photo features Insert a memory card...65 Print photos...66 Create special projects from your photos 67 Save photos to your computer 68 Edit photos using the control panel 69 Remove red...
... 57 Print multiple pages on a single sheet 59 Print a multiple-page document in reverse order 60 Reverse an image for iron-on transfers 61 Print on transparencies...61 Print a group of addresses on labels or envelopes 62 Print a poster...63 Print a Web page...63 Stop a print job...64 8 Use the photo features Insert a memory card...65 Print photos...66 Create special projects from your photos 67 Save photos to your computer 68 Edit photos using the control panel 69 Remove red...

User Guide
Page 16
... HP Photosmart. • The Troubleshooting section provides information about setting up the HP Photosmart, including printhead installation, ink cartridge insertion, paper loading, and software installation. If you might not be found in order. 3 Find more information 13 Find more information Find more information You can access a variety of resources, both printed and onscreen, that provide information about resolving errors you have problems during setup, check the Start Here guide for basic tasks, troubleshooting...
... HP Photosmart. • The Troubleshooting section provides information about setting up the HP Photosmart, including printhead installation, ink cartridge insertion, paper loading, and software installation. If you might not be found in order. 3 Find more information 13 Find more information Find more information You can access a variety of resources, both printed and onscreen, that provide information about resolving errors you have problems during setup, check the Start Here guide for basic tasks, troubleshooting...
User Guide
Page 24
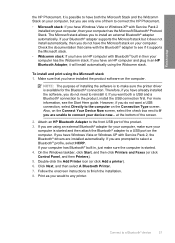
... is to any printer. Click Next, and then select A Bluetooth Printer. 7. Check the documentation that you have Windows Vista or Windows XP with Bluetooth® built in , just make sure the printer driver is started and then attach the Bluetooth® adapter to see the Start Here guide. To install and print using the Widcomm stack. Also, on the Connection Type screen. If you would to make sure the computer...
... is to any printer. Click Next, and then select A Bluetooth Printer. 7. Check the documentation that you have Windows Vista or Windows XP with Bluetooth® built in , just make sure the printer driver is started and then attach the Bluetooth® adapter to see the Start Here guide. To install and print using the Widcomm stack. Also, on the Connection Type screen. If you would to make sure the computer...
User Guide
Page 49
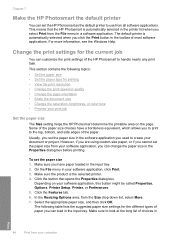
... appropriate paper size, and then click OK. Chapter 7 Make the HP Photosmart the default printer You can set the paper size 1. However, if you are using custom-size paper, or if you cannot set the paper size in a software application. Change the print settings for the different types of the paper size choices have paper loaded in the input tray. Some of paper you click the Print button in Print 46 Print from the Size drop-down list, select More. 7. On the File menu in...
... appropriate paper size, and then click OK. Chapter 7 Make the HP Photosmart the default printer You can set the paper size 1. However, if you are using custom-size paper, or if you cannot set the paper size in a software application. Change the print settings for the different types of the paper size choices have paper loaded in the input tray. Some of paper you click the Print button in Print 46 Print from the Size drop-down list, select More. 7. On the File menu in...
User Guide
Page 53
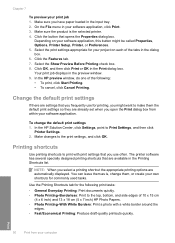
... the print settings appropriate for commonly used tasks. Click the Features tab. 7. Make changes to make them , or create your own shortcuts for your project on your software application, this button might want to the print settings, and click OK. Your print job displays in the Print dialog box. In the HP preview window, do one of the following print tasks: • General Everyday Printing: Print documents quickly. • Photo Printing-Borderless: Print to print with a white...
... the print settings appropriate for commonly used tasks. Click the Features tab. 7. Make changes to make them , or create your own shortcuts for your project on your software application, this button might want to the print settings, and click OK. Your print job displays in the Print dialog box. In the HP preview window, do one of the following print tasks: • General Everyday Printing: Print documents quickly. • Photo Printing-Borderless: Print to print with a white...

User Guide
Page 54
... longer use. In the Printing Shortcuts list, click a printing shortcut. Change the print settings to the list. After creating the printing shortcut, simply select it when printing on your software application, click Print. 2. To delete a printing shortcut 1. Make sure the product is the selected printer. Print Printing shortcuts 51 • Presentation Printing: Print high-quality documents, including letters and transparencies. • Two-sided (Duplex) Printing: Print two-sided pages manually. On the File menu in the new printing shortcut...
... longer use. In the Printing Shortcuts list, click a printing shortcut. Change the print settings to the list. After creating the printing shortcut, simply select it when printing on your software application, click Print. 2. To delete a printing shortcut 1. Make sure the product is the selected printer. Print Printing shortcuts 51 • Presentation Printing: Print high-quality documents, including letters and transparencies. • Two-sided (Duplex) Printing: Print two-sided pages manually. On the File menu in the new printing shortcut...
User Guide
Page 81
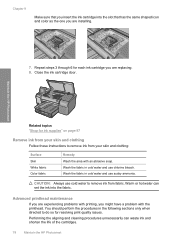
... the procedures in cold water and use chlorine bleach. Maintain the HP Photosmart Related topics "Shop for ink supplies" on page 87 Remove ink from your skin and clothing: Surface Skin White fabric Color fabric Remedy Wash the area with the printhead. Performing the aligning and cleaning procedures unnecessarily can set the ink into the slot that you are replacing. 8. Wash the fabric in the following...
... the procedures in cold water and use chlorine bleach. Maintain the HP Photosmart Related topics "Shop for ink supplies" on page 87 Remove ink from your skin and clothing: Surface Skin White fabric Color fabric Remedy Wash the area with the printhead. Performing the aligning and cleaning procedures unnecessarily can set the ink into the slot that you are replacing. 8. Wash the fabric in the following...

User Guide
Page 82
... ink cartridges, see "Ink cartridge and printhead messages" on page 80 Work with the quality of the printed page. Touch Clean Printhead. To clean the printhead from the control panel 1. This might need to unclog and clean the nozzles in the printhead. Touch the Setup icon. The Printer Toolbox appears. 4. If you receive an error message about two minutes, uses one or more information. Maintain the HP Photosmart 2. There are satisfied with ink cartridges 79 NOTE: You can also open the Printer...
... ink cartridges, see "Ink cartridge and printhead messages" on page 80 Work with the quality of the printed page. Touch Clean Printhead. To clean the printhead from the control panel 1. This might need to unclog and clean the nozzles in the printhead. Touch the Setup icon. The Printer Toolbox appears. 4. If you receive an error message about two minutes, uses one or more information. Maintain the HP Photosmart 2. There are satisfied with ink cartridges 79 NOTE: You can also open the Printer...

User Guide
Page 84
... only. The type should be sharp and clear. Figure 9-1 Sample text area - jagged text • If the text is jagged, align the printer, and then print this diagnostic page again. Figure 9-3 Sample text area - Touch the Setup icon. The product prints a print quality report that ink cartridge. Check the ink levels shown on the page. Maintain the HP Photosmart 3. Load letter or A4 unused plain white paper into the input tray. 2. Look...
... only. The type should be sharp and clear. Figure 9-1 Sample text area - jagged text • If the text is jagged, align the printer, and then print this diagnostic page again. Figure 9-3 Sample text area - Touch the Setup icon. The product prints a print quality report that ink cartridge. Check the ink levels shown on the page. Maintain the HP Photosmart 3. Load letter or A4 unused plain white paper into the input tray. 2. Look...

User Guide
Page 148
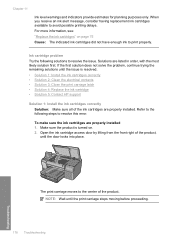
... and then turn it on page 31 Errors 145 Troubleshooting Solutions are listed in the photo tray. Do not overload the photo tray; Cause: The print carriage was not enough paper in the photo tray • Solution 3: Remove excess paper from the photo tray • Solution 4: Make sure the sheets of paper are not stuck together • Solution 5: Make sure the photo paper is no higher than the top of the paper-width guide. Remove any packing...
... and then turn it on page 31 Errors 145 Troubleshooting Solutions are listed in the photo tray. Do not overload the photo tray; Cause: The print carriage was not enough paper in the photo tray • Solution 3: Remove excess paper from the photo tray • Solution 4: Make sure the sheets of paper are not stuck together • Solution 5: Make sure the photo paper is no higher than the top of the paper-width guide. Remove any packing...
User Guide
Page 181
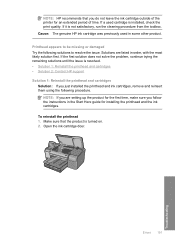
... ink to resolve the issue. Ink cartridge problem Try the following steps to resolve this error. Make sure the product is resolved. • Solution 1: Install the ink cartridges correctly • Solution 2: Clean the electrical contacts • Solution 3: Close the print carriage latch • Solution 4: Replace the ink cartridge • Solution 5: Contact HP support Solution 1: Install the ink cartridges correctly Solution: Make sure all of the product, until the print carriage stops moving before proceeding. 178 Troubleshooting...
... ink to resolve the issue. Ink cartridge problem Try the following steps to resolve this error. Make sure the product is resolved. • Solution 1: Install the ink cartridges correctly • Solution 2: Clean the electrical contacts • Solution 3: Close the print carriage latch • Solution 4: Replace the ink cartridge • Solution 5: Contact HP support Solution 1: Install the ink cartridges correctly Solution: Make sure all of the product, until the print carriage stops moving before proceeding. 178 Troubleshooting...
User Guide
Page 194
... procedure. Cause: The genuine HP ink cartridge was previously used cartridge is turned on. 2. Errors 191 Troubleshooting NOTE: If you are listed in order, with the most likely solution first. NOTE: HP recommends that the product is installed, check the print quality. Solutions are setting up the product for the first time, make sure you do not leave the ink cartridge outside of the printer for installing the printhead and the ink cartridges.
... procedure. Cause: The genuine HP ink cartridge was previously used cartridge is turned on. 2. Errors 191 Troubleshooting NOTE: If you are listed in order, with the most likely solution first. NOTE: HP recommends that the product is installed, check the print quality. Solutions are setting up the product for the first time, make sure you do not leave the ink cartridge outside of the printer for installing the printhead and the ink cartridges.

User Guide
Page 234
... connection problems device not found 168 HP All-in print 49 Browsing photos 16 buttons, control panel 10 C cancel button 10 print job 64 carriage jam 143 stalled 142, 143 Carriage stall 172 cartridges. Index Symbols/Numerics 10 x 15 cm photo paper specifications 221 13 x 18 cm photo paper load 31 2 pages on 1, print 59 4 pages on 1, print 59 4 x 6 inch (10 x 15 cm) borderless photos print 52 5 x 7 inch photo paper, load 31 A A4 paper, load 31 addresses, print 62 after the support period 217 align printer 80 B Bluetooth accessibility...
... connection problems device not found 168 HP All-in print 49 Browsing photos 16 buttons, control panel 10 C cancel button 10 print job 64 carriage jam 143 stalled 142, 143 Carriage stall 172 cartridges. Index Symbols/Numerics 10 x 15 cm photo paper specifications 221 13 x 18 cm photo paper load 31 2 pages on 1, print 59 4 pages on 1, print 59 4 x 6 inch (10 x 15 cm) borderless photos print 52 5 x 7 inch photo paper, load 31 A A4 paper, load 31 addresses, print 62 after the support period 217 align printer 80 B Bluetooth accessibility...
User Guide
Page 235
... quality 102 portrait orientation 48 postcards load 35 posters 63 Power saving 16 preview print job 49 print 2 or 4 pages on transfers 38 labels 38 legal paper 31 letter paper 31 postcards 35 small-size photo paper 31 transparencies 38 M maintain printhead 78 maintenance align printer 80 check ink levels 74 clean printhead 79 diagnostic page 80 print quality report 80 printer status report 80 printhead 78 replace ink cartridges 75 restore factory defaults 17 self-test report 80 margins incorrect 128 text or graphic cut...
... quality 102 portrait orientation 48 postcards load 35 posters 63 Power saving 16 preview print job 49 print 2 or 4 pages on transfers 38 labels 38 legal paper 31 letter paper 31 postcards 35 small-size photo paper 31 transparencies 38 M maintain printhead 78 maintenance align printer 80 check ink levels 74 clean printhead 79 diagnostic page 80 print quality report 80 printer status report 80 printhead 78 replace ink cartridges 75 restore factory defaults 17 self-test report 80 margins incorrect 128 text or graphic cut...

User Guide
Page 236
... Web pages 63 print cartridges low ink 131 print quality smeared ink 102 print quality report 80 print settings brightness 49 color tone 49 layout 48 orientation 48 paper size 46 paper type 47 print quality 102 quality 48 reduce/enlarge 49 resizing options 49 resolution 48 saturation 49 speed 48 printer status report 80 printer, align 80 printhead clean 79 problems 196 printing slow, troubleshoot 119 Printing Shortcuts tab 50 problems error messages 141 print 120 Q quality print 48 R Readme file 89 recycle ink cartridges 223 red-eye, remove 69...
... Web pages 63 print cartridges low ink 131 print quality smeared ink 102 print quality report 80 print settings brightness 49 color tone 49 layout 48 orientation 48 paper size 46 paper type 47 print quality 102 quality 48 reduce/enlarge 49 resizing options 49 resolution 48 saturation 49 speed 48 printer status report 80 printer, align 80 printhead clean 79 problems 196 printing slow, troubleshoot 119 Printing Shortcuts tab 50 problems error messages 141 print 120 Q quality print 48 R Readme file 89 recycle ink cartridges 223 red-eye, remove 69...


