hp brio 80xx, self-repair instructions
Page 1
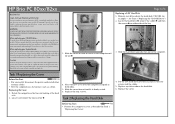
... whom you do not open the laser module. CAUTION SHOULD BE USED WHEN WORKING WITH THIS EQUIPMENT. Do not attempt to make any adjustment to HP, so they can be recycled or disposed of the bay. ‚ ˜ ˜ ƒ 3. If your PC, or to the ...... Place the new cover over the computer and push in household waste. When replacing your safety, disconnect the power cord and all equipment. HP Brio PC 80xx/82xx Read Me First Legal, Safety & Regulatory Information Incorrect installation can damage electronic components. Locate the hard drive ‚, remove the cables...
... whom you do not open the laser module. CAUTION SHOULD BE USED WHEN WORKING WITH THIS EQUIPMENT. Do not attempt to make any adjustment to HP, so they can be recycled or disposed of the bay. ‚ ˜ ˜ ƒ 3. If your PC, or to the ...... Place the new cover over the computer and push in household waste. When replacing your safety, disconnect the power cord and all equipment. HP Brio PC 80xx/82xx Read Me First Legal, Safety & Regulatory Information Incorrect installation can damage electronic components. Locate the hard drive ‚, remove the cables...
hp brio 80xx, self-repair instructions
Page 2
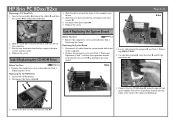
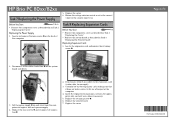
...the screws „ on each side ƒ. Reconnect the three cables ‚. 7. Remove all cables from the system board slide it out of its socket. 80xx ‚ ƒ ‚ † ƒ 3. Locate and remove the memory ƒ, see Task 8 "Replacing Expansion Cards") and then the expansion ... chips †, using the special tool (part number 5041-2553), by removing the two screws ‚ and lifting it out of the computer. 3. HP Brio PC 80xx/82xx Replacing a 3.5" Hard Disk 4. Put the new hard drive into the bay and replace the four screws ƒ. ‚ ‚ 6. Replacing...
...the screws „ on each side ƒ. Reconnect the three cables ‚. 7. Remove all cables from the system board slide it out of its socket. 80xx ‚ ƒ ‚ † ƒ 3. Locate and remove the memory ƒ, see Task 8 "Replacing Expansion Cards") and then the expansion ... chips †, using the special tool (part number 5041-2553), by removing the two screws ‚ and lifting it out of the computer. 3. HP Brio PC 80xx/82xx Replacing a 3.5" Hard Disk 4. Put the new hard drive into the bay and replace the four screws ƒ. ‚ ‚ 6. Replacing...
hp brio 80xx, self-repair instructions
Page 3
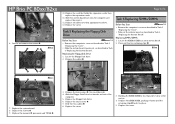
...four screws ƒ. 7. Refit the two cables ‚. 8. Holding the SIMM/DIMM by its edges, lift it in place. 5. Replace the cover. HP Brio PC 80xx/82xx † † 6. Replace all cables into the computer and replace the screws. 12. Page 3 of 4 Task 6 Replacing SIMMs/DIMMs Before You... expansion cards, then replace the expansion cards. 11. Replacing SIMMs/DIMMs 1. Locate the Floppy Disk drive. 2. Press out the two retaining clips ‚. 80xx ‚ ‚ ‡ ‡‡ ‡‡ 82xx ‡ ‡ 7. Slide the Floppy Disk Drive backwards and out of the ...
...four screws ƒ. 7. Refit the two cables ‚. 8. Holding the SIMM/DIMM by its edges, lift it in place. 5. Replace the cover. HP Brio PC 80xx/82xx † † 6. Replace all cables into the computer and replace the screws. 12. Page 3 of 4 Task 6 Replacing SIMMs/DIMMs Before You... expansion cards, then replace the expansion cards. 11. Replacing SIMMs/DIMMs 1. Locate the Floppy Disk drive. 2. Press out the two retaining clips ‚. 80xx ‚ ‚ ‡ ‡‡ ‡‡ 82xx ‡ ‡ 7. Slide the Floppy Disk Drive backwards and out of the ...
hp brio 80xx, self-repair instructions
Page 4
...; 3. Lift the power supply „ up and away from the computer and replace with any cables if necessary. 5. Replace the cover. Page 4 of the computer. 4. HP Brio PC 80xx/82xx Task 7 Replacing the Power Supply Before You Start T-15 & + • Remove the computer's cover as described in Task 4 "Replacing the System Board".
...; 3. Lift the power supply „ up and away from the computer and replace with any cables if necessary. 5. Replace the cover. Page 4 of the computer. 4. HP Brio PC 80xx/82xx Task 7 Replacing the Power Supply Before You Start T-15 & + • Remove the computer's cover as described in Task 4 "Replacing the System Board".

