Service Manual
Page 6
... and replacing the stapler unit 60 Loading staples 62 Downloading a remote firmware update 63 5 Theory of operation Introduction 67 Basic operation of the printer 67 General descriptions 69 DC controller PCA 69 Power supply 71 Laser/scanner assembly 76 Paper pickup system 78 Paper pickup and feed block ...79 Printing from tray 1 80 Printing from tray 2 82 Media skew prevention 85 Fixing/delivery block 86 Printer jam detection 87 Printing from the 500-sheet ...
... and replacing the stapler unit 60 Loading staples 62 Downloading a remote firmware update 63 5 Theory of operation Introduction 67 Basic operation of the printer 67 General descriptions 69 DC controller PCA 69 Power supply 71 Laser/scanner assembly 76 Paper pickup system 78 Paper pickup and feed block ...79 Printing from tray 1 80 Printing from tray 2 82 Media skew prevention 85 Fixing/delivery block 86 Printer jam detection 87 Printing from the 500-sheet ...

Service Manual
Page 7
HP LaserJet 4300 series printer only 170 Laser/scanner assembly 173 Print-cartridge motor (HP LaserJet 4300 series printer only 175 Main motor 177 Tray 2 lifter-drive assembly 179 DC controller PCA 181 Q2431-90912 Table of contents v Image-formation system 118 ...-side cover 151 Tray 1 152 Rear output bin 155 Control-panel display 156 Control-panel overlay 156 Control-panel assembly 157 Internal components 160 Firmware DIMM 160 Formatter assembly 161 Fuser 162 Output delivery assembly 163 Duplexing pendulum assembly 165 Tray 2 media-size sensor 167 Main cooling fan (left...
HP LaserJet 4300 series printer only 170 Laser/scanner assembly 173 Print-cartridge motor (HP LaserJet 4300 series printer only 175 Main motor 177 Tray 2 lifter-drive assembly 179 DC controller PCA 181 Q2431-90912 Table of contents v Image-formation system 118 ...-side cover 151 Tray 1 152 Rear output bin 155 Control-panel display 156 Control-panel overlay 156 Control-panel assembly 157 Internal components 160 Firmware DIMM 160 Formatter assembly 161 Fuser 162 Output delivery assembly 163 Duplexing pendulum assembly 165 Tray 2 media-size sensor 167 Main cooling fan (left...
Service Manual
Page 12
...(5 of 2 166 Figure 106. Firmware DIMM 160 Figure 99. Formatter assembly 161 Figure 100. Duplexing pendulum assembly (2 of 6 154 Figure 90. Cooling fan (HP LaserJet 4300 series only; 1 of 4 142 ...of 4 157 Figure 95. Fuser (2 of 5 171 Figure 115. Cooling fan (HP LaserJet 4300 series only; 3 of 2 162 Figure 102. Laser/scanner (1 of 4 173 x List of 5 146 Figure 75. Top cover (1... 62. Tray 2 feed rollers (1 of 2 163 Figure 103. Right-side cover (1 of printer, input trays, and cabinet wheel locks 136 Figure 59. Transferring the image 123 Figure 55. ...
...(5 of 2 166 Figure 106. Firmware DIMM 160 Figure 99. Formatter assembly 161 Figure 100. Duplexing pendulum assembly (2 of 6 154 Figure 90. Cooling fan (HP LaserJet 4300 series only; 1 of 4 142 ...of 4 157 Figure 95. Fuser (2 of 5 171 Figure 115. Cooling fan (HP LaserJet 4300 series only; 3 of 2 162 Figure 102. Laser/scanner (1 of 4 173 x List of 5 146 Figure 75. Top cover (1... 62. Tray 2 feed rollers (1 of 2 163 Figure 103. Right-side cover (1 of printer, input trays, and cabinet wheel locks 136 Figure 59. Transferring the image 123 Figure 55. ...

Service Manual
Page 73
... Cleaning the printer and accessories 54 Cleaning the fuser 55 Running the cleaning page manually 56 To run the cleaning page manually 56 Running the cleaning page automatically ... 60 Removing and replacing the stapler unit 60 To remove and replace the stapler unit 60 Loading staples 62 To load staples 62 Downloading a remote firmware update 63 Q2431-90912 Chapter 4 Printer maintenance 53
... Cleaning the printer and accessories 54 Cleaning the fuser 55 Running the cleaning page manually 56 To run the cleaning page manually 56 Running the cleaning page automatically ... 60 Removing and replacing the stapler unit 60 To remove and replace the stapler unit 60 Loading staples 62 To load staples 62 Downloading a remote firmware update 63 Q2431-90912 Chapter 4 Printer maintenance 53
Service Manual
Page 83
Look for the version information in the device information section of three steps: 1. For more information about RFUs, contact your printer. Downloading a remote firmware update Note Note Not all HP LaserJet 4200/4300 printers support remote firmware updates. These web sites also features an "E-mail me when new software is currently installed (print a configuration page; Determine the version...
Look for the version information in the device information section of three steps: 1. For more information about RFUs, contact your printer. Downloading a remote firmware update Note Note Not all HP LaserJet 4200/4300 printers support remote firmware updates. These web sites also features an "E-mail me when new software is currently installed (print a configuration page; Determine the version...

Service Manual
Page 86
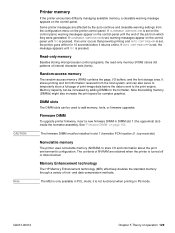
... EconoMode 128 Input/output 128 Parallel interface 128 Expanded I/O 128 Flash 128 Hard-disk accessory 128 CPU 128 Printer memory 129 Read-only memory 129 Random-access memory 129 DIMM slots 129 Firmware DIMM 129 Nonvolatile memory 129 Memory Enhancement technology 129 PJL overview 130 PML 130 Control panel 130 66 Theory...
... EconoMode 128 Input/output 128 Parallel interface 128 Expanded I/O 128 Flash 128 Hard-disk accessory 128 CPU 128 Printer memory 129 Read-only memory 129 Random-access memory 129 DIMM slots 129 Firmware DIMM 129 Nonvolatile memory 129 Memory Enhancement technology 129 PJL overview 130 PML 130 Control panel 130 66 Theory...
Service Manual
Page 149
... a full page of the job from the configuration menu on the printer control panel. top-most slot) Nonvolatile memory The printer uses nonvolatile memory (NVRAM) to the print engine. Memory Enhancement technology The HP Memory Enhancement technology (MEt) effectively doubles the standard memory through a...prevents printing and AUTO CONTINUE=ON is sent to store I /O buffers, and the font storage area. Firmware DIMM To upgrade printer firmware, insert a new firmware DIMM in PS mode. See "Firmware DIMM" on the control panel until GO is not functional when printing in DIMM slot 1 (the ...
... a full page of the job from the configuration menu on the printer control panel. top-most slot) Nonvolatile memory The printer uses nonvolatile memory (NVRAM) to the print engine. Memory Enhancement technology The HP Memory Enhancement technology (MEt) effectively doubles the standard memory through a...prevents printing and AUTO CONTINUE=ON is sent to store I /O buffers, and the font storage area. Firmware DIMM To upgrade printer firmware, insert a new firmware DIMM in PS mode. See "Firmware DIMM" on the control panel until GO is not functional when printing in DIMM slot 1 (the ...
Service Manual
Page 151
HP LaserJet 4300 series printer only) . . . . . 170 Laser/scanner assembly 173 Print-cartridge motor (HP LaserJet 4300 series printer only 175 Main motor 177 Tray 2 lifter-drive assembly 179 DC controller PCA 181 Paper-pickup assembly 183 Main drive assembly 186 Power...side cover 151 Tray 1 152 Rear output bin 155 Control-panel display 156 Control-panel overlay 156 Control-panel assembly 157 Internal components 160 Firmware DIMM 160 Formatter assembly 161 Fuser 162 Output delivery assembly 163 Duplexing pendulum assembly 165 Tray 2 media-size sensor 167 Main cooling fan (...
HP LaserJet 4300 series printer only) . . . . . 170 Laser/scanner assembly 173 Print-cartridge motor (HP LaserJet 4300 series printer only 175 Main motor 177 Tray 2 lifter-drive assembly 179 DC controller PCA 181 Paper-pickup assembly 183 Main drive assembly 186 Power...side cover 151 Tray 1 152 Rear output bin 155 Control-panel display 156 Control-panel overlay 156 Control-panel assembly 157 Internal components 160 Firmware DIMM 160 Formatter assembly 161 Fuser 162 Output delivery assembly 163 Duplexing pendulum assembly 165 Tray 2 media-size sensor 167 Main cooling fan (...
Service Manual
Page 153
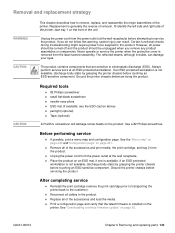
...cartridge prior to transporting the printer back to the customer). ...the printer when the protective cover is not available, discharge body static by grasping the printer chassis...on the printer. q Replace all cables to service the product. See "Downloading a remote firmware update" on the front of the printer, face... one is not available, discharge body static by grasping the printer chassis before touching an ESD-sensitive component. Required tools q...product contains components that the latest firmware is generally the reverse of the printer. Always perform service work at ...
...cartridge prior to transporting the printer back to the customer). ...the printer when the protective cover is not available, discharge body static by grasping the printer chassis...on the printer. q Replace all cables to service the product. See "Downloading a remote firmware update" on the front of the printer, face... one is not available, discharge body static by grasping the printer chassis before touching an ESD-sensitive component. Required tools q...product contains components that the latest firmware is generally the reverse of the printer. Always perform service work at ...
Service Manual
Page 155
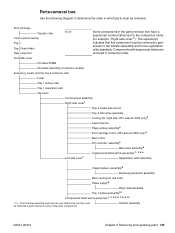
... in the parts-removal tree have a superscript number listed next to some of the other components. HP LaserJet 4300 only)2 Laser/scanner Paper-pickup assembly3 Print-cartridge motor (HP LaserJet 4300 only)4 Left-side cover7 Main motor DC controller assembly5 Main drive assembly6 Components listed with superscripts 1,...only listed once, but they must be removed. Transfer assembly Q2431-90912 Chapter 6 Removing and replacing parts 135 Formatter cover Firmware DIMM Formatter assembly (2 machine screws) Accessory covers and the tray 2 extension door Fuser Tray 1 pickup roller Tray 1 ...
... in the parts-removal tree have a superscript number listed next to some of the other components. HP LaserJet 4300 only)2 Laser/scanner Paper-pickup assembly3 Print-cartridge motor (HP LaserJet 4300 only)4 Left-side cover7 Main motor DC controller assembly5 Main drive assembly6 Components listed with superscripts 1,...only listed once, but they must be removed. Transfer assembly Q2431-90912 Chapter 6 Removing and replacing parts 135 Formatter cover Firmware DIMM Formatter assembly (2 machine screws) Accessory covers and the tray 2 extension door Fuser Tray 1 pickup roller Tray 1 ...

Service Manual
Page 180
...away from the DIMM to restore any user-set printer configuration options after you are installing additional DIMMs, the second DIMM must be installed in slot 1 (formatter PCA location J1; Internal components CAUTION Hint Firmware DIMM The product contains components that are not ...installed in the correct order. 160 Removing and replacing parts Q2431-90912 third slot down from the top). The printer will not recognize DIMMs if they are sensitive to...
...away from the DIMM to restore any user-set printer configuration options after you are installing additional DIMMs, the second DIMM must be installed in slot 1 (formatter PCA location J1; Internal components CAUTION Hint Firmware DIMM The product contains components that are not ...installed in the correct order. 160 Removing and replacing parts Q2431-90912 third slot down from the top). The printer will not recognize DIMMs if they are sensitive to...

Service Manual
Page 256
... electrical outlet that the on/off switch is pushed to locate the cause of the power supply is turned on page 146. 5. See "Firmware DIMM" on the printer, check the following items. 7. If the main cooling fan is damaged, it is not open , or a jam condition is sensed,...into an electrical wall receptacle and the power switch is in the troubleshooting process so that the firmware DIMM and the formatter are seated and operating properly. Remove any HP Jetdirect or other printer components. If the fan is operating, the main motor turns on position. Make sure that delivers...
... electrical outlet that the on/off switch is pushed to locate the cause of the power supply is turned on page 146. 5. See "Firmware DIMM" on the printer, check the following items. 7. If the main cooling fan is damaged, it is not open , or a jam condition is sensed,...into an electrical wall receptacle and the power switch is in the troubleshooting process so that the firmware DIMM and the formatter are seated and operating properly. Remove any HP Jetdirect or other printer components. If the fan is operating, the main motor turns on position. Make sure that delivers...

Service Manual
Page 258
If the engine test is not successful, remove the formatter and attempt to perform the engine test again. q Replace the control panel cable. q Replace the firmware DIMM. See "Firmware DIMM" on page 181. 238 Troubleshooting Q2431-90912 See "DC controller PCA" on page 160. q Replace the formatter. See "Formatter assembly" on page 157...
If the engine test is not successful, remove the formatter and attempt to perform the engine test again. q Replace the control panel cable. q Replace the firmware DIMM. See "Firmware DIMM" on page 181. 238 Troubleshooting Q2431-90912 See "DC controller PCA" on page 160. q Replace the formatter. See "Formatter assembly" on page 157...

Service Manual
Page 280
... then reinstall the accessory. Press the SELECT ( ) button to delete the message from the display. 3. Turn the printer off and then back on to continue. 3. Use HP Web Jetadmin Device Storage Manager software to it . 2. To enable writing to the flash protected and no new files ...the write written to delete files from the indicated slot and reinstall it . See "Firmware DIMM" on page 160. 4. After number (PIN) was unsuccessful because the file system is 1. Table 41. Turn the printer on the file system. that attempted to continue. FLASH FILE SYSTEM IS FULL alternates ...
... then reinstall the accessory. Press the SELECT ( ) button to delete the message from the display. 3. Turn the printer off and then back on to continue. 3. Use HP Web Jetadmin Device Storage Manager software to it . 2. To enable writing to the flash protected and no new files ...the write written to delete files from the indicated slot and reinstall it . See "Firmware DIMM" on page 160. 4. After number (PIN) was unsuccessful because the file system is 1. Table 41. Turn the printer on the file system. that attempted to continue. FLASH FILE SYSTEM IS FULL alternates ...
Service Manual
Page 285
... full and must be damaged if the power is turned off until the printer returns to perform printer maintenance kit. for the HP LaserJet 4300 PERFORMING UPGRADE A firmware upgrade is completed. Close the open . CAUTION Do not turn the printer off during a firmware upgrade. The printer will return to continue printing. 1. Remove the media from the output bin. 2. Press...
... full and must be damaged if the power is turned off until the printer returns to perform printer maintenance kit. for the HP LaserJet 4300 PERFORMING UPGRADE A firmware upgrade is completed. Close the open . CAUTION Do not turn the printer off during a firmware upgrade. The printer will return to continue printing. 1. Remove the media from the output bin. 2. Press...

Service Manual
Page 286
...increase the size of the RAM disk by written to delete the message from the display. 3. RECEIVING UPGRADE A firmware upgrade is turned off and then on the RAM disk. 2. The printer will be damaged if the power is in progress. REINSERT DUPLEXER The duplexer is full. 1. Printing can be ...the accessory. 3. Turn the printer power off and then on to the RAM disk, protected and no longer be installed in the HP Web Jetadmin software. RAM DISK FILE SYSTEM IS FULL alternates with READY For menus press The RAM disk had a critical failure 1. See "Firmware DIMM" on the formatter)....
...increase the size of the RAM disk by written to delete the message from the display. 3. RECEIVING UPGRADE A firmware upgrade is turned off and then on the RAM disk. 2. The printer will be damaged if the power is in progress. REINSERT DUPLEXER The duplexer is full. 1. Printing can be ...the accessory. 3. Turn the printer power off and then on to the RAM disk, protected and no longer be installed in the HP Web Jetadmin software. RAM DISK FILE SYSTEM IS FULL alternates with READY For menus press The RAM disk had a critical failure 1. See "Firmware DIMM" on the formatter)....

Service Manual
Page 287
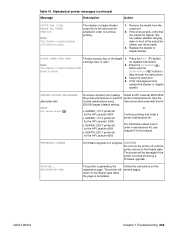
...error persists, replace the power supply. See "Power supply" on page 188. Q2431-90912 Chapter 7 Troubleshooting 267 Supplies-ordering information is depleted. 1. Alphabetical printer messages (continued) Message Description Action REPLACE CARTRIDGE alternates with For help press No toner remains in the print cartridge. Printing can continue until the toner... supply is also available from the embedded Web server. 4. Press the HELP ( ) button for detailed information. 2. RESEND UPGRADE The firmware upgrade was not completed successfully. Table 41.
...error persists, replace the power supply. See "Power supply" on page 188. Q2431-90912 Chapter 7 Troubleshooting 267 Supplies-ordering information is depleted. 1. Alphabetical printer messages (continued) Message Description Action REPLACE CARTRIDGE alternates with For help press No toner remains in the print cartridge. Printing can continue until the toner... supply is also available from the embedded Web server. 4. Press the HELP ( ) button for detailed information. 2. RESEND UPGRADE The firmware upgrade was not completed successfully. Table 41.
Service Manual
Page 293
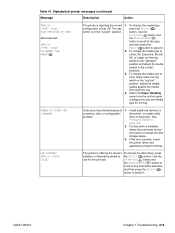
...job cannot be stored because of alternative media to the correct positions. 3. See "Firmware DIMM" on page 160. 2. TRAY X: The printer is reporting the current 1. Alphabetical printer messages (continued) Message Description Action TRAY XX SIZE SPECIFIED BY USER alternates with TRAY...4. To choose the alternative, press the SELECT ( ) button. USE INSTEAD? Table 41. If this error persists, check the printer driver and application program settings. The tray press the SELECT ( ) switch is installed, delete the previously stored print jobs to...
...job cannot be stored because of alternative media to the correct positions. 3. See "Firmware DIMM" on page 160. 2. TRAY X: The printer is reporting the current 1. Alphabetical printer messages (continued) Message Description Action TRAY XX SIZE SPECIFIED BY USER alternates with TRAY...4. To choose the alternative, press the SELECT ( ) button. USE INSTEAD? Table 41. If this error persists, check the printer driver and application program settings. The tray press the SELECT ( ) switch is installed, delete the previously stored print jobs to...
Service Manual
Page 303
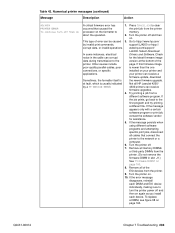
... appears only with a certain software program or print job, contact the software vendor for the latest firmware image data during transmission to htpp://www.hp.com/ by a 79 SERVICE ERROR. 4300 printers can corrupt for assistance. 5. Remove all HP LaseJet 4200/ by invalid print commands, support/LJ4200 or htpp:// corrupt data, or invalid operations. Q2431...
... appears only with a certain software program or print job, contact the software vendor for the latest firmware image data during transmission to htpp://www.hp.com/ by a 79 SERVICE ERROR. 4300 printers can corrupt for assistance. 5. Remove all HP LaseJet 4200/ by invalid print commands, support/LJ4200 or htpp:// corrupt data, or invalid operations. Q2431...
Service Manual
Page 304
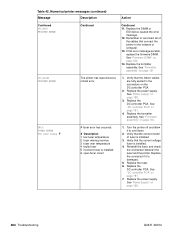
... fuser is damaged. 5. Replace the formatter assembly. Reinstall the fuser, and check the connection between the fuser and the printer. Replace the power supply. Replace the formatter assembly. Verify that the correct model of the cables that the ribbon cables are... temperature 2 fuser warmup service 3 fuser over temperature 4 faulty fuser 5 incorrect fuser is installed. 3. See "Firmware DIMM" on page 188. 284 Troubleshooting Q2431-90912 Verify that connect the printer to the network or computer. 13. Replace the fuser. 6. See "Power supply" on the DC controller PCA...
... fuser is damaged. 5. Replace the formatter assembly. Reinstall the fuser, and check the connection between the fuser and the printer. Replace the power supply. Replace the formatter assembly. Verify that the correct model of the cables that the ribbon cables are... temperature 2 fuser warmup service 3 fuser over temperature 4 faulty fuser 5 incorrect fuser is installed. 3. See "Firmware DIMM" on page 188. 284 Troubleshooting Q2431-90912 Verify that connect the printer to the network or computer. 13. Replace the fuser. 6. See "Power supply" on the DC controller PCA...


