HP 9050 Support Question
HP 9050 Support Question
Find answers below for this question about HP 9050 - LaserJet B/W Laser Printer.Need a HP 9050 manual? We have 28 online manuals for this item!
Question posted by cgerald on June 16th, 2011
How To Upgrade Firmware On Hp Lasejet 9050n Priner
Current Answers
Answer #1: Posted by kcmjr on June 16th, 2011 11:23 AM

Member since:
May 5th, 2011 Points: 4,254,255

Installation instructions are at that link as well.
NOTE: Please be aware that an update in some circumstance may require ten minutes or more to complete.Upgrading firmware to a single device
You can send an .RFU update to a device at any time; the device will wait for all I/O channels to become idle before cycling power. Please print a configuration page prior to performing any firmware update. To print the configuration page:- Go to the printer's or MFP's control panel.
- Press the "Administration" Icon on the touch screen.
- Select the "INFORMATION" selection on the touch screen.
- Select "CONFIGURATION/STATUS PAGES".
- Select "CONFIGURATION PAGE".
- Select the "Print" button.
On the printed CONFIGURATION page look in the section marked "Device Information" for the firmware date code. The firmware date code will look something like this: 20040322 48.001.0
NOTE: If the firmware update involves a change in the format of NVRAM, the NVRAM settings will be lost and must be set again by the customer.The elapsed time for an update depends on the I/O transfer time as well as the time that it takes for the printer to reinitialize. The I/O transfer time will depend on a number of things including the speed of the host computer sending the update and the I/O method (parallel, or network).
The re-initialization time will depend on the specific hardware configuration of the printer, such as the number of EIO devices installed, the presence of external paper handling devices, and the amount of memory installed. Finally, any print jobs ahead of the .RFU job in the queue will be printed before the .RFU update is processed.
NOTE: When the upgrade process has completed the LaserJet will reboot. Once the printer is back online, print a Configuration Page and verify that the new firmware has been installed.--Using FTP from Internet Explorer--
Take note of the TCP/IP address on the configuration pages.
- Insure the "Enable folder view for FTP sites" box is checked on the Advanced tab under Tools/Internet Options.
- Open the browser and type ftp://192.168.0.90 (this is an example).
- Use the TCP/IP address of the printer from step 1). The display will show a folder labeled Port 1.
- Open Windows Explorer and navigate to the directory where the .rfu file is located.
- Drag the rfu file from Windows Explorer to the Port 1 folder in step 2.
- Verify the printer's control panel displays "Performing Upgrade"
copy /b FILENAME \\SHARENAME\PRINTERNAME
where FILENAME is the name of the .RFU file,SHARENAME is the name of the machine, from which the printer is being shared, and PRINTERNAME is the printer's share name (do not type the angle brackets).
If the device is attached locally, then the .RFU file can be sent directly to the printer with a COPY command from a command prompt or DOS window:
Using USB
Before you can send a firmware upgrade through the USB port, you need to know the name of the computer the printer is connected to, and you need to enable printer sharing. These steps are for Windows® XP. Other versions of Windows operating systems are similar, with slightly different operations.
How to find out the name of your computer:
- Click the Start button, Programs, Accessories, System Tools, and then choose System Information.
- You will find your computer's name in the right window-pane next to System Name.
- Write down this name as it will be needed later.
How to share the connected printer:
- Click the Start button, Settings, then Printers and Faxes.
- Right-click the printer you need to send the upgrade to, then choose Sharing…
- Choose the radio button labeled Share this printer.
- Type a name for the share. Make it short and easy to remember.
- Click Apply and write down the share name, as it will be needed later.
- For example:"HP LaserJet mfp"
How to send the firmware upgrade using a USB connection:
- Open a DOS Command Prompt (in Windows NT® 4.0, 2000, or XP, click Start, Run, then type CMD and press OK, or in Windows 9x click Start, Programs, Accessories, and then click MSDOS Prompt.) and locate the directory where you saved the firmware file.
- Type: copy /b filename \\computer name\share name
- For example: copy /b ljXXXXmfpfw_0X.00X.X.rfu \\computer1\HP LaserJet mfp printer
- Press Enter.
If your HP Color LaserJet printer uses a direct network connection, you can use file transfer protocol (FTP) to update your HP Color LaserJet firmware. Take note of the TCP/IP address on the configuration pages.
NOTE: Make sure that the printer is not in Powersave mode. Also make sure that any error messages are cleared from the control panel display.- Open a DOS command window on your computer.
- Type ftp (for example, if the TCP/IP address is 192.168.0.90, type ftp 192.168.0.90).
- Press ENTER on the keyboard.
- When prompted for user name and password press ENTER for each.
- Type bin at the >prompt.
- Press ENTER.
- Type: put where is the location where the .RFU file was downloaded from the Web. For example, type: put C:\CLJXXXX\cljXXXXFW.RFU
- Press ENTER.
- Type "bye" at the command prompt once the download process begins and the firmware is updated on the printer
- Press ENTER to exit the FTP session.
$ cp /home/yourmachine/FILENAME /dev/
where XXXX is the appropriate parallel device; and where /home/yourmachine/FILENAME contains the .RFU file.Mac OS X System (ftp)
- Open the Terminal application found in the Utilities folder; a terminal window will appear.
- After the % symbol enter following information:
ftp <>(example - % ftp 192.0.0.192)
The terminal window will list that you are connected to the printer and the JD FTP Server is Ready. - Press the enter key twice. Both the Username and Password can be blank
- Enter the following information after ftp>:
put <>(Example - ftp> put /users/computername/Desktop/laserjet_fw.rfu)
Remote firmware update using the HP Printer Utility (Macintosh OS X)
The HP Printer Utility is a software program that gives you access to the product in Mac OS X.
The HP Printer Utility is available in Mac OS X V10.3 and later. The HP Printer Utility does not work when it is installed by using the AppleTalk protocol. Use IP, Bonjour, Rendezvous, or a USB connection to enable the HP Printer Utility.
The HP Printer Utility can be found on the Administrator software CD ("Admin CD") that came with the product.
If you do not have the CD, you can obtain the HP Printer Utility by downloading the latest product installer from the following Web sites:
http://www.hp.com/support/lj9040 or www.hp.com/support/lj9050
Complete the following steps:
- Open the HP Printer Utility:
- (OS X v 10.4 and 10.5) The utility can be found in the Application/Utilities folder by choosing the HP Printer Selector.
- (OS X v 10.3) The utility can be found in the Library/Printers/hp/Utilities folder.
- Choose your printer from the list, Press Select and continue with step 7.
- If a list does not appear, click on the printer icon in the lower left corner.
- Choose your printer from the list, Press Select and continue with step 7.
- If the product does not appear, click More Printers…. The Connection Type screen will appear.
- Choose the connection type (USB or TCP/IP). Choose the product name or enter in an IP address.
- On the Connection Type screen, click Add. The Select Printer screen will now appear.
- Choose your printer from the List and Press Select.
- You are now in the HP Printer Utility.
- Select Update Firmware on the left side of the window, click Choose, browse to firmware upgrade file, and then click Open.
- On the Update Firmware screen, click Update.
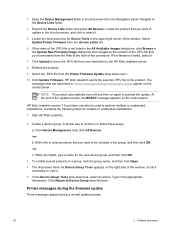
Using HP Web JetAdmin 7.x or 8.X
Download the appropriate firmware update file from hp.com to a folder on your PC or the Web JetAdmin server.- Start Web JetAdmin 7.x or 8.x.
- From the Navigation section of the screen select the "Device management" selection from the dropdown menu. This is located in the top left hand section of the window.
- Choose the "Device List " folder and select one of the following depending on what list your device/s are located under:
- All Devices
- Ungrouped Devices
- New Devices
- Once you have selected you list or group that your device is located in highlight the device/s you want to update from populated Device List or Device Groups List on the right hand section of the window.
- Select "Update Printer Firmware from the Device Tools drop down on the top right hand section of the window.
- Click the "Browse" button and locate the correct firmware image.
- Select the file and Click on the "OK" button.
- Select the "Update" button, found in the lower right portion of the window to start the update process.
Using HP Web Jetadmin 10.x
NOTE: HP Web Jetadmin can be configured to get firmware details from hp.com directly. Use Tools, Options, Shared, Network, HTTP to add HTTP proxy details (if needed) and to enable "Allow downloadv. vAllow download" is required for HP Web Jetadmin to communicate with the Internet. Once these settings are enabled, HP Web Jetadmin may be able to get firmware listing and firmware image files directly from HP.com if this is allowed on the network where HP Web Jetadmin is running.- Start Web Jetadmin 10.x
- From the "Device Management" section, select vAll Devices" (or the appropriate device group). An "All Devicesv list will appear in the center window.
- Find your device in the list, or type the IP address of the device in the Quick Device Discovery section in the lower-left of the screen (this will highlight your device in the device list). You can sort the device list by clicking on a column name at the top.
- If your device list is sorted my model number, you may select multiple devices with the same model number by Control-Click or Shift-Click.
- Right-click on the device and select "Upgrade firmware…v.
- An Upgrade Firmware window will appear. Select "Device firmware" and click "Next"
- A list of available firmware will appear. If the correct version is listed, click "Next", and the upgrade process will start.
- Click on "Firmware/Firmware Repository" in the "Device Management" pane 2
- A "Firmware Repository" window will appear in the center of the screen
- Click on "Upload" in the upper-right of the window
- Browse to the .rfu file on your local PC
- Click "Upload"
- Once the .rfu file is uploaded, go back to step 2 in the first section and complete steps 2 through 6.
Licenses & Certifications: Microsoft, Cisco, VMware, Novell, FCC RF & Amateur Radio licensed.
Related HP 9050 Manual Pages


Similar Questions


