User Guide - Windows 8
Page 5
...and software information 3 Locating hardware ...3 Locating software ...3 Front ...3 Right side ...4 Left side ...5 Display ...7 Top ...8 TouchPad ...8 Lights ...9 Buttons ...10 Keys ...11 Bottom ...12 Labels ...13 3 Connecting to a network ...14 Connecting to a wireless network ...14 Using the wireless controls 14 Using the wireless button 14 Using operating system controls 14 Using a WLAN ...15 Using an Internet service provider 15 Setting up a WLAN 16 Configuring a wireless router 16 Protecting your WLAN 16 Connecting to a WLAN 17 Using Bluetooth wireless devices (select models only...
...and software information 3 Locating hardware ...3 Locating software ...3 Front ...3 Right side ...4 Left side ...5 Display ...7 Top ...8 TouchPad ...8 Lights ...9 Buttons ...10 Keys ...11 Bottom ...12 Labels ...13 3 Connecting to a network ...14 Connecting to a wireless network ...14 Using the wireless controls 14 Using the wireless button 14 Using operating system controls 14 Using a WLAN ...15 Using an Internet service provider 15 Setting up a WLAN 16 Configuring a wireless router 16 Protecting your WLAN 16 Connecting to a WLAN 17 Using Bluetooth wireless devices (select models only...
User Guide - Windows 8
Page 8
... wireless network ...60 Backing up your software applications and information 60 Using an optional security cable lock 60 10 Using Setup Utility (BIOS) and System Diagnostics 62 Starting Setup Utility (BIOS) ...62 Updating the BIOS ...62 Determining the BIOS version 62 Downloading a BIOS update 63 Using System Diagnostics ...63 11 Backing up, restoring, and recovering ...65 Creating recovery media and backups 65 Creating HP Recovery media 66 Restore and recovery ...67 Using Windows Refresh for quick and easy recovery 68 Remove everything and reinstall Windows 68 Recovering using HP...
... wireless network ...60 Backing up your software applications and information 60 Using an optional security cable lock 60 10 Using Setup Utility (BIOS) and System Diagnostics 62 Starting Setup Utility (BIOS) ...62 Updating the BIOS ...62 Determining the BIOS version 62 Downloading a BIOS update 63 Using System Diagnostics ...63 11 Backing up, restoring, and recovering ...65 Creating recovery media and backups 65 Creating HP Recovery media 66 Restore and recovery ...67 Using Windows Refresh for quick and easy recovery 68 Remove everything and reinstall Windows 68 Recovering using HP...
User Guide - Windows 8
Page 10
... support To get support in printed format, you request a printed copy of apps. Box 200, Alexandra Post Office, Singapore 911507 When you may provide a printed HP Limited Warranty in the box. Resource Setup Instructions Windows 8 Basics guide Help and Support To access Help and Support, from the Start screen, type help, and then select Help and Support from the Start screen, select My computer, and then select User guides...
... support To get support in printed format, you request a printed copy of apps. Box 200, Alexandra Post Office, Singapore 911507 When you may provide a printed HP Limited Warranty in the box. Resource Setup Instructions Windows 8 Basics guide Help and Support To access Help and Support, from the Start screen, type help, and then select Help and Support from the Start screen, select My computer, and then select User guides...
User Guide - Windows 8
Page 13
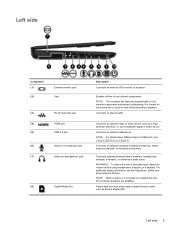
... to cool internal components. For additional safety information, see Using a USB device on and off during routine operation. Reads data from and writes data to digital memory cards such as a highdefinition television, or any compatible digital or audio device. Connects an optional computer headset microphone, stereo array microphone, or monaural microphone. Left side 5 Left side Component (1) (2) External monitor port Vent (3) RJ-45 (network) jack (4) HDMI port (5) USB 2.0 port (6) Audio-in (microphone) jack (7) Audio-out (headphone) jack (8) Digital Media Slot...
... to cool internal components. For additional safety information, see Using a USB device on and off during routine operation. Reads data from and writes data to digital memory cards such as a highdefinition television, or any compatible digital or audio device. Connects an optional computer headset microphone, stereo array microphone, or monaural microphone. Left side 5 Left side Component (1) (2) External monitor port Vent (3) RJ-45 (network) jack (4) HDMI port (5) USB 2.0 port (6) Audio-in (microphone) jack (7) Audio-out (headphone) jack (8) Digital Media Slot...
User Guide - Windows 8
Page 25
... floors. If the wireless light is sold separately. To access the Network Sharing Center, from the list. 4. Connecting to , open the Network Sharing Center. WARNING! Click Connect. NOTE: The functional range (how far your WLAN from the Start screen, type network and sharing. For information about configuring and using Bluetooth devices, see the WLAN you do not plug a modem cable or telephone cable into an RJ-45 (network) jack. From the Desktop...
... floors. If the wireless light is sold separately. To access the Network Sharing Center, from the list. 4. Connecting to , open the Network Sharing Center. WARNING! Click Connect. NOTE: The functional range (how far your WLAN from the Start screen, type network and sharing. For information about configuring and using Bluetooth devices, see the WLAN you do not plug a modem cable or telephone cable into an RJ-45 (network) jack. From the Desktop...
User Guide - Windows 8
Page 28
... station. Component (7) (8) (9) (10) Audio-out (headphone) jack Audio-in (microphone) jack HDMI port External monitor port Description Produces sound when connected to your computer, follow the device manufacturer's instructions. For additional safety information, see Configuring audio settings (with friends and colleagues next door or on headphones, earbuds, or a headset. Using audio On your HP computer, you to adjust the volume. To connect wireless speakers to Help and Support. For details about using the webcam, go to your...
... station. Component (7) (8) (9) (10) Audio-out (headphone) jack Audio-in (microphone) jack HDMI port External monitor port Description Produces sound when connected to your computer, follow the device manufacturer's instructions. For additional safety information, see Configuring audio settings (with friends and colleagues next door or on headphones, earbuds, or a headset. Using audio On your HP computer, you to adjust the volume. To connect wireless speakers to Help and Support. For details about using the webcam, go to your...
User Guide - Windows 8
Page 33
... hot key functions on the computer. From the Start screen, type control, select Control Panel from the list of gestures that let your fingers scroll, swipe, pinch, and rotate to control the pointing device on common tasks using the TouchPad, touch screen, or the keyboard. NOTE: TouchPad gestures are not supported in addition to one of the USB ports on the keyboard to navigate the computer with your fingers. Using the TouchPad 25 Review the Windows 8 Basics guide...
... hot key functions on the computer. From the Start screen, type control, select Control Panel from the list of gestures that let your fingers scroll, swipe, pinch, and rotate to control the pointing device on common tasks using the TouchPad, touch screen, or the keyboard. NOTE: TouchPad gestures are not supported in addition to one of the USB ports on the keyboard to navigate the computer with your fingers. Using the TouchPad 25 Review the Windows 8 Basics guide...
User Guide - Windows 8
Page 39
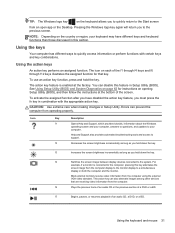
... the monitor. NOTE: Depending on opening Setup Utility (BIOS), and then follow the instructions at the factory. To use an action key function, press and hold down the key. The action key feature is connected to support. To activate the assigned function after you have different keys and keyboard functions than those discussed in Setup Utility (BIOS). CAUTION: Use extreme care when making changes in combination with certain keys and key combinations. Help and Support also provides automated troubleshooting...
... the monitor. NOTE: Depending on opening Setup Utility (BIOS), and then follow the instructions at the factory. To use an action key function, press and hold down the key. The action key feature is connected to support. To activate the assigned function after you have different keys and keyboard functions than those discussed in Setup Utility (BIOS). CAUTION: Use extreme care when making changes in combination with certain keys and key combinations. Help and Support also provides automated troubleshooting...

User Guide - Windows 8
Page 49
... a network on page 14. Your computer may have their own power source. Some devices use minimal force to connect the device. Using a USB device 41 A USB flash drive, connected to the Universal Serial Bus (USB) port on your phone or camera. 7 Managing and sharing information Drives are digital storage devices that help you to read or write to a CD, DVD, or (on select models) Blu-ray Disc (BD). NOTE: For more than one type...
... a network on page 14. Your computer may have their own power source. Some devices use minimal force to connect the device. Using a USB device 41 A USB flash drive, connected to the Universal Serial Bus (USB) port on your phone or camera. 7 Managing and sharing information Drives are digital storage devices that help you to read or write to a CD, DVD, or (on select models) Blu-ray Disc (BD). NOTE: For more than one type...
User Guide - Windows 8
Page 60
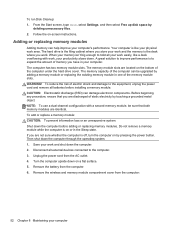
... identical. To reduce the risk of static electricity by deleting unnecessary files. 2. CAUTION: Electrostatic discharge (ESD) can help improve your computer. Remove the wireless and memory module compartment cover from the computer: 52 Chapter 8 Maintaining your work . The computer has two memory module slots. To run Disk Cleanup: 1. From the Start screen, type disk, select Settings, and then select Free up disk space by touching a grounded metal object.
... identical. To reduce the risk of static electricity by deleting unnecessary files. 2. CAUTION: Electrostatic discharge (ESD) can help improve your computer. Remove the wireless and memory module compartment cover from the computer: 52 Chapter 8 Maintaining your work . The computer has two memory module slots. To run Disk Cleanup: 1. From the Start screen, type disk, select Settings, and then select Free up disk space by touching a grounded metal object.

User Guide - Windows 8
Page 71
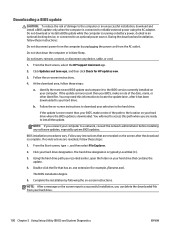
..., open the folder on -screen instructions. 4. Do not insert, remove, connect, or disconnect any software updates, especially system BIOS updates. Make a note of the date, name, or other identifier. You may need to access this information to locate the update later, after the download is connected to reliable external power using the AC adapter. If no instructions are ready to install the update. Follow the on your hard drive where the BIOS update is functioning properly. The BIOS installation begins...
..., open the folder on -screen instructions. 4. Do not insert, remove, connect, or disconnect any software updates, especially system BIOS updates. Make a note of the date, name, or other identifier. You may need to access this information to locate the update later, after the download is connected to reliable external power using the AC adapter. If no instructions are ready to install the update. Follow the on your hard drive where the BIOS update is functioning properly. The BIOS installation begins...
User Guide - Windows 8
Page 75
... recovery partition to restore your information from the backups you can choose to restore to the replacement drive. For more information, see Recovering using HP Recovery Manager on page 68. ● If you want to recover the computer's original factory partitioning and content, you can use Windows File History to reclaim hard drive space, HP Recovery Manager offers the Remove Recovery Partition option. From the Start screen, type help , and then select Help and Support. ● If you want to reset...
... recovery partition to restore your information from the backups you can choose to restore to the replacement drive. For more information, see Recovering using HP Recovery Manager on page 68. ● If you want to recover the computer's original factory partitioning and content, you can use Windows File History to reclaim hard drive space, HP Recovery Manager offers the Remove Recovery Partition option. From the Start screen, type help , and then select Help and Support. ● If you want to reset...
User Guide - Windows 8
Page 81
...monitor port, identifying 20 F firewall software 59 fn key, identifying 11, 32 fun things to do 1 H hard drive bay, identifying 12 hard drive light 6 HDMI configuring audio 23 HDMI port, connecting 22 HDMI port, identifying 5, 20 Hibernation enabling 35 initiated during critical battery level 38 high-definition devices, connecting 22 hot keys description 32 display system information 33 using 32 HP and third-party software updates, installing 60 HP Recovery Manager 69 correcting boot problems 70 starting 69 HP Recovery media creating 66 recovery 70 HP Recovery partition 69 recovery 69 removing...
...monitor port, identifying 20 F firewall software 59 fn key, identifying 11, 32 fun things to do 1 H hard drive bay, identifying 12 hard drive light 6 HDMI configuring audio 23 HDMI port, connecting 22 HDMI port, identifying 5, 20 Hibernation enabling 35 initiated during critical battery level 38 high-definition devices, connecting 22 hot keys description 32 display system information 33 using 32 HP and third-party software updates, installing 60 HP Recovery Manager 69 correcting boot problems 70 starting 69 HP Recovery media creating 66 recovery 70 HP Recovery partition 69 recovery 69 removing...
User Guide - Windows 8
Page 82
...webcam light, identifying 7, 19 internal display switch, identifying 7 internal microphone, identifying 7, 19 Internet connection setup 16 Internet security software, using 59 J jacks audio-in (microphone) 5, 20 audio-out (headphone) 5, 20 network 5 RJ-45 (network) 5 K keyboard hot keys, identifying 32 keys action 11 esc 11 fn 11 Windows applications 11 Windows logo 11 L labels Bluetooth 13 regulatory 13 serial number 13 service 13 wireless certification 13 WLAN 13 latch, battery release 12 lights AC adapter 4 caps lock 9 hard drive 6 optical drive 4 power 6, 9 TouchPad 8 webcam 7, 19 wireless...
...webcam light, identifying 7, 19 internal display switch, identifying 7 internal microphone, identifying 7, 19 Internet connection setup 16 Internet security software, using 59 J jacks audio-in (microphone) 5, 20 audio-out (headphone) 5, 20 network 5 RJ-45 (network) 5 K keyboard hot keys, identifying 32 keys action 11 esc 11 fn 11 Windows applications 11 Windows logo 11 L labels Bluetooth 13 regulatory 13 serial number 13 service 13 wireless certification 13 WLAN 13 latch, battery release 12 lights AC adapter 4 caps lock 9 hard drive 6 optical drive 4 power 6, 9 TouchPad 8 webcam 7, 19 wireless...
User Guide - Windows 8
Page 83
... recovery 69 system restore point creating 65 restoring 67 T temperature 38 TouchPad buttons 8 TouchPad gestures pinching 27 rotating 27 scrolling 26 zooming 27 TouchPad light 8 TouchPad on/off button 8 TouchPad zone, identifying 8 traveling with the computer 13, 38, 55 troubleshooting AC adapter 39 turning off the computer 40 U unresponsive system 40 USB cable, connecting 42 USB devices connecting 41 description 41 removing 42 USB hubs 41 USB ports, identifying 4, 5, 19 using external AC power 39 using passwords 57 using the power meter and power settings...
... recovery 69 system restore point creating 65 restoring 67 T temperature 38 TouchPad buttons 8 TouchPad gestures pinching 27 rotating 27 scrolling 26 zooming 27 TouchPad light 8 TouchPad on/off button 8 TouchPad zone, identifying 8 traveling with the computer 13, 38, 55 troubleshooting AC adapter 39 turning off the computer 40 U unresponsive system 40 USB cable, connecting 42 USB devices connecting 41 description 41 removing 42 USB hubs 41 USB ports, identifying 4, 5, 19 using external AC power 39 using passwords 57 using the power meter and power settings...
HP 2000 Notebook PC and Compaq CQ58 Notebook PC - Maintenance and Service Guide
Page 44
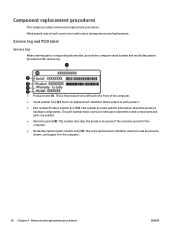
... product's hardware components. This number describes the duration (in years) of the computer. ● Serial number (s/n) (2). This is an alphanumeric identifier that is the alphanumeric identifier used to each screw's size and location during removal and replacement. This is unique to locate documents, drivers, and support for the computer. ● Model description (select models only) (5). Make special note of each product. ● Part number/Product number (p/n) (3). Service tag...
... product's hardware components. This number describes the duration (in years) of the computer. ● Serial number (s/n) (2). This is an alphanumeric identifier that is the alphanumeric identifier used to each screw's size and location during removal and replacement. This is unique to locate documents, drivers, and support for the computer. ● Model description (select models only) (5). Make special note of each product. ● Part number/Product number (p/n) (3). Service tag...
HP 2000 Notebook PC and Compaq CQ58 Notebook PC - Maintenance and Service Guide
Page 108
... Start screen, select the HP Support Assistant app. 2. Follow the on -screen instructions. b. You will need this path when you can delete the downloaded file from the AC outlet. Follow any device, cable, or cord. 1. Identify the most recent BIOS update and compare it has been downloaded to your computer to a network, consult the network administrator before installing any software updates, especially system BIOS updates. The hard drive designation is connected to reliable external power using...
... Start screen, select the HP Support Assistant app. 2. Follow the on -screen instructions. b. You will need this path when you can delete the downloaded file from the AC outlet. Follow any device, cable, or cord. 1. Identify the most recent BIOS update and compare it has been downloaded to your computer to a network, consult the network administrator before installing any software updates, especially system BIOS updates. The hard drive designation is connected to reliable external power using...
HP 2000 Notebook PC and Compaq CQ58 Notebook PC - Maintenance and Service Guide
Page 118
... a problem with a preinstalled application or driver, use Windows File History to restore your personal files and data, you can choose to restore to reclaim hard drive space, HP Recovery Manager offers the Remove Recovery Partition option. Choose the method that came preinstalled on your situation and level of HP Recovery media to restore the factory image to restore your information from the backups you created. From the Start screen, type h, and then select Help and Support. ●...
... a problem with a preinstalled application or driver, use Windows File History to restore your personal files and data, you can choose to restore to reclaim hard drive space, HP Recovery Manager offers the Remove Recovery Partition option. Choose the method that came preinstalled on your situation and level of HP Recovery media to restore the factory image to restore your information from the backups you created. From the Start screen, type h, and then select Help and Support. ●...
HP 2000 Notebook PC and Compaq CQ58 Notebook PC - Maintenance and Service Guide
Page 133
... downloading an update 100 updating 99 boot order changing HP Recovery Manager 113 buttons left TouchPad 9 optical drive eject 5 power 11 right TouchPad 9 TouchPad on/off 9 C cables service considerations 31 caps lock light identifying 10 chipset product description 2 components bottom 13 display 8 front 7 left side 6 right side 5 top 9 computer feet locating 38 spare part number 27 computer major components illustrated 15 computer reset 111 computer specifications 103 connectors service considerations 31 D deleted files restoring 110 Digital Media Slot identifying 6 display...
... downloading an update 100 updating 99 boot order changing HP Recovery Manager 113 buttons left TouchPad 9 optical drive eject 5 power 11 right TouchPad 9 TouchPad on/off 9 C cables service considerations 31 caps lock light identifying 10 chipset product description 2 components bottom 13 display 8 front 7 left side 6 right side 5 top 9 computer feet locating 38 spare part number 27 computer major components illustrated 15 computer reset 111 computer specifications 103 connectors service considerations 31 D deleted files restoring 110 Digital Media Slot identifying 6 display...

HP 2000 Notebook PC and Compaq CQ58 Notebook PC - Maintenance and Service Guide
Page 135
... 1 removing 96 spare part number 25, 26, 27 product description audio 3 chipset 2 display panel 2 Ethernet 3 external media cards 3 graphics 2 hard drive 3 keyboard 4 memory module 2 microphone 3 operating system 4 optical drive 3 pointing device 4 ports 3 power requirements 4 processor 1 product name 1 security 4 serviceability 4 video 3 wireless 3 product name 1 R recovery 110, 111 discs 109, 113 HP Recovery Manager 112 media 113 starting 112 supported discs 109 system 112 USB flash drive 113 using HP Recovery media 109 recovery media creating 108 creating using HP Recovery Manager 109...
... 1 removing 96 spare part number 25, 26, 27 product description audio 3 chipset 2 display panel 2 Ethernet 3 external media cards 3 graphics 2 hard drive 3 keyboard 4 memory module 2 microphone 3 operating system 4 optical drive 3 pointing device 4 ports 3 power requirements 4 processor 1 product name 1 security 4 serviceability 4 video 3 wireless 3 product name 1 R recovery 110, 111 discs 109, 113 HP Recovery Manager 112 media 113 starting 112 supported discs 109 system 112 USB flash drive 113 using HP Recovery media 109 recovery media creating 108 creating using HP Recovery Manager 109...


