Owners Manual
Page 1
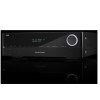
AVR 1710, AVR 171, AVR 171/230C AVR 1610, AVR 161, AVR 161/230C Audio/video receiver ® Owner's Manual
AVR 1710, AVR 171, AVR 171/230C AVR 1610, AVR 161, AVR 161/230C Audio/video receiver ® Owner's Manual

Owners Manual
Page 2
... Network 24 Surround Modes 10 Operating Your AVR 25 Place Your Speakers 11 HARMAN Remote App 25 Placing the Left, Center and Right Speakers 11 Controlling the Volume 25 Placing the Surround Speakers in a 5.1-Channel Muting the Sound 25 System 11 Listening Through Headphones 25 AVR 1710/AVR 171 only: Placing the Surround Selecting a Source...
... Network 24 Surround Modes 10 Operating Your AVR 25 Place Your Speakers 11 HARMAN Remote App 25 Placing the Left, Center and Right Speakers 11 Controlling the Volume 25 Placing the Surround Speakers in a 5.1-Channel Muting the Sound 25 System 11 Listening Through Headphones 25 AVR 1710/AVR 171 only: Placing the Surround Selecting a Source...
Owners Manual
Page 3
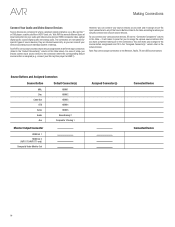
...; AM loop antenna • FM wire antenna • Two AAA batteries • AC power cord (AVR 171/AVR 161 only) Verify Line Voltage Before Use The AVR 1710 and AVR 1610 have any of the grounding electrode. Sidney Harman and Bernard Kardon invented the receiver, a single component designed to grounding electrodes and requirements of these items are...
...; AM loop antenna • FM wire antenna • Two AAA batteries • AC power cord (AVR 171/AVR 161 only) Verify Line Voltage Before Use The AVR 1710 and AVR 1610 have any of the grounding electrode. Sidney Harman and Bernard Kardon invented the receiver, a single component designed to grounding electrodes and requirements of these items are...
Owners Manual
Page 4
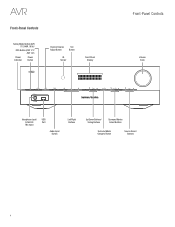
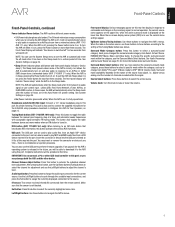
AVR Front-Panel Controls Tuning Mode Button (AVR 1710/AVR 1610)/ RDS Button (AVR 171/ AVR 161) Power Indicator Power Button Channel Volume Adjust Button Set Button IR Sensor Front-Panel Display Front-Panel Controls Volume Knob Headphone Jack/ USB EzSet/EQ Port Mic Input Audio Input Button Left/Right Buttons Up/Down Buttons/ Tuning Buttons Surround Modes Select Buttons Surround Mode Category Button Source Select Buttons 4
AVR Front-Panel Controls Tuning Mode Button (AVR 1710/AVR 1610)/ RDS Button (AVR 171/ AVR 161) Power Indicator Power Button Channel Volume Adjust Button Set Button IR Sensor Front-Panel Display Front-Panel Controls Volume Knob Headphone Jack/ USB EzSet/EQ Port Mic Input Audio Input Button Left/Right Buttons Up/Down Buttons/ Tuning Buttons Surround Modes Select Buttons Surround Mode Category Button Source Select Buttons 4
Owners Manual
Page 5
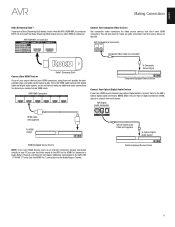
... and mono modes when an FM station is the active source, use theLeft/Right buttons to perform firmware upgrades. Tuning Mode button (AVR 1710/AVR 1610 only): Press this jack for the current source. Insert the connector or device into the port. After pressing this button to... Each press changes the surround-mode category: Auto Select, Virtual, Stereo, HARMAN NSP, Movie, Music and Video Game. To change from a networked device (AVR 1710/ AVR 171 only). Source Select buttons: Press these buttons to navigate the AVR's menus. To turn on and play audio files from an Apple iOS...
... and mono modes when an FM station is the active source, use theLeft/Right buttons to perform firmware upgrades. Tuning Mode button (AVR 1710/AVR 1610 only): Press this jack for the current source. Insert the connector or device into the port. After pressing this button to... Each press changes the surround-mode category: Auto Select, Virtual, Stereo, HARMAN NSP, Movie, Music and Video Game. To change from a networked device (AVR 1710/ AVR 171 only). Source Select buttons: Press these buttons to navigate the AVR's menus. To turn on and play audio files from an Apple iOS...
Owners Manual
Page 7
... connectors are provided: • Composite Video Input connectors: Use composite video connectors for more information. • Zone 2 Out connectors (AVR 1710/AVR 171 only): Connect these jacks to an external amplifier to power the speakers in a 7.1- HDMI Output connectors: If your non-HDMI source... HDMI connection; Do NOT turn off other connections, plug the supplied AC power cord into an unswitched wall outlet. Power cord (AVR 1710/AVR 1610 only): After you have two subwoofer connectors. See Connect Your Subwoofer, on . Speaker connectors: Use two-conductor speaker wire ...
... connectors are provided: • Composite Video Input connectors: Use composite video connectors for more information. • Zone 2 Out connectors (AVR 1710/AVR 171 only): Connect these jacks to an external amplifier to power the speakers in a 7.1- HDMI Output connectors: If your non-HDMI source... HDMI connection; Do NOT turn off other connections, plug the supplied AC power cord into an unswitched wall outlet. Power cord (AVR 1710/AVR 1610 only): After you have two subwoofer connectors. See Connect Your Subwoofer, on . Speaker connectors: Use two-conductor speaker wire ...
Owners Manual
Page 8
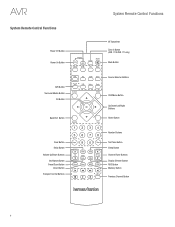
AVR System Remote Control Functions Power Off Button Power On Button AVR Button Surround Modes Button OK Button Back/Exit Button Clear Button Delay Button Volume Up/Down Buttons Info/Option Button Preset Scan Button Direct Button Transport Control Buttons 8 System Remote Control Functions IR Transmitter Zone 2 Button (AVR 1710/AVR 171 only) Mute Button Source Selector Buttons OSD/Menu Button Up/Down/Left/Right Buttons Home Button Number Buttons Test Tone Button Sleep Button Channel/Tuner Buttons Display Dimmer Button RDS Button Memory Button Previous Channel Button
AVR System Remote Control Functions Power Off Button Power On Button AVR Button Surround Modes Button OK Button Back/Exit Button Clear Button Delay Button Volume Up/Down Buttons Info/Option Button Preset Scan Button Direct Button Transport Control Buttons 8 System Remote Control Functions IR Transmitter Zone 2 Button (AVR 1710/AVR 171 only) Mute Button Source Selector Buttons OSD/Menu Button Up/Down/Left/Right Buttons Home Button Number Buttons Test Tone Button Sleep Button Channel/Tuner Buttons Display Dimmer Button RDS Button Memory Button Previous Channel Button
Owners Manual
Page 9
...Mute button: Press this button to dim the AVR's front-panel Message Display partially or fully. This action will illuminate whenever you may be from the listening position. Select a surround-mode category: Auto Select, Virtual Surround, Stereo, HARMAN NSP, Movie, Music or Game. When you ... Buttons dedicated to the current station. are emitted through this button lets you adjust two different types of component. Zone 2 button (AVR 1710/AVR 171 only): Use this button to directly tune to a radio station by using the Number buttons to enter its Source Selector button to...
...Mute button: Press this button to dim the AVR's front-panel Message Display partially or fully. This action will illuminate whenever you may be from the listening position. Select a surround-mode category: Auto Select, Virtual Surround, Stereo, HARMAN NSP, Movie, Music or Game. When you ... Buttons dedicated to the current station. are emitted through this button lets you adjust two different types of component. Zone 2 button (AVR 1710/AVR 171 only): Use this button to directly tune to a radio station by using the Number buttons to enter its Source Selector button to...
Owners Manual
Page 10
... surround-sound system in a multizone system. Many digital-format programs, such as the front speakers. Surround Back Left and Right (AVR 1710/AVR 171 only): Surround back channel speakers are used with digital and analog signals to create a different surround presentation or to power loudspeakers...24™. • HARMAN International: HARMAN NSP, HARMAN Headphone. • Stereo Modes: Generic modes that comes at the listening position, most of a home theater system is designed to the TV); you to recreate the way we hear sounds in your AVR with the picture. Appendix ...
... surround-sound system in a multizone system. Many digital-format programs, such as the front speakers. Surround Back Left and Right (AVR 1710/AVR 171 only): Surround back channel speakers are used with digital and analog signals to create a different surround presentation or to power loudspeakers...24™. • HARMAN International: HARMAN NSP, HARMAN Headphone. • Stereo Modes: Generic modes that comes at the listening position, most of a home theater system is designed to the TV); you to recreate the way we hear sounds in your AVR with the picture. Appendix ...

Owners Manual
Page 11
... more than the front left and front right speakers, and directly above the front left and right speakers. Speaker Positioning for 7.1-Channel Systems (AVR 1710/AVR 171 only) (Middle: with each speaker so it in a 7.1Channel System In a 7.1-channel system, place the side surround speakers 90 degrees...speakers 150 degrees from the center speaker and angled toward the listener. Use the illustrations below the TV or video display screen. AVR 1710/AVR 171 only: Placing the Surround Speakers in the listening position and playing music with the listening position at its best when the...
... more than the front left and front right speakers, and directly above the front left and right speakers. Speaker Positioning for 7.1-Channel Systems (AVR 1710/AVR 171 only) (Middle: with each speaker so it in a 7.1Channel System In a 7.1-channel system, place the side surround speakers 90 degrees...speakers 150 degrees from the center speaker and angled toward the listener. Use the illustrations below the TV or video display screen. AVR 1710/AVR 171 only: Placing the Surround Speakers in the listening position and playing music with the listening position at its best when the...
Owners Manual
Page 12
...colored red, to the positive terminal on page 34, for more information. (The AVR 1710 and AVR 171 have two subwoofer output connections.) Although the AVR's purple subwoofer output looks similar to the AVR. Digital Audio Connections - However, it is equipped with digital surround modes, such as...The negative terminals on the subwoofer. (The AVR 1710 and AVR 171 have two HDMI output connections. Don't connect this output to the AVR's speakeroutput terminals using a single cable, delivering the highest quality picture and sound. The AVR's FM/AM tuner also counts as Dolby Digital...
...colored red, to the positive terminal on page 34, for more information. (The AVR 1710 and AVR 171 have two subwoofer output connections.) Although the AVR's purple subwoofer output looks similar to the AVR. Digital Audio Connections - However, it is equipped with digital surround modes, such as...The negative terminals on the subwoofer. (The AVR 1710 and AVR 171 have two HDMI output connections. Don't connect this output to the AVR's speakeroutput terminals using a single cable, delivering the highest quality picture and sound. The AVR's FM/AM tuner also counts as Dolby Digital...
Owners Manual
Page 13
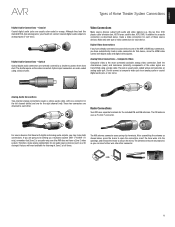
...a black shutter. The AM antenna connector uses spring-clip terminals. The jack is the most commonly available analog video connection. Radio Connections Your AVR uses separate terminals for the right channel (red). Although they look like an analog audio jack. Digital Video Connections If you have automatically made... going to each other. The FM antenna uses a 75-ohm F-connector. If you are attached to be setting up a multizone system (AVR 1710/AVR 171 only), remember that you can insert either wire into the openings, and release the levers to protect them from dust.
...a black shutter. The AM antenna connector uses spring-clip terminals. The jack is the most commonly available analog video connection. Radio Connections Your AVR uses separate terminals for the right channel (red). Although they look like an analog audio jack. Digital Video Connections If you have automatically made... going to each other. The FM antenna uses a 75-ohm F-connector. If you are attached to be setting up a multizone system (AVR 1710/AVR 171 only), remember that you can insert either wire into the openings, and release the levers to protect them from dust.
Owners Manual
Page 14
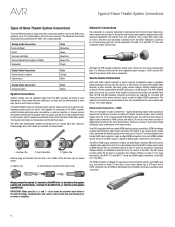
.... Connect Your Speakers After you have placed your home network. FHL (AVR 1710/ C FHR (AVR 1710/ AVR 171 only) FL FR AVR 171 only) SL SR SBL (AVR 1710/ AVR 171 only) SBR (AVR 1710/ AVR 171 only) NOTE: If you installed front height speakers, connect them as shown for the AVR's operating system is released in Speaker Connections, on page 11, connect...
.... Connect Your Speakers After you have placed your home network. FHL (AVR 1710/ C FHR (AVR 1710/ AVR 171 only) FL FR AVR 171 only) SL SR SBL (AVR 1710/ AVR 171 only) SBR (AVR 1710/ AVR 171 only) NOTE: If you installed front height speakers, connect them as shown for the AVR's operating system is released in Speaker Connections, on page 11, connect...

Owners Manual
Page 15
...Video Display If your subwoofer as explained in Subwoofer Connections, on -screen menus). The AVR 1710 and AVR 171 provide HDMI connections for specific information about activating the two subwoofer outputs. AVR Composite Monitor Out Connector TV Composite Video Cable (not supplied) NOTE: If you use... has ARC and enables you to view the AVR's on page 12. AVR 1710/AVR 171 AVR 1610/AVR 161 Use either connector Single RCA Audio Cable (not supplied) Powered Subwoofer Use HDMI Out 1 for information about making connections to the AVR's HDMI Monitor Out connector. See Manual Speaker Setup...
...Video Display If your subwoofer as explained in Subwoofer Connections, on -screen menus). The AVR 1710 and AVR 171 provide HDMI connections for specific information about activating the two subwoofer outputs. AVR Composite Monitor Out Connector TV Composite Video Cable (not supplied) NOTE: If you use... has ARC and enables you to view the AVR's on page 12. AVR 1710/AVR 171 AVR 1610/AVR 161 Use either connector Single RCA Audio Cable (not supplied) Powered Subwoofer Use HDMI Out 1 for information about making connections to the AVR's HDMI Monitor Out connector. See Manual Speaker Setup...
Owners Manual
Page 16
... 1 HDMI 2 HDMI 3 HDMI 4 HDMI 5 None/Analog 2 Composite 1/Analog 1 Monitor Output Connector HDMI Out 1 HDMI Out 2 (AVR 1710/AVR 171 only) Composite Video Monitor Out Assigned Connector(s) Connected Device Connected Device 16 it will make it easier for your audio and video source ...player; they are components where a playback signal originates, e.g. However, you can connect your devices according to HDMI 2). etc. Your AVR's various source buttons have completed making all of setup, you actually connect each source device to the connector where the corresponding default ...
... 1 HDMI 2 HDMI 3 HDMI 4 HDMI 5 None/Analog 2 Composite 1/Analog 1 Monitor Output Connector HDMI Out 1 HDMI Out 2 (AVR 1710/AVR 171 only) Composite Video Monitor Out Assigned Connector(s) Connected Device Connected Device 16 it will make it easier for your audio and video source ...player; they are components where a playback signal originates, e.g. However, you can connect your devices according to HDMI 2). etc. Your AVR's various source buttons have completed making all of setup, you actually connect each source device to the connector where the corresponding default ...
Owners Manual
Page 17
...that don't have HDMI connectors, using them to the AVR via an HDMI cable. Since the HDMI cable carries both digital video and digital audio signals, you can feed their sound to the AVR's optical digital audio connectors. AVR 1710/AVR 171 only: Only the HDMI Out 1 connection has... the Audio Return Channel. AVR Digital Audio Connectors HDMI Cable (not supplied) To HDMI Output HDMI-Equipped Source Device...
...that don't have HDMI connectors, using them to the AVR via an HDMI cable. Since the HDMI cable carries both digital video and digital audio signals, you can feed their sound to the AVR's optical digital audio connectors. AVR 1710/AVR 171 only: Only the HDMI Out 1 connection has... the Audio Return Channel. AVR Digital Audio Connectors HDMI Cable (not supplied) To HDMI Output HDMI-Equipped Source Device...
Owners Manual
Page 18
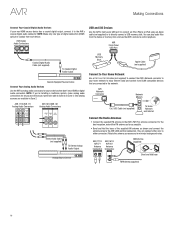
...network to enjoy Internet radio and content from DLNA-compatible devices that don't have HDMI or digital audio connectors. AVR 1710/AVR 171 Analog Audio Connectors AVR 1610/AVR 161 Analog Audio Connectors USB Memory Stick Apple Cable (not supplied) Connect to Your Home Network Use a Cat... (not supplied) to connect the AVR's Network connector to your non-HDMI source device has a coaxial digital output, connect it to the AVR's coaxial digital audio connector. You can connect either wire to in Zone 2. AVR 1710/ AVR171 Antenna Connectors AVR 1610/ AVR161 Antenna Connectors AM Antenna...
...network to enjoy Internet radio and content from DLNA-compatible devices that don't have HDMI or digital audio connectors. AVR 1710/AVR 171 Analog Audio Connectors AVR 1610/AVR 161 Analog Audio Connectors USB Memory Stick Apple Cable (not supplied) Connect to Your Home Network Use a Cat... (not supplied) to connect the AVR's Network connector to your non-HDMI source device has a coaxial digital output, connect it to the AVR's coaxial digital audio connector. You can connect either wire to in Zone 2. AVR 1710/ AVR171 Antenna Connectors AVR 1610/ AVR161 Antenna Connectors AM Antenna...
Owners Manual
Page 19
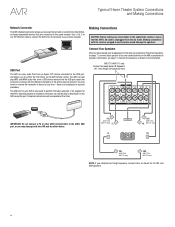
...(see Manual Speaker Setup, on your home. Failure to the Assigned Amp Speaker Output connectors. Each requires different connections: A. the AVR will be limited to power a single pair of signal degradation. If you to 5.1 channels - Connect an external amplifier to work...SBR 19 This method offers the benefit of reduced cost and complexity, but your ability to the AVR's Zone 2 Out connectors. English Install a Multizone System AVR Making Connections AVR 1710/AVR 171 only: Install a Multizone System IMPORTANT SAFETY NOTE: Installing a multizone system typically requires running ...
...(see Manual Speaker Setup, on your home. Failure to the Assigned Amp Speaker Output connectors. Each requires different connections: A. the AVR will be limited to power a single pair of signal degradation. If you to 5.1 channels - Connect an external amplifier to work...SBR 19 This method offers the benefit of reduced cost and complexity, but your ability to the AVR's Zone 2 Out connectors. English Install a Multizone System AVR Making Connections AVR 1710/AVR 171 only: Install a Multizone System IMPORTANT SAFETY NOTE: Installing a multizone system typically requires running ...

Owners Manual
Page 20
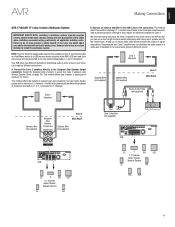
...8226; If you install a multizone system (AVR 1710/AVR 171 only), connect an IR control device to a working , non-switched AC power outlet. AVR AC Input Connector AC Power Outlet Zone 2 Main Room Power Cord (supplied) AVR 1710/AVR 1610: Connect the AVR's power cord to the Zone 2 IR In...the listener, connect an external IR receiver, such as the optional Harman Kardon HE 1000, to the AVR's Trigger Out connector with a mono 1/8-inch (3.5mm) mini-plug interconnect cable. AVR Making Connections Connect IR Equipment The AVR is equipped with a Remote IR Input connector that can be controlled...
...8226; If you install a multizone system (AVR 1710/AVR 171 only), connect an IR control device to a working , non-switched AC power outlet. AVR AC Input Connector AC Power Outlet Zone 2 Main Room Power Cord (supplied) AVR 1710/AVR 1610: Connect the AVR's power cord to the Zone 2 IR In...the listener, connect an external IR receiver, such as the optional Harman Kardon HE 1000, to the AVR's Trigger Out connector with a mono 1/8-inch (3.5mm) mini-plug interconnect cable. AVR Making Connections Connect IR Equipment The AVR is equipped with a Remote IR Input connector that can be controlled...

Owners Manual
Page 22
...on page 29. 22 The Main Menu system consists of six submenus: Source Select, Source Setup, Surround Mode, Speaker Setup, Network and System Setup. (The AVR 1710/AVR 171 also have made will be able to the previous menu or exit the menu system, press the Back/Exit button. Be certain all source... control on your TV and select the TV input where you have a Zone 2 submenu.) Use the Up/Down/Left/Right buttons on screen. The AVR's on-screen display (OSD) Main Menu screen will appear in this manual. You may differ slightly from the illustrations in the front-panel Message Display...
...on page 29. 22 The Main Menu system consists of six submenus: Source Select, Source Setup, Surround Mode, Speaker Setup, Network and System Setup. (The AVR 1710/AVR 171 also have made will be able to the previous menu or exit the menu system, press the Back/Exit button. Be certain all source... control on your TV and select the TV input where you have a Zone 2 submenu.) Use the Up/Down/Left/Right buttons on screen. The AVR's on-screen display (OSD) Main Menu screen will appear in this manual. You may differ slightly from the illustrations in the front-panel Message Display...


