User Manual
Page 2
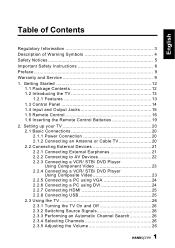
.../ DVD Player Using Component Video 23 2.2.4 Connecting a VCR/ STB/ DVD Player Using Composite Video 23 2.2.5 Connecting a PC using VGA 24 2.2.6 Connecting a PC using DVI 24 2.2.7 Connecting HDMI 25 2.2.8 Connecting USB 25 2.3 Using the TV 26 2.3.1 Turning the TV On and Off 26 2.3.2 Switching Source Signals 26 2.3.3 Performing an Automatic Channel Search 26 2.3.4 Selecting Channels 26 2.3.5 Adjusting the Volume 26 1 Getting Started 12 1.1 Package Contents 12 1.2 Introducing the TV 13 1.2.1 Features 13 1.3 Control Panel 14 1.4 Input and Output Jacks 15 1.5 Remote Control 16...
.../ DVD Player Using Component Video 23 2.2.4 Connecting a VCR/ STB/ DVD Player Using Composite Video 23 2.2.5 Connecting a PC using VGA 24 2.2.6 Connecting a PC using DVI 24 2.2.7 Connecting HDMI 25 2.2.8 Connecting USB 25 2.3 Using the TV 26 2.3.1 Turning the TV On and Off 26 2.3.2 Switching Source Signals 26 2.3.3 Performing an Automatic Channel Search 26 2.3.4 Selecting Channels 26 2.3.5 Adjusting the Volume 26 1 Getting Started 12 1.1 Package Contents 12 1.2 Introducing the TV 13 1.2.1 Features 13 1.3 Control Panel 14 1.4 Input and Output Jacks 15 1.5 Remote Control 16...
User Manual
Page 3
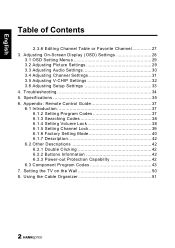
...Setting Volume Lock 38 6.1.5 Setting Channel Lock 39 6.1.6 Factory Setting Mode 40 6.1.7 Description 42 6.2 Other Descriptions 42 6.2.1 Double Clicking 42 6.2.2 Buttons Information 42 6.2.3 Power-out Protection Capability 42 6.3 Component Program Codes 43 7. Adjusting On-Screen Display (OSD) Settings 28 3.1 OSD Setting Menus 29 3.2 Adjusting Picture Settings 29 3.3 Adjusting Audio Settings 30 3.4 Adjusting Channel Settings 31 3.5 Adjusting V-CHIP Settings 32 3.6 Adjusting Setup Settings 33 4. Setting the TV on the Wall 50 8. Using the Cable Organizer 51 2 English Table...
...Setting Volume Lock 38 6.1.5 Setting Channel Lock 39 6.1.6 Factory Setting Mode 40 6.1.7 Description 42 6.2 Other Descriptions 42 6.2.1 Double Clicking 42 6.2.2 Buttons Information 42 6.2.3 Power-out Protection Capability 42 6.3 Component Program Codes 43 7. Adjusting On-Screen Display (OSD) Settings 28 3.1 OSD Setting Menus 29 3.2 Adjusting Picture Settings 29 3.3 Adjusting Audio Settings 30 3.4 Adjusting Channel Settings 31 3.5 Adjusting V-CHIP Settings 32 3.6 Adjusting Setup Settings 33 4. Setting the TV on the Wall 50 8. Using the Cable Organizer 51 2 English Table...
User Manual
Page 6
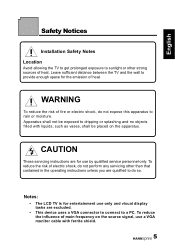
... Safety Notices Installation Safety Notes Location Avoid allowing the TV to get prolonged exposure to a PC. Leave sufficient distance between the TV and the wall to do not perform any servicing other than that contained in the operating instructions unless you are excluded. • This device uses a VGA connector to connect to sunlight or other strong sources of electric...
... Safety Notices Installation Safety Notes Location Avoid allowing the TV to get prolonged exposure to a PC. Leave sufficient distance between the TV and the wall to do not perform any servicing other than that contained in the operating instructions unless you are excluded. • This device uses a VGA connector to connect to sunlight or other strong sources of electric...
User Manual
Page 7
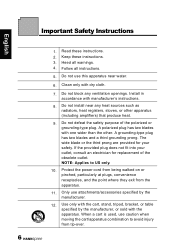
...instructions. 8. Install in accordance with the apparatus. A grounding-type plug has two blades and a third grounding prong. Only use this apparatus near any ventilation openings. Use only with the cart, stand, tripod, bracket, or table specified by the manufacturer. 12. Heed all instructions. 5. A polarized plug...any heat sources such as radiators, heat registers, stoves, or other . English Important Safety Instructions 1. Do not install near water. 6. Keep these instructions. 2. Protect the power cord from being walked on or pinched, particularly at plugs, convenience...
...instructions. 8. Install in accordance with the apparatus. A grounding-type plug has two blades and a third grounding prong. Only use this apparatus near any ventilation openings. Use only with the cart, stand, tripod, bracket, or table specified by the manufacturer. 12. Heed all instructions. 5. A polarized plug...any heat sources such as radiators, heat registers, stoves, or other . English Important Safety Instructions 1. Do not install near water. 6. Keep these instructions. 2. Protect the power cord from being walked on or pinched, particularly at plugs, convenience...

User Manual
Page 10
... a Hannspree Liquid Crystal Display Television (LCD TV). As an ENERGY STAR® Partner, Hannspree has determined that the safety and operation instructions in this manual are followed. however, no guarantee is designed to assist you in its entirety before setting up and using or operating your TV. The information in this manual has been carefully checked for energy efficiency. 9 Warranty and Service For complete warranty service...
... a Hannspree Liquid Crystal Display Television (LCD TV). As an ENERGY STAR® Partner, Hannspree has determined that the safety and operation instructions in this manual are followed. however, no guarantee is designed to assist you in its entirety before setting up and using or operating your TV. The information in this manual has been carefully checked for energy efficiency. 9 Warranty and Service For complete warranty service...
User Manual
Page 14
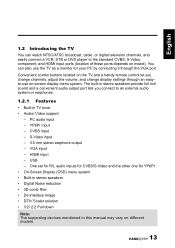
... audio output port lets you change channels, adjust the volume, and change display settings through an easyto-use the TV as a monitor for your PC by connecting it through the VGA port. You can watch NTSC/ATSC broadcast, cable, or digital television channels, and easily connect a VCR, STB or DVD player to an external audio system or earphones. 1.2.1 Features • Built-in TV tuner • Audio/ Video support: - The built-in this manual may vary on different models. 13 USB...
... audio output port lets you change channels, adjust the volume, and change display settings through an easyto-use the TV as a monitor for your PC by connecting it through the VGA port. You can watch NTSC/ATSC broadcast, cable, or digital television channels, and easily connect a VCR, STB or DVD player to an external audio system or earphones. 1.2.1 Features • Built-in TV tuner • Audio/ Video support: - The built-in this manual may vary on different models. 13 USB...

User Manual
Page 15
... sounds. 14 Press to the left on the OSD menu. Press to increase the channel number or move to open the OSD menu. Press to decrease the volume or move upward to turn the TV on the OSD menu. Press to the previous item on the OSD menu. English 1.3 Control Panel Description Button Power Input source Menu INPUT MENU Channel select CH Channel select CH Volume adjust Volume adjust Remote IR sensor Power/ Standby indicator Speakers VOL VOL Function Power button...
... sounds. 14 Press to the left on the OSD menu. Press to increase the channel number or move to open the OSD menu. Press to decrease the volume or move upward to turn the TV on the OSD menu. Press to the previous item on the OSD menu. English 1.3 Control Panel Description Button Power Input source Menu INPUT MENU Channel select CH Channel select CH Volume adjust Volume adjust Remote IR sensor Power/ Standby indicator Speakers VOL VOL Function Power button...
User Manual
Page 16
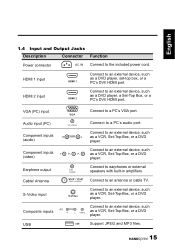
...) Component inputs (audio) PC LINE IN R AUDIO L Connect to an antenna or cable TV. Connect to a PC's audio port. S-Video input S-Video Connect to an external device, such as a VCR, Set-Top-Box, or a DVD player. Composite inputs AV AUDIO R L VIDEO Connect to an external device, such as a DVD player, set-top box, or a PC's DVI/ HDMI port. HDMI 2 input HDMI 2 Connect to an external device, such as a VCR, Set-Top-Box, or a DVD player. Earphone output Cable/ Antenna EAR PHONE VHF / UHF CABLE / ANTENNA Connect to the included power cord. USB USB Support...
...) Component inputs (audio) PC LINE IN R AUDIO L Connect to an antenna or cable TV. Connect to a PC's audio port. S-Video input S-Video Connect to an external device, such as a VCR, Set-Top-Box, or a DVD player. Composite inputs AV AUDIO R L VIDEO Connect to an external device, such as a DVD player, set-top box, or a PC's DVI/ HDMI port. HDMI 2 input HDMI 2 Connect to an external device, such as a VCR, Set-Top-Box, or a DVD player. Earphone output Cable/ Antenna EAR PHONE VHF / UHF CABLE / ANTENNA Connect to the included power cord. USB USB Support...
User Manual
Page 17
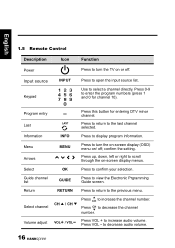
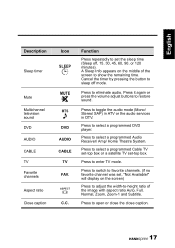
... or off ; English 1.5 Remote Control Description Icon Power Input source INPUT Keypad Function Press to turn the on-screen display (OSD) menu on -screen display menus. Press to confirm your selection. Program entry Last Information Menu LAST INFO MENU Arrows Select Guide channel list Return OK GUIDE RETURN CH / CH Select channel Volume adjust VOL / VOL Press this button for channel 10). Press to view the Electronic Prgramming Guide screen. Use to increase the channel number. Press CH to select...
... or off ; English 1.5 Remote Control Description Icon Power Input source INPUT Keypad Function Press to turn the on-screen display (OSD) menu on -screen display menus. Press to confirm your selection. Program entry Last Information Menu LAST INFO MENU Arrows Select Guide channel list Return OK GUIDE RETURN CH / CH Select channel Volume adjust VOL / VOL Press this button for channel 10). Press to view the Electronic Prgramming Guide screen. Use to increase the channel number. Press CH to select...
User Manual
Page 18
English Description Sleep timer Mute Multichannel television sound DVD AUDIO CABLE TV Favorite channels Aspect ratio Close caption Icon SLEEP MUTE MTS DVD AUDIO CABLE TV FAV. Cancel the timer by pressing the button to select a programmed Cable TV set-top box or a satellite TV set , "Not Available!" Press to eliminate audio. Press to sleep off , 15, 30, 45, 60, 90, or 120 minutes). A Sleep Info appears on the screen) Press to adjust the width-to-height...
English Description Sleep timer Mute Multichannel television sound DVD AUDIO CABLE TV Favorite channels Aspect ratio Close caption Icon SLEEP MUTE MTS DVD AUDIO CABLE TV FAV. Cancel the timer by pressing the button to select a programmed Cable TV set-top box or a satellite TV set , "Not Available!" Press to eliminate audio. Press to sleep off , 15, 30, 45, 60, 90, or 120 minutes). A Sleep Info appears on the screen) Press to adjust the width-to-height...
User Manual
Page 22
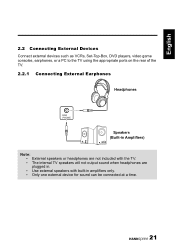
English 2.2 Connecting External Devices Connect external devices such as VCRs, Set-Top-Box, DVD players, video game consoles, earphones, or a PC to the TV using the appropriate ports on the rear of the TV. 2.2.1 Connecting External Earphones Headphones EAR PHONE Speakers (Built-in Amplifiers) Note: • External speakers or headphones are not included with the TV. • The internal TV speakers will not output sound when headphones are plugged in. • Use external speakers with built-in amplifiers only. • Only one external device for sound can be connected at a time. 21
English 2.2 Connecting External Devices Connect external devices such as VCRs, Set-Top-Box, DVD players, video game consoles, earphones, or a PC to the TV using the appropriate ports on the rear of the TV. 2.2.1 Connecting External Earphones Headphones EAR PHONE Speakers (Built-in Amplifiers) Note: • External speakers or headphones are not included with the TV. • The internal TV speakers will not output sound when headphones are plugged in. • Use external speakers with built-in amplifiers only. • Only one external device for sound can be connected at a time. 21
User Manual
Page 27
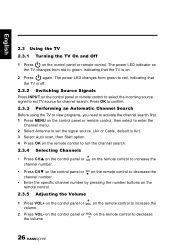
... remote control to decrease the channel number. • Enter the specific channel number by pressing the number buttons on the remote control. 2.3.5 Adjusting the Volume 1 Press VOL+ on the control panel or VOL on the remote control to green, indicating that the TV is on. 2 Press again. on the control panel or VOL on the TV changes from green to red, indicating that the TV is off. 2.3.2 Switching Source Signals Press INPUT on the control panel or remote control. The power LED changes from red...
... remote control to decrease the channel number. • Enter the specific channel number by pressing the number buttons on the remote control. 2.3.5 Adjusting the Volume 1 Press VOL+ on the control panel or VOL on the remote control to green, indicating that the TV is on. 2 Press again. on the control panel or VOL on the TV changes from green to red, indicating that the TV is off. 2.3.2 Switching Source Signals Press INPUT on the control panel or remote control. The power LED changes from red...
User Manual
Page 29
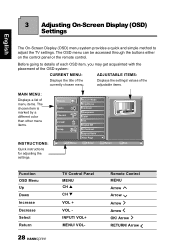
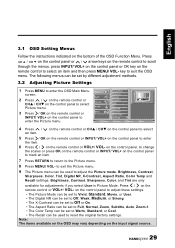
... menu items. The chosen item is marked by a different color than other menu items. INSTRUCTIONS: Quick instructions for adjusting the settings. Before going to adjust the TV settings. Picture Audio Channel V-CHIP Setup Move Picture Mode Brightness Contrast Sharpness Color Tint Digital NR X-Contrast Aspect Ratio Next Page OK Enter Return Return Menu Exit Function OSD Menu Up Down Increase Decrease Select Return 28 TV Control Panel MENU CH S CH T VOL + VOL INPUT/ VOL+ MENU...
... menu items. The chosen item is marked by a different color than other menu items. INSTRUCTIONS: Quick instructions for adjusting the settings. Before going to adjust the TV settings. Picture Audio Channel V-CHIP Setup Move Picture Mode Brightness Contrast Sharpness Color Tint Digital NR X-Contrast Aspect Ratio Next Page OK Enter Return Return Menu Exit Function OSD Menu Up Down Increase Decrease Select Return 28 TV Control Panel MENU CH S CH T VOL + VOL INPUT/ VOL+ MENU...
User Manual
Page 30
... Main Menu screen. 2 Press / on the remote control or CHS / CHT on the control panel to change the scales or press OK on the remote control or INPUT/ VOL+ on the bottom of the OSD Function Menu. on the control panel, to select Picture menu. Press CH / CH on the control panel or / arrow keys on the control panel to scroll through the menus. Picture Audio Channel V-CHIP Picture Mode Brightness Contrast Sharpness Color Tint Digital...
... Main Menu screen. 2 Press / on the remote control or CHS / CHT on the control panel to change the scales or press OK on the remote control or INPUT/ VOL+ on the bottom of the OSD Function Menu. on the control panel, to select Picture menu. Press CH / CH on the control panel or / arrow keys on the control panel to scroll through the menus. Picture Audio Channel V-CHIP Picture Mode Brightness Contrast Sharpness Color Tint Digital...
User Manual
Page 32
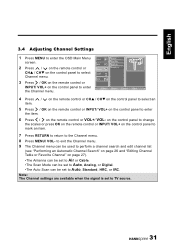
... Picture Audio Channel V-CHIP Setup Antenna Scan Mode Auto Scan Channel List Move OK Enter Return Return Menu Exit 4 Press / on the remote control or CHS / CHT on the control panel to select an item. 5 Press / OK on the remote control or INPUT/ VOL+ on the control panel to enter the item. 6 Press / on page 27). •The Antenna can be set to Air or Cable. •The Scan Mode can be set to Auto, Analog, or Digital. •The Auto Scan...
... Picture Audio Channel V-CHIP Setup Antenna Scan Mode Auto Scan Channel List Move OK Enter Return Return Menu Exit 4 Press / on the remote control or CHS / CHT on the control panel to select an item. 5 Press / OK on the remote control or INPUT/ VOL+ on the control panel to enter the item. 6 Press / on page 27). •The Antenna can be set to Air or Cable. •The Scan Mode can be set to Auto, Analog, or Digital. •The Auto Scan...
User Manual
Page 34
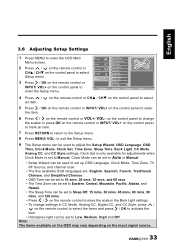
... the remote control or VOL+/ VOL- on the control panel to change settings in CC Mode, Analog CC, Digital CC, and CC Style, press / on the control panel to adjust the Setup Wizard, OSD Language, OSD TIme, Clock Mode, Clock Set, Time Zone, Sleep Time, Back Light, CC Mode, Analog CC, and CC Style settings. English 3.6 Adjusting Setup Settings 1 Press MENU to enter the Setup menu. Channel V-CHIP Setup Clock Mode Clock Set Time Zone Sleep Time Back Light 3 Press / OK on the remote control or INPUT/ VOL+ on the input signal source...
... the remote control or VOL+/ VOL- on the control panel to change settings in CC Mode, Analog CC, Digital CC, and CC Style, press / on the control panel to adjust the Setup Wizard, OSD Language, OSD TIme, Clock Mode, Clock Set, Time Zone, Sleep Time, Back Light, CC Mode, Analog CC, and CC Style settings. English 3.6 Adjusting Setup Settings 1 Press MENU to enter the Setup menu. Channel V-CHIP Setup Clock Mode Clock Set Time Zone Sleep Time Back Light 3 Press / OK on the remote control or INPUT/ VOL+ on the input signal source...
User Manual
Page 35
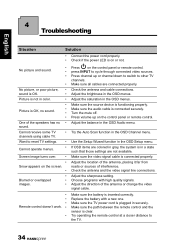
...; Remote control doesn't work. • • Press on the control panel or remote control. Want to the TV. 34 Check the antenna and cable connections. Adjust the saturation in the OSD Channel menu. Try the Auto Scan function in the OSD menus. Check the antenna and the video signal line connections. Make sure the TV power cord is inserted correctly. Make sure all cables are colored in gray, the system is clear. Press volume...
...; Remote control doesn't work. • • Press on the control panel or remote control. Want to the TV. 34 Check the antenna and cable connections. Adjust the saturation in the OSD Channel menu. Try the Auto Scan function in the OSD menus. Check the antenna and the video signal line connections. Make sure the TV power cord is inserted correctly. Make sure all cables are colored in gray, the system is clear. Press volume...
User Manual
Page 40
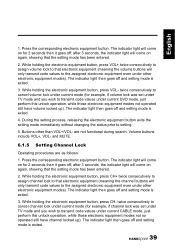
... volume locked up ). While holding the electronic equipment button, press CH- The indicator light then goes off and setting mode is exited. 3. Press the corresponding electronic equipment button. During the setting process, releasing the electronic equipment button exits the setting mode immediately without changing the status prior to transmit code values under current DVD mode, just perform this unlock operation, while those electronic equipment modes not operated still have channel locked...
... volume locked up ). While holding the electronic equipment button, press CH- The indicator light then goes off and setting mode is exited. 3. Press the corresponding electronic equipment button. During the setting process, releasing the electronic equipment button exits the setting mode immediately without changing the status prior to transmit code values under current DVD mode, just perform this unlock operation, while those electronic equipment modes not operated still have channel locked...
User Manual
Page 42
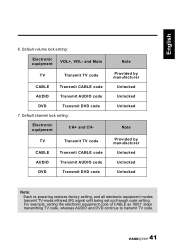
Default volume lock setting: Electronic equipment VOL+, VOL- TV Transmit TV code CABLE AUDIO DVD Transmit CABLE code Transmit AUDIO code Transmit DVD code Note Provided by manufacturer Unlocked Unlocked Unlocked Note Provided by manufacturer Unlocked Unlocked Unlocked Note: Each re-powering restores factory setting, and all electronic equipment modes transmit TV-mode infrared (IR) signal until being set up through code setting. and Mute TV Transmit TV code CABLE Transmit CABLE code AUDIO Transmit AUDIO code DVD Transmit DVD code 7. Default channel lock setting: ...
Default volume lock setting: Electronic equipment VOL+, VOL- TV Transmit TV code CABLE AUDIO DVD Transmit CABLE code Transmit AUDIO code Transmit DVD code Note Provided by manufacturer Unlocked Unlocked Unlocked Note Provided by manufacturer Unlocked Unlocked Unlocked Note: Each re-powering restores factory setting, and all electronic equipment modes transmit TV-mode infrared (IR) signal until being set up through code setting. and Mute TV Transmit TV code CABLE Transmit CABLE code AUDIO Transmit AUDIO code DVD Transmit DVD code 7. Default channel lock setting: ...
User Manual
Page 51
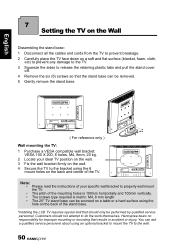
... the wall. 3 Fix the wall bracket firmly on the wall. 4 Secure the TV to the wall. 50 SERVICE VHF / UHF Customers should only be removed. 5 Gently remove the stand base. ( For reference only ) Wall mounting the TV: 1 Purchase a VESA compatible wall bracket: VESA 100 X 200, 6 holes, M4, 8mm, 20 kg. 2 Locate your specific wall bracket to do the work themselves. English SERVICE VHF / UHF 7 Setting the TV on the Wall Dissembling the stand base: 1 Disconnect all the cables and cords...
... the wall. 3 Fix the wall bracket firmly on the wall. 4 Secure the TV to the wall. 50 SERVICE VHF / UHF Customers should only be removed. 5 Gently remove the stand base. ( For reference only ) Wall mounting the TV: 1 Purchase a VESA compatible wall bracket: VESA 100 X 200, 6 holes, M4, 8mm, 20 kg. 2 Locate your specific wall bracket to do the work themselves. English SERVICE VHF / UHF 7 Setting the TV on the Wall Dissembling the stand base: 1 Disconnect all the cables and cords...


