
User Manual
Page 1
... 1.4 Control Panel 10 1.5 Input and Output Jacks 10 1.6 Remote Control 12 1.7 Inserting the Remote Control Batteries 16 2. Setting up your TV 18 2.1 Basic Connections 18 2.1.1 Power Connection 18 2.1.2 Connecting an Antenna or Cable TV 18 2.2 Connecting External Devices 19 2.2.1 Connecting External Earphones 19 2.2.2 Connecting to AV Devices 20 2.2.3 Connecting a VCR/ STB/ DVD Player Using Component Video 21 2.2.4 Connecting a PC using VGA 22 2.2.5 Connecting a PC using DVI 22 2.2.6 Connecting HDMI 23 2.2.7 Connecting USB 23 2.2.8 Connecting a VCR/ STB/ DVD Player using SCART...
... 1.4 Control Panel 10 1.5 Input and Output Jacks 10 1.6 Remote Control 12 1.7 Inserting the Remote Control Batteries 16 2. Setting up your TV 18 2.1 Basic Connections 18 2.1.1 Power Connection 18 2.1.2 Connecting an Antenna or Cable TV 18 2.2 Connecting External Devices 19 2.2.1 Connecting External Earphones 19 2.2.2 Connecting to AV Devices 20 2.2.3 Connecting a VCR/ STB/ DVD Player Using Component Video 21 2.2.4 Connecting a PC using VGA 22 2.2.5 Connecting a PC using DVI 22 2.2.6 Connecting HDMI 23 2.2.7 Connecting USB 23 2.2.8 Connecting a VCR/ STB/ DVD Player using SCART...
User Manual
Page 2
Using the Cable Organizer 40 2 Support Timing 37 6. Dissembling the stand base 39 8. English Table of Contents 3.3 Adjusting Sound Settings 28 3.4 Adjusting Channel Settings 28 3.5 Adjusting DTV Settings 30 3.6 Adjusting PC Settings 33 3.7 Adjusting Setup Settings 34 4. Troubleshooting 36 5. Specifications 38 7.
Using the Cable Organizer 40 2 Support Timing 37 6. Dissembling the stand base 39 8. English Table of Contents 3.3 Adjusting Sound Settings 28 3.4 Adjusting Channel Settings 28 3.5 Adjusting DTV Settings 30 3.6 Adjusting PC Settings 33 3.7 Adjusting Setup Settings 34 4. Troubleshooting 36 5. Specifications 38 7.

User Manual
Page 4
...servicing instructions are excluded. • This device uses a VGA connector to connect to rain or moisture. To reduce the influence of heat. Apparatus shall not be placed on the source signal, use a VGA monitor cable with liquids, such as vases, shall be exposed to dripping or splashing and no objects filled with ferrite shield. 4 English Safety Notices Installation Safety Notes Location...The LCD TV is for entertainment use by qualified service personnel only. Leave sufficient distance between the TV and the wall to provide enough space for use only and visual display ...
...servicing instructions are excluded. • This device uses a VGA connector to connect to rain or moisture. To reduce the influence of heat. Apparatus shall not be placed on the source signal, use a VGA monitor cable with liquids, such as vases, shall be exposed to dripping or splashing and no objects filled with ferrite shield. 4 English Safety Notices Installation Safety Notes Location...The LCD TV is for entertainment use by qualified service personnel only. Leave sufficient distance between the TV and the wall to provide enough space for use only and visual display ...

User Manual
Page 6
... you to enjoy superior audio and video while enriching your lifestyle with your TV. 6 This instruction manual is subject to change without notice. Warranty and Service For complete warranty service information, please refer to the correctness of such damages in its entirety before setting up and using or operating your TV. To ensure the safe and correct installation and operations of the TV, it...
... you to enjoy superior audio and video while enriching your lifestyle with your TV. 6 This instruction manual is subject to change without notice. Warranty and Service For complete warranty service information, please refer to the correctness of such damages in its entirety before setting up and using or operating your TV. To ensure the safe and correct installation and operations of the TV, it...

User Manual
Page 9
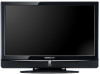
.... R/L audio inputs - Convenient control buttons located on -screen display menu system. The built-in TV Tuner • Audio/ Video support: - VGA (PC) input - You can watch SECAM/ PAL/ DVB-T broadcast, cable, or digital television channels, and easily connect a VCR, STB or DVD player to the manufacturer's user manual or the Quick Start Guide of these ports depends on different models. English 1.2 Introducing the TV You can also use on the TV and a handy remote control let you connect to an external audio...
.... R/L audio inputs - Convenient control buttons located on -screen display menu system. The built-in TV Tuner • Audio/ Video support: - VGA (PC) input - You can watch SECAM/ PAL/ DVB-T broadcast, cable, or digital television channels, and easily connect a VCR, STB or DVD player to the manufacturer's user manual or the Quick Start Guide of these ports depends on different models. English 1.2 Introducing the TV You can also use on the TV and a handy remote control let you connect to an external audio...

User Manual
Page 10
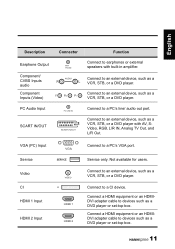
... Green/Red light indicators Deliver high-quality sounds. 1.5 Input and Output Jacks Description Connector Function Cable/Antenna TV / DTV CABLE / ANTENNA Connect to an antenna or cable TV. 10 Press to increase the volume or move downward to the right on the OSD menu. Press to decrease the volume or move upward to the left on the OSD menu. Press to select the proper input source. Receive incoming remote control commands. English 1.4 Control Panel...
... Green/Red light indicators Deliver high-quality sounds. 1.5 Input and Output Jacks Description Connector Function Cable/Antenna TV / DTV CABLE / ANTENNA Connect to an antenna or cable TV. 10 Press to increase the volume or move downward to the right on the OSD menu. Press to decrease the volume or move upward to the left on the OSD menu. Press to select the proper input source. Receive incoming remote control commands. English 1.4 Control Panel...
User Manual
Page 11
..., STB, or a DVD player. Not available for users. Connect to a PC's line/ audio out port. Connect a HDMI equipment or an HDMIDVI adapter cable to devices such as a VCR, STB, or a DVD player. Connect to a PC's VGA port. VGA (PC) Input Service VGA SERVICE Video CI VIDEO CI HDMI 1 Input HDMI 1 HDMI 2 Input HDMI 2 Connect to an external device, such as a DVD player or set -top box. 11 Service only. Connect a HDMI equipment or an HDMIDVI adapter cable to devices such as a VCR, STB, or a DVD player with built...
..., STB, or a DVD player. Not available for users. Connect to a PC's line/ audio out port. Connect a HDMI equipment or an HDMIDVI adapter cable to devices such as a VCR, STB, or a DVD player. Connect to a PC's VGA port. VGA (PC) Input Service VGA SERVICE Video CI VIDEO CI HDMI 1 Input HDMI 1 HDMI 2 Input HDMI 2 Connect to an external device, such as a DVD player or set -top box. 11 Service only. Connect a HDMI equipment or an HDMIDVI adapter cable to devices such as a VCR, STB, or a DVD player with built...

User Manual
Page 12
.... English Description Power Connector Connector Function AC IN Connect to the included power cord. 1.6 Remote Control Description Icon Power Input Signal Type INPUT Keypad Pro.List Last Pro.LIST LAST Function Press to turn the on-screen display (OSD) menu on or off . Press to display help information about Channel Organizer, Channel Sorting, Channel Grouping, Time and Parental Rating. Information Menu OK INFO MENU OK 1. Press to select the input signal type selections: TV, DTV, SCART, AV, HDMI 1, HDMI 2, HDTV, and PC...
.... English Description Power Connector Connector Function AC IN Connect to the included power cord. 1.6 Remote Control Description Icon Power Input Signal Type INPUT Keypad Pro.List Last Pro.LIST LAST Function Press to turn the on-screen display (OSD) menu on or off . Press to display help information about Channel Organizer, Channel Sorting, Channel Grouping, Time and Parental Rating. Information Menu OK INFO MENU OK 1. Press to select the input signal type selections: TV, DTV, SCART, AV, HDMI 1, HDMI 2, HDTV, and PC...
User Manual
Page 14
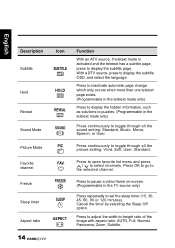
...: AUTO, Full, Normal, Panorama, Zoom, Subtitle. 14 Press to adjust the width-to display the subtitle page. FREEZE SLEEP ASPECT Press to open favorite list menu and press / to the selected channel. Press to pause a video frame on-screen. (Programmable in the teletext mode only) Press continuously to toggle through all the picture setting: Vivid, Soft, User, Standard. Cancel the timer by selecting the Sleep...
...: AUTO, Full, Normal, Panorama, Zoom, Subtitle. 14 Press to adjust the width-to display the subtitle page. FREEZE SLEEP ASPECT Press to open favorite list menu and press / to the selected channel. Press to pause a video frame on-screen. (Programmable in the teletext mode only) Press continuously to toggle through all the picture setting: Vivid, Soft, User, Standard. Cancel the timer by selecting the Sleep...

User Manual
Page 18
... receive channels after connecting to TV/DTV jack on the rear of the TV. 2 Insert the plug at the other end of the power cord into a power outlet. 2.1.2 Connecting an Antenna or Cable TV Connect one end of the TV. English 2 Setting up your TV 2.1 Basic Connections 2.1.1 Power Connection 1 Connect the power cord to the AC IN input jack on the rear of the VHF/UHF (Antenna) or CATV cable to an antenna or cable...
... receive channels after connecting to TV/DTV jack on the rear of the TV. 2 Insert the plug at the other end of the power cord into a power outlet. 2.1.2 Connecting an Antenna or Cable TV Connect one end of the TV. English 2 Setting up your TV 2.1 Basic Connections 2.1.1 Power Connection 1 Connect the power cord to the AC IN input jack on the rear of the VHF/UHF (Antenna) or CATV cable to an antenna or cable...

User Manual
Page 21
English 2.2.3 Connecting a VCR/ STB/ DVD Player Using Component Video Connect the TV to a VCR/ STB/ DVD player using the component video inputs. AUDIO R LY Pb Pr VCR STB DVD VCR STB DVD Audio Cable (Optional) Video Cable (Optional) VIDEO AUDIO R L Video Cable (Optional) Audio Cable (Optional) 21
English 2.2.3 Connecting a VCR/ STB/ DVD Player Using Component Video Connect the TV to a VCR/ STB/ DVD player using the component video inputs. AUDIO R LY Pb Pr VCR STB DVD VCR STB DVD Audio Cable (Optional) Video Cable (Optional) VIDEO AUDIO R L Video Cable (Optional) Audio Cable (Optional) 21
User Manual
Page 24
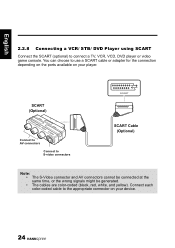
... your device. 24 English 2.2.8 Connecting a VCR/ STB/ DVD Player using SCART Connect the SCART (optional) to S-video connectors SCART SCART Cable (Optional) Note: • The S-Video connector and AV connectors cannot be connected at the same time, or the wrong signals might be generated. • The cables are color-coded (black, red, white, and yellow). SCART (Optional) R-AUDIO-L/MONO VIDEO S.VIDEO Connect to AV connectors Connect to connect a TV, VCR, VCD, DVD player or video game console.
... your device. 24 English 2.2.8 Connecting a VCR/ STB/ DVD Player using SCART Connect the SCART (optional) to S-video connectors SCART SCART Cable (Optional) Note: • The S-Video connector and AV connectors cannot be connected at the same time, or the wrong signals might be generated. • The cables are color-coded (black, red, white, and yellow). SCART (Optional) R-AUDIO-L/MONO VIDEO S.VIDEO Connect to AV connectors Connect to connect a TV, VCR, VCD, DVD player or video game console.

User Manual
Page 25
... the specific channel number by pressing the number buttons on the remote control. 2.3.5 Adjusting the Volume 1 Press VOL+ on . 2 Press again. English 2.3 Using the TV 2.3.1 Turning the TV On and Off 1 Press on the control panel or remote control to decrease the volume. 3 Press MUTE to eliminate sounds, and press MUTE again or press the volume buttons to restore the original volume. 25 on the control panel or remote control. The power LED changes from red to green, indicating...
... the specific channel number by pressing the number buttons on the remote control. 2.3.5 Adjusting the Volume 1 Press VOL+ on . 2 Press again. English 2.3 Using the TV 2.3.1 Turning the TV On and Off 1 Press on the control panel or remote control to decrease the volume. 3 Press MUTE to eliminate sounds, and press MUTE again or press the volume buttons to restore the original volume. 25 on the control panel or remote control. The power LED changes from red to green, indicating...

User Manual
Page 27
... the OSD may vary depending on the input signal source. 27 Press / to adjust the scales from 0-9. • The Backlight helps to enter the OSD Main Menu screen. The Picture menu can be used to adjust the Picture Mode, Brightness, Contrast, Sharpness, Colour, Hue, Backlight, and Colour Temp settings. • The Picture Mode can be set to Standard, Vivid, Soft, or User. • The Brightness, Contrast, Colour, and...
... the OSD may vary depending on the input signal source. 27 Press / to adjust the scales from 0-9. • The Backlight helps to enter the OSD Main Menu screen. The Picture menu can be used to adjust the Picture Mode, Brightness, Contrast, Sharpness, Colour, Hue, Backlight, and Colour Temp settings. • The Picture Mode can be set to Standard, Vivid, Soft, or User. • The Brightness, Contrast, Colour, and...
User Manual
Page 28
... vary depending on the input signal source. 3.4 Adjusting Channel Settings 1 Press MENU to enter the OSD Main Menu screen. 2 Press to select the Channel menu. 3 Press to enter the Channel menu. 4 Press / to exit the OSD menu. - The Channel menu can be used to adjust the Sound Mode, Balance, Treble, and Bass settings. • The Sound Mode can be set to Standard, Music, Movie, Speech, or User. • The Balance can be adjusted by pressing / to...
... vary depending on the input signal source. 3.4 Adjusting Channel Settings 1 Press MENU to enter the OSD Main Menu screen. 2 Press to select the Channel menu. 3 Press to enter the Channel menu. 4 Press / to exit the OSD menu. - The Channel menu can be used to adjust the Sound Mode, Balance, Treble, and Bass settings. • The Sound Mode can be set to Standard, Music, Movie, Speech, or User. • The Balance can be adjusted by pressing / to...

User Manual
Page 30
... Left / Right button on the remote control to change the password. - To change the scales or options settings. 6 Press MENU to return to the DTV menu entry. 7 Press MENU to rename the channels. - DTV Channel Management Area Auto Search Manual Search Preferred Audio Preferred Subtitle Parental Lock Subtitle Type Move Select UK English Off Normal Menu Return 30 Press the Yellow button on the remote control to delete the channels. - Channel Editor Channel Frequency 1 223...
... Left / Right button on the remote control to change the password. - To change the scales or options settings. 6 Press MENU to return to the DTV menu entry. 7 Press MENU to rename the channels. - DTV Channel Management Area Auto Search Manual Search Preferred Audio Preferred Subtitle Parental Lock Subtitle Type Move Select UK English Off Normal Menu Return 30 Press the Yellow button on the remote control to delete the channels. - Channel Editor Channel Frequency 1 223...

User Manual
Page 31
... OK button on the remote control to complete. • The Parental Lock allows you to 0000 by default. 31 The DTV menu can be used to adjust the Channel Management, Area, Auto Search, Manual Search, Preferred Audio, Preferred Subtitle, Parental Lock, Subtitle Type, Time, CI and Parental Rating. • The Channel Management selections include Channel Organizer, Channel Sorting, Channel Grouping, and Delete All TV Channels. • The Area can be set to change the password. Select Manual Scan...
... OK button on the remote control to complete. • The Parental Lock allows you to 0000 by default. 31 The DTV menu can be used to adjust the Channel Management, Area, Auto Search, Manual Search, Preferred Audio, Preferred Subtitle, Parental Lock, Subtitle Type, Time, CI and Parental Rating. • The Channel Management selections include Channel Organizer, Channel Sorting, Channel Grouping, and Delete All TV Channels. • The Area can be set to change the password. Select Manual Scan...

User Manual
Page 34
...; Select Reset Setting to reset settings to the defaults. • Background can be set to Blue or Off. • Select Initial Setup to do Channel auto search • Hannspree Light can be set to exit the OSD menu. - English 3.7 Adjusting Setup Settings 1 Press MENU to change the scales or options settings. to select the Setting menu 3 Press to enter the Setting menu. 4 Press / to select an item. 5 Press / to enter the OSD Main Menu screen...
...; Select Reset Setting to reset settings to the defaults. • Background can be set to Blue or Off. • Select Initial Setup to do Channel auto search • Hannspree Light can be set to exit the OSD menu. - English 3.7 Adjusting Setup Settings 1 Press MENU to change the scales or options settings. to select the Setting menu 3 Press to enter the Setting menu. 4 Press / to select an item. 5 Press / to enter the OSD Main Menu screen...

User Manual
Page 36
...; Remote control doesn't work. • • Press on the control panel or remote control. Adjust the sharpness setting. English 4 Troubleshooting Situation Solution • Connect the power cord properly. • Check if the power LED is on the control panel or remote control. Use the Reset function in the Audio OSD menu. Turn the mute off. Adjust the balance in the Setup OSD menu. Adjust the location of the antenna, placing it far from roads or sources of the antenna or replace the video signal cable. Replace the...
...; Remote control doesn't work. • • Press on the control panel or remote control. Adjust the sharpness setting. English 4 Troubleshooting Situation Solution • Connect the power cord properly. • Check if the power LED is on the control panel or remote control. Use the Reset function in the Audio OSD menu. Turn the mute off. Adjust the balance in the Setup OSD menu. Adjust the location of the antenna, placing it far from roads or sources of the antenna or replace the video signal cable. Replace the...

User Manual
Page 39
... performed by qualified service personnel. Hannspree bears no responsibility for improper mounting or mounting that should not attempt to the wall. 39 You can be screwed on a table or a hard surface using the hole on the back of the stand base. *Installing the LCD TV requires special skill that results in accident or injury. English 7 Dissembling the stand base 1 Disconnect all the cables and cords from the...
... performed by qualified service personnel. Hannspree bears no responsibility for improper mounting or mounting that should not attempt to the wall. 39 You can be screwed on a table or a hard surface using the hole on the back of the stand base. *Installing the LCD TV requires special skill that results in accident or injury. English 7 Dissembling the stand base 1 Disconnect all the cables and cords from the...


