Brochure
Page 1
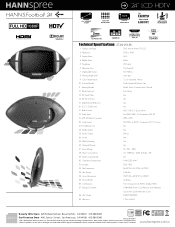
... TIME 4-BAND EQ INPUTS 3xHDMI, YPbPr, 2x COMPOSITE, VGA, RF COMBO TUNER ATSC / NTSC / CLEAR QAM Technical Specifications (ST24HMUB): 1. Resolution 1920 x 1080 3. Built-in 21. Viewing Angle (H/V) 170°/160° 9. Input Voltage AC 100 ~ 240V 28. Color Temperature Cool / Standard / Warm 10. USB 2.0 Flash Drive Input JPEG, MP3 20. Picture Modes Vivid/ Standard/ Movie/ User 11. Brightness 250 cd/m² 6. Display Size/Type 23.6" Active Matrix TFT LCD...
... TIME 4-BAND EQ INPUTS 3xHDMI, YPbPr, 2x COMPOSITE, VGA, RF COMBO TUNER ATSC / NTSC / CLEAR QAM Technical Specifications (ST24HMUB): 1. Resolution 1920 x 1080 3. Built-in 21. Viewing Angle (H/V) 170°/160° 9. Input Voltage AC 100 ~ 240V 28. Color Temperature Cool / Standard / Warm 10. USB 2.0 Flash Drive Input JPEG, MP3 20. Picture Modes Vivid/ Standard/ Movie/ User 11. Brightness 250 cd/m² 6. Display Size/Type 23.6" Active Matrix TFT LCD...
User Manual
Page 3
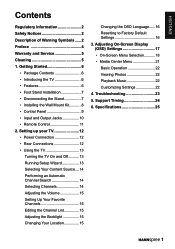
... Location 15 Changing the OSD Language......16 Resetting to Factory Default Settings 16 3. Troubleshooting 23 5. Adjusting On-Screen Display (OSD) Settings 17 • On-Screen Menu Selection...........18 • Media Center Menu 21 Basic Operation 22 Viewing Photos 22 Playback Music 22 Customizing Settings 22 4. Getting Started 6 • Package Contents 6 • Introducing the TV 6 • Features 6 • Foot Stand Installation 7 • Disconnecting the Stand 7 • Installing the Wall Mount Kit............8 • Control Panel 9 • Input and Output...
... Location 15 Changing the OSD Language......16 Resetting to Factory Default Settings 16 3. Troubleshooting 23 5. Adjusting On-Screen Display (OSD) Settings 17 • On-Screen Menu Selection...........18 • Media Center Menu 21 Basic Operation 22 Viewing Photos 22 Playback Music 22 Customizing Settings 22 4. Getting Started 6 • Package Contents 6 • Introducing the TV 6 • Features 6 • Foot Stand Installation 7 • Disconnecting the Stand 7 • Installing the Wall Mount Kit............8 • Control Panel 9 • Input and Output...
User Manual
Page 4
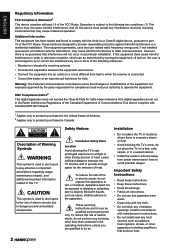
... by the party responsible for use this apparatus near any ventilation openings. Operation is subject to the following measures: • Reorient or relocate the receiving antenna • Increase the separation between the TV and the wall to provide enough space for help Warning: The Federal Communications Commission warns that contained in the operating instructions unless you are qualified...
... by the party responsible for use this apparatus near any ventilation openings. Operation is subject to the following measures: • Reorient or relocate the receiving antenna • Increase the separation between the TV and the wall to provide enough space for help Warning: The Federal Communications Commission warns that contained in the operating instructions unless you are qualified...

User Manual
Page 5
... magnetic sensitive items such as watches, credit cards, or flash media close to use force when pulling the remote control cover open; Dolby and the double-D symbol are provided for long periods of used , use attachments/accessories specified by the manufacturer. • Use only with the cart, stand, tripod, bracket, or table specified by the manufacturer, or sold with liquids, such as...
... magnetic sensitive items such as watches, credit cards, or flash media close to use force when pulling the remote control cover open; Dolby and the double-D symbol are provided for long periods of used , use attachments/accessories specified by the manufacturer. • Use only with the cart, stand, tripod, bracket, or table specified by the manufacturer, or sold with liquids, such as...
User Manual
Page 6
... law in its use that the safety and operation instructions in your lifestyle with a protective earthing connection. ENGLISH Copyright © Copyright 2011 Hannspree, Inc. The TV described in this manual in the sale of Hannspree. www.hannspree.com/us create a healthier Earth. To reduce the influence of main frequency on the source signal, use only and visual display tasks are trademarks of...
... law in its use that the safety and operation instructions in your lifestyle with a protective earthing connection. ENGLISH Copyright © Copyright 2011 Hannspree, Inc. The TV described in this manual in the sale of Hannspree. www.hannspree.com/us create a healthier Earth. To reduce the influence of main frequency on the source signal, use only and visual display tasks are trademarks of...
User Manual
Page 7
... is a joint program of Energy. Cleaning Instruction for later use detergents or any other aggressive cleaning. This might damage the housing or screen surface. 5 Environmental Protection Agency and Department of these goverment agencies, designed to promote energy efficient products and practices. Changes to certain fetures, settings, and functionalities of this TV can be removed with a moist cloth...
... is a joint program of Energy. Cleaning Instruction for later use detergents or any other aggressive cleaning. This might damage the housing or screen surface. 5 Environmental Protection Agency and Department of these goverment agencies, designed to promote energy efficient products and practices. Changes to certain fetures, settings, and functionalities of this TV can be removed with a moist cloth...
User Manual
Page 8
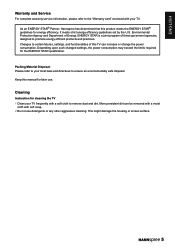
...; Audio/Video support: - Attention card Warranty sticker Power cord Remote control and batteries TV stand Introducing the TV You can also use on model). AV (Composite) input - The built-in the box. For more information, please refer to an external audio system or earphones. Getting Started Package Contents Make sure the following components are included in stereo speakers provide full rich sound and a convenient audio output port lets you change channels, adjust the volume, and change display settings...
...; Audio/Video support: - Attention card Warranty sticker Power cord Remote control and batteries TV stand Introducing the TV You can also use on model). AV (Composite) input - The built-in the box. For more information, please refer to an external audio system or earphones. Getting Started Package Contents Make sure the following components are included in stereo speakers provide full rich sound and a convenient audio output port lets you change channels, adjust the volume, and change display settings...
User Manual
Page 9
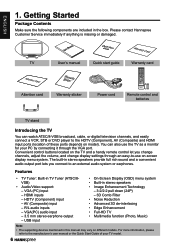
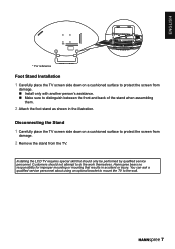
.... Installing the LCD TV requires special skill that results in the illustration. Disconnecting the Stand 1 Carefully place the TV screen side down on a cushioned surface to protect the screen from damage. 2 Remove the stand from damage. Customers should only be performed by qualified service personnel. You can ask a qualified service personnel about using an optional bracket to mount the TV to the wall. 7 Hannspree...
.... Installing the LCD TV requires special skill that results in the illustration. Disconnecting the Stand 1 Carefully place the TV screen side down on a cushioned surface to protect the screen from damage. 2 Remove the stand from damage. Customers should only be performed by qualified service personnel. You can ask a qualified service personnel about using an optional bracket to mount the TV to the wall. 7 Hannspree...
User Manual
Page 10
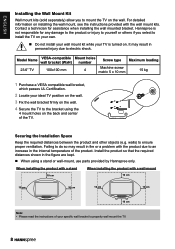
... wall mount the TV. 8 Model Name 23.6" TV VESA-compatible wall bracket (WxH) 100x100 mm Mount holes number 4 Screw type Machine screw metric 5 x 10 mm Maximum loading 15 kg 1 Purchase a VESA compatible wall bracket, which passes UL Certification. 2 Locate your specific wall bracket to mount the TV on the wall. Securing the Installation Space Keep the required distances between the product and other objects (e.g. Failing to the bracket using a stand or wall-mount, use parts provided by Hannspree only. n When using the 4 mount...
... wall mount the TV. 8 Model Name 23.6" TV VESA-compatible wall bracket (WxH) 100x100 mm Mount holes number 4 Screw type Machine screw metric 5 x 10 mm Maximum loading 15 kg 1 Purchase a VESA compatible wall bracket, which passes UL Certification. 2 Locate your specific wall bracket to mount the TV on the wall. Securing the Installation Space Keep the required distances between the product and other objects (e.g. Failing to the bracket using a stand or wall-mount, use parts provided by Hannspree only. n When using the 4 mount...
User Manual
Page 11
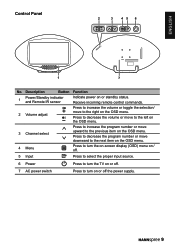
... off the power supply. 9 ENGLISH Control Panel 2 3 45 6 1 7 No. Description Button Function 1 Power/Standby indicator and Remote IR sensor Indicate power on the OSD menu. Press to decrease the volume or move to the left on the OSD menu. 3 Channel select Press to increase the program number or move downward to the next item on the OSD menu. 4 Menu Press to turn the on-screen display (OSD) menu on / off. 5 Input Press to...
... off the power supply. 9 ENGLISH Control Panel 2 3 45 6 1 7 No. Description Button Function 1 Power/Standby indicator and Remote IR sensor Indicate power on the OSD menu. Press to decrease the volume or move to the left on the OSD menu. 3 Channel select Press to increase the program number or move downward to the next item on the OSD menu. 4 Menu Press to turn the on-screen display (OSD) menu on / off. 5 Input Press to...

User Manual
Page 12
..., or a DVD player. 5 Component Input AV IN2 AV IN2 / YPbPr Connect to an external device, such as a VCR, STB, or a DVD player. 6 VGA Audio Input Connect to a PC line / audio port. 7 VGA (PC) Input 8 HDMI 1/HDMI 2/ HDMI 3 Input 9 AC IN Input Connect to devices such as a DVD player or set-top box. Connect a HDMI equipment or an HDMIDVI adapter cable to a PC VGA port. No. Description Connector Function 1 Earphone Output Connect to earphones or external amplified speakers. 2 USB 3 Cable/Antenna Connect to the included power cord. 10 Connect to a USB flash drive...
..., or a DVD player. 5 Component Input AV IN2 AV IN2 / YPbPr Connect to an external device, such as a VCR, STB, or a DVD player. 6 VGA Audio Input Connect to a PC line / audio port. 7 VGA (PC) Input 8 HDMI 1/HDMI 2/ HDMI 3 Input 9 AC IN Input Connect to devices such as a DVD player or set-top box. Connect a HDMI equipment or an HDMIDVI adapter cable to a PC VGA port. No. Description Connector Function 1 Earphone Output Connect to earphones or external amplified speakers. 2 USB 3 Cable/Antenna Connect to the included power cord. 10 Connect to a USB flash drive...
User Manual
Page 13
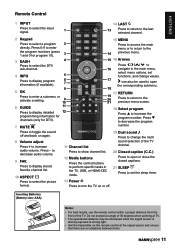
... previous menu screen. 6 GUIDE 11 Press to open or close the closed captions. to increase the program number. MUTE 7 MUTE 18 Select program Press p to decrease audio volume. 9 FAV. SLEEP 21 SLEEP Press to set functions, and change the multi sound selection of the TV. Inserting Batteries (Battery size: AAA) Notes: • For best results, use the remote control within a proper distance from the front of the TV channel. 20 Closed caption (C.C.) Press to display...
... previous menu screen. 6 GUIDE 11 Press to open or close the closed captions. to increase the program number. MUTE 7 MUTE 18 Select program Press p to decrease audio volume. 9 FAV. SLEEP 21 SLEEP Press to set functions, and change the multi sound selection of the TV. Inserting Batteries (Battery size: AAA) Notes: • For best results, use the remote control within a proper distance from the front of the TV channel. 20 Closed caption (C.C.) Press to display...
User Manual
Page 14
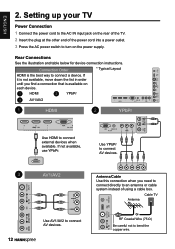
... the list in order until you need to connect directly to turn on the rear of the TV. 2 Insert the plug at the other end of the power cord into a power outlet. 3 Press the AC power switch to an antenna or cable system instead of using a cable box. Rear Connections See the illustration and table below for device connection instructions. Setting up your TV Power Connection 1 Connect the power cord to the AC IN input jack on the power supply...
... the list in order until you need to connect directly to turn on the rear of the TV. 2 Insert the plug at the other end of the power cord into a power outlet. 3 Press the AC power switch to an antenna or cable system instead of using a cable box. Rear Connections See the illustration and table below for device connection instructions. Setting up your TV Power Connection 1 Connect the power cord to the AC IN input jack on the power supply...
User Manual
Page 15
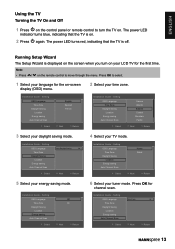
... the remote control to turn on your time zone. Installation Guide - Installation Guide - Installation Guide - Setting OSD Language Time Zone Daylight Saving Location Energy saving Auto Channel Scan Select Select type Next Air Return 13 The power LED turns red, indicating that the TV is on. 2 Press again. Press OK to select. 1 Select your language for channel scan. Setting OSD Language Time Zone Daylight Saving Location Energy saving Auto Channel Scan Select Auto Daylight Saving No Next Return 4 Select your tuner mode. Setting...
... the remote control to turn on your time zone. Installation Guide - Installation Guide - Installation Guide - Setting OSD Language Time Zone Daylight Saving Location Energy saving Auto Channel Scan Select Select type Next Air Return 13 The power LED turns red, indicating that the TV is on. 2 Press again. Press OK to select. 1 Select your language for channel scan. Setting OSD Language Time Zone Daylight Saving Location Energy saving Auto Channel Scan Select Auto Daylight Saving No Next Return 4 Select your tuner mode. Setting...
User Manual
Page 16
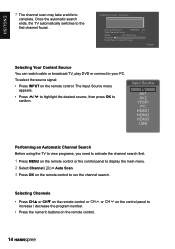
... cable or broadcast TV, play DVD or connect to run the channel search. To select the source signal: • Press INPUT on the remote control. Input Source TV AV1 AV2 YPbPr PC HDMI1 HDMI2 HDMI3 USB Performing an Automatic Channel Search Before using the TV to view programs, you need to activate the channel search first. 1 Press MENU on the remote control or the control panel to display the main menu. 2 Select Channel ( ) > Auto Scan. 3 Press OK on the control panel...
... cable or broadcast TV, play DVD or connect to run the channel search. To select the source signal: • Press INPUT on the remote control. Input Source TV AV1 AV2 YPbPr PC HDMI1 HDMI2 HDMI3 USB Performing an Automatic Channel Search Before using the TV to view programs, you need to activate the channel search first. 1 Press MENU on the remote control or the control panel to display the main menu. 2 Select Channel ( ) > Auto Scan. 3 Press OK on the control panel...
User Manual
Page 20
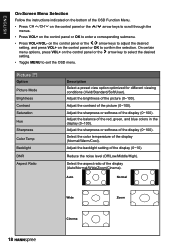
...). Picture Option Picture Mode Brightness Contrast Saturation Hue Sharpness Color Temp Backlight DNR Aspect Ratio Description Select a preset view option optimized for different viewing conditions (Vivid/Standard/Soft/User). Adjust the sharpness or softness of the display (Normal/Warm/Cool). ENGLISH On-Screen Menu Selection Follow the instructions indicated on the bottom of the picture (0~100). On certain menu options, press VOL+ on the control panel...
...). Picture Option Picture Mode Brightness Contrast Saturation Hue Sharpness Color Temp Backlight DNR Aspect Ratio Description Select a preset view option optimized for different viewing conditions (Vivid/Standard/Soft/User). Adjust the sharpness or softness of the display (Normal/Warm/Cool). ENGLISH On-Screen Menu Selection Follow the instructions indicated on the bottom of the picture (0~100). On certain menu options, press VOL+ on the control panel...
User Manual
Page 21
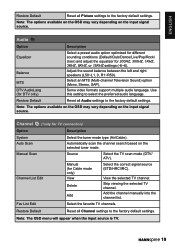
... Default Reset all Picture settings to the factory default settings. Note: The options available on the OSD may vary depending on the input signal source. Manual (for TV connection) Description System Auto Scan Manual Scan Channel List Edit Fav List Edit Select the tuner mode type (Air/Cable). View the selected TV channel. Audio Option Description Equalizer Balance MTS DTV AudioLang (for DTV only) Select a preset audio option optimized for different sounding conditions (Default/Club/Dance/Live/Pop/Rock/ User...
... Default Reset all Picture settings to the factory default settings. Note: The options available on the OSD may vary depending on the input signal source. Manual (for TV connection) Description System Auto Scan Manual Scan Channel List Edit Fav List Edit Select the tuner mode type (Air/Cable). View the selected TV channel. Audio Option Description Equalizer Balance MTS DTV AudioLang (for DTV only) Select a preset audio option optimized for different sounding conditions (Default/Club/Dance/Live/Pop/Rock/ User...

User Manual
Page 23
... File Format Music Format File Format FAT16, FAT32, NTFS JPEG(*.jpg) MP3(*.mp3) 21 Sleep Timer Set the timer to music stored on a USB storage device. Restore Default Reset all Setup settings to factory default and erase all stored channels. Factory Setting Reset the TV to the factory default settings. Notes: • The options available on the OSD may vary depending on the input signal source. • The default password for V-Chip is equipped with a USB connector...
... File Format Music Format File Format FAT16, FAT32, NTFS JPEG(*.jpg) MP3(*.mp3) 21 Sleep Timer Set the timer to music stored on a USB storage device. Restore Default Reset all Setup settings to factory default and erase all stored channels. Factory Setting Reset the TV to the factory default settings. Notes: • The options available on the OSD may vary depending on the input signal source. • The default password for V-Chip is equipped with a USB connector...
User Manual
Page 25
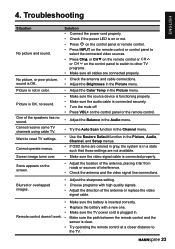
... connected video sources. • Press CHp or CHq on the remote control or CH or CH on the control panel to switch to other TV programs. • Make sure all cables are not available. • Make sure the video signal cable is not in color. Make sure the TV power cord is clear. Screen image turns over. Make sure the path between the remote control and the sensor is plugged in the Picture menu...
... connected video sources. • Press CHp or CHq on the remote control or CH or CH on the control panel to switch to other TV programs. • Make sure all cables are not available. • Make sure the video signal cable is not in color. Make sure the TV power cord is clear. Screen image turns over. Make sure the path between the remote control and the sensor is plugged in the Picture menu...
User Manual
Page 27
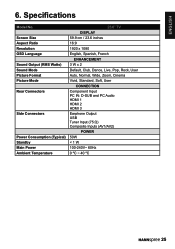
... 6. Specifications Model No. Screen Size Aspect Ratio Resolution OSD Language Sound Output (RMS Watts) Sound Mode Picture Format Picture Mode Rear Connectors Side Connectors Power Consumption (Typical) Standby Main Power Ambient Temperature 23.6" TV DISPLAY 59.9 cm / 23.6 inches 16:9 1920 x 1080 English, Spanish, French ENHANCEMENT 3 W x 2 Default, Club, Dance, Live, Pop, Rock, User Auto, Normal, Wide, Zoom, Cinema Vivid, Standard, Soft, User CONNECTION Component Input PC IN: D-SUB and PC Audio HDMI 1 HDMI 2 HDMI 3 Earphone Output USB Tuner Input (75 Ω) Composite Inputs (AV1/AV2) POWER...
... 6. Specifications Model No. Screen Size Aspect Ratio Resolution OSD Language Sound Output (RMS Watts) Sound Mode Picture Format Picture Mode Rear Connectors Side Connectors Power Consumption (Typical) Standby Main Power Ambient Temperature 23.6" TV DISPLAY 59.9 cm / 23.6 inches 16:9 1920 x 1080 English, Spanish, French ENHANCEMENT 3 W x 2 Default, Club, Dance, Live, Pop, Rock, User Auto, Normal, Wide, Zoom, Cinema Vivid, Standard, Soft, User CONNECTION Component Input PC IN: D-SUB and PC Audio HDMI 1 HDMI 2 HDMI 3 Earphone Output USB Tuner Input (75 Ω) Composite Inputs (AV1/AV2) POWER...


