

User Manual
Page 2
... sources, such as power-supply cord or plug is better to qualified service personnel-- English Explanation of WARNING Symbols Dangerous Voltage: The lightning flash with the LCD TV. Do not use the point where they exit from tip-over. 15) Unplug this LCD TV during lightening storms or when unused for long periods of time. 16) Refer all instructions. 5) Do not use this LCD...
... sources, such as power-supply cord or plug is better to qualified service personnel-- English Explanation of WARNING Symbols Dangerous Voltage: The lightning flash with the LCD TV. Do not use the point where they exit from tip-over. 15) Unplug this LCD TV during lightening storms or when unused for long periods of time. 16) Refer all instructions. 5) Do not use this LCD...
User Manual
Page 3
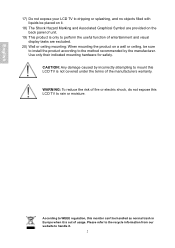
... expose this monitor can't be handled as normal trash in Europe when it is only to perform the useful function of the manufacturers warranty. According to WEEE regulation, this LCD TV to rain or moisture. Use only their indicated mounting hardware for safety...display tasks are provided on the back panel of unit. 19) This product is out of usage. Please refer to the recycle information from our website to handle it . 18) The Shock Hazard Marking and Associated Graphical Symbol are excluded. 20) Wall or ceiling mounting: When mounting the product on a wall or ceiling, be sure to install...
... expose this monitor can't be handled as normal trash in Europe when it is only to perform the useful function of the manufacturers warranty. According to WEEE regulation, this LCD TV to rain or moisture. Use only their indicated mounting hardware for safety...display tasks are provided on the back panel of unit. 19) This product is out of usage. Please refer to the recycle information from our website to handle it . 18) The Shock Hazard Marking and Associated Graphical Symbol are excluded. 20) Wall or ceiling mounting: When mounting the product on a wall or ceiling, be sure to install...

User Manual
Page 4
...Content ACCESSORIES ...1 FRONT PANEL CONTROL 2 BACK PANEL CONTROL ...3 REMOTE CONTROL ...4 Function of remote control button 5 Teletext function control button 6 INSTALLATION...8 Connecting RF antenna, Cable TV Wire or DTV cable 8 Connecting to DVD/ Set Top Box 8 Connecting to the Headphone 10 Connecting to a Computer 11 Connecting with the Power Cord 11 BASIC OPERATION ...12 Power On/Off ...12 Selecting input source 12 Volume Adjust...12 Channel Select ...12 Sleep Time Setting...12 Sound Mode Select ...13 Picture Mode Select...13 Aspect Ratio ...13 TV AUDIO...13 Subtitle Select...13...
...Content ACCESSORIES ...1 FRONT PANEL CONTROL 2 BACK PANEL CONTROL ...3 REMOTE CONTROL ...4 Function of remote control button 5 Teletext function control button 6 INSTALLATION...8 Connecting RF antenna, Cable TV Wire or DTV cable 8 Connecting to DVD/ Set Top Box 8 Connecting to the Headphone 10 Connecting to a Computer 11 Connecting with the Power Cord 11 BASIC OPERATION ...12 Power On/Off ...12 Selecting input source 12 Volume Adjust...12 Channel Select ...12 Sleep Time Setting...12 Sound Mode Select ...13 Picture Mode Select...13 Aspect Ratio ...13 TV AUDIO...13 Subtitle Select...13...

User Manual
Page 5
English ACCESSORIES Thank you for purchasing this LCD-TV of high performance! This LCD-TV package comes with: LCD TV User's Manual Quick Start Guide Warranty Card Remote Control Battery AAA x 2 Power Cord 1
English ACCESSORIES Thank you for purchasing this LCD-TV of high performance! This LCD-TV package comes with: LCD TV User's Manual Quick Start Guide Warranty Card Remote Control Battery AAA x 2 Power Cord 1
User Manual
Page 9
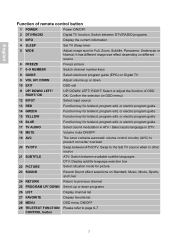
... or adjust the function of remote control button 1 POWER Power ON/OFF 2 DTV/RADIO Digital TV function. It has different image size effect depending on different source 6 FREEZE Freeze picture 7 0~9 NUMBER Switch channel number keys 8 GUIDE Select electronic program guide (EPG) on Standard, Music, Movie, Sports, and User 24 RETURN Return to previous channel 25 PROGRAM UP/ DOWN Select up or down programs 26 LIST Display channel list 27 FAVORITE Display favorite list 28 MENU OSD menu ON/OFF...
... or adjust the function of remote control button 1 POWER Power ON/OFF 2 DTV/RADIO Digital TV function. It has different image size effect depending on different source 6 FREEZE Freeze picture 7 0~9 NUMBER Switch channel number keys 8 GUIDE Select electronic program guide (EPG) on Standard, Music, Movie, Sports, and User 24 RETURN Return to previous channel 25 PROGRAM UP/ DOWN Select up or down programs 26 LIST Display channel list 27 FAVORITE Display favorite list 28 MENU OSD menu ON/OFF...

User Manual
Page 12
... Antenna (not supplied) Connecting to DVD/ Set Top Box Connect Video/ Audio cables from compatible devices into the CAM card slot. To receive DTV programs, perform Auto Tuning function (see page 26) for Digital TV. To watch subscription channels, insert the CAM card into the back panel of LCD TV. 1) With RCA A/V cable: RCA A/V Cable (not supplied) VCD or DVD Player 8 English INSTALLATION Connecting RF antenna, Cable TV Wire or DTV cable Make sure the power is OFF before installing...
... Antenna (not supplied) Connecting to DVD/ Set Top Box Connect Video/ Audio cables from compatible devices into the CAM card slot. To receive DTV programs, perform Auto Tuning function (see page 26) for Digital TV. To watch subscription channels, insert the CAM card into the back panel of LCD TV. 1) With RCA A/V cable: RCA A/V Cable (not supplied) VCD or DVD Player 8 English INSTALLATION Connecting RF antenna, Cable TV Wire or DTV cable Make sure the power is OFF before installing...

User Manual
Page 16
.... Channel Select Press number buttons or PROG ▲▼ buttons to adjust volume. To cancel Sleep Time function, choose Off. 12 Insert the power plug, and the power LED indicator will light red. Return to turn off timer. To turn on . The power LED indicator lights green when the LCD TV is used to select input source, change channels, or adjust volume. The function is on /off the LCD TV after a few seconds' idleness. 2. To operate your remote control to previous channel, press RETURN button...
.... Channel Select Press number buttons or PROG ▲▼ buttons to adjust volume. To cancel Sleep Time function, choose Off. 12 Insert the power plug, and the power LED indicator will light red. Return to turn off timer. To turn on . The power LED indicator lights green when the LCD TV is used to select input source, change channels, or adjust volume. The function is on /off the LCD TV after a few seconds' idleness. 2. To operate your remote control to previous channel, press RETURN button...
User Manual
Page 17
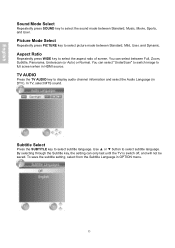
..." to switch image to full screen when in HDMI source. Use ▲ or ▼ button to select the aspect ratio of screen. You can select between Standard, Music, Movie, Sports, and User. Subtitle Select Press the SUBTITLE key to select picture mode between Standard, Mild, User, and Dynamic. To save the subtitle setting, select from the Subtitle Language in DTV). English Sound Mode Select...
..." to switch image to full screen when in HDMI source. Use ▲ or ▼ button to select the aspect ratio of screen. You can select between Standard, Music, Movie, Sports, and User. Subtitle Select Press the SUBTITLE key to select picture mode between Standard, Mild, User, and Dynamic. To save the subtitle setting, select from the Subtitle Language in DTV). English Sound Mode Select...
User Manual
Page 19
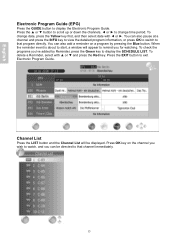
... press the Red key. To delete a Reminder, select with ◄ or ►. Channel List Press the LIST button and the Channel List will appear to watch, and you 've added by pressing the Blue button. Press OK key on a program by Reminder, press the Green key to that channel immediately. 15 To change time period. English Electronic Program Guide (EPG) Press the GUIDE button to that program directly...
... press the Red key. To delete a Reminder, select with ◄ or ►. Channel List Press the LIST button and the Channel List will appear to watch, and you 've added by pressing the Blue button. Press OK key on a program by Reminder, press the Green key to that channel immediately. 15 To change time period. English Electronic Program Guide (EPG) Press the GUIDE button to that program directly...

User Manual
Page 20
... you 've added to adjust various settings by using your remote control or menu button on the bottom of the LCD TV. You can use OSD menus to the FAVORITE LIST. The basic operation is marked with ►, press ► to display the sub-menu or enable the function. • Press MENU again to exit current OSD page. • Use RED/GREEN/YELLOW/BLUE button to that channel immediately.
... you 've added to adjust various settings by using your remote control or menu button on the bottom of the LCD TV. You can use OSD menus to the FAVORITE LIST. The basic operation is marked with ►, press ► to display the sub-menu or enable the function. • Press MENU again to exit current OSD page. • Use RED/GREEN/YELLOW/BLUE button to that channel immediately.

User Manual
Page 23
...) input signals. Noise Reduction: To reduce the noise level of video. V-Pos: To adjust the vertical position of video. Contrast: To adjust contrast of the picture. Colour: To adjust colour. When User is selected, you can select "UnderScan" to switch image to full screen when in order to PC. Auto Adjust: Auto adjust to optimize the display position and phase of the picture when the TV connected to...
...) input signals. Noise Reduction: To reduce the noise level of video. V-Pos: To adjust the vertical position of video. Contrast: To adjust contrast of the picture. Colour: To adjust colour. When User is selected, you can select "UnderScan" to switch image to full screen when in order to PC. Auto Adjust: Auto adjust to optimize the display position and phase of the picture when the TV connected to...
User Manual
Page 24
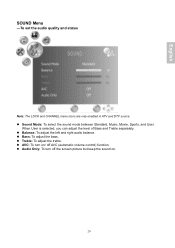
Balance: To adjust the left and right audio balance. When User is selected, you can adjust the level of Bass and Treble separately. Audio Only: To turn on . 20 Bass: To adjust the bass. AVC: To turn off the screen picture but keep the sound on / off AVC (automatic volume control) function. Treble: To adjust the treble. English SOUND Menu -To set the audio quality and status Note: The LOCK and CHANNEL menu icons are only enabled in ATV and DTV source. Sound Mode: To select the sound mode between Standard, Music, Movie, Sports, and User.
Balance: To adjust the left and right audio balance. When User is selected, you can adjust the level of Bass and Treble separately. Audio Only: To turn on . 20 Bass: To adjust the bass. AVC: To turn off the screen picture but keep the sound on / off AVC (automatic volume control) function. Treble: To adjust the treble. English SOUND Menu -To set the audio quality and status Note: The LOCK and CHANNEL menu icons are only enabled in ATV and DTV source. Sound Mode: To select the sound mode between Standard, Music, Movie, Sports, and User.

User Manual
Page 25
...-menu. Clock: To adjust the current time. Off Time: To set a regular turn-on . On Time: To set a regular turn into sleep mode after 10 minutes if there is no remote action and no signal received. (OSD menu must be turned off. Press ► to enter sub-menu. Press ▲▼ to select Repeat, Hour, Minute, and press ◄► to set the time you complete the adjustment, move to Close...
...-menu. Clock: To adjust the current time. Off Time: To set a regular turn-on . On Time: To set a regular turn into sleep mode after 10 minutes if there is no remote action and no signal received. (OSD menu must be turned off. Press ► to enter sub-menu. Press ▲▼ to select Repeat, Hour, Minute, and press ◄► to set the time you complete the adjustment, move to Close...
User Manual
Page 27
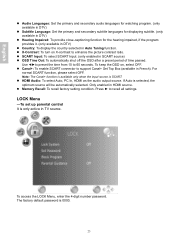
... source. HDMI Audio: To select Auto, PC In, HDMI as the audio output source. Use ◄►to preset the time from 10 to recall all settings. To access the LOCK Menu, enter the 4-digit number password. English Audio Languages: Set the primary and secondary audio languages for watching program. (only available in DTV) Subtitle Language: Set the primary and secondary subtitle languages for displaying subtitle. (only available in DTV) Hearing Impaired: To provide close-captioning...
... source. HDMI Audio: To select Auto, PC In, HDMI as the audio output source. Use ◄►to preset the time from 10 to recall all settings. To access the LOCK Menu, enter the 4-digit number password. English Audio Languages: Set the primary and secondary audio languages for watching program. (only available in DTV) Subtitle Language: Set the primary and secondary subtitle languages for displaying subtitle. (only available in DTV) Hearing Impaired: To provide close-captioning...
User Manual
Page 29
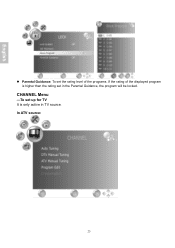
English Parental Guidance: To set in TV source. CHANNEL Menu -To set up for TV It is higher than the rating set the rating level of the programs. If the rating of the displayed program is only active in the Parental Guidance, the program will be locked. In ATV source: 25
English Parental Guidance: To set in TV source. CHANNEL Menu -To set up for TV It is higher than the rating set the rating level of the programs. If the rating of the displayed program is only active in the Parental Guidance, the program will be locked. In ATV source: 25

User Manual
Page 31
... turn on/off the switch of the current channel is possible to save the result. When completed, press Red key to save to. ♦ System: Press ◄► to select the TV sound system. ♦ Current CH: Press ◄► to select the current channel. ♦ Search: Press ◄► to select the channel number you switch channels by using manual tuning...
... turn on/off the switch of the current channel is possible to save the result. When completed, press Red key to save to. ♦ System: Press ◄► to select the TV sound system. ♦ Current CH: Press ◄► to select the current channel. ♦ Search: Press ◄► to select the channel number you switch channels by using manual tuning...
User Manual
Page 32
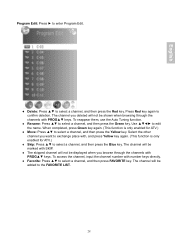
To access the channel, input the channel number with , and press Yellow key again. (This function is only enabled for ATV.) ♦ Skip: Press ▲▼ to select a channel, and then press the Yellow key. To reappear them, use the Auto Tuning function. ♦ Rename: Press ▲▼ to select a channel, and then press the Red key. When completed, press Green key...
To access the channel, input the channel number with , and press Yellow key again. (This function is only enabled for ATV.) ♦ Skip: Press ▲▼ to select a channel, and then press the Yellow key. To reappear them, use the Auto Tuning function. ♦ Rename: Press ▲▼ to select a channel, and then press the Red key. When completed, press Green key...

User Manual
Page 36
... Star, GOST-R Power saving modes On < 60 W (green LED) Active Off < 1 W (red LED) Preset Timing Mode (Pre-adjusted to GTF® 1680 x 1050 @ 60 Hz) Warning: Do not set the graphics card in permanent damage to switch between timings: "640x400 and 720x400, 1440x900 and 1152x900, 1680x1050 and 1400x1050" 32 Please press and hold keypad MENU button then press CH- TECHNICAL INFORMATION English LCD Type 22.0" TFT...
... Star, GOST-R Power saving modes On < 60 W (green LED) Active Off < 1 W (red LED) Preset Timing Mode (Pre-adjusted to GTF® 1680 x 1050 @ 60 Hz) Warning: Do not set the graphics card in permanent damage to switch between timings: "640x400 and 720x400, 1440x900 and 1152x900, 1680x1050 and 1400x1050" 32 Please press and hold keypad MENU button then press CH- TECHNICAL INFORMATION English LCD Type 22.0" TFT...

User Manual
Page 37
... bodies, even when the power cord is high-voltage parts inside that a user's safety comes first. Do not remove the LCD TV cabinet. The LCD TV should be operated only at the correct power sources indicated on the label on the cable or power cord. Apply non-ammonia based cleaner onto the cloth, not directly onto the glass screen. Put your LCD TV only in your...
... bodies, even when the power cord is high-voltage parts inside that a user's safety comes first. Do not remove the LCD TV cabinet. The LCD TV should be operated only at the correct power sources indicated on the label on the cable or power cord. Apply non-ammonia based cleaner onto the cloth, not directly onto the glass screen. Put your LCD TV only in your...

User Manual
Page 38
... colours If any colours (red, green, blue) are missing, check the video cable to the power supply is installed in a clean and moisture-free area. Make certain your LCD TV away from magnets, motors, transformers, speakers, and other heat source. TROUBLESHOOTING No Power Make sure A/C power cord is securely connected to make sure the video source is no screen image Make sure the video cables are installed. Remove the power cord immediately and call your...
... colours If any colours (red, green, blue) are missing, check the video cable to the power supply is installed in a clean and moisture-free area. Make certain your LCD TV away from magnets, motors, transformers, speakers, and other heat source. TROUBLESHOOTING No Power Make sure A/C power cord is securely connected to make sure the video source is no screen image Make sure the video cables are installed. Remove the power cord immediately and call your...


