
Owners Manual
Page 2
Contents Safety and warnings 2-3 Introduction 4 Stand installation guide 5 Installation 6-9 Remote Control 10 Operation...11-15 Trouble Shooting 16 DVD Operation 17-20 DVD Trouble Shooting 21 Warranty...2 2 -1-
Contents Safety and warnings 2-3 Introduction 4 Stand installation guide 5 Installation 6-9 Remote Control 10 Operation...11-15 Trouble Shooting 16 DVD Operation 17-20 DVD Trouble Shooting 21 Warranty...2 2 -1-
Owners Manual
Page 3
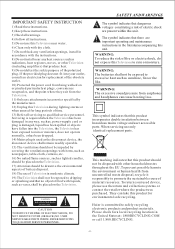
... and user accessible parts. Haier is requiredwhen the Television has been damaged in anyway, suchas; Servicing is committed to the environmental aspects of the obsolete outlet. 10) Protected the power cord from being walked on the Television. WARNING: The excessive sound pressure from the Television. 11) Only use attachments/accessories specified by covering the ventilation openings with items, such as newspapers, table-cloth...
... and user accessible parts. Haier is requiredwhen the Television has been damaged in anyway, suchas; Servicing is committed to the environmental aspects of the obsolete outlet. 10) Protected the power cord from being walked on the Television. WARNING: The excessive sound pressure from the Television. 11) Only use attachments/accessories specified by covering the ventilation openings with items, such as newspapers, table-cloth...
Owners Manual
Page 4
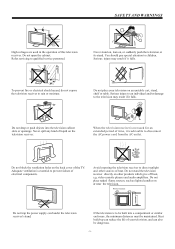
... service personnel. Do not trap the power supply cord under the television receiver's stand. Heat build-up can reduce the life of your television on or near the television. You should pay special attention to rain or moisture. Serious injury to an individual and/or damage to the television may result if it falls. When the television receiver is not used in the operation...
... service personnel. Do not trap the power supply cord under the television receiver's stand. Heat build-up can reduce the life of your television on or near the television. You should pay special attention to rain or moisture. Serious injury to an individual and/or damage to the television may result if it falls. When the television receiver is not used in the operation...
Owners Manual
Page 5
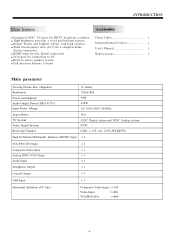
... provides a vivid and brilliant picture Deeper blacks and brighter whites with high contrast Wide Screen aspect ratio (16:9) for a complete home theater experience HDMI input for true digital connection VGA port for connection to PC Built-in stereo speaker system Full-function Remote Control Power Cable 1 Infrared Remote Control 1 User s Manual 1 Battery(AAA 2 Main parameter Viewing Picture Size (diagonal) Resolution: Power consumption: Audio Output Power (THD 7%): Input Power Voltage: Aspect Ratio: TV System: Video Signal System: Receiving Channel: 32 inches 1920x1080 90W 2x8W AC...
... provides a vivid and brilliant picture Deeper blacks and brighter whites with high contrast Wide Screen aspect ratio (16:9) for a complete home theater experience HDMI input for true digital connection VGA port for connection to PC Built-in stereo speaker system Full-function Remote Control Power Cable 1 Infrared Remote Control 1 User s Manual 1 Battery(AAA 2 Main parameter Viewing Picture Size (diagonal) Resolution: Power consumption: Audio Output Power (THD 7%): Input Power Voltage: Aspect Ratio: TV System: Video Signal System: Receiving Channel: 32 inches 1920x1080 90W 2x8W AC...
Owners Manual
Page 6
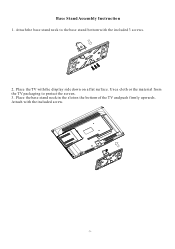
Place the base stand neck in the slot on a flat surface. Place the TV with the display side down on the bottom of the TV and push firmly upwards. Use a cloth or the material from the TV packaging to the base stand bottom with the included screw. -5- Base Stand Assembly Instruction 1. Attach the base stand neck to protect the screen. 3. Attach with the included 3 screws. 2.
Place the base stand neck in the slot on a flat surface. Place the TV with the display side down on the bottom of the TV and push firmly upwards. Use a cloth or the material from the TV packaging to the base stand bottom with the included screw. -5- Base Stand Assembly Instruction 1. Attach the base stand neck to protect the screen. 3. Attach with the included 3 screws. 2.
Owners Manual
Page 7
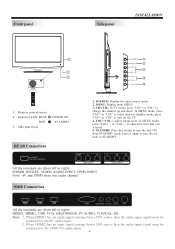
... from STANDBY mode. Y Pb Pr COMPONENT SIDE Connections HDMI1 HDMI2 USB VGA HEADPHONE PC AUDIO COAXIAL RF All the terminals are (from a DVI source then the audio input signal must be connected to right): POWER SOCKET, VIDEO, AUDIO INPUT, YPbPr INPUT Note: AV and YPbPr share one audio channel. STANDBY 5 1: Remote control sensor. 2: Indicator LED: BLUE RED 3: Side panel keys POWER ON. Note: 1. When HDMI2 has an input signal coming from left to turn the set back to change the channel up...
... from STANDBY mode. Y Pb Pr COMPONENT SIDE Connections HDMI1 HDMI2 USB VGA HEADPHONE PC AUDIO COAXIAL RF All the terminals are (from a DVI source then the audio input signal must be connected to right): POWER SOCKET, VIDEO, AUDIO INPUT, YPbPr INPUT Note: AV and YPbPr share one audio channel. STANDBY 5 1: Remote control sensor. 2: Indicator LED: BLUE RED 3: Side panel keys POWER ON. Note: 1. When HDMI2 has an input signal coming from left to turn the set back to change the channel up...

Owners Manual
Page 8
HDMI1 HDMI2 USB VGA HEADPHONE PC AUDIO COAXIAL RF -7- Input impendance:75 unbalanced. This sequence is very important. PC STEPS: Be sure both the TV and computer are set to Power off. 1.Connect VGA and audio cable. 2.Connect the power cord. 3.Power on the TV, switch to PC mode. 4.Power on the PC. ANTENNA INSTALLATION Note: Aerial connections: IEC (female).
HDMI1 HDMI2 USB VGA HEADPHONE PC AUDIO COAXIAL RF -7- Input impendance:75 unbalanced. This sequence is very important. PC STEPS: Be sure both the TV and computer are set to Power off. 1.Connect VGA and audio cable. 2.Connect the power cord. 3.Power on the TV, switch to PC mode. 4.Power on the PC. ANTENNA INSTALLATION Note: Aerial connections: IEC (female).
Owners Manual
Page 10
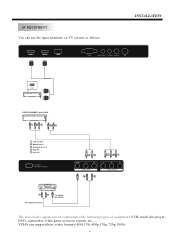
... can use the input terminals on TV set rear as follows. INSTALLATION HDMI1 HDMI2 USB VGA HEADPHONE PC AUDIO COAXIAL RF HDMI VIDEO EQUIPMENT with YPbPr GBR WR Y Yellow (video) W White(audio L) R Red(audio R or Pr) B Blue(Pb) G Green(Y) AC-INPUT 100-240V~50/60Hz WR VIDEO L R COMPOSITE W R G BR Y Pb Pr COMPONENT VIDEO EQUIPMENT W R TO VIDEO OUTPUTS TO AUDIO OUTPUTS The television's inputs can be connected to the following types of equipment: VCR, multi disc player, DVD, camcorder, video game or...
... can use the input terminals on TV set rear as follows. INSTALLATION HDMI1 HDMI2 USB VGA HEADPHONE PC AUDIO COAXIAL RF HDMI VIDEO EQUIPMENT with YPbPr GBR WR Y Yellow (video) W White(audio L) R Red(audio R or Pr) B Blue(Pb) G Green(Y) AC-INPUT 100-240V~50/60Hz WR VIDEO L R COMPOSITE W R G BR Y Pb Pr COMPONENT VIDEO EQUIPMENT W R TO VIDEO OUTPUTS TO AUDIO OUTPUTS The television's inputs can be connected to the following types of equipment: VCR, multi disc player, DVD, camcorder, video game or...
Owners Manual
Page 11
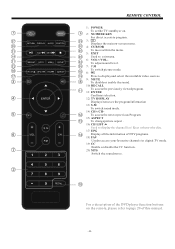
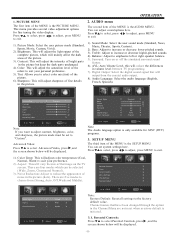
... P.M 7 REMOTE CONTROL 1: POWER To setthe TV standbyor on. 9 2: NUMBER KEY For direct access to program. 29 3: Displays the main on-screen menu. 30 4: CURSOR 25 To move within the menu. 5: EXIT 20 Used to exit menu. 6: VOL+/VOL- 24 To adjustsound level. 26 7: P.M To switch picture mode. 15 8: 18 Press to display and select the available video sources. 9: MUTE 8 To disable or enable the sound. 10: RECALL To access the previously viewed program. 11...
... P.M 7 REMOTE CONTROL 1: POWER To setthe TV standbyor on. 9 2: NUMBER KEY For direct access to program. 29 3: Displays the main on-screen menu. 30 4: CURSOR 25 To move within the menu. 5: EXIT 20 Used to exit menu. 6: VOL+/VOL- 24 To adjustsound level. 26 7: P.M To switch picture mode. 15 8: 18 Press to display and select the available video sources. 9: MUTE 8 To disable or enable the sound. 10: RECALL To access the previously viewed program. 11...
Owners Manual
Page 12
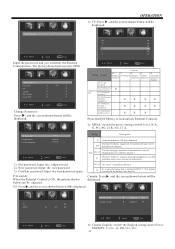
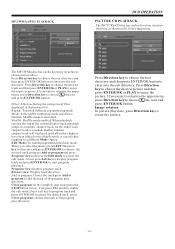
... the picture. 2. Contrast: This will be selected Parental Controls > Timer (Wide, Zoom, Cinemaand Normal). > Closed Caption > 3). Sound Mode Bass Treble Balance Surround AVL Digital Output Audio Language < Standard > 50 50 0 < Off > < Off > < PCM > < English > Adjust Select Menu Exit Note: The Audio language option is initiated. 3.1. Parental Controls: Press to select Parental Controls, press , and the screen shown below will adjust the intensity of the colors to "Custom". Brightness: This will adjust the light output...
... the picture. 2. Contrast: This will be selected Parental Controls > Timer (Wide, Zoom, Cinemaand Normal). > Closed Caption > 3). Sound Mode Bass Treble Balance Surround AVL Digital Output Audio Language < Standard > 50 50 0 < Off > < Off > < PCM > < English > Adjust Select Menu Exit Note: The Audio language option is initiated. 3.1. Parental Controls: Press to select Parental Controls, press , and the screen shown below will adjust the intensity of the colors to "Custom". Brightness: This will adjust the light output...
Owners Manual
Page 13
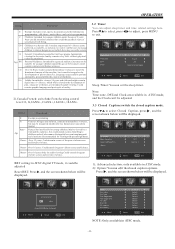
... below will enter the Parental Control menu. The factory default password is unifiedwith NC-17 but maybe encoded in the dataof older movies. Restrict. Change password P.G switch US Canada RRT setting Reset RRT > < Off > < > < > < > < > Adjust Select Menu Exit Change Password: Press , and the screen shown below will be displayed. Under 17 requires accompanyingparent or adult R guardian (age varies insome jurisdictions). 1). Confirm password: Input the new password again NC-17 No...
... below will enter the Parental Control menu. The factory default password is unifiedwith NC-17 but maybe encoded in the dataof older movies. Restrict. Change password P.G switch US Canada RRT setting Reset RRT > < Off > < > < > < > < > Adjust Select Menu Exit Change Password: Press , and the screen shown below will be displayed. Under 17 requires accompanyingparent or adult R guardian (age varies insome jurisdictions). 1). Confirm password: Input the new password again NC-17 No...
Owners Manual
Page 14
... be adjusted Reset RRT: Press , and the screen shown below will be displayed. Recommended for adult viewing.Could contain frequent violent scenes and extreme violence. NO YES Press¡E°NTER¡K±ey To Select Adjust Select Menu Exit Mode Font style Font size Font Edge style Font Edge color FG color BG color FG opacity BG opacity Adjust Select Custom > Default > Default > Default > Default Default > Default > Default > Default > Menu Exit...
... be adjusted Reset RRT: Press , and the screen shown below will be displayed. Recommended for adult viewing.Could contain frequent violent scenes and extreme violence. NO YES Press¡E°NTER¡K±ey To Select Adjust Select Menu Exit Mode Font style Font size Font Edge style Font Edge color FG color BG color FG opacity BG opacity Adjust Select Custom > Default > Default > Default > Default Default > Default > Default > Default > Menu Exit...
Owners Manual
Page 15
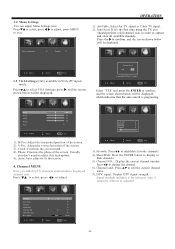
... 50 > Adjust Select Menu Exit 1). V-Pos: Adjust the vertical position of the screen. Clock: Fine tune the screen width. 4). R F CH: 4 Found: 4 Analog: 1 Digital: 3 Adjust Select Menu Exit 3). Press to exit. Menu Language < English > OPERATION 1). Auto: Auto adjust to add/delete favorite channels. 4). Channel NO. : Display the current channel number. Channel Lable. Air/Cable: Select Air TV signal or Cable TV signal. 2). Auto Scan: If it cannot be displayed. Adjust Select Menu Exit 3.5 VGASettings: Only available inVGA (PCinput) mode. Press to...
... 50 > Adjust Select Menu Exit 1). V-Pos: Adjust the vertical position of the screen. Clock: Fine tune the screen width. 4). R F CH: 4 Found: 4 Analog: 1 Digital: 3 Adjust Select Menu Exit 3). Press to exit. Menu Language < English > OPERATION 1). Auto: Auto adjust to add/delete favorite channels. 4). Channel NO. : Display the current channel number. Channel Lable. Air/Cable: Select Air TV signal or Cable TV signal. 2). Auto Scan: If it cannot be displayed. Adjust Select Menu Exit 3.5 VGASettings: Only available inVGA (PCinput) mode. Press to...
Owners Manual
Page 16
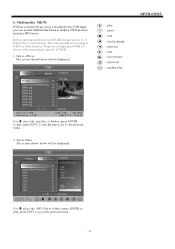
... externalstorage device attached to the USB input, you can use a high-speed USB 2.0 device with a maximum capacity of FAT32 file system format. Please use the Multimedia Menu to display JPEG pictures and play 2. Select a Photo The screen shown below will be displayed. Jpg files or folders, press ENTER to play, press EXIT to stop playing or go to the previous menu. : play : pause : stop : fast backward...
... externalstorage device attached to the USB input, you can use a high-speed USB 2.0 device with a maximum capacity of FAT32 file system format. Please use the Multimedia Menu to display JPEG pictures and play 2. Select a Photo The screen shown below will be displayed. Jpg files or folders, press ENTER to play, press EXIT to stop playing or go to the previous menu. : play : pause : stop : fast backward...
Owners Manual
Page 17
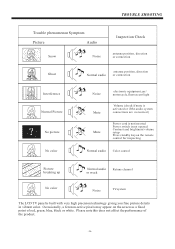
... red, green, blue, black or white. TROUBLE SHOOTING Trouble phenomenon Symptom Picture Audio Snow Noise Inspection Check antenna position, direction or connection Ghost Normal audio antenna position, direction or connection Interference Normal Picture No picture No color Noise Mute Mute electronic equipment,car/ motorcycle,fluorescent light Volume (check if mute is activated or if the audio system connections are not correct) Power cord is not inserted Power switch is not opened Contrast and brightness/volume setup...
... red, green, blue, black or white. TROUBLE SHOOTING Trouble phenomenon Symptom Picture Audio Snow Noise Inspection Check antenna position, direction or connection Ghost Normal audio antenna position, direction or connection Interference Normal Picture No picture No color Noise Mute Mute electronic equipment,car/ motorcycle,fluorescent light Volume (check if mute is activated or if the audio system connections are not correct) Power cord is not inserted Power switch is not opened Contrast and brightness/volume setup...

Owners Manual
Page 18
... are trademarks of the TV. SOURCE 2. Confidential Unpublished Works. 1992-1997 Dolby Laboratories, Inc. To eject the DVD disc, press CH LIST/ Eject/Insert button on remote or the OPEN/CLOSE button on the side of Dolby Laboratories. DVD OPERATION DVD SIDE PANEL OPEN/CLOSE PLAY/PAUSE Disc with the KODAK Picture CD format and will automatically be harmful to "DVD" mode by this copyright protection technology must...
... are trademarks of the TV. SOURCE 2. Confidential Unpublished Works. 1992-1997 Dolby Laboratories, Inc. To eject the DVD disc, press CH LIST/ Eject/Insert button on remote or the OPEN/CLOSE button on the side of Dolby Laboratories. DVD OPERATION DVD SIDE PANEL OPEN/CLOSE PLAY/PAUSE Disc with the KODAK Picture CD format and will automatically be harmful to "DVD" mode by this copyright protection technology must...
Owners Manual
Page 19
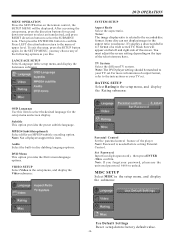
Notes: The image display ratio is needed before setting Parental Control. You must adjust the screen setting depending on the type of output format, refer to the instructions or your TV set .For more information of the television you have. TV System Select the different TV system. Note: The DVD player setting should be matched to your password, please use the universal password 6666 to select the SUBMENU item. MPEG4 Subtitle(optional...
Notes: The image display ratio is needed before setting Parental Control. You must adjust the screen setting depending on the type of output format, refer to the instructions or your TV set .For more information of the television you have. TV System Select the different TV system. Note: The DVD player setting should be matched to your password, please use the universal password 6666 to select the SUBMENU item. MPEG4 Subtitle(optional...
Owners Manual
Page 20
... tracks/chapters have been played or the Shuffle mode is cancelled. The MP3/WMA disc has such a directory structure as shown in the browser list. Edit Mode: To enableprogrammed playback mode. Program view: Display program track. Clear program: In the complete stop state(press the STOP button twice), First press Edit mode to rotate the picture. -19- press Clear program to choose the icon...
... tracks/chapters have been played or the Shuffle mode is cancelled. The MP3/WMA disc has such a directory structure as shown in the browser list. Edit Mode: To enableprogrammed playback mode. Program view: Display program track. Clear program: In the complete stop state(press the STOP button twice), First press Edit mode to rotate the picture. -19- press Clear program to choose the icon...
Owners Manual
Page 21
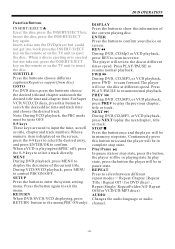
... repeat modes Repeat Chapter / Repeat Title / Repeat Off for DVD discs , Repeat Single/ Repeat Folder/All/ Repeat Off(for VCD/CD/MP3 discs) AUDIO Changes the audio language or audio channel. -20- Continuously press this button to the menu(PBC ON only). REPEAT Press to control PBC ON/OFF. DISPLAY Press the button to display the disc menu of the current playing disc. The player will...
... repeat modes Repeat Chapter / Repeat Title / Repeat Off for DVD discs , Repeat Single/ Repeat Folder/All/ Repeat Off(for VCD/CD/MP3 discs) AUDIO Changes the audio language or audio channel. -20- Continuously press this button to the menu(PBC ON only). REPEAT Press to control PBC ON/OFF. DISPLAY Press the button to display the disc menu of the current playing disc. The player will...
Owners Manual
Page 22
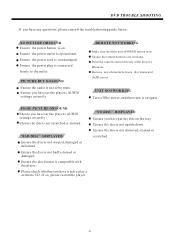
... troubleshooting guide below: NO PICTURE OR SOUND Ensure the power button is not upside down. UNIT NOT WORKING Turn off the power, and then turn it on the tray. NO DISC DISPLAYED Ensure you have put the disc on again. Ensure the disc format is not set the player s AUDIO settings correctly. If so, please restart the player. Ensure the disc is on Ensure the remote batteries are working. DVD TROUBLE...
... troubleshooting guide below: NO PICTURE OR SOUND Ensure the power button is not upside down. UNIT NOT WORKING Turn off the power, and then turn it on the tray. NO DISC DISPLAYED Ensure you have put the disc on again. Ensure the disc format is not set the player s AUDIO settings correctly. If so, please restart the player. Ensure the disc is on Ensure the remote batteries are working. DVD TROUBLE...


